Basic Str
uct
ur
e
Basic Oper
ation
Connections
Basic Section
Connections
MOTIF XF Reference Manual
42
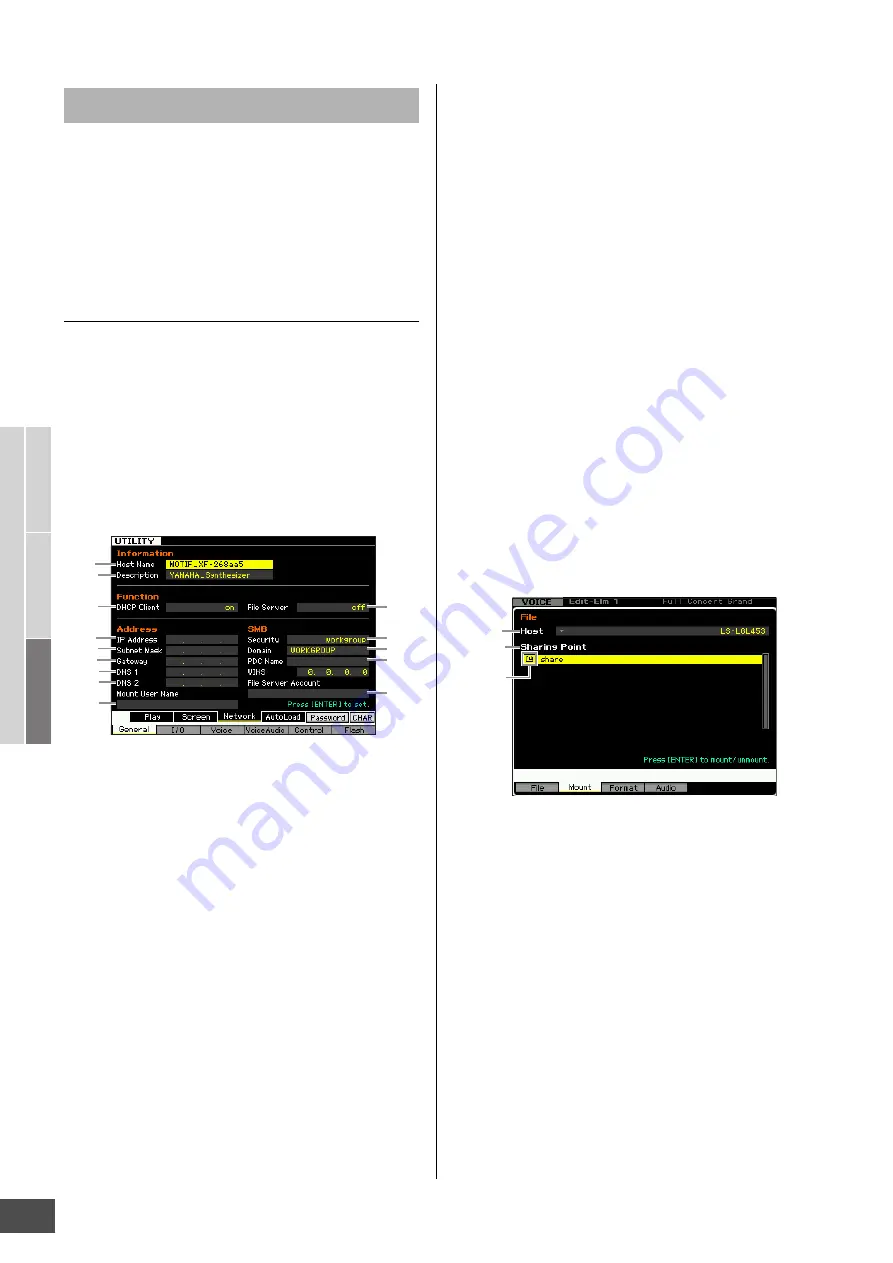
After the LAN connection is completed, you should set the
network related parameters to make the connection active.
Once the MOTIF XF has been connected to the network,
files can be saved or loaded between the MOTIF XF and
the computer connected to the same network. Call up the
Network display (page 221) in the Utility mode.
File Sharing for accessing a computer from
the MOTIF XF
Follow the instructions below so that you can access a
computer from the MOTIF XF via the LAN network.
1
Call up the Network display (page 221) of the
Utility mode.
Press the [UTILITY] button to enter the Utility mode then
press the [F1] button and the [SF3] button to call up the
Network display.
2
Set the parameters related to the network.
Here, the minimum required settings (parameters
3
,
)
and
^
) are explained. For details on the other
parameters, see page 221.
3
DHCP Client
Set this parameter to “on,” if you have the network using
the device with the DHCP server function such as a
broadband router. When this is set to on, setting
parameters
5
–
9
are not necessary. Set this
parameter to “off,” if your network does not use a
device with the DHCP server function.
)
Security
Set this parameter to “workgroup,” if your network
administrator does not specify otherwise.
^
Mount User Name
Input the User Name necessary for accessing the
computer on the network. This can be stored as the
parameter setting to the MOTIF XF.
Parameters
1
and
2
are not necessary here.
Parameters
5
–
9
are necessary to be set if your
network does not use a device with the DHCP server
function. For details, see page 221. For instructions on
setting these parameters, consult your network
administrator or provider.
For information on the other parameters, refer to the
explanation of the Network display (page 221) in the
Utility mode.
3
Press the [ENTER] button to actually apply the
settings to the MOTIF XF.
4
Set the shared directory on your computer.
On your computer, set the folder which you want to
access from the MOTIF XF via network to the shared
folder. For details, refer to the owner’s manual of your
computer.
5
Confirm whether or not the MOTIF XF and the
computer are properly connected to the
network.
Press the [FILE] button to enter the File mode, then
press the [F2] button to call up the Mount display
(page 239). If the MOTIF XF and the computer are
connected properly, the computer name is shown in the
HOST column. If the computer name is not shown,
press the [SF5] Char button then enter the computer
name directly in the Host (
&
) column. If the MOTIF XF
and the computer are connected properly, the name
you input will be recognized.
n
Confirm the computer name on the operating system of
your computer. For details, refer to the owner’s manual of
your computer.
n
When the computer name is not shown on the display with
the Windows XP connected, execute the following
instructions to show the computer name.
1. Select [Control Panel]
[Administrative Tools]
[Services].
2. Double-click [Messenger] in the list then set “Startup
type” to “Automatic.”
3. Click [Apply] then click [Start].
6
In the File mode of the MOTIF XF, access the
computer via network so that the shared
directory appears on the display.
Call up the Mount display of the File mode. When
setting the HOST (
&
) to a computer name containing
the desired shared directory, “Press [ENTER] to
access” appears on the display. Next, press the
[ENTER] button so that the display prompts you to enter
Network Settings
1
2
4
)
!
@
#
6
3
5
7
9
^
8
&
*
Mount
Indicator


