background image

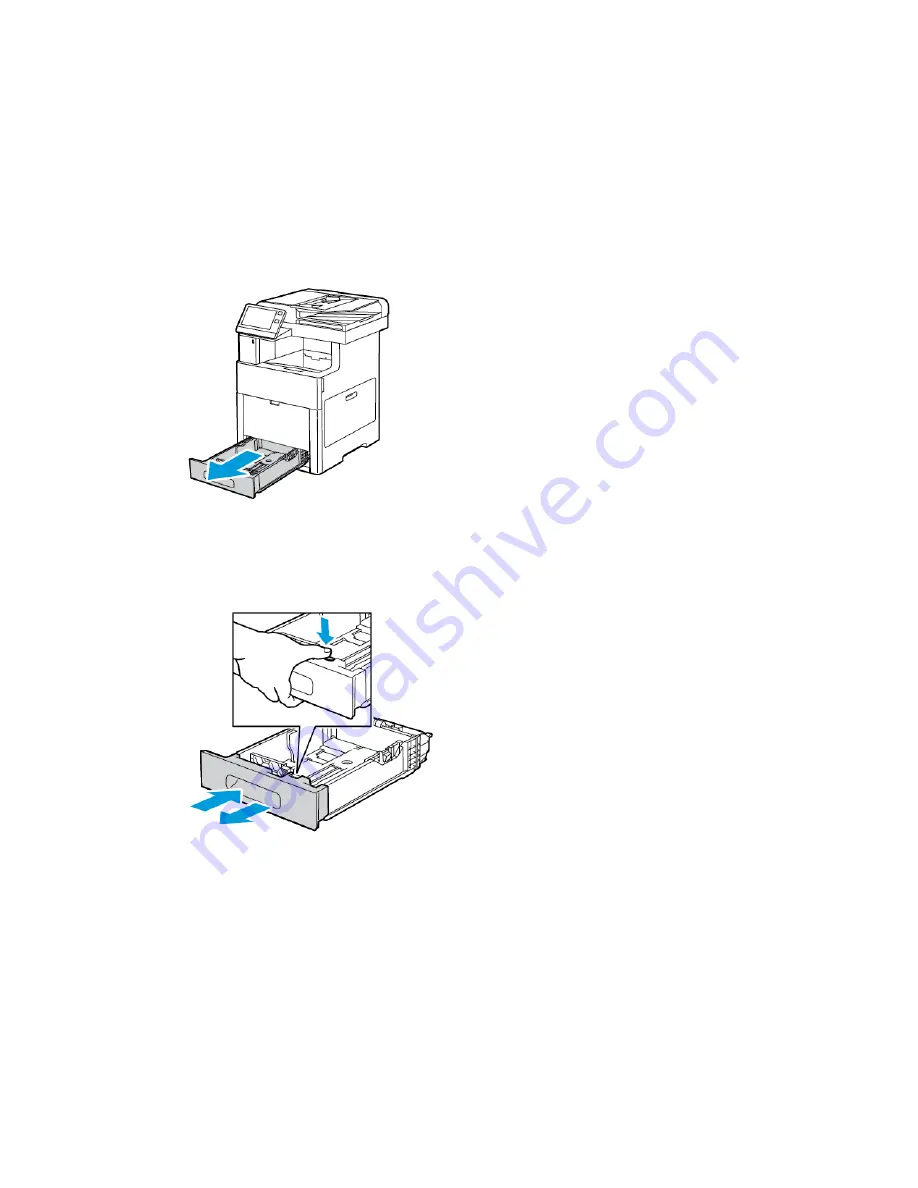
Configuring Tray 1 and Trays 2–5 for the Paper Length

You can adjust the length of the trays to accommodate A4, Letter (8.5 x 11 in.), and
Legal (8.5 x 14 in.) paper sizes. When you use the Legal-length paper setting, the paper
tray protrudes from the front of the printer.

To change the trays to match the paper length:
1. To remove the tray from the printer, pull out the tray until it stops. Lift the front of

the tray slightly, then pull it out.

2. Remove all paper from the tray.
3. To compress the tray for shorter paper, hold the back of the tray with one hand. With

the other hand, press the release latch at the front of the tray, then push the ends
inward until they latch.

4. To extend the tray for longer paper, hold the back of the tray with one hand. With

the other hand, press the release latch at the front of the tray, then pull the ends
outward until they latch.

6-9

Xerox

®

VersaLink

®

C505 Multifunction Printer

User Guide

Paper and Media

Summary of Contents for VersaLink C505S

Page 1: ...Xerox VersaLink C505 Multifunction Printer User Guide Version 0 1 April 2017 702P04963...

Page 2: ...ountries IBM and AIX are registered trademarks of International Business Machines Corporation in the United States and or other countries Microsoft Windows Vista Windows and Windows Server are registe...

Page 3: ...ting Started 2 1 Parts of the Printer 2 1 Front View 2 1 Duplex Automatic Document Feeder 2 2 Document Feeder Guidelines 2 2 Document Glass Guidelines 2 2 Internal Parts 2 3 Rear View 2 4 Options 2 4...

Page 4: ...ing the Software 2 25 Operating System Requirements 2 25 Installing the Print Drivers for a Windows Network Printer 2 25 Installing the Print Drivers for a Windows USB Printer 2 26 Installing the Driv...

Page 5: ...vices 4 8 Address Book 4 8 Address Book Overview 4 8 Editing the Address Book 4 8 Adding or Editing Contacts in the Address Book at the Control Panel 4 8 Adding or Editing Groups in the Address Book a...

Page 6: ...Edges of Copies 4 24 Printing a Sample Copy 4 25 Adding Annotations 4 25 ID Card Copy 4 26 ID Card Copy Overview 4 26 Copying an ID Card 4 27 Email 4 27 Email Overview 4 27 Sending a Scanned Image in...

Page 7: ...40 Printing a Fax Activity Report 4 41 USB 4 42 USB Overview 4 42 Scanning to a USB Flash Drive 4 42 Printing from a USB Flash Drive 4 43 To print from a USB Flash drive 4 43 To print from a USB Flas...

Page 8: ...ewing Printing or Deleting Jobs 5 9 Printing Special Job Types 5 9 Saved Job 5 9 Secure Print 5 10 Personal Print 5 11 Sample Set 5 12 Selecting Paper Options for Printing 5 13 Scaling 5 13 Printing o...

Page 9: ...ding Guidelines 6 2 Paper That Can Damage Your Printer 6 2 Paper Storage Guidelines 6 2 Supported Paper Types and Weights 6 3 Supported Paper Types and Weights for Automatic 2 Sided Printing 6 3 Suppo...

Page 10: ...gistration 7 11 Performing a Color Registration Adjustment 7 11 Color Calibration 7 12 Scan Color Consistency 7 12 Adjusting Paper Registration 7 13 Verifying Paper Registration 7 13 Performing a Pape...

Page 11: ...8 7 Clearing Paper Jams 8 8 Clearing Paper Jams from the Duplex Automatic Document Feeder 8 8 Clearing Paper Jams from the Bypass Tray 8 10 Clearing Paper Jams from the Tray 1 Area 8 12 Clearing Pape...

Page 12: ...Optional Cabinet with Casters A 4 Optional High Capacity Feeder with Casters A 5 Height Measurements for Configurations A 5 Height Configurations for Optional Feeders A 5 Height Configurations for Opt...

Page 13: ...B 5 Regulatory Information for 2 4 GHz and 5 GHz Wireless Network Adapter B 5 Copy Regulations B 5 United States B 5 Canada B 7 Other Countries B 8 Fax Regulations B 8 United States B 8 Fax Send Head...

Page 14: ...ipment and Batteries C 2 Business Users in the European Union C 2 Disposal Outside of the European Union C 2 Battery Symbol Note C 3 Battery Removal C 3 Other Countries C 3 D Apps Features D 1 Xerox V...

Page 15: ...printer and supplies are designed and tested to meet strict safety requirements These include safety agency evaluation and certification and compliance with electromagnetic regulations and established...

Page 16: ...e to activate If any of these conditions occur do the following 1 Power off the printer immediately 2 Disconnect the power cord from the electrical outlet 3 Call an authorized service representative P...

Page 17: ...from the electrical outlet Contact an authorized Xerox service representative to correct the problem if The equipment emits unusual odors or makes unusual noises The power cable is damaged or frayed A...

Page 18: ...m environment_europe Printer Location Place the printer on a level solid non vibrating surface with adequate strength to hold its weight To find the weight for your printer configuration refer to Phys...

Page 19: ...faction Guarantee is available in the United States and Canada Coverage could vary outside these areas Please contact your Xerox representative for details Maintenance Safety Do not attempt any mainte...

Page 20: ...touch the part or area of the printer Do not touch Do not expose the drum cartridges to direct sunlight Do not burn the toner cartridges Do not burn the waste cartridge Do not burn the drum cartridge...

Page 21: ...Environmental Health and Safety Contact Information For more information on Environment Health and Safety in relation to this Xerox product and supplies contact the following customer help lines 1 80...

Page 22: ...Xerox VersaLink C505 Multifunction Printer 1 8 User Guide Safety...

Page 23: ...ional 550 Sheet Feeder 2 9 Tray 1 Touch Screen 10 3 Duplex Automatic Document Feed Bypass Tray 4 11 Front Door Output Tray 12 5 Output Tray Extension Card Reader Bay 6 13 USB Memory Port Right Side Do...

Page 24: ...so that the top of the document enters the feeder first Place only loose sheets of undamaged paper in the duplex automatic document feeder Adjust the paper guides so that they fit against the original...

Page 25: ...ks Internal Parts 6 1 Transfer Belt Front Door 2 7 Toner Cartridges Drum Cartridges 8 3 Waste Cartridge Document Glass 4 9 Document Cover Cleaning Rod 10 5 Right Side Door Single Pass Duplex Automatic...

Page 26: ...ptional Productivity Kit Phone Connector 6 Fax Line Connector 12 Power Connector Options Mailbox Finisher Control Panel The control panel consists of a touch screen and buttons you press to control th...

Page 27: ...ogon 2 This button serves several power related functions Power Wake 3 When the printer is off this button powers on the printer When the printer is on pressing this button displays a menu on the cont...

Page 28: ...or to signal detection of a Wi Fi Direct connection request Amber Blinks to indicate an error condition or warning that re quires your attention For example an out of toner con dition a paper jam or...

Page 29: ...reen is powered off and unresponsive To wake the printer manually press the Power Wake button Caution To prevent a printer malfunction perform the control panel shutdown first Do not plug or unplug th...

Page 30: ...d more The following Information Pages are available Description Name The Configuration Report provides printer information including installed options network settings port setup tray information and...

Page 31: ...on and more Printing the Configuration Report 1 At the printer control panel press the Home button 2 Touch Device About Information Pages 3 Touch Configuration Report 4 To return to the Home screen pr...

Page 32: ...Script Accessing the Embedded Web Server At your computer open a Web browser In the address field type the IP address of the printer then press Enter or Return Finding the IP Address of Your Printer T...

Page 33: ...rnet cable or wireless connection Hardware and cabling requirements vary for the different connection methods Routers network hubs and switches modems Ethernet cables and USB cables are not included w...

Page 34: ...using a network connection it is important to understand how your computer is connected to the network Note Hardware and cabling requirements vary for the different connection methods Routers network...

Page 35: ...ck of the printer 2 Connect the A end of the USB cable to the USB port on the computer 3 If the Windows Found New Hardware Wizard appears press Cancel 4 Install the print driver Connecting to a Wired...

Page 36: ...he adapter is able to connect to a wireless network To install the Wireless Network Adapter 1 Power off the printer 2 To remove the Wireless Network Adapter Port Cover press down on the latch then pul...

Page 37: ...er to Removing the Wireless Network Adapter 5 Power on the printer 6 Configure the Wi Fi settings from the front panel or the embedded web server if connected via ethernet For more information refer t...

Page 38: ...printer and push the release lever toward the front of the printer Hold the release lever in this position and gently pull the Wireless Network Adapter away from the printer Note Do not use force to p...

Page 39: ...k of the printer until it latches into place 6 Place the left side cover into place then slide it toward the front of the printer 7 To latch the cover swing the handle toward the front of the printer...

Page 40: ...and configuration information To prevent the printer from attempting to connect to the previous network reset the wireless settings To reset the wireless settings 1 At the printer control panel press...

Page 41: ...g a common PIN The printer generates and prints a PIN for use in the setup process When you enter the PIN into the router the router broadcasts network information using the PIN When both devices reco...

Page 42: ...en the wireless router control panel then select Add WPS Client 14 Select PIN Method The wireless router control panel opens to a dialog box ready for the PIN number 15 At the printer control panel to...

Page 43: ...S Client 4 Select PIN Method The wireless router control panel opens to a dialog box ready for the PIN number 5 At the printer control panel touch Device Connectivity Wi Fi 6 Touch Manual Setup 7 Touc...

Page 44: ...k enter the password for the selected network then touch OK If the desired network does not appear touch Manual Setup then configure the wireless network settings For Enter the Network Name SSID type...

Page 45: ...ddress for the Ethernet network connection The installation wizard starts automatically the first time the printer is powered on The installation wizard prompts the system administrator to configure t...

Page 46: ...Home Connectivity Note If this feature does not appear log in as a system administrator 3 For Mobile Printing click AirPrint 4 To enable AirPrint click the Enable toggle button Note AirPrint is enabl...

Page 47: ...default printer name appears in this format Model name MAC address Installing the Software Before installing driver software verify that the printer is plugged in powered on connected correctly and ha...

Page 48: ...Printer 1 Insert the Software and Documentation disc into the appropriate drive on your computer If the installer does not start automatically navigate to the drive and double click the Setup exe ins...

Page 49: ...ns folder or from the dock open System Preferences 2 Click Printers Scanners The list of printers appears on the left of the window 3 For the list of printers click the Plus icon 4 At the top of the w...

Page 50: ...e LAN Fax Installer package file 5 To acknowledge the warning and introductory messages click Continue 6 To accept the license agreement click Continue then click Agree 7 To accept the current install...

Page 51: ...rt Technical support information for your printer including online technical support Online Sup port Assistant and print driver downloads Print from the control panel For details refer to Information...

Page 52: ...Xerox VersaLink C505 Multifunction Printer 2 30 User Guide Getting Started...

Page 53: ...save job settings for repeated use Customization enables users to work more productively When individual user accounts are configured on the device you can Person alize the device to meet specific us...

Page 54: ...d App 4 Drag the App to the new location 5 Release the App 6 Touch Done 7 Verify that the Apps appear in the correct location on the Home screen Customizing or Personalizing the Apps Customization ena...

Page 55: ...croll to the bottom then touch Customize 4 Touch Entry Screen 5 Touch the needed options Note For logged in administrators a window appears that asks you to confirm if the changes are for a Guest or f...

Page 56: ...nel press the Home button 2 Touch the App required 3 Scroll to the bottom then touch Customize 4 Touch Remove App Customization 5 At the prompt touch OK Customizing App Default Settings To customize t...

Page 57: ...or capab ilities for your device The Xerox App Gallery provides direct access to Apps that can improve your productivity simplify workflows and enhance your user experience The Xerox App Gallery enabl...

Page 58: ...a valid email address using the touch screen keypad then touch Enter 5 Touch OK A message is displayed stating completion instructions have been sent to the email address entered 6 Touch Close 7 Acces...

Page 59: ...In The Xerox App Gallery appears 6 Touch the App required then touch Install The License Agreement screen appears Note If the App was installed previously and a new version is available the button is...

Page 60: ...updates and configure up date settings SoftwareUpdate Use the Notifications option to see details of current alerts or faults on the device A History button displays fault codes and the date that the...

Page 61: ...printer has a set of information pages that you can print These pages include configuration and font information demonstration pages and more The following Information Pages are available Description...

Page 62: ...w status information for the printer supplies touch Device Supplies 2 To view details about a specific item including part numbers for reordering touch the desired item 3 To return to the Supplies scr...

Page 63: ...o count large sheets as large impressions or as multiple smaller impressions the number of impressions can differ Sheet Counters This option provides the number of impressions made by the printer Impr...

Page 64: ...Before you can use this feature the System Administrator must enable users to view and manage the Device Address Book Editing the Address Book You can create and save contact information for individu...

Page 65: ...nel press the Home button then touch Address Book 2 Touch the Plus icon then select Add Group 3 Select the group type enter a name for the group then touch Enter 4 To add group members touch Add Membe...

Page 66: ...ick OK To add an FTP scan location click the FTP Plus icon then enter the FTP details Click OK 6 To mark the email address or fax number as a favorite touch the Star icon 7 To save the contact click O...

Page 67: ...e address field type the IP address of the printer then press Enter or Return 2 In the Embedded Web Server click Address Book 3 Within the address book select a group 4 To add group members a For Memb...

Page 68: ...e Favorite list for a selected feature for the selected feature touch the Star icon c To save changes touch OK 6 To return to the Home screen press the Home button Managing Favorites in the Embedded W...

Page 69: ...elete Note If you do not make a selection within 60 seconds the job automatically resumes 4 To return to the Home screen press the Home button Viewing Printing or Deleting Saved and Secure Jobs Note T...

Page 70: ...y user can print or delete a Saved Job Printing a Saved Job 1 In your software application access the print settings For most software applications press CTRL P for Windows or CMD P for Macintosh 2 Se...

Page 71: ...click OK then click Print For Macintosh click Print Releasing a Secure Print job 1 At the printer control panel press the Home button 2 Touch Jobs 3 To view Secure Print jobs touch Personal Secure Jo...

Page 72: ...job 1 At the printer control panel press the Home button 2 Touch Jobs 3 To view Personal Print jobs touch Personal Secure Jobs 4 Touch your folder 5 If prompted for a passcode touch Skip Note When yo...

Page 73: ...nd shows the number of remaining copies of the job 4 Select an option To print the remaining copies of the job touch Release To delete the remaining copies of the job touch Delete 5 To return to the H...

Page 74: ...features You can adjust various settings for individual Copy jobs and save settings as Presets for future jobs The list of features can be customized and some features could be hidden from view when t...

Page 75: ...select an option 6 Adjust copy settings as needed For details about available features refer to Apps Features 7 Touch Start If you placed documents in the feeder scanning continues until the feeder is...

Page 76: ...ust the highlight midtone and shadow density levels by color touch the color that you want to adjust then move the sliders to increase or decrease the density levels 5 Touch OK To adjust the Saturatio...

Page 77: ...on touch Page Layout then touch More Select Portrait or Landscape Note The Original Orientation option is only available when the selected number of pages per slide is 2 4 or 8 6 To change the Image O...

Page 78: ...l documents face up short edge entering the feeder first Document Glass Position original documents face down in the upper left corner of the document glass short edge to the left To change the placem...

Page 79: ...ress the Home button 2 Touch Copy 3 Touch Booklet Creation Note If Reduce Enlarge has been adjusted a message appears confirming that Reduce Enlarge has changed to Auto If Paper Supply has been set to...

Page 80: ...g the Edge Erase feature You can specify the amount to erase on the right left top and bottom edges To erase the edges of copies 1 At the printer control panel press the Home button 2 Touch Copy 3 Tou...

Page 81: ...d 8 To return to the home screen press the Home button Adding Annotations You can use the Annotations feature to add a page number comment date or Bates Stamp to your copies Note This function is only...

Page 82: ...then select the required option e To adjust which pages contain the selected annotation touch Apply To then select the required option f Touch OK 8 To change the text formatting touch Format Style Adj...

Page 83: ...ormat of the attachment and include a subject heading and message for the email You can adjust various settings for individual Email jobs and save settings as Presets for future jobs The list of featu...

Page 84: ...cts then select a recipient 6 If scanning from 2 sided original documents touch 2 Sided Scanning then select an option 7 Adjust the email settings as needed To save the scanned document with a specifi...

Page 85: ...the USB app Refer to Scan original documents to your home folder Scan original documents to a shared network location using SMB and FTP transfer protocols You can adjust various settings for individu...

Page 86: ...to finish touch Done or to scan another page touch Add Page Note If you are scanning a document from the automatic document feeder a prompt does not appear 12 To return to the Home screen press the H...

Page 87: ...Before you begin Before scanning ensure that your computer and the printer are plugged in powered on and connected to an active network On your computer ensure that you have the correct print driver...

Page 88: ...Remember the Share name for later use 8 Click OK again 9 Click Close Sharing a Folder in Macintosh OS X Version 10 7 and Later 1 From the Apple menu select System Preferences 2 From the Internet Wire...

Page 89: ...ocument Path Enter the path of the folder on the SMB server For example to save the scanned files to a folder named colorscans inside the scans folder type colorscans Login Name Enter your computer us...

Page 90: ...Some Windows applications including Microsoft Office 2007 and newer do not support this feature 1 Load the original document on the document glass or in the duplex automatic document feeder 2 At your...

Page 91: ...as FIOS and DSL are not supported Before you use the fax configure the Fax Settings to ensure that the settings are compatible with your local connection and regulations The Fax Settings include optio...

Page 92: ...that they fit against the documents 4 Touch Fax 5 To enter a recipient fax number use the touch screen keypad then touch Enter To add a number from the fax address book touch the Address Book icon Not...

Page 93: ...dress Book touch the Address Book icon 4 Load original documents into the printer then adjust the settings as needed For details refer to Sending a Fax 5 Touch Delay Send 6 Touch Specific Time enter t...

Page 94: ...e the device to forward faxes to an email address You can specify the types of faxes to forward for example received faxes sent faxes or sent and received faxes Note Before you can forward a fax to an...

Page 95: ...x Manually You can use the Manual Send feature to enable the fax modem speaker temporarily This feature is helpful to dial international numbers or to use phone systems that require you to wait for a...

Page 96: ...x to the printer from an application on your computer Sending a Fax From Windows Applications You can use the print driver to send a fax from Windows applications You can use the fax window to enter r...

Page 97: ...the desired document or image open in your application open the Print dialog box For most software applications click File Print or press CMD P 2 Select the required printer 3 To access the fax drive...

Page 98: ...t glass or in the duplex automatic document feeder 2 At the printer control panel press the Home button 3 Insert your USB Flash drive into the USB memory port on the front of the printer 4 At the USB...

Page 99: ...cted screen touch Print from USB Note If this feature does not appear enable the feature or contact the system administrator For details refer to the System Administrator Guide at www xerox com office...

Page 100: ...touch the Select All icon Verify that your files are selected To print a specific file browse to that file then touch the file name or icon 5 Touch OK 6 Confirm that the required files are listed To...

Page 101: ...erences For Macintosh select Xerox Features The title of the button can vary depending on your application 6 Modify the print driver settings as necessary then click OK 7 To send the job to the printe...

Page 102: ...d click the Properties or Preferences button to open the Printing Preferences window The title of the button can vary depending on your application 3 Click a tab in the Printing Preferences window the...

Page 103: ...n path to your list of printers 2 In the list of printers right click the icon for your printer then select Printer properties 3 In the printer Properties dialog box click the Advanced tab 4 On the Ad...

Page 104: ...Note To see all printing options click Show Details 4 Click Presets Save Current Settings as Preset 5 Type a name for the printing options To save the set of options in the Presets list click OK 6 To...

Page 105: ...the download read the End User License Agreement then click accept The file automatically downloads to the default location for your computer file downloads 8 To install the Xerox Print Driver package...

Page 106: ...ownloads page on the Xerox Support website 2 Copy the PPD file into the CUPS ppd Xerox folder on your workstation If you are unsure of the location of the folder use the Find command to locate the PPD...

Page 107: ...MOPRIA to print from your mobile device to MOPRIA enabled printers Note MOPRIA and all of its required protocols are enabled by default Ensure that you have the latest version of the MOPRIA Print Ser...

Page 108: ...nserted in the Printer 1 If the USB Flash drive is already in the USB memory port press the Home button 2 Touch Print from USB Note If this feature does not appear enable the feature or contact the sy...

Page 109: ...int the job touch the job enter the quantity then touch OK To delete the job touch the Trash icon then touch Delete To view Personal jobs touch Personal Secure Jobs To print the jobs touch the folder...

Page 110: ...5 To delete the document after printing for that job touch the Trash icon then at the prompt touch Delete 6 To return to the Home screen press the Home button Secure Print Use Secure Print to print s...

Page 111: ...ter Personal Print is a type of saved job with these features A Personal Print job appears in a folder named after the user ID associated with the print job A Personal Print job does not use a passcod...

Page 112: ...med after the user ID associated with the print job A Sample Set job does not use a passcode Any user can print or delete a Sample Set job A Sample Set prints one copy of a job to allow you to proofre...

Page 113: ...r Windows the scale options are on the Printing Options tab in the Paper field For Macintosh the scale options are in the Print window for Preview To view more printing options click Show Details The...

Page 114: ...on both sides of the paper The images print to allow binding on the short edge of the paper The following illustrations show the result for documents with portrait and landscape orientations respectiv...

Page 115: ...your computer monitor display screen Image Shift Image Shift allows you to modify the location of the image on the page You can shift the printed image along the X and Y axes of each sheet of paper Co...

Page 116: ...Pages Per Sheet on the Page Layout tab For Windows Page Layout is on the Document Options tab For Macintosh in the Print window Layout is on the Preview list Printing Booklets With 2 sided printing y...

Page 117: ...estination option then select one of the mailbox bins 2 Click OK The prints are delivered to the selected mailbox bin Using Special Pages The Special Pages options control how covers inserts and excep...

Page 118: ...hen For example to specify pages 1 6 9 10 and 11 type 1 6 9 11 Paper Displays the default size color and type of paper selected in Use Job Settings Job Setting Displays the attributes of the paper for...

Page 119: ...rmark 1 In the print driver click the Document Options tab 2 Click the Watermark tab 3 From the Watermark menu select the watermark You can choose from preset watermarks or create a customized waterma...

Page 120: ...to select the direction that the page prints For Windows the Orientation tab is on the Document Options tab Note The orientation setting in your application print dialog box may override the orientati...

Page 121: ...ustom paper sizes that are within the minimum and maximum size range supported by the printer For details refer to Supported Custom Paper Sizes Printing on Custom Paper Sizes Note Before printing on a...

Page 122: ...To specify the units of measurement at the bottom of the window click the Measurements button then select Inches or Millimeters 5 To save in the Name field type a title for the new size then click OK...

Page 123: ...7 To return to the Home screen press the Home button 5 23 Xerox VersaLink C505 Multifunction Printer User Guide Printing...

Page 124: ...Xerox VersaLink C505 Multifunction Printer 5 24 User Guide Printing...

Page 125: ...inting If you have the same size paper loaded in more than one tray ensure that the proper tray is selected in the print driver Store your paper and other media properly for optimum print quality For...

Page 126: ...hat has been photocopied Paper that has been folded or wrinkled Paper with cutouts or perforations Stapled paper Envelopes with windows metal clasps side seams or adhesives with release strips Padded...

Page 127: ...60 80 g m Recycled Tray 1 and Trays 2 5 Bypass Tray 60 90 g m Custom 75 105 g m Bond Hole Punched Letterhead Plain Pre Printed 106 176 g m Lightweight Cardstock Lightweight Glossy Cardstock 177 220 g...

Page 128: ...x 11 7 in 215 x 315 mm DL Envelope 110 x 220 mm 4 33 x 8 66 in C5 Envelope 162 x 229 mm 6 4 x 9 in B5 ISO 176 x 250 mm 6 9 x 9 8 in Bypass Tray Executive 184 x 267 mm 7 25 x 10 5 in Letter 216 x 279 m...

Page 129: ...y you can change the tray settings The following options are available Fully Adjustable If you select this paper setting you can change the paper size type and color when you load paper into the tray...

Page 130: ...rent size or type 2 Pull out the extension tray for larger sizes 3 Move the width guides to the edges of the tray 4 Flex the sheets back and forth and fan them then align the edges of the stack on a l...

Page 131: ...not load paper above the maximum fill line on the width guides Overfilling the tray can cause the printer to jam Load hole punched paper with the holes to the left For 1 sided printing load letterhead...

Page 132: ...If the paper type size and color are correct touch OK b If the paper type size or color are incorrect change the settings To select a sheet size touch the current size setting then from the list sele...

Page 133: ...ay until it stops Lift the front of the tray slightly then pull it out 2 Remove all paper from the tray 3 To compress the tray for shorter paper hold the back of the tray with one hand With the other...

Page 134: ...1 and Trays 2 5 You can adjust the length of the paper tray to accommodate A4 210 x 297 mm Letter 8 5 x 11 in and Legal 8 5 x 14 in paper sizes You can also load label sheets in Tray 1 1 To remove the...

Page 135: ...parates any sheets that are stuck together and reduces the possibility of jams 5 Load paper into the tray with the print side face up Load hole punched paper with the holes to the left Load label shee...

Page 136: ...n cause the printer to jam 6 Adjust the length and width guides to fit the paper 7 Insert the tray into the printer Note To avoid paper jams do not remove the paper cover when printing is in progress...

Page 137: ...different paper color touch the current paper color then from the list select the color c To save the settings touch OK 10 To change a paper tray to Dedicated Mode a At the printer control panel press...

Page 138: ...in A4 paper only and is loaded in the short edge feed SEF direction 1 Pull out the tray slowly until it stops 2 Flex the sheets back and forth and fan the sheets before loading them into the tray 3 Lo...

Page 139: ...select the type To select a paper size touch the current paper size then from the list select the size To select a different paper color touch the current paper color then from the list select the col...

Page 140: ...Fully Adjustable prompts you to confirm or modify paper tray settings when paper is loaded in a tray Dedicated uses the current paper size and type settings and does not prompt you to confirm or modi...

Page 141: ...to seal before or during printing Remove air bubbles from the envelopes before loading them into the tray by setting a heavy book on top of the envelopes In the print driver software select Envelope...

Page 142: ...d can cause a jam or misfeed Load envelopes up to 16 5 mm 65 in in height This is approximately 10 20 envelopes depending on brand size and texture If you do not load envelopes in the Bypass Tray righ...

Page 143: ...ge going into the printer flaps down and flaps to the right Load envelopes with the print side up flaps open and down and the bottom of the envelope going into the printer Load envelopes with the prin...

Page 144: ...g into the printer Load envelopes with the print side up flaps closed and down and short edge going into the printer Note For envelopes to print correctly load envelopes with the flaps open In the pri...

Page 145: ...h the current paper type then from the list select Envelope To select an envelope color touch the current paper color then from the list select an envelope color c To save the settings touch OK Loadin...

Page 146: ...rom the list select Envelope To select a different color touch the current paper color then from the list select the color c To save the settings touch OK 8 From the Print dialog at your workstation s...

Page 147: ...printer In the print driver software select Label as the paper type Before loading labels remove all other paper from the tray Warning Do not use any sheet where labels are missing curled or pulled a...

Page 148: ...label sheets a If the size type and color are correct touch OK b If the size type or color are incorrect change the settings To select a different size touch the current size setting then from the li...

Page 149: ...then pull it out 2 Adjust the paper length and width guides 3 Load the label sheets in the tray face up Note Do not load paper above the maximum fill line Overfilling can cause paper jams 4 Slide the...

Page 150: ...stock refer to Supported Paper Types and Weights Guidelines for Printing on Glossy Cardstock Do not open sealed packages of glossy cardstock until you are ready to load paper into the printer Leave gl...

Page 151: ...ove the covers or guards that are fastened with screws You cannot maintain or service any parts that are behind these covers and guards Do not attempt any maintenance procedure that is not described i...

Page 152: ...ergent directly on the printer Liquid detergent could enter the printer through a gap and cause problems Never use cleaning agents other than water or mild detergent Cleaning the Scanner Clean the sca...

Page 153: ...best results use Xerox Glass Cleaner to remove marks and streaks 6 Wipe the white underside of the document cover until it is clean and dry 7 To access the second side scanning lens assembly lower the...

Page 154: ...a soft cloth with a small amount of neutral detergent then wipe the printer parts dry with a soft cloth Note To prevent damage to the film around the glass do not press heavily on the mirrored glass...

Page 155: ...the fuser You can get burned If a sheet of paper is wrapped around the heat roller do not try to remove it immediately Power off the printer immediately and wait 40 minutes for the fuser to cool Try...

Page 156: ...gh one or more colors use the following instructions to clean the LED lenses Warning If you accidentally get toner on your clothes lightly dust them off as best as you can If some toner remains on you...

Page 157: ...e and lift it away from the printer To prevent toner spills keep the openings facing up Note Be careful not to spill toner when handling the waste cartridge After removing the waste cartridge do not t...

Page 158: ...the openings facing up Note To avoid toner spills or malfunction do not lay the waste cartridge on its side or with the openings facing down 6 Remove the cleaning rod from inside the printer Xerox Ver...

Page 159: ...rocedure for the holes in the other three slots 9 Return the cleaning rod to its original location 10 To reinsert the waste cartridge lower the bottom of the cartridge into position To lock the cartri...

Page 160: ...ors If the print or color density is too light missing or the background is foggy clean the color density sensors 1 Power off the printer 2 Lift the rear door release and pull open the door Xerox Vers...

Page 161: ...ust the color registration Performing a Color Registration Adjustment A color registration adjustment occurs every time a new toner cartridge is installed You can run this adjustment at other times as...

Page 162: ...ion touch Start Follow the onscreen instructions 7 When finished touch Close 8 To exit the menu touch X 9 To return to the Home screen press the Home button Scan Color Consistency Use the Scan Color C...

Page 163: ...ply b Touch the desired tray 5 If your printer has automatic 2 sided printing select the sides that you want to optimize To select a sample registration page for adjusting side 1 touch Adjusted Side t...

Page 164: ...the desired tray 5 Using the chart printed in Verifying Paper Registration select the side for registration a For adjusting Side 1 touch Adjusted Side then touch Side 1 b For adjusting Side 2 touch A...

Page 165: ...er Voltage Adjustment 3 To select the paper type for the adjustment touch Paper Type then touch the paper type 4 To adjust the transfer voltage for Voltage Level touch the Plus icon or the Minus icon...

Page 166: ...er and Transfer Roller Cleaning procedure to reduce background toner on prints To perform a Developer and Transfer Roller Cleaning procedure 1 At the printer control panel press the Home button 2 Touc...

Page 167: ...e Items Routine maintenance items are printer parts that have a limited life and require periodic replacement Replacements can be parts or kits Routine maintenance items are typically customer replace...

Page 168: ...uch the back arrow Customizing Supplies Alert Settings 1 To customize the alerts that appear for printer supplies touch Device Supplies Alerts Setup 2 To enable supplies alerts touch the Enable Alerts...

Page 169: ...nsult a physician immediately Warning Use a damp cloth to wipe off spilled toner Never use a vacuum cleaner to remove spills Electric sparks inside the vacuum cleaner can cause a fire or explosion If...

Page 170: ...nters then select an option 4 After viewing the usage readings to return to the Home screen press the Home button Printing the Billing Summary Report The Billing Summary Report provides information ab...

Page 171: ...never touch the power plug with wet hands When removing the power cord ensure that you pull the plug and not the cord Pulling the cord can damage it which can lead to fire or electric shock 2 Remove...

Page 172: ...aper from Tray 1 then close the tray 7 Keep the paper wrapped and away from humidity and dirt 8 If the optional 550 Sheet Feeder is installed unlock then uninstall it before you move the printer Xerox...

Page 173: ...Failure to repackage the printer properly for shipment can result in damage not covered by the Xerox Warranty Service Agreement or Total Satisfaction Guarantee The Xerox Warranty Service Agreement or...

Page 174: ...Xerox VersaLink C505 Multifunction Printer 7 24 User Guide Maintenance...

Page 175: ...f the printer then unplug the power cord and wait 30 seconds Plug the power cord into the outlet securely then press the Power Wake button The printer requires a full reset Plug another electrical app...

Page 176: ...Power Off feature For details refer to the System Administrator Guide at www xerox com office VLC505docs The Auto Power Off feature is enabled to save power Printer Does Not Print Solutions Probable...

Page 177: ...he printer and the computer The printer cable is disconnected If the printer is connected to a network There is a network connectivity issue 1 Verify that the Ethernet cable is connected to the printe...

Page 178: ...s at the rated speed of the printer you could have a network or printer installation issue For addi tional help contact the system administrator The way the printer was installed on the net work could...

Page 179: ...If you cannot remove the obstruc tion contact your Xerox representative There is an obstruction or debris inside the printer Paper Tray Will Not Close Solutions Probable Causes The paper tray does not...

Page 180: ...er Jams Locating Paper Jams Warning Never touch a labeled area on or near the heat roller in the fuser You can get burned If a sheet of paper is wrapped around the heat roller do not try to remove it...

Page 181: ...per jams Selecting the incorrect paper type in the print driver Using damaged paper Using unsupported paper Loading paper incorrectly Overfilling the tray Adjusting the paper guides improperly Most ja...

Page 182: ...cation Avoid the following Polyester coated paper that is designed especially for inkjet printers Paper that is folded wrinkled or excessively curled Loading more than one type size or weight of paper...

Page 183: ...ess the jammed paper open the Second Side Scanning Access Cover then remove any jammed paper 4 Close the Second Side Scanning Access Cover 5 Close the Document Cover then reload the document in the Du...

Page 184: ...er to Document Feeder Guidelines Clearing Paper Jams from the Bypass Tray To resolve the error displayed on the control panel you must clear all paper from the paper path 1 Remove any paper from the B...

Page 185: ...tely into the printer 7 When paper trays are set to Fully Adjustable you are prompted to verify or change the paper settings a To confirm the same paper size type or color touch OK b To select a new p...

Page 186: ...trol panel you must clear all paper from the paper path 1 Remove any paper from the Bypass Tray 2 Grasp both sides of the Bypass Tray then pull it straight out of the printer 3 Remove Tray 1 from the...

Page 187: ...6 Insert the Bypass Tray completely into the printer 7 When paper trays are set to Fully Adjustable you are prompted to verify or change the paper settings a To confirm the same paper size type or col...

Page 188: ...For the tray reported on the Touch Screen Display pull out the tray until it stops 2 To remove the tray lift the front of it slightly then pull it out of the printer 3 Remove any crumpled paper from...

Page 189: ...or legal size paper the tray protrudes when it is inserted into the printer 6 When paper trays are set to Fully Adjustable you are prompted to verify or change the paper settings a To confirm the same...

Page 190: ...clear all paper from the paper path 1 Lift the rear door release and pull open the door 2 To open the paper guide on the top of the fuser lift the paper guide tab 3 Remove any jammed paper from the ba...

Page 191: ...load it The edges of the paper are not even Remove the paper from the tray and replace it with new dry paper The paper is moist from humidity Try a new ream of paper Too much static electricity is pre...

Page 192: ...out and reload it If it still misfeeds do not use that paper The tray contains warped or wrinkled paper Remove the moist paper and replace it with new dry paper The paper is moist from humidity Use on...

Page 193: ...the printer doors is open Note Check for and remove torn pieces of paper in the paper path Jams During Automatic 2 Sided Printing Solutions Probable Causes Use paper of the correct size thickness or...

Page 194: ...elines in this section to maintain optimum print quality from your printer Temperature and humidity affect the quality of the printed output The range for optimal print quality is 15 28 C 59 82 F and...

Page 195: ...ation Pages If the print quality does not improve after performing the appropriate action contact your Xerox representative Note To maintain print quality the toner print and drum cartridges for many...

Page 196: ...lection Verify that the paper types set in the control panel and the print driver match the paper loaded in the tray The bias transfer voltage is not properly adjusted for the paper type Print the Dem...

Page 197: ...sary For details refer to Con sumables The toner cartridges are not Xerox toner cartridges Ensure that the toner cart ridges meet specifications Re place the cartridges if neces sary For details refe...

Page 198: ...bris from the paper path Ensure that the trays are pushed in all the way Ensure that the rear cover is closed and locked Power on the printer and leave it on for at least 1 hour to get rid of the cond...

Page 199: ...included in the Maintenance Kit For assistance go to the Xerox Support website at www xerox com of fice VLC505support Reset the paper tray guides For details refer to Loading Paper The paper guides in...

Page 200: ...n Transfer Belt 63 5 mm 2 5 in Transfer Belt 56 5 mm 2 2 in Transfer Roller 3 If the repeating defects match one of these dis tances replace that item Copy and Scan Problems If the copy or scan qualit...

Page 201: ...ce VLC505support Fax Problems Note If the printer cannot send and receive faxes make sure that you are connected to an approved analog telephone line The fax cannot send or receive when connected to a...

Page 202: ...problem with the fax machine of the caller The document was loaded in correctly The fax received by the recipi ent is blank Document feeder Place the original document face up Document glass Place the...

Page 203: ...uced based on the avail able paper supply in the print er The paper supply in the printer does not match the document size sent The received fax size is re duced Set the printer to automatic reception...

Page 204: ...tory report that can assist you in troubleshooting certain problems The Demonstration Print page prints an image to show print quality You can use this page to troubleshoot print quality issues with t...

Page 205: ...rinter including online technical support Online Sup port Assistant and print driver downloads Print from the control panel For details refer to Information Pages Information Pages www xerox com offic...

Page 206: ...Xerox VersaLink C505 Multifunction Printer 8 32 User Guide Troubleshooting...

Page 207: ...Not Applicable Not Applicable Finisher Not Applicable Not Applicable 4 Bin Mailbox Option Option 2000 Sheet High Capacity Feeder with Casters Option Option Cabinet with Casters Standard Option Product...

Page 208: ...ute for color or black and white copies 1 Sided Copy 2 Sided Copy 43 Letter size copies per minute for color or black and white copies 600 x 400 dpi Copy Resolution Legal 216 x 356 mm 8 5 x 14 in Maxi...

Page 209: ...IC Card Reader support Foreign Device Interface FDI Embedded Web Server Remote Access Options and Upgrades Fax Wireless Network Adapter IEEE 802 11 n g b compliant and supports 2 4 GHz and 5 GHz freq...

Page 210: ...out Options Dimension 64 4 cm 25 4 in Height 35 kg 77 1 lb Weight Standard Configuration Optional 550 Sheet Feeder Optional Cabinet with Casters Xerox VersaLink C505 Multifunction Printer A 4 User Gui...

Page 211: ...ument Glass Height Height Configurations for Optional Feeders and Casters 4 Optional Feeders 3 Optional Feeders 2 Optional Feeders 1 Optional Feeder No Optional Feeders Item Configuration View 122 6 c...

Page 212: ...Document Glass Height Height Configurations for Optional High Capacity Feeder HCF with Casters 1 Optional Feeder No Optional Feeders Item Configuration View 122 6 cm 48 3 in 110 3 cm 43 4 in Height 11...

Page 213: ...tive humidity at 28 C 82 F Note Under extreme environmental conditions such as 10 C and 85 relative humidity printing defects can occur due to condensation inside the printer Elevation For optimum per...

Page 214: ...ative humidity Printer warm up time Print Speed Print speeds for continuous printing are up to 45 ppm Print speeds are the same for color or black and white printing Several factors affect print speed...

Page 215: ...on of this equipment in a residential area is likely to cause harmful interference in which case the user will be required to correct the interference at his her own expense If this equipment does cau...

Page 216: ...us and Kazakhstan are working to establish a common customs union the Eurasian Economic Community or EurAsEC The Eurasian Economic Community members anticipate sharing a common regulatory scheme and c...

Page 217: ...STAR program and models qualified to ENERGY STAR can be found at the following website www energystar gov The ENERGY STAR and ENERGY STAR mark are registered United States trademarks The ENERGY STARI...

Page 218: ...fication Xerox Corporation has proven this product meets the Environmental Choice criteria for energy efficiency Certified copier printer multifunctional device and fax products must also meet criteri...

Page 219: ...vice is subject to the following two conditions 1 this device may not cause harmful interference and 2 this device must accept any interference received including interference that may cause undesired...

Page 220: ...sentatives of value of whatever denomination which have been or may be issued under any Act of Congress Adjusted Compensation Certificates for Veterans of the World Wars 2 Obligations or Securities of...

Page 221: ...in Canada or of a court of law Proclamations orders regulations or appointments or notices thereof with intent to falsely cause same to purport to have been printed by the Queens Printer for Canada or...

Page 222: ...the sending machine or such business other entity or individual The telephone number provided may not be a 900 number or any other number for which charges exceed local or long distance transmission...

Page 223: ...ible If the Telephone Company interrupts your service they can advise you of your right to file a complaint with the FCC if you believe that it is necessary The Telephone Company could change its faci...

Page 224: ...ction The Ringer Equivalence Number REN indicates the maximum number of devices allowed to be connected to a telephone interface The termination of an interface may consist of any combination of devic...

Page 225: ...horized by Xerox invalidates its certification New Zealand 1 The grant of a Telepermit for any item of terminal equipment indicates only that Telecom has accepted that the item complies with minimum c...

Page 226: ...e within the following limits for compliance with Telecom Specifications For repeat calls to the same number There shall be no more than 10 call attempts to the same number within any 30 minute period...

Page 227: ...ndling may apply For more information go to www dtsc ca gov hazardouswaste perchlorate North America Xerox operates an equipment take back and reuse recycle program Contact your Xerox representative 1...

Page 228: ...rical and electronic products and batteries should not be mixed with general household waste For proper treatment recovery and recycling of old products and used batteries please take them to applicab...

Page 229: ...with the requirements set out by the Directive Battery Removal Batteries should only be replaced by a manufacturer approved service facility Other Countries Please contact your local waste management...

Page 230: ...Xerox VersaLink C505 Multifunction Printer C 4 User Guide Recycling and Disposal...

Page 231: ...yellow and black before printing your copy Color Balance X For a color original document you can adjust the color of the copy using preset color effects For example you can adjust colors to be bright...

Page 232: ...e image quality of the copies based on the type of images in the original docu ment and how the original was cre ated Original Type X X X X X Use the Lighten Darken slider to make the output image or...

Page 233: ...re that you are scanning the correct area of the documents spe cify the original document size Original Size X You can use the Book Copying fea ture to copy books magazines or other bound documents Bo...

Page 234: ...of a job to inspect before printing multiple copies This feature is useful for complex or high volume jobs After you print and inspect the test copy you can choose to print or cancel the remaining co...

Page 235: ...ather than to the device Note The system administrator can preset this option Reply To X X Use Message to enter information to accompany the email Message X Use the File Format option to specify the f...

Page 236: ...ransmission Header Text Ensure that the name and telephone number of the sender and the date and time of the transmission are included on all faxes Transmission Header Text X You can set a time in the...

Page 237: ......

Page 238: ......

Reviews: