2 Instrument Configuration
Copyright © WOODLEY EQUIPMENT COMPANY LTD.
40
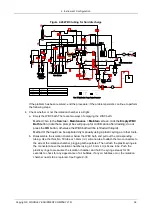
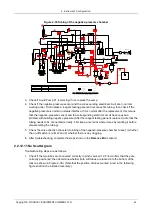
Figure 2-33 Check the liquid pushing of the sample probe
b. Restore the tubing to its original status (cut off the crimped part at the front end of the
sampling tube, and readjust the tubing for installation. Make sure to check if the sampling
tubing gets into the way of other assemblies whenever the sampling assembly moves up and
down, or if it feels too tight. If this is the case, continue to adjust the sampling tubing until it
looks like it fits properly.)
5. Check for any wear and tear in the top aperture of the swab.
a. To disassemble, take off the swab's fixed jump ring. Pull out the swab's inflow and outflow
tubes.
b. Measure the upper-section aperture with a caliper; an aperture with a diameter of more than
1.71mm indicates that the swab needs to be replaced.
c. When reinstalling or replacing the swab, first put the inflow tube and outflow tube in place,
then put on the swab (insert the probe into the swab aperture) and tap the swab's fixed jump
ring to complete the procedure.
The inflow tube is the Thin 50 tube, connected to the bottom connector; the outflow tube is the Thick
50 tube, connected to the top connector.
2.2.12.9 Problems with Creating Positive Pressure
The troubleshooting steps are:
1. Check if the pressure chamber is broken: Disassemble the pressure chamber if necessary and
seal the openings with rubber tubes. Then place the pressure chamber into the water tank. Use a
syringe or other equipment to pressurise the pressure chamber. Any air bubbles detected
indicate that the pressure chamber needs to be replaced.
2. Check if there are any kinks or damage along the tubing to the pressure chamber. Any
replacements should be made using tubing of the proper length and type.


