4. INSTALLATION PROCEDURE FOR OPTIONAL EQUIPMENT
EO18-33012A
4.3 STRIP MODULE (B-9904-H-QM)
4-14
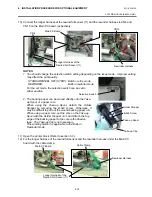
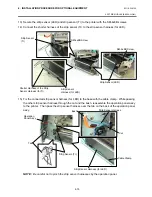
10) Connect the longer harness of the rewind full sensor (Tr) and the rewinder harness to CN4 and
CN15 on the Main PC board, respectively.
NOTES
:
1. You should change the selection switch setting depending on the issue mode. Improper setting
may affect the print quality.
STANDARD/PEEL OFF (STRIP): Batch or strip mode
REWINDER:
Built-in rewinder mode
For the cut mode, the selection switch can be set to
either position.
2. The backing paper can be wound directly onto the Take-
up Spool or a paper core.
When using the Take-up Spool, detach the Holder
Stopper by removing the B-3x4 screw. Otherwise, it
may be difficult to pull out the wound backing paper roll.
When using a paper core, put the core on the Take-up
Spool with the Holder Stopper on it, and Attach the top
edge of the backing paper to the core with adhesive
tape. The Take-up Clip is not necessary.
This winding method is applicable to the Built-in
Rewinder mode.
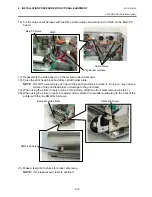
11) Open the printer block. (Refer to section 3.3.)
12) Fix the longer harness of the rewind full sensor and the rewinder harness under the Main PC
board with the cable clamp.
Main PC Board
Longer Harness of the
Rewind Full Sensor (Tr)
CN4
CN15
Selection Switch
Cable Clamp
Longer Harness of the
Rewind Full Sensor (Tr)
Rewinder Harness
Rewinder Harness
Main PC Board
Take-up Spool
B-3x4 Screw
Holder Stopper
Take-up Clip
Summary of Contents for B-SX4T Series
Page 3: ...TEC Thermal Printer B SX4T QQ QP Owner s Manual ...
Page 54: ......
Page 56: ......
Page 57: ......
Page 58: ...M EO1 33034 ...
Page 59: ...TEC Thermal Printer B SX5T QQ QP Owner s Manual ...
Page 112: ......
Page 114: ......
Page 115: ......
Page 116: ...M EO1 33036 ...
Page 141: ......
Page 142: ...PRINTED IN JAPAN EO10 33013A ...
Page 312: ......
Page 313: ......
Page 314: ...PRINTED IN JAPAN EO18 33012A ...
Page 315: ......
Page 316: ...PRINTED IN JAPAN EO0 33013A ...


