4. INSTALLATION PROCEDURE FOR OPTIONAL EQUIPMENT
EO18-33012A
4.1 SWING CUTTER (B-4205-QM)
4- 5
2) Open the top cover. (Refer to Section 3.1.)
3) Remove the side panel (L) from the printer. (Refer to section 3.2.)
4) Open the printer block. (Refer to Section 3.3.)
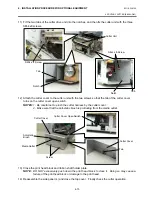
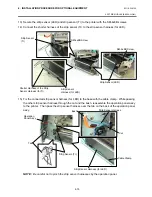
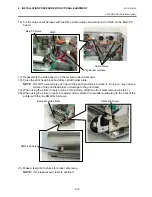
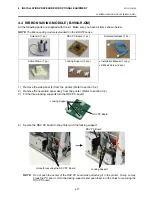
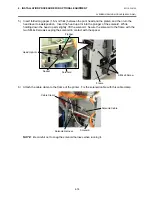
5) Attach the cutter unit to the front of the printer with the cutter attachment screws and the FL-4x6
screw.
6) Connect the cutter harness to CN1 on the cutter I/F PC board.
7) Fit the bush to the cutter harness in the orientation shown below.
8) Insert the cutter harness into the gap between the cutter unit and the printer, and then into the
hole in the main frame. Fit the bush into the hole.
Cutter Attachment Screw
FL-4x6 Screw
Cutter Unit
CN1
Cutter Harness
Cutter I/F
PC Board
Bush
Cutter Harness
Hole
Main Frame
Summary of Contents for B-SX4T Series
Page 3: ...TEC Thermal Printer B SX4T QQ QP Owner s Manual ...
Page 54: ......
Page 56: ......
Page 57: ......
Page 58: ...M EO1 33034 ...
Page 59: ...TEC Thermal Printer B SX5T QQ QP Owner s Manual ...
Page 112: ......
Page 114: ......
Page 115: ......
Page 116: ...M EO1 33036 ...
Page 141: ......
Page 142: ...PRINTED IN JAPAN EO10 33013A ...
Page 312: ......
Page 313: ......
Page 314: ...PRINTED IN JAPAN EO18 33012A ...
Page 315: ......
Page 316: ...PRINTED IN JAPAN EO0 33013A ...


