4. INSTALLATION PROCEDURE FOR OPTIONAL EQUIPMENT
EO18-33012A
4.5 PCMCIA INTERFACE BOARD (B-9700-PCM-QM)
4-20
4.5 PCMCIA INTERFACE BOARD (B-9700-PCM-QM)
This optional interface board is provided with the two slots, which allows for the use of the two TYPE II
PC cards. However, it is not applied to TYPE III PC cards.
CAUTION!
1. Loosen the two M-3x5 screws of the PCMCIA interface board before installing it. Failure to do
this may cause damage to the connector.
2. When using the LAN interface board or USB interface board together, install the PCMCIA
interface board first.
NOTE:
When both B-9700-PCM-QM and B-9700-LAN-QM are installed, inserting a LAN PC card into
the slot of the B-9700-PCM-QM disables the B-9700-LAN-QM.
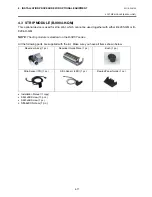
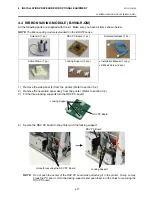
All the following parts are supplied with the kit. Make sure you have all items shown below.
PCMCIA Interface Board (1 pc.)
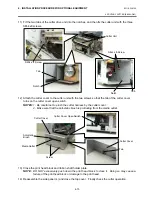
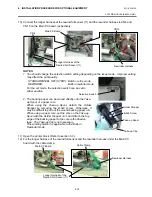
1) Remove the side panel (L) from the printer. (Refer to section 3.2.)
2) Loosen the two M-3x5 screws of the PCMCIA interface board. (Refer to Caution above.)
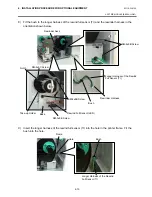
3) Remove the two SM-3x6 screws to detach the blind plate A from the back.
M-3x5 Screw
•
Installation Manual (1 copy)
•
SM-3x6 Screw (3 pcs.)
Rear Plate
SM-3x6 Screw
Blind Plate A
Summary of Contents for B-SX4T Series
Page 3: ...TEC Thermal Printer B SX4T QQ QP Owner s Manual ...
Page 54: ......
Page 56: ......
Page 57: ......
Page 58: ...M EO1 33034 ...
Page 59: ...TEC Thermal Printer B SX5T QQ QP Owner s Manual ...
Page 112: ......
Page 114: ......
Page 115: ......
Page 116: ...M EO1 33036 ...
Page 141: ......
Page 142: ...PRINTED IN JAPAN EO10 33013A ...
Page 312: ......
Page 313: ......
Page 314: ...PRINTED IN JAPAN EO18 33012A ...
Page 315: ......
Page 316: ...PRINTED IN JAPAN EO0 33013A ...


