background image

103

ɡ

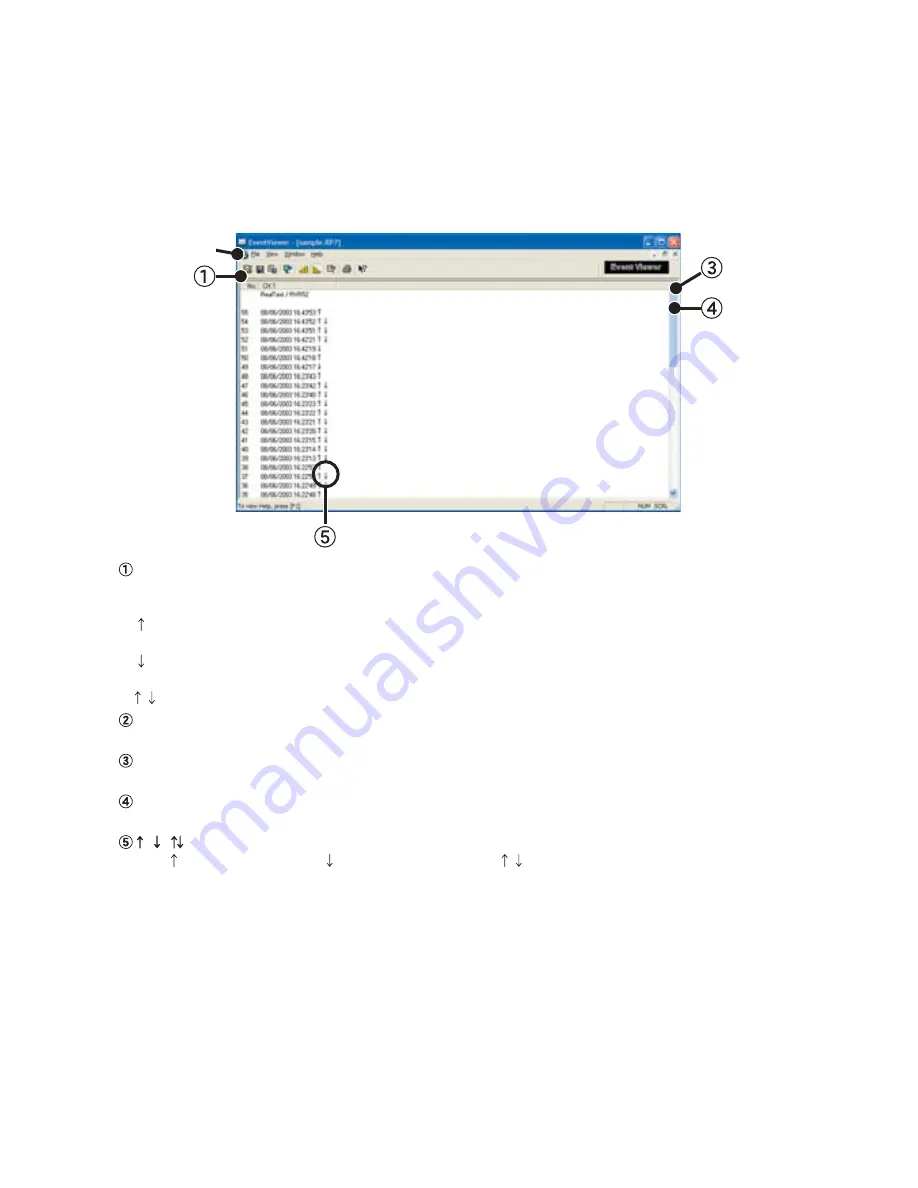
Event Viewer Display Part Names and Functions

With Event Viewer you can view Recorded Event Time Data in a List (up to 64 channels), 
Print the List, or Save as Text File.

Menu Bar

Menus are lined up which contain various commands. They are used to view data or to make settings for 
the various functions in each menu.

Icon: View only rising edge data This includes when there was a simultaneous occurrence of rising and 

falling.

 Icon: View only falling edge data.This includes when there was a simultaneous occurrence of rising and 

falling.

 Icon: View all Data 

Toolbar

Buttons appear for frequently used commands.

Button for Moving Vertical Axis

Click the arrow buttons to move up or down.

Scroll Bar

By dragging the Scroll Bar you can move up and down to the desired position.


/

/

View  rising (Lo to Hi) waves,   falling (Hi to Lo) waves, or 

both types.

Summary of Contents for RTR-5W

Page 1: ...16007024270 7h Edition User s Manual Thank you for purchasing our product Carefully read this instruction manual before using this unit RTR 5W RTR 5W Copyright 2006 2008 T D Corporation All rights re...

Page 2: ...Specifications design and other contents outlined in this manual are subject to change without notice On screen messages in this manual may vary slightly from the actual messages Please notify the sh...

Page 3: ...on to correct any defects found in RTR 5W for Windows Copyright All copyrights for RTR 5W for Windows including all of the programs and all related documents are the sole property of T D Corporation T...

Page 4: ...ls Warning These entries are actions that absolutely under no circumstance should be taken The taking of such an action may cause serious personal physical damage or death Caution These entries are ac...

Page 5: ...main units AC adaptors and LAN cables out of the reach of children Touching them may result in injury and it is dangerous if they are dropped If any smoke or strange smells are emitted from the unit i...

Page 6: ...AN cable and AC adaptor are inserted fully so as not to cause an improper connection Also when unplugging the LAN cable from the main unit do not pull the cord but hold the connector to disconnect Con...

Page 7: ...er damage including malfunction Areas exposed to excessive vibration This may cause injury malfunction damage or loss of proper electrical contact Areas that are not flat or level This may cause the u...

Page 8: ...o the Internet 22 Connection Example 22 Using this software with Windows Vista 24 Installation 30 Initialization Settings Using the Network Settings Utility 33 How to Open 33 Using Help 33 Network Set...

Page 9: ...urning to Original Size 101 Zoom out step by step 101 Event Viewer How to Operate the Event Viewer 102 How to Open 102 Using Help 102 Event Viewer Display Part Names and Functions 103 Change the Event...

Page 10: ...nt in high humidity environments such as brewing and crop cultivation Measurement in places where wiring is difficult or impossible The RTR 5W is designed solely for network communication It does not...

Page 11: ...es and wiring For information and updates concerning which wireless LAN cards can be used please see our Website Internet Connection allows for Public Access to Data The built in WEB server gives you...

Page 12: ...Series as a Remote Unit also possible to register in Groups for easy management Recording Settings By setting the recording interval the recording start time and the recording mode recording will begi...

Page 13: ...ayed Graph Printing It is possible to easily print in color the Graph as it is being displayed View and Print Data List You can view the data displayed in the graph window as a list and then choose to...

Page 14: ...communicates with Remote Units at a set regular interval and then stores the gathered readings The most recent measurement will be displayed It is also possible to view via a cell phone browser Graph...

Page 15: ...RK COMMUNICATION T DOES NOT INCLUDE ANY 23 OR 53 COMMUNICATION INTERFACE 4O MAKE USE OF THIS PRODUCT YOU MUST CONNECT IT TO A NETWORK 4HE FOLLOWING ITEMS SHOULD BE IN THE PACKAGE WITH EACH MAIN UNIT 0...

Page 16: ...mp will blink Optical Communication Area When you wish to communicate directly not by wireless with a data logger Remote Unit it is necessary to place the logger Remote Unit face down on this area for...

Page 17: ...N Cable AC Adaptor Jack Connect using the supplied AC adaptor CF Interface Slot Insert a Wireless LAN Card 1 NOTE Do not insert or try to connect anything other than a CF communication card RESET Butt...

Page 18: ...50 make sure to install the application and USB device driver into your computer If you connect an RTR 50 to the computer before installing the USB device driver may not be installed properly If you...

Page 19: ...ble connection to your access point 4 Connecting to a Network Connect the RTR 5W to the desired network See p 19 20 for connection examples of how to connect directly to your computer or use a router...

Page 20: ...Create Group s 3 Register Remote Unit s 4 Depending on the communication status register and position a Repeater Up to 64 Remote Units can be registered to one Location Basic Operations 1 Recording S...

Page 21: ...e viewed in the same Graph Up to 8 channels of data You can view the data displayed in the graph window as a list also choose to print It is also possible to convert the data to common text file forma...

Page 22: ...te Units to gather and display the current measurement readings Also by setting a communication interval the current readings will be continuously gathered and displayed at that interval If you are us...

Page 23: ...egistration Administration menu Create Locations Properties Create Groups Properties Remote Unit Registration Properties Initialization Repeater Registration Delete from Tree Settings menu Start Stop...

Page 24: ...d Settings Login ID Password DNS SNTP SMTP Mail Server IP Block Wireless LAN Port Number Time Difference Mail Auth Settings Rebooting the Communication Functions Restarting the System Menu Menu Login...

Page 25: ...Doing so may cause fire or other trouble Insert the AC adaptor plug into an AC 100 to 240V socket Inserting the plug into a socket with different voltage may cause fire or other trouble Do not insert...

Page 26: ...on areas meet To make measuring mode changes in an RVR 52A use via optical communication when registering a Remote Unit Place a Data Logger face down on the RTR 5W Optical Communication Area Communica...

Page 27: ...oltage when OFF AC DC less than 50V Current when ON less than 0 1A Resistance when ON 35 Useable Wires Compatible Wires Single wire 1 0 AWG18 Twisted wire 0 75mm2 Useable Wires Single wire 0 4 1 0 AWG...

Page 28: ...0 Using a LAN Connect the provided LAN cable to the HUB that is connected to your computer Connecting Directly to a PC Connect the RTR 5W to your computer with a LAN cross cable LAN cross reverse cab...

Page 29: ...Connecting to a HUB for in company Communication To ensure a proper connection make sure that the plug is completely inserted Connection Example Connecting Directly to PC for Communication Do not use...

Page 30: ...where LAN wiring is difficult or troublesome To ensure a proper connection make sure that the plug is completely inserted NOTE Before you insert or take out the LAN card make sure that the AC adaptor...

Page 31: ...nection Example Using the RTR 5W on the Internet In order to access the RTR 5W from your browser enter the Global IP address that has been assigned to the RTR 5W in your browser s URL bar following ht...

Page 32: ...warning mail it is necessary to have set up a SMTP server for sending and a POP or IMAP server for receiving in the network Sending Internet Mail The RTR 5W via a router or provider accesses an SMTP s...

Page 33: ...above may appear as Run first exe It is possible to make settings so as not to have this display shown These settings can be made in the Control Panel under AutoPlay By starting the installation the f...

Page 34: ...n In the Start Menu right click on the Graph program and select Run as Administrator After that right click on a data file and under Properties General tab click on the Change Button in Type of File t...

Page 35: ...data But when Windows automatically restarts after an automatic Windows Update the application is not automatically reopened hence the Auto Download function can not be executed properly Windows Updat...

Page 36: ...any confirmation necessary from the user 3 3 After making settings for Windows Update in the Group Policy Object Editor select to not automatically restart the system after installation Group Policy...

Page 37: ...en using the Vista OS the Virtual Store function will redirect files from the default folder into which the program was installed to separate folders under Program Files for each user as shown below C...

Page 38: ...with this please go to the Microsoft Web Site at http support microsoft com default aspx kb 917607 to download the necessary program WinHlp32 exe to enable viewing When trying to open the Help Menu u...

Page 39: ...wish to install it For Windows XP 2000 1 Open Windows 2 Place the accompanying CD ROM into your CD ROM drive In a few seconds the Start window will appear If that window does not automatically open p...

Page 40: ...window will appear If the Install Program Window does not automatically open please open it by double clicking on the CD ROM icon in Computer Execute Button Click 4 Select Install RTR 5W for Windows t...

Page 41: ...fter the application has been installed the following message will appear Click the Install Button Install Button After installation is completed an icon for RTR 5W for Windows will appear in the Star...

Page 42: ...ar and then How to Use Network Settings Utility you can click on one of the tabs Contents or Index to search for the topic or term you are unsure about or have questions about Contents By clicking on...

Page 43: ...indows software but if an RTR 5W is rebooted restarted the clock settings will be initialized However by making settings to enable the SNTP server it is possible to have the clock automatically reset...

Page 44: ...the computer you have opened Network Settings Utility is connected to 2 Click on the Network Initialization Tab and then click on the Search Button After clicking the search results will be shown in a...

Page 45: ...details 6 After checking for entry errors click the Send Button After transmission has been completed a message will appear Click the OK Button to finish After settings are completed the RTR 5W will...

Page 46: ...ick the Get Settings Button The current settings will appear A list that shows all of the IP addresses and domain names with which successful communication has occurred until now can be viewed in the...

Page 47: ...ettings in 2 After making the settings enter the info for the recipient of the settings and click the Send Settings Button 3 A message will appear asking you if it is OK to restart the system Click th...

Page 48: ...e Mail Auth Settings Button and make any necessary settings changes For details about making settings changes see the Help Menu in the Network Settings Utility Mail Auth Settings Button 2 After having...

Page 49: ...unication click the Re activate Communication Button Note that by restarting the data transfer graph in the RTR 5W Web Viewer will also be reset Re Activate Communication Button NOTE Note that by clic...

Page 50: ...default factory settings 1 Pull out the AC adaptor plug from the RTR 5W logger 2 Press in the RESET Button on the RTR 5W logger with a pointed object and reconnect the AC adaptor RESET Button 3 When...

Page 51: ...dow will appear where you can make changes to the settings SMTP Settings 3 Under SNTP Settings click ON to change the setting How to find an NTP server If you are connected to an intra company LAN you...

Page 52: ...ing Button Enter the information for the recipient 5 A message will appear asking you if it is OK to restart the system Click the Yes Button to restart The new settings will not become valid until the...

Page 53: ...Administration Menu select Location RTR 5W Properties or by right clicking on the Location icon a popup menu will appear where you can select Location RTR 5W Properties to display the properties windo...

Page 54: ...are unsure about or have questions about Contents By clicking on one of the topics listed you can find detailed information for that subject Index By selecting a Keyword in the Keyword list and clicki...

Page 55: ...g to Locations RTR 5W Toolbar Menu Bar Administration Tree Setting Contents Info Area Menu Bar The Menu Bar contains various menus which contain a variety of commands The commands within the menus can...

Page 56: ...l Remote Units to be placed For more details see p 49 Remote Unit Registration 3 Register Repeater Names and Relay Routes For more details see p 58 Repeater Registration NOTE There is no need to regis...

Page 57: ...10 units the necessary time would reach about 70 minutes Communication time for an RTR 50 is set to be limited to no longer than 2 hours and 30 minutes For this reason if there were 250 Repeaters it...

Page 58: ...among Repeaters will occur in sequence from the one that is closest to the Base Unit Please keep that in mind when placing the Repeaters EX Communication will occur sequentially from the first Repeate...

Page 59: ...RTR 5W for Windows 2 In the Registration Administration Menu click on Create Location RTR 5W to display a window where you can enter a name for the new Location In the Location name you cannot use a s...

Page 60: ...ttings Utility Browser Display Settings If necessary make settings in the Browser Display Settings Area Select whether to permit or forbid access from a browser by clicking ON or OFF Make access possi...

Page 61: ...ase make sure to reset the internal clock to your local time before using This is necessary because each time the RTR 5W is rebooted the internal clock is automatically reset to its default setting Se...

Page 62: ...ame 2 After entering the Group Name by clicking the OK Button the Group will be created in the Administration Tree Administration Tree Group Icon 3 Click on the desired Group Icon In the Registration...

Page 63: ...arby and there is a possibility that communication could occur at the same time please make sure to set the Communication Frequency Channels for each Group to a different setting If two Groups use the...

Page 64: ...nu will appear where you can select Remote Unit Registration to display the Remote Registration window If an exclamation mark is next to a Location Icon make sure to carry out Send Group Remote Info a...

Page 65: ...Sending Registration Info to an RTR 5W 1 Select a Location from the Administration Tree and in the Settings Menu select Send Group Remote Info Send Button 2 Click the Send Button to send the registra...

Page 66: ...t 100 meters 330 ft 2 Select the placed Remote Unit from the Administration Tree and in the Data Menu select Gather Current Data By right clicking on the Remote Unit icon a popup menu will appear wher...

Page 67: ...dows 2000 Vista When installing the software RTR 5W for Windows the USB Device Driver will also be installed automatically Checking the USB Device Driver Installation For Windows Vista 1 Connect the R...

Page 68: ...er see the User s Manual that accompanies your RTR 50 Wireless Communication Port 2 Open the Control Panel and double click on System the system properties will be displayed 3 Click the Hardware Tab a...

Page 69: ...see the User s Manual that accompanies your RTR 50 Wireless Communication Port 3 By connecting the RTR 50 to the computer the Found New Hardware Wizard will automatically open If that window does not...

Page 70: ...Hardware Wizard will automatically open If a window appears such as the one below check No not this time and then click the Next Button Windows such as this will not appear for No Service Pack and Ser...

Page 71: ...ng used from the folder where RTR 5W for Windows was installed For RTR 50 RTR 5W for Windows Driver RTR 50 Insert the CD ROM into the proper drive and from the CD ROM select the driver for the device...

Page 72: ...Click the Hardware Tab and click the Device Manager Button in the Device Manager Area Device Manager Button Hardwere Tab 4 In the Device Manager Window check to see if USB Recorder is listed under US...

Page 73: ...see either the User s Manual that came with RTR 50 for Windows or the Help Menu found in RTR 50 for Windows NOTE Application version 1 40 is not compatible for USB communication with Windows Vista OS...

Page 74: ...he number for the Frequency Channel set when registering a Remote Unit to a Group is different from the number used for the Relay Route Frequency Channel when adding a Repeater to a Relay Route Once a...

Page 75: ...icking Assigning Remote Units to a Repeaters a display will appear in which you can select the Repeater Select the Relay Route and Repeater number then click the OK Button to finish the setting proces...

Page 76: ...nfo Delete Initialize tab Delete Route Button Delete Repeater Button Repeater Info View Repeater Info for the unit s selected from the Registration List Relay Route Name the Relay Route Name will appe...

Page 77: ...those Remote Units to the new Repeater Initialize Button Connect the Repeater you wish to initialize to your computer with a USB or Serial Communication Cable and click the Initialize Button NOTE By i...

Page 78: ...as well as all Remote Units that communicate directly with the Base Unit Remote Unit Group The signal strength for the Remote Units which belong to the Group selected from the Remote Unit Group List...

Page 79: ...re it If the Repeater Number is 1 then the Strength shown will be for communication with the Base Unit Communication Failure Appears in front of the Remote or Repeater Name for which a communication f...

Page 80: ...n the Remote Unit and the Base Station RTR 5W If more than one Remote Unit have been selected only wireless communication can be used Recording Start Time Select from Immediate Start Programmed Start...

Page 81: ...r the average that is recorded is from every two seconds Unit of measurement in display V Pulse Rising Records the number of rising pulses during the set recording interval Unit of measurement in disp...

Page 82: ...ltiple number of Remote Units Recording Stop Button Press to stop recording during a recording session Measuring Moisture RVR 52A 1 When you wish to measure moisture place the RVR 52A logger face down...

Page 83: ...the File Name Button The Info for the selected Remote will be displayed 3 Select the Download Mode 4 If you wish to save the file by specifying the location click the Specify File Name Button and make...

Page 84: ...lect the Download Mode 5 Click the Specify Button to specify the file saving location If only one Remote Unit has been selected the default file name will appear when this window is opened 6 Make sett...

Page 85: ...ed you can find detailed information for that subject Index By selecting a Keyword in the Keyword list and clicking the Display Button at the bottom a detailed explanation will appear Search Enter the...

Page 86: ...s functions for each menu Button for Moving Horizontal Axis The time axis moves by clicking these arrow buttons Horizontal Gauge Bar By dragging the gauge you can move left and right to the data you w...

Page 87: ...78 Zoom in Using the Mouse With the left button drag the mouse to outline the area you want to zoom in on Menu Display Using the Mouse By right clicking on the graph the Menu will be displayed...

Page 88: ...display between the recorded date and the amount of elapsed time since recording started Date Time Button Recorded Date Display The highest value is in RED lowest is in BLUE and the average is in PINK...

Page 89: ...be displayed in the Graph The same operation can be done by clicking on the channel number icons in the Toolbar Check Enlarged Set High Low Average Calculation Range From the Tools Menu 1 Enter a cal...

Page 90: ...nfo for that channel number Name Up to 32 letters can be entered Started Date Time The month day year hour minute and second can be changed Channel Number Edit Items Restore Button OK Button 2 After m...

Page 91: ...while making changes After clicking the OK Button the settings cannot be restored to the original settings Drag the channel number to the newly desired OK Button Restore Button Specify the Channel Num...

Page 92: ...el number you wish to erase 2 By clicking on the OK Button the deletion will be completed Check OK Button Shift Unit C F From the Tools Menu By clicking on Shift Unit C F you can automatically change...

Page 93: ...Button the change will be completed By clicking the Return to Default Button you will return to the color settings when the software was opened Graph Line Width Settings Change the width of the data l...

Page 94: ...5 Copy Display to Clipboard From the Tools Menu By clicking Copy Display to Clipboard you can copy the currently displayed window to the clipboard and make use of the graph by pasting to other softwar...

Page 95: ...e right or left Moving Up and Down on the Graph Move the Graph Display up or down Vertical Axis Settings Set the vertical axis scale range 1 Check either Auto or Manual AUTO The vertical axis will aut...

Page 96: ...ted you can find detailed information for that subject Index By selecting a Keyword in the Keyword list and clicking the Display Button at the bottom a detailed explanation will appear Search Enter th...

Page 97: ...ntal Axis The time axis moves by clicking these arrow buttons Horizontal Gauge Bar By dragging the gauge you can move left and right to the data you want to be displayed Vertical Axis Scale for each C...

Page 98: ...89 Zoom in Using the Mouse With the left button drag the mouse to outline the area you want to zoom in on Menu Display Using the Mouse By right clicking on the graph the Menu will be displayed...

Page 99: ...display between the recorded date and the amount of elapsed time since recording started Recorded Date Display Date Time Button The highest value is in RED lowest is in BLUE and the average is in PINK...

Page 100: ...isplayed in the Graph The same operation can be done by clicking on the channel number icons in the Toolbar Enlarged Check Scale Channels ON OFF From the View Menu You can choose to view only the sele...

Page 101: ...be displayed If in the graph display you place the A cursor at the position for the beginning of the calculation range and the B cursor at the end of the range those dates and times will appear as the...

Page 102: ...nfo for that channel number Channel Number Edit Items Restore Button OK Button Name Up to 32 letters can be entered Started Date Time The month day year hour minute and second can be changed 2 After m...

Page 103: ...ag the channel name number you wish to move to the newly desired channel name number position and drop it OK Button Drag the channel name to the newly desired Specify the Channel Numbers to be Moved 1...

Page 104: ...ifferent If the data is of different types If the conversion equation for the scale settings are different If the measuring times overlap This can be adjusted by using the Edit Recording Conditions 1...

Page 105: ...96 Erase Selected Channel Data From the Tools Menu 1 Put a check on the channel number you wish to erase 2 Click the OK Button to complete the deletion OK Button Check...

Page 106: ...r limit must be 40 000 or higher 1 Put a check next to Fixed for the channel you wish to make settings for Check Fixed and enter the desired numerical values OK Button Make all settings same as Ch 1 2...

Page 107: ...se the conversion equation of Designate by y Ax B Conversion Info OK Button Designate by y Ax B Designate by 2 points 2 Make settings for the conversion equation and unit 3 Click the OK Button to fini...

Page 108: ...sh to change the type of line click the Line Type Button to view the line type selections If you wish to make changes to the width of the lines In the image preview display first click on a channel nu...

Page 109: ...review display click the Close Button to complete the changes By clicking the Default Button you will return to the color settings to the Default settings Memo Here it is possible to save one pattern...

Page 110: ...Display Returning to Original Size Return from zooming in on one part of data to the original whole graph size Zoom out step by step Return by regular steps from zooming in on one part of data to sho...

Page 111: ...ou can find detailed information for that subject Index By selecting a Keyword in the Keyword list and clicking the Display Button at the bottom a detailed explanation will appear Search Enter the key...

Page 112: ...Icon View only rising edge data This includes when there was a simultaneous occurrence of rising and falling Icon View only falling edge data This includes when there was a simultaneous occurrence of...

Page 113: ...o view either by the recorded date time or by the elapsed time from the last recorded data Recorded Date Time Display Elapsed Time Display Shift Descending Ascending From the View Menu or the Toolbar...

Page 114: ...currently displayed data list File Name File names of the data files currently displayed in the data list Path The Location where the File is saved Date Created The date and time when the data file w...

Page 115: ...yed After confirming click the Print Button to start the printing Button Functions Print The Print box will appear and printing will begin Previous Preview the previous page Specify P Specify the page...

Page 116: ...same operation can be carried out from Save in the Toolbar In the File Menu select Save All Data as Save with a new File Name In the File Menu select Save Displayed Data Save only that data in the cur...

Page 117: ...using Event Viewer only Save Data as can be used 1 Click Save Data as in the File Menu 2 Specify the Location and enter a File Name Save Button Assign a Location Enter a File Name 3 Click Save to com...

Page 118: ...olon are codes used by common spreadsheet software such as Excel and Lotus when reading Text File to divide cells OK Button Select the Range to be Saved Select the Text File Type 3 Designate the locat...

Page 119: ...e and Semi colon are codes used by common spreadsheet software such as Excel and Lotus when reading Text File to divide cells OK Button Select the Text File Type Designate File Button File Name and Lo...

Page 120: ...nu of the Graph Display 2 Select the name of the data you wish to open and click Open to view the data in graph form Open Button Select a data file to open For Event Viewer 1 Open Event Viewer 2 In th...

Page 121: ...ry day Fixed Interval Carry out the downloading of recorded data automatically at a set interval of time Make setting for 10 days or less 4 Click the OK Button to finish the setting process Make setti...

Page 122: ...eduled download If another type of communication such as a warning monitoring occurs at the scheduled downloading time and downloading is not possible downloading will begin upon the ending of the oth...

Page 123: ...server address Enter SMTP settings 3 Open RTR 5W for Windows 4 Select the Remote Unit s you wish to make settings for and in the Registration Administration Menu click on Remote Unit Properties By rig...

Page 124: ...and make monitoring interval settings Enter an amount of time between 10 minutes and 1440 minutes If this interval is short battery life will be depleted quickly Notification Address Set the recipien...

Page 125: ...hey will not continually be sent By entering 0 there will be no rest period Notify of a communication failure for monitoring warnings Place a check here if you wish to have communication failure repor...

Page 126: ...fore carrying out a notification test it is necessary to make settings for the following There must be a check next to Warning ON and proper entries must be made for Notification Address and Sender Ad...

Page 127: ...d complete the settings 5 Click the Transmission Test button to test if a mail can be sent If warnings exist send mail at this time Make setting for the time of sending a battery life warning mail Sen...

Page 128: ...downloaded data from this location and make Location Settings Recorded Data Format attachment Select the format for the attached data file For formats TRX PV5 RP7 TRX can be opened by Temp Humid Graph...

Page 129: ...you wish to make settings from the list and check Send mail containing data from selected Remote Select either Send at Fixed Time Every Day or Send at Fixed Interval and then set the number of hours f...

Page 130: ...pped during the sending of the settings 1 Open RTR 5W for Windows 2 From the Administration Tree select the RTR 52Pt unit only one at a time for which settings are to be made and then select Settings...

Page 131: ...at the RTR 51 52 53 and RVR 52 do not contain this function 1 point 2 point Adjustment Current Reading Enter the actual measurement before adjustment After Enter the desired measurement after adjustme...

Page 132: ...t Use when measuring in a range of 20 C This adjustment method changes only the offset b where the slope a is considered 1 For example the RTR 52Pt is measuring 10 C but the standard says the actual m...

Page 133: ...tton Clears any previous adjustment equation s from the selected Remote unit and initializes the device NOTE By making new adjustment settings to an already adjusted device without first clicking the...

Page 134: ...Script 2 In the address area enter the address of the RTR 5W logger you wish to view Enter Address 3 By pressing the Enter key the RTR 5W Web Viewer will appear If the Viewer does not appear 1 Make su...

Page 135: ...dings The RTR 5W displays the newest measurement readings that are collected at the regular interval set in Location RTR 5W Properties By clicking the Gather Current Readings Button communication will...

Page 136: ...t the display Gather Current Readings Button 3 The Monitor Current Readings display will automatically open 4 Click the Gather Current Readings Button to get the most recent info If the registration i...

Page 137: ...the name of the Remote Unit you wish to view and the Graph will appear By clicking the Show Graph Button the Graph will be refreshed If any of the following operations are performed all data in the gr...

Page 138: ...ess enter 2 Select the mobile phone carrier you wish to use 3 The Current Readings display will automatically open NOTE To view the current readings monitor via mobile phone it is necessary to open th...

Page 139: ...e following procedures for checking and making changes to your computer network settings 1 In the Control Panel open Network Connections 2 Select the Network adaptor that you are using and right click...

Page 140: ...down the current settings for IP Address Subnet Mask Default Gateway Primary DNS Server and Alternate DNS Server 6 Enter 192 168 1 1 as the IP Address and 255 255 255 0 as the Subnet Mask IP Address 1...

Page 141: ...NS server and Alternate DNS server that you had written down before and click the OK Button 12 Open the browser enter the address URL that you set in the settings utility and check to make sure that t...

Page 142: ...XP If this occurs the USB device driver must be re installed How to Re install The images in the following explanation are taken from Windows XP They may differ from the windows that appear when using...

Page 143: ...er Other Devices and then click on Properties to display the USB Device Properties Window 4 In the USB Device Properties Window click on the Re install Driver Button to display the Hardware Detection...

Page 144: ...in which you wish to install it 1 In the Windows Control Panel click on Add Remove Programs 2 From the list of currently installed programs select RTR 5W for Windows and click the Add Remove Button 3...

Page 145: ...ogram Program Uninstall 2 From the list of currently installed programs select RTR 5W for Windows and click the Uninstall Button 3 The Install Shield Wizard will appear Check Remove and click Next Che...

Page 146: ...mputer you are using are not on the same network The Network Settings Utility is already being used by another computer The LAN card which is being used has not been formatted Q 4 I cannot make settin...

Page 147: ...a wired LAN A If a wireless LAN card is inserted the wireless LAN will have priority Because of this if the wireless LAN settings are incorrect and a wired LAN is connected communication will not tak...

Page 148: ...ndar A The RTR 5W has an internal clock calendar built into it If the internal clock settings for the RTR 5W are not set correctly the date and time in the RTR 5W Web Viewer s current readings monitor...

Page 149: ...e been proven to be compatible and are suggested for use Q 7 Which has priority a wireless LAN or a wired LAN A If the Wireless LAN is connected properly and all settings are correct the Wireless LAN...

Page 150: ...a provider of services to various users is called a server and the computers which request these services from the server are referred to as clients Most communication service is made up of exchanges...

Page 151: ...cording settings and all other types of settings cannot be carried out Q 2 What must I do to view current RTR 5W readings on my cell phone A To view the current readings of a RTR 5W it is necessary to...

Page 152: ...ea Network the IP address that is used is called a Private IP address An IP address is divided into 4 blocks of numbers separated by periods such as 192 168 15 10 The assigned numbers can use the digi...

Page 153: ...is no chance for duplication Q 6 What is a port number A When using TCP IP communication with a LAN cable or via a phone line port numbers are assigned to distinguish one application from another Por...

Page 154: ...RODUCT RTR W INDEX PHP SCHEMA DOMAIN NAME FILE NAME For example if the IP address that is assigned to www tandd com is 61 197 203 107 by entering http 61 197 203 107 product wdr_3 tr_7w_01feature html...

Page 155: ...ing of service but with most providers it is necessary to sign up for this special service Q 2 How do you get a fixed IP address A A fixed IP address is a service offered by your Internet provider For...

Page 156: ...amic DNS tracks the IP address you can still access the desired server using the same URL There are many types of dynamic DNS plans and services available please contact your local provider for more d...

Page 157: ...data or change my settings A Yes as long as you are connected to the Internet the logger could well be the target of unwanted access And as long as you are open on the Internet it is possible that a...

Page 158: ...out condensation Accessories included in package AC Adaptor AD 0606 x 1 LAN Cable LN 20W x 1 Software Set Introductory Manual and Warranty x 1 For information and updates concerning which wireless LAN...

Page 159: ...multaneous Display Processing Screen Display Graph Data Other Functions Data Graphs for every Channel Zoom in out and scroll with mouse or keyboard Change Display Colors for Channels View Hide Channel...

Page 160: ...151 Options AC adaptor For RTR 5W AD 0607 AC adaptor AC 100 to 240V Wall Attachment Unit For RTR 5W TR 5WK1 Wall Attachment...

Page 161: ...12 Sec in air Approx 2 Sec in agitated water Thermistor Stainless pipe SUS316 Teflon Compaction Tube Teflon Resin FEP Shielded Possible Measurement Range Sensor Temperature Durability Measurement Accu...

Page 162: ...fe Operational conditions 10 to 95 RH 0 to 50 C 10 to 55 C 5 RH at 25 C 50 RH 1 year under normal operational conditions Without dew condensation water leakage or effect from corrosive gas or organic...

Page 163: ...Wire Connector Sensor Adaptor For RTR 52Pt unit millimeters RTR 05P1 Cable Length Operational Temperature 1 0m 25 to 60 C Not Waterproof Vinyl Chloride Vinyl Coated Electrical Wire Sensor Extension Ca...

Page 164: ...tents Lithium Battery x 1 LS26500 about 2 years and 6 months 1 Monitoring at 1 minute interval about 20 months Splash proof 40 to 80 C 2 about 75g including lithium battery Attachment hook x 1 Rubber...

Page 165: ...g x 1 for back of main unit Silica Gel Pack drying agent x 1 Double sided Adhesive Tape x 1 for fastening silica gel Screws x 2 extras for fastening back of main unit TR 11P2 Low Temperature Battery S...

Page 166: ...C Double sided Adhesive Tape x 1 Screws x 2 RTR 5 RVR 52 TR 5 NOTE If a strong shock occurs to the unit in environments under 30 C cracking may occur Polycarbonate TR 05K3L Wall Attachment Operating T...

Page 167: ...31 Fax 81 263 40 3152 E mail support tandd com Office Hours Monday to Friday 9 00 12 00 13 00 17 00 GMT 9 00 Tokyo Time Website http www tandd com Web Wing WL RTR 5W User s Manual Published by T D COR...

Reviews: