


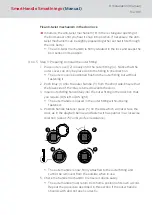


3. Insert fastening screw sensor into the sensor screw hole until it will go
no further.
9
A spring mechanism holds the fastening screw sensor in place in the
door lock.
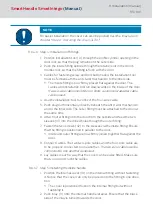
8.6.4.4 Step 2: Bolt sensor installation
Preparation of the bolt sensor
For preparation, the bolt sensor (C) has to be mounted onto the
installation tool according to the following illustration:
The bolt sensor cone may need to be moved, depending on the door lock
used. In most cases, the cone can remain in the pre-set "Position 1".
The cone can be moved with the following steps:
1. Make sure that the bolt sensor (C) is placed firmly on the installation
tool (D).
SmartHandle
SmartIntego
(Manual)
8. Installation (manual)
82 / 160
Summary of Contents for SI:SmartHandle Series
Page 1: ...SmartHandle SmartIntego Manual 28 10 2020...
Page 25: ...6 5 Distances and door thicknesses SmartHandle SmartIntego Manual 6 Designs 25 160...
Page 131: ...SmartHandle SmartIntego Manual 8 Installation manual 131 160...
Page 132: ...9 Outer fitting is mounted SmartHandle SmartIntego Manual 8 Installation manual 132 160...
Page 136: ...2 Remove the uppermost battery SmartHandle SmartIntego Manual 8 Installation manual 136 160...
Page 137: ...3 Screw on the inside fitting SmartHandle SmartIntego Manual 8 Installation manual 137 160...
Page 145: ...10 Configuration See TechGuide WO SVCN SmartHandle SmartIntego Manual 10 Configuration 145 160...
Page 147: ...12 Signal See TechGuide WO SVCN SmartHandle SmartIntego Manual 12 Signal 147 160...