
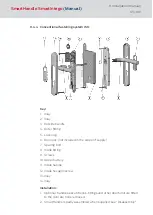


2. Attach outer fitting onto the door from the outside and at the same
time feed the end of the installation tool with the plug through the lock
to the inside of the door.
9
The three sleeves of the outer fitting construction are fit in the
previously drilled holes and the cable of the installation tool
protrudes outward from the inside of the door. The outer fitting
construction is flush and parallel with the door.
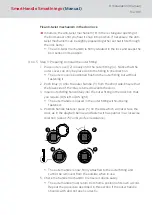
3. Adapter plate for the inside fitting (A) to the inside door and fasten iwth
a screw (X2) with the centre sleeve of the outer fitting construct. Feed
the cable of the installation tool through the long slot of the adapter
plate.
9
The outer fitting stops by itself at the door and the cable of the
installation tool protrude to the inside of the door.
9
All drill holes must be flush!
4. Connect the cable of the inside fitting with the installation tool.
5. Push the inner fitting (7) spindle through the lock's retainer slot and
push the inner fitting, so that it is flush on the door. At the same time, by
pulling on the installation tool from the outer side of the door, pull the
cable of the inside fitting to the outer fitting.
6. Fasten inside fitting with two screws (X2).
7. Connect the connection cable of the inside fitting with the installation
tool.
8. Check the outer handle to ensure it opens easily. The handle must al-
ways return to its starting position by itself.
9
If the handle catches, repeat the steps of this chapter. Check
whether the fittings are aligned parallel and that the screws are not
pulled too night.
8.5.4.6 Step 4: Check the outer handle to ensure it opens easily
Check the outer handle to ensure it opens easily. The handle must return to
its starting position by itself.
NOTE
If the handle catches, repeat the steps of this chapter. Check whether the
fittings are aligned parallel and that the screws are not pulled too night.
SmartHandle
SmartIntego
(Manual)
8. Installation (manual)
76 / 160
Summary of Contents for SI:SmartHandle Series
Page 1: ...SmartHandle SmartIntego Manual 28 10 2020...
Page 25: ...6 5 Distances and door thicknesses SmartHandle SmartIntego Manual 6 Designs 25 160...
Page 131: ...SmartHandle SmartIntego Manual 8 Installation manual 131 160...
Page 132: ...9 Outer fitting is mounted SmartHandle SmartIntego Manual 8 Installation manual 132 160...
Page 136: ...2 Remove the uppermost battery SmartHandle SmartIntego Manual 8 Installation manual 136 160...
Page 137: ...3 Screw on the inside fitting SmartHandle SmartIntego Manual 8 Installation manual 137 160...
Page 145: ...10 Configuration See TechGuide WO SVCN SmartHandle SmartIntego Manual 10 Configuration 145 160...
Page 147: ...12 Signal See TechGuide WO SVCN SmartHandle SmartIntego Manual 12 Signal 147 160...