


Initial configuration
Page 80
FiberPatrol FP1150 Product Guide
4.
Verify that the Actual Ends of Sensor 1 and Sensor 2 are as expected (these values are
entered automatically by the system and are based on the optical length of the sensor cable).
Verify that the value of the Sensor Offsets are 0 and the Sensor Scales are 1.
5.
Verify that the Channel Status and Set Points indicators display light green, and the Auto Gain
and Auto Bias indicators display dark green.
6.
Select the Global Setup button and enter the installation medium(s) and the maximum lengths
of S1 and S2.
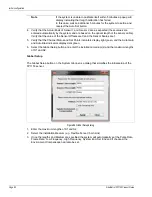
Global Setup
The Global Setup button on the System tab opens a dialog that simplifies the initial setup of the
FP1150 sensor.
1.
Enter the maximum lengths of S1 and S2.
2.
Select the installation Medium (e.g. Flexible Fence Chain Link).
3.
Once the lengths and Medium are specified the system will automatically set the Pulse Rate,
Frame Rate, Low Frequency, High Frequency, System End, Set End and if checked, the
Environment Compensation will also be set.
Note
If the system is unable to calibrate itself within 5 minutes a popup will
display indicating that length calibration has failed.
In this case, wait an additional 5 minutes for the system to settle, and
reselect the Auto Set button.
Figure 86 Global Setup dialog


