


Masonry walls and buildings
Page 54
FiberPatrol FP1150 Product Guide
Masonry walls and buildings
To install sensor cable on masonry, custom P-clamps are used to secure the cable so it extends
about 5/8 in. past the edge of the wall and 5/8 in. above the height of the wall. The P-clamps are
attached to the masonry surface every 50 cm (20 in.). Adjust the spacing of the P-clamps at any
changes in direction (horizontal or vertical) to ensure the minimum bend radius of the sensor cable
is not violated. Follow standard masonry fastening procedures approved for light to medium duty
applications.
The P-clamps are 2.5 in. galvanized steel, and are designed to be anchored with a single screw.
Self-tapping 3/16 in. by 1-1/4 in. concrete screws, such as Tapcon
®
screws with slotted hex
washer heads are recommended. The required mounting holes are 5/32 in. diameter and 1 1/2 in.
deep and are centered 1.5 in. from the edge of the surface. The cable loop in the P-clamp is vinyl-
coated and sized to grip a standard sensor cable snugly once the clamp is closed.
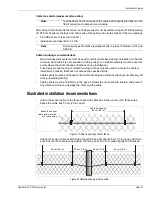
Begin by drilling 5/32 in. mounting holes that are centered 1.5 in. from the edge of the surface.
Each hole should be 1 1/2 in. deep. Tapcon 3/16 in. X 1 1/4 in. hex washer anchors are
recommended for fastening the P-clamps to the surface.
Figure 62 Masonry surface mounting hole dimensions
Figure 63 Masonry surface P-clamp spacing
P-clamp
sensor cable
mounting hole
5/32 in.
1.5 in.
1.5 in.
0.5 in.
P-clamp
sensor cable
50 cm
(20 in.)
50 cm
(20 in.)


