background image

- 18 -

MF 5990 - Agoris M943

3 -  Getting to know the machine

Inserting original documents

The instructions for inserting original documents are the 
same for copies, faxes or scanned documents.

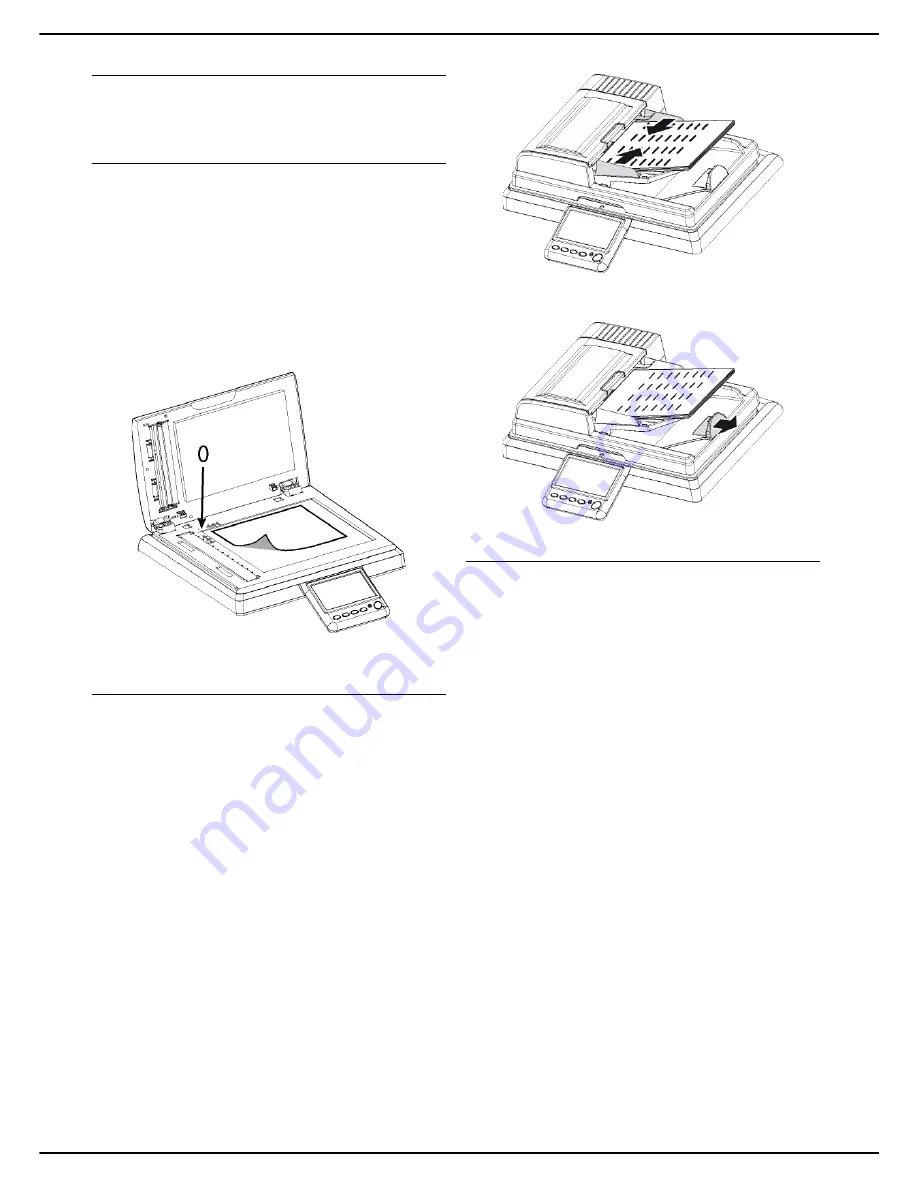
Using the flatbed scanner

Accepted formats

The format of documents for scanning should respect the 
following conditions:
• Maximum length: 299 mm.
• Maximum width: 219 mm.

Inserting the document

1

Open the cover of the flatbed scanner.

2

Place your document with the side to be copied 
face down on the window respecting the indica-
tions around the window.

3

Close the cover of the flatbed scanner.

Using the autofeed scanner

The autofeed scanner enables you to scan original 
documents comprising one or several sheets. You can 
place up to 70 sheets of 80 g/m² in the automatic feeder.

Accepted formats

A5, A4, Letter, Legal or any other format respecting the 
following conditions:
• Length between 140 mm and 358 mm.
• Width between 139 mm and 219 mm.
• Weight between 60 and 105 g/m².

Recommendations for use

• Do not load documents of different sizes or weights.
• Remove staples or paper clips before inserting docu-

ments in the automatic feeder.

• Do not insert the following types of documents:

Creased or folded paper.

Torn paper.

Corrugated paper

Inserting the document

1

Move the paper guides apart to the maximum.

2

Insert your document in the automatic feeder, side 
to be copied facing upwards.

3

Adjust the paper guides against the document.

4

Set the limit stop on the output tray for scanned 
documents to the size of the original document.

Using the Multiple Scan option correctly

To meet your scanning needs, the 

Scan to

 functions 

allow you to "add" and group pages from several 
documents in the same emission.
Activating the 

Multiple Scan

 option is especially useful in 

the following cases:
• you are using the autofeed scanner and your docu-

ment is voluminous. The number of pages exceeds 
the capacity of the document feeder (70 pages 80 g/
m²), but you want the recipient to receive a single file.

• you are using the flatbed scanner and your document 

contains several pages that you want to scan one after 
the other so that the recipient receives a single file.

• you want to use the flatbed scanner and the autofeed 

scanner to scan different pages, but you want the re-
cipient to receive a single file.

Use the following table to know how to configure and use 
the 

Multiple Scan

 option.

Summary of Contents for MF5990

Page 1: ...TELECOM User Manual MF5990 Agoris M943...

Page 2: ...her for receiving them In this configuration it is preferable to use direct telephone lines reserved exclusively for the machine in order to maintain it constantly in service and to receive communicat...

Page 3: ...one number 27 Fax emission settings 28 Fax reception settings 30 Configuring the fax server optional 32 Advanced fax settings 33 Service default settings 33 Copy function default settings 34 Fax emiss...

Page 4: ...d print tasks 66 Force a print task 66 Editing a print task 66 Deleting a print task 66 Using a USB memory key 67 Support compatibility 67 Recommendations for using USB keys 67 Viewing the content of...

Page 5: ...card incidents 118 Communication failures 118 Scanning failure 118 Sending failure 118 Communication failure codes 119 Safety 121 Safety Instructions 121 Laser Safety Information 121 For Europe Asia 1...

Page 6: ...r adjustment guide 11 Main paper tray 3 Automatic document feeder 12 On Off button 4 Original document output 13 Secondary paper tray 5 Paper reception stop 14 Toner cartridge access button 6 Fingerpr...

Page 7: ...epending on the model 23 Duplex module Key Description To access the machine s home screen To activate the Send Fax function To activate the Scan Document function To activate the Copy Document functi...

Page 8: ...supplied with this option for installation instructions Perfume diffuser The perfume unit is an option enabling you to install a perfume diffuser on the machine When this option is installed and acti...

Page 9: ...Press the paper compression flap to lock it 4 Press on the longitudinal paper guide and slide it to the required paper format 5 Press on the right lateral paper guide and slide it to the required pap...

Page 10: ...er format larger than A4 The procedure for loading paper described in this section applies to all paper trays in the machine 1 Remove the paper tray from the machine and place it on a flat surface 2 R...

Page 11: ...2 Define the paper format and type used in the ma chine The machine automatically detects standard paper formats To check define the format and type of pa per loaded consult the section Paper settings...

Page 12: ...the transparencies do not exceed the fill limit 9 Replace the cover on the paper tray Ensure that the cover is properly closed 10 Replace the paper tray in the machine and push it in fully 11 Define t...

Page 13: ...e is complete the machine initialisation phase starts 1 Insert the initialization card provided with the ma chine in the card reader 2 Once the analysis is complete remove the initiali zation card fro...

Page 14: ...s SETTINGS to return to the previous menu To run an automatic configuration of the Ethernet network automatic allocation of the IP address via the DHCP server 1 In the menu SETTINGS press COMMUNICATIO...

Page 15: ...he upper frame of the screen displays the navigation path leading to the current menu For example to create a contact in the address book the path is as follows 1 Press the MENU key to display the hom...

Page 16: ...ress book and manage contacts and contact lists For more information consult the section Address book 79 MOBILE PRINT This menu is used for printing documents sent by email For more information consul...

Page 17: ...of the problem e g paper jam A colour code is used to identify the gravity of the problem red a serious error has occurred rendering one or more machine functions unusable You must resolve the incide...

Page 18: ...ng docu ments in the automatic feeder Do not insert the following types of documents Creased or folded paper Torn paper Corrugated paper Inserting the document 1 Move the paper guides apart to the max...

Page 19: ...displays the identification screen To log out manually 1 Press MENU 2 Press OTHER COMMANDS IDENTIFICATION LOG OFF The machine disconnects you from your user ac count Personalising your user account f...

Page 20: ...it slowly downwards The machine informs you when the option is successful If you have entered your email address the ma chine automatically sends you your fingerprint 7 When you have made the modific...

Page 21: ...ing executed by another connected user General settings Date Time Settings Setting the date and the time At any time you can edit the machine s date and time 1 Press MENU 2 Select SETTINGS GENERAL DAT...

Page 22: ...untry in accordance with the standards in force By default when configuring a country the type of public telephone network to be used in the country concerned is defined automatically 1 Press MENU 2 S...

Page 23: ...chine is set to NO 4 Press MENU to return to the home screen Toner saving This parameter is used to reduce the quantity of toner consumer by all the machine s print outs 1 Press the MENU key 2 Select...

Page 24: ...achine does not recognize the perfume unit installed set in WITHOUT To activate this option you just need to configure the setting PERFUME to the diffusion length of your choice Note that the longer t...

Page 25: ...inter paper format The paper format defined in this menu becomes the default format of the main printing paper tray and the flatbed scanner 1 Press MENU 2 Select SETTINGS SCANNER PRINTER PAPER FORMAT...

Page 26: ...ns printing to save toner cartridge ink TASK DELAY Waiting time for data from the PC before the PC print task is cancelled FONTS This parameter is used to draw up the set of symbols The possible value...

Page 27: ...e desired name using the vir tual keyboard Press OK to confirm the new setting 5 Press MENU to return to the home screen Defining the machine phone number To record the number of the machine 1 Press t...

Page 28: ...e virtual key board Use the and keys to pass from one char acter to the next In the event of an error use the key to delete a character Press OK to con firm the new setting 5 If you have the dual line...

Page 29: ...h heading containing your name number the date and the number of pages Important If you send a fax from a document feeder the emission heading will not appear on the document received by your correspo...

Page 30: ...ing received documents To activate toner saving printing 1 Press MENU 2 Select SETTINGS COMMUNICATION FAX RECEPTION PRINT 3 Press TONER SAVE 4 Select the required status from the list Press OK to conf...

Page 31: ...CATION FAX RECEPTION PC MANAGEMENT 3 Press MODE 4 Select the required option from the list 5 Press OK to confirm the new setting To select the PC that will receive the documents 1 Press PC RECEIVER 2...

Page 32: ...ADDRESS main fax server NETWORK 2 ADDRESS backup fax server to be used if the connection with the main fax server fails To define the main fax server address 1 Press NETWORK 1 ADDRESS 2 Enter the IP a...

Page 33: ...the type of network you prefer To select the type of network 1 Press the MENU key 2 Select SETTINGS COMMUNICATION FAX ADVANCED 3 Press L1 NETWORK TYPE 4 Select the type of network required for telepho...

Page 34: ...the navigation path to return to the previous menu MENU to return to the home screen Parameter Available settings NUMBER OF COPIES 1 to 99 QUALITY SPEED NORMAL TEXT TEXT AND IMAGE or PHOTO CONTRAST 4...

Page 35: ...to delete a character Press OK to confirm the new setting 5 Press MENU to return to the home screen Ethernet network communication speed By default the machine is configured to adapt its communication...

Page 36: ...Automatic configuration of the Ethernet network in IPv6 To configure the machine on the local IPv6 network proceed as follows 1 Press the MENU key 2 Select SETTINGS COMMUNICATION LOCAL NETWORK IPV6 Th...

Page 37: ...rvice on the machine Accessing SNMP service configuration 1 Press MENU 2 Select SETTINGS COMMUNICATION SERVICES SNMP MANAGER 3 Make the required adjustments using the proce dures described below Press...

Page 38: ...to the home screen Configuring the LDAP server The LDAP server is used to access a directory server for contacts or lists of contacts maximum 500 recipients The LDAP function can only be activated if...

Page 39: ...allows you to send and receive documents by email via your local network or an internet access via the telephone line You may also print TIFF JPEG PDF TXT documents sent to the machine by email To con...

Page 40: ...ding and maintenance are functions which are part of a maintenance contract and are activated by your installer The aim of these functions is to communicate to a server centre the following informatio...

Page 41: ...ect the SETTINGS tab 3 Select the menu TRANSFER PC 4 Select EXPORT A file saving window opens 5 Enter the name of the file the destination directory and confirm The machine settings are exported in XM...

Page 42: ...lue 7 When you have selected the file press OK to con firm and start the import or Cancel to return to the previous menu 8 When the Import successful message appears press YES to return to the previou...

Page 43: ...les 1 Press MENU 2 Select CONSUMABLES DISPLAY For each consumable the machine displays the re maining capacity expressed as a percentage To print out the status of consumables 1 Press MENU 2 Select CO...

Page 44: ...RE VERSION Software version installed VERSION MINIBOOT Miniboot version installed OPTIONS Access to options installed on the machine additional paper trays etc PRINT Printing counters activities see A...

Page 45: ...hts management and limit access to all machine functions without creating user accounts the machine will only be able to be used by the Admin user account Therefore in order to set up user rights mana...

Page 46: ...ac counts can scan and send doc uments using the SCAN function after logging in Press OK to confirm the new setting Function Description Procedure Ownership Description CODE 4 digit code generated by...

Page 47: ...list 3 Select the user account to delete and press OK The selected user account is deleted Printing the list of user accounts For each user account on the machine the print out of the list of user acc...

Page 48: ...ort does not affect monthly print outs of the usage counters This action sends an interim report of usage counters by email to the Admin user account on the condition that this user account specifies...

Page 49: ...and short edges Long edge binding The pages are printed to be bound on the left margin and turned from right to left Short edge binding The pages are printed to be bound at the top and turned from bot...

Page 50: ...f toner consumed on the page and thus reduce printing costs When using this mode the consumption of toner is reduced and the print is lighter Cancelling an operation 1 Insert the document to photocopy...

Page 51: ...rm 13 If you are using the autofeed scanner you can mo saic print your documents Press MOSAIC and se lect the required option from the list see section Mosaic copy 49 Press OK to confirm 14 If you are...

Page 52: ...your document from the available options Press OK to confirm 6 To change the luminosity press BRIGHTNESS Select the most suitable luminosity for your docu ment from the available options Press OK to c...

Page 53: ...contacts required from the address book entries Use the up and down arrows to view all entries in the ad dress book OR Enter the first few letters of the name of your corre spondent using the virtual...

Page 54: ...m the address book In the data field Address book press then Select the contact or list of contacts required from the address book entries Use the up and down arrows to view all entries in the ad dres...

Page 55: ...xt page on the scanner select NEXT Select SEND when all pages have been scanned Note Access to functions depends on your user rights To know which rights you have con sult your machine administrator N...

Page 56: ...r rights 1 Press MENU 2 Press PRINT QUEUE 3 Press PRINT The faxes received and saved in the memory are identified by FAX HELD 4 Select the required fax The machine prints out the fax selected Monitori...

Page 57: ...on request and press OK The selected emission request disappears from the emission queue Print out a document awaiting emission To print out a document awaiting emission 1 Press PRINT The faxes are id...

Page 58: ...the doc ument on double format paper of the specified docu ment format In this way you can fold the document in two to make a booklet Custom sizes tab This tab allows you to create a personalised pap...

Page 59: ...ark The personalised watermark will then be available in the list of water marks offered by the machine Creating a watermark allows you to personalize the text to insert specify the font characteristi...

Page 60: ...1 Press the MENU key 2 Select OTHER COMMANDS IDENTIFICATION SEND FINGERPRINT 3 Press RECIPIENT S Enter your email address using the virtual keyboard In the event of an error use the key to delete a ch...

Page 61: ...ppears on the screen 2 Press OK to confirm cancellation of the print task in progress Monitoring printing The print queue contains documents that are currently being printed awaiting printing preceded...

Page 62: ...quired print task and press OK The properties of the selected print task are dis played 3 Make the required modifications and press OK to confirm Deleting a print task To delete a print task from the...

Page 63: ...print job the document will not be printed automatically Printing of the document can be launched from the machine s print queue using this 4 digit code You can also manage the configuration of secur...

Page 64: ...ument If identification fails the machine displays an explanatory message insufficient rights unknown account etc In all cases contact the machine s administrator Managing configuration of secure prin...

Page 65: ...dit the code associat ed with your email address An identification screen is displayed Enter your new 4 digit code using the virtual key board Confirm this new 4 digit code Press OK to return to the p...

Page 66: ...becomes the priority The corresponding document is printed as soon as the machine is available to print Editing a print task To edit the properties of a print task from the print queue 1 Press DISPLAY...

Page 67: ...table files documents and images are displayed without taking account of their arborescence on the USB key Printing files from a USB key For clarity and to help you select the right printing options f...

Page 68: ...screen The left hand side contains the list of available files The right hand side contains the files selected for printing 4 Use the up and down arrows to view all available files Select the require...

Page 69: ...ress OK to confirm 8 To change the resolution press QUALITY Select the resolution the best suited to your document from the options available and press OK to confirm 9 To scan the document in colour p...

Page 70: ...e JFFS2 The function SAVE enables you to save the machine s settings and or the address book on a USB key The function LOAD enables you to import the ma chine s settings and or address book from a USB...

Page 71: ...escription Scan to Key Scan a document and save it on a key connected to the machine Scan to Mail Send an email with the scanned document as an attachment Scan to File Save a scanned document in a fil...

Page 72: ...UMBER OF PAGES Enter the number of pages using the virtual keyboard or the number pad Press OK to confirm 17 To activate deactivate the Multiple Scan option press MULTIPLE SCAN Select the option YES t...

Page 73: ...key to delete a character Press OK to confirm 10 To customize the format of the attachment press DOCUMENT FORMAT Select the format from the available options and press OK to confirm 11 If you have sel...

Page 74: ...re PDF format and place it directly in a shared directory on a computer connected to the local network on your PC for example To connect to the destination PC you must know the name of the PC the full...

Page 75: ...the most suitable contrast for your document from the available options Press OK to confirm To select an SMB address then defined in an address book contact In the data field Address book press then S...

Page 76: ...and press OK to confirm 5 Press to send the document User rights The document is scanned and saved on the selected computer with the scan settings defined in the peripheral manager associated with the...

Page 77: ...the cancellation is displayed on the screen 2 Press OK to confirm cancelling the emission in pro gress For several recipients you can delete the other recipients from the emission queue see Deleting...

Page 78: ...t from the emission queue 1 Press DISPLAY EDIT Documents sent by email or for archiving are identified by MAIL or NETWORK documents sent to an FTP or SMB address are identified by FILE or NETWORK 2 Se...

Page 79: ...oard or the number pad from 1 to 500 Press OK to confirm 6 To change the resolution press QUALITY Select the resolution the best suited to your document from the options available and press OK to conf...

Page 80: ...a contact To edit a contact Cancelling an operation 1 Press the MENU key 2 Select ADDRESS BOOK CONTACTS EDIT 3 Select the contact to edit from the scroll down list You can also enter the contact s na...

Page 81: ...rm The list of contacts has been created Press MENU to exit the address book Editing a list of contacts To edit a list of contacts Cancelling an operation 1 Press the MENU key 2 Select ADDRESS BOOK LI...

Page 82: ...ab ADDRESS BOOK 3 Select the menu TRANSFER PC 4 Select EXPORT A file saving window opens 5 Enter the name of the file the destination directory and confirm The address book is exported Exporting the a...

Page 83: ...t becomes blue 7 When you have selected the file press OK to con firm and start the import or Cancel to return to the previous menu 8 When the Import successful message appears press YES to return to...

Page 84: ...to the machine s smart card reader The machine analyzes the directory card con tents 2 If several directory cards are required a message asking you to insert the next card is displayed on the screen I...

Page 85: ...ws 2000 minimum 512 Mb for Windows XP x86 Home and Pro 2 Gb for Windows Vista 2 Gb for Windows 7 Installing the software This section describes the following installation procedures complete installat...

Page 86: ...ROM drive insert the installation CD ROM and close the drive 2 An installation procedure runs automatically Auto run Otherwise double click on setup exe in the CD ROM root directory 3 A screen entitl...

Page 87: ...f you wish to install PostScript print drivers on your multifunction machine 1 Connect to the Adobe website http www adobe com support downloads product jsp product 44 platform Windows and download th...

Page 88: ...the Companion Suite Pro kit place your cursor on it and click on the left button of the mouse Companion Monitor Graphic presentation Run the application Companion Monitor by clicking on the icon on y...

Page 89: ...lick on End 9 Enter the name for your PC and click on OK The multifunction machine will use this name to identify your PC 10 Click on OK 11 The window indicating that the installation proce dure was s...

Page 90: ...es To cancel the deletion click on No The peripheral no longer appears in the list You can also unregister a PC from the multifunction machine see section Unregistering a PC 40 Displaying the status o...

Page 91: ...n Analysis using the Scan to function Run the application by clicking on the Companion Director icon on your desktop or from the menu Start All programmes Companion Suite Companion Suite Pro LH2 Compa...

Page 92: ...the Print command in the File menu of the ap plication currently open on the screen 2 Select the printer Laser HFFv2 For more information on the print options see the section Printing documents from...

Page 93: ...lect the Cover page tab and check the box With cover page Select the cover page you want to include in the drop down menu or create a new one For more information consult the section Cover page 95 7 C...

Page 94: ...about to be reattempted requests which have been rejected failed calls Rejected requests are listed at the end so they are accessible if you want to resend them or delete them The requests are listed...

Page 95: ...ating the cover page template First step Create a background image with the re quired logos and page formatting Option Description Automatic printing of a received document The fax is automatically pr...

Page 96: ...d image is created in the folder C Pro gram Files Companion Suite Pro LH2 Docu ments FAX Temporary and has the file extension fax Option B 1 Run Companion FAX Manager select New Fax and select the sca...

Page 97: ...e A window opens containing the cover page tem plate you created 3 Click on the icon to display the fields available 4 To add a field Select the field you want to insert by checking the available fiel...

Page 98: ...programmes Companion Suite Companion Suite Pro LH2 Uninstall 1 A confirmation window appears Click on Yes to continue uninstalling the Companion Suite Pro LH2 drivers 2 The uninstall programme starts...

Page 99: ...ng system 2 Select the System Properties tab 3 Select the Device manager 4 In the sub menu Imaging device selectthe Scanner HFFv2 driver and click on the right button of the mouse 5 Select Uninstall i...

Page 100: ...which has remained too long in the paper tray Cleaning The presence of dust dirt and paper debris on the external surfaces and inside the printer may hinder its operation We recommend you clean it reg...

Page 101: ...using a soft lint free cloth with one of the authorised cleaning products 3 Gently wipe the surface with a soft dry cloth until it is dry Exert as little pressure as possible 4 Connect the power cabl...

Page 102: ...dry cloth To clean them rotate them in the same direction as normal paper feed 3 Replace the paper tray in the machine and push it in fully Replacing consumables To access the status of consumables p...

Page 103: ...wards 8 Close the access flap to the toner cartridge and lower the flatbed scanner 9 Insert the smart card provided with the new toner cartridge into the smart card reader 10 The machine detects the s...

Page 104: ...r machine the printer should be serviced drum change etc every 200 000 pages printed The feeder shoe and the loading unit should be replaced every 50 000 pages scanned on the autofeed scanner Contact...

Page 105: ...Paper tray paper jam The procedure for removing paper jams described in this section applies to all paper trays in the machine 1 Remove the paper tray from the machine and place it on a flat surface 2...

Page 106: ...l paper from the machine s paper output 2 Open the cover of the duplex module by lifting the latch 3 Lift up the inner lever on the top left of the ma chine s rear cover 4 Open the rear cover 5 Remove...

Page 107: ...ge access button 3 Lift up the flatbed scanner and open the access flap to the toner cartridge 4 Remove the toner cartridge gently by pulling on its handle and place it on a flat surface 5 Remove the...

Page 108: ...ator rights To install the update from the integrated website 1 Go to the integrated website see Remote configuration 21 2 Select the SERVICES tab 3 Select the PC TRANSFER menu 4 In SOFTWARE UPDATE pr...

Page 109: ...re View Software files JFFS2 View JFFS2 files Key Action Move the list up 1 file at a time at each press Move the list up 10 files at a time at each press Move the list down 1 file at a time at each p...

Page 110: ...chine on again A system error occurred Contact a maintenance technician The machine does not detect the presence of the document inserted in the autofeed scanner The document is too thick or incorrect...

Page 111: ...or more information An incorrect toner cartridge is installed Only use the correct toner cartridges See the consumable specifications described in Characteristics Contact your retailer for more inform...

Page 112: ...m If the jams persist use another media The media used is damp Remove the loaded media and replace it with dry media The media used is not compatible format thickness type etc Only use compatible medi...

Page 113: ...ution Blank print The toner cartridge cover has not been removed Remove the toner cartridge and check that the cover has been removed see Installing the toner cartridge 8 The toner cartridge is defect...

Page 114: ...ve Remove the toner cartridge and check its condition Replace the defective toner cartridge The toner cartridge is almost empty Replace the toner cartridge see Replacing the toner cartridge 102 The le...

Page 115: ...defective Remove the toner cartridge and check its condition Replace the defective toner cartridge Traces like hair inside and outside half shade zones The media used has been left in an open packet...

Page 116: ...dge is defective or incorrectly installed Remove the toner cartridge and check its condition Replace the defective toner cartridge Correctly reinstall the toner cartridge see Installing the toner cart...

Page 117: ...of the ma chine s rear cover Open the rear cover Left up the levers to prevent creasing Once the envelope printing is complete remember to lower the levers again Fuzzy printing The media used is damp...

Page 118: ...d adjust the guides against the stack of transparencies see Loading transparencies into the paper tray 11 Printing on postcards lacks clarity The postcards used are not compatible format thickness typ...

Page 119: ...e number 08 Quality The document you sent was not properly received Contact your correspondent to see whether it is necessary to resend the document It is possible the interference occurred in a usele...

Page 120: ...ng SMTP server the service is momentarily unavailable Try again later 71 POP3 server disconnection Disconnection from the incoming POP3 server the service is momentarily unavailable Try again later 72...

Page 121: ...ormance of procedures other than those specified in this guide may result in hazardous light exposure This equipment complies with international safety standards and is classified as a Class 1 Laser P...

Page 122: ...y information Maschinenl minformations Verordnung 3 GPSGV Certifications in Europe The CE mark applied to this product indicates the declaration of conformity of Sagemcom Documents SAS with the applic...

Page 123: ...n describes the operating environment required for the machine Temperature 10 C to 32 C 50 F to 89 6 F with ambient humidity of between 15 and 80 up to 65 ambient humidity for a temperature of 32 C 89...

Page 124: ...subject the screen to violent shocks or pressure You risk breaking the touch screen Safety information When using the machine the following safety precautions must always be respected Safety during o...

Page 125: ...ment The installation instructions in this respect are important and must be adhered to If it is suspected that this installation is creating electromagnetic interference switching it on off may ensur...

Page 126: ...ome in contact with your skin If you get toner in your eyes rinse immediately with cold water and consult a doctor Toner on the hands can be cleaned using cold water and a mild soap For the removal of...

Page 127: ...not lend or transfer Software usage right to third parties You are authorized to make one backup copy This license is no exclusive and no transferable The presence of the logo green point means that...

Page 128: ...herwise including without limitation lost information lost time business interruption lost income lost clients arising out of the use of or inability to use the Software Development With a view to con...

Page 129: ...are referring to freedom not price Our General Public Licenses are designed to make sure that you have the freedom to distribute copies of free software and charge for this service if you wish that y...

Page 130: ...a whole which is a work based on the Program the distribution of the whole must be on the terms of this License whose permissions for other licensees extend to the entire whole and thus to each and ev...

Page 131: ...erfaces the original copyright holder who places the Program under this License may add an explicit geographical distribution limitation excluding those countries so that distribution is permitted onl...

Page 132: ...nse GNU LESSER GENERAL PUBLIC LICENSE Version 2 1 February 1999 GNU LESSER GENERAL PUBLIC LICENSE Version 2 1 February 1999 Copyright C 1991 1999 Free Software Foundation Inc 51 Franklin Street Fifth...

Page 133: ...ersion of the Library The precise terms and conditions for copying distribution and modification follow Pay close attention to the difference between a work based on the library and a work that uses t...

Page 134: ...executable form under the terms of Sections 1 and 2 above provided that you accompany it with the complete corresponding machine readable source code which must be distributed under the terms of Secti...

Page 135: ...distribute the Library except as expressly provided under this License Any attempt otherwise to copy modify sublicense link with or distribute the Library is void and will automatically terminate your...

Page 136: ...REDISTRIBUTE THE LIBRARY AS PERMITTED ABOVE BE LIABLE TO YOU FOR DAMAGES INCLUDING ANY GENERAL SPECIAL INCIDENTAL OR CONSEQUENTIAL DAMAGES ARISING OUT OF THE USE OR INABILITY TO USE THE LIBRARY INCLUD...

Page 137: ...50 F to 89 6 F with maximum differ ence of 10 C per hour Storage 20 C to 40 C 4 F to 104 F with maximum differ ence of 10 C per hour Admissible humidity 15 to 85 RH without condensation with maximum...

Page 138: ...rd paper 80 g m 22 lb Paper format A4 A5 B5 ISO B5 JIS Executive Letter Legal 14 Legal 13 Statement 1 3 A4 Envelope Com10 Envelope C5 Envelope DL Envelope Monarch A6 postcard Japanese postcard Paper S...

Page 139: ...general characteristics Type PSTN V34 Communication speed 33600 bps maximum V34Fax Protocol TCP IP PPP protocols PAP CHAP MD5 C protocols SMTP POP3 MIME protocols for emails Connectivity Network port...

Page 140: ...0 0 6 9 x 9 8 Yes Yes Yes B5 JIS 182 0 x 257 0 7 1 x 10 1 Yes Yes Yes Envelope Com10 104 7 x 241 3 4 09 x 9 5 Yes Yes No Envelope DL 110 0 x 220 0 4 3 x 8 7 Yes Yes No Envelope C5 162 0 x 229 0 6 4 x...

Page 141: ...y risk causing paper jams Fine paper First test the fine paper to be used to ensure acceptable print quality Note Store media in a room where the tempera ture is between 10 C and 30 C and where relati...

Page 142: ...u can print continuous sheets of labels but depending on the media used and the printing environment paper feed problems may occur If so stop the continuous print and print out sheets one by one Befor...

Page 143: ...test on standard paper to check page formatting Main and additional paper tray Secondary paper tray Capacity Up to 290 sheets of labels depending on thickness Maximum height 49 4 mm Up to 100 sheets o...

Page 144: ...he maximum surface which can be printed clearly without distortion This surface is limited by two hardware constraints the size of the media and the margins required by the printer and a software cons...

Page 145: ...The margins are defined in the computer application When the application allows personalise the margins taking account of the guaranteed printable surface Marker Description 1 Non printable surface 4...

Page 146: ...n in this document is correct but does not accept liability for error or omission Non contractual document All trademarks are registered by their respective owners Simplified joint stock company Capit...

Reviews: