Ricoh Aficio 400 User Manual Download Page 64

1

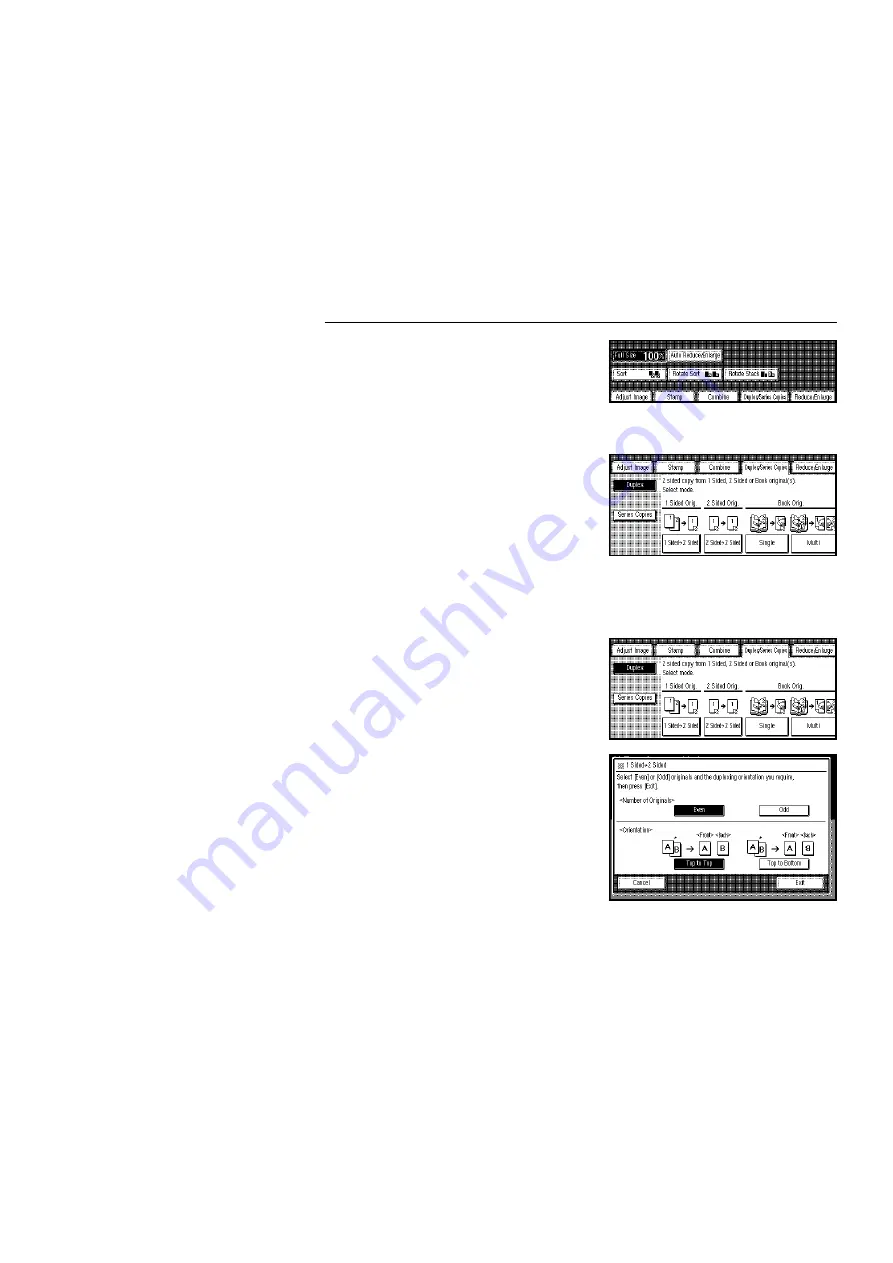
Touch the [Duplex/Series Cop-
ies]
 key.

2

Confirm that the [Duplex] key is
dark. If not, touch the [Duplex] key.

3

When you want to make two-sided copies from 
one-sided originals

Touch the [1 Sided 

 2 Sided]

key.

Select  [Even] or [Odd] for the
number of originals.

Select [Top to Top] or [Top to
Bottom]
 for the orientation re-
ferring to the table on page 64.

Touch the [Exit] key.

Set your originals (

 see pages 30~33) and make your copies.

If you set originals in the optional document feeder, the last page should be
on the bottom.

If you set one original in the optional document feeder at a time, start with
the last page to be copied. Follow the procedures on pages 32 ~ 33.

If you place originals on the exposure glass, start with the last page to be
copied. After setting your original, press the Enter or Start key following the
instructions on the display.

na-6-2

WORKING WITH BOTH SIDES OF ORIGINALS AND COPIES (Duplex/Series Copies)

65

Summary of Contents for Aficio 400

Page 1: ...g Operation In this manual the following important symbols are used This symbol is intended to alert the user to the presence of impor tant operating and maintenance servicing instructions in the lite...

Page 2: ...t eat or swallow toner and keep it out of reach of children The fusing unit may be very hot Be careful when handling it CAUTIONS While copying do not turn off the main switch While copying do not open...

Page 3: ...t be used for a long period disconnect the power cord If the copier must be transported by vehicle please contact your service repre sentative When the main switch is in the Stand by position the opti...

Page 4: ...WHERE IS IT WHAT IS IT na 2 SYSTEM OVERVIEW 3 COPIER EXTERIOR INTERIOR 4 OPERATION PANEL 6 Hard Keys 6 Touch Panel Display 8 1...

Page 5: ...2 Copy tray Option Completed copies are delivered here 3 Finisher Option Sorts stacks and staples copies 4 1500 sheet tray unit Option Holds 1500 sheets of copy paper 5 1000 sheet tray unit Option Hol...

Page 6: ...COPIER EXTERIOR INTERIOR na 2 1 2 3 4 5 6 7 8 13 14 15 9 10 11 12 COPIER EXTERIOR INTERIOR 4...

Page 7: ...he inside of the copier 7 Unit for two sided copies Duplex unit Makes two sided copies 8 Paper tray Holds 500 sheets of copy paper 9 Bypass tray Use to copy onto OHP sheets adhesive labels translucent...

Page 8: ...ls key Changes the basic settings and copy features See page 134 3 Guidance key Shows guidance for functions See page 28 4 Touch Panel Display See page 26 5 Program key Press to select the program mod...

Page 9: ...s to make interrupt copies during a copy run See page 53 9 Start key Press to start copying Use to set the Auto Start See page 37 10 Clear Stop key While entering numbers press to cancel a number you...

Page 10: ...2 Message area Copier status and messages Copy Set Total Total number of copy sets entered Copy Set Counter Number of copy sets made so far Original Counter Number of originals scanned so far Message...

Page 11: ...ex from one sided originals to two sided copies Number of originals Even Orientation Top to Top Adjust Image Margin Adjustment 0 2 width margin for right side of back side You can change the above def...

Page 12: ...WHAT YOU CAN DO WITH THIS COPIER na 3 11...

Page 13: ...e 55 See page 61 See page 70 See page 74 See page 86 See page 44 See page 36 See page 41 See page 39 See page 38 See page 48 See page 37 See page 37 See page 43 See page 38 See page 55 See page 61 See...

Page 14: ...usting Copy Image Density See page 37 Having The Copier Choose The Paper Size See page 39 Having The Copier Choose The Reproduction Ratios See page 41 Selecting Original Type Setting See page 43 Sorti...

Page 15: ...ng From The Bypass Tray See page 50 Temporarily Stopping One Job To Copy Something Else See page 53 Recalling Job Settings See page 53 Storing Your Copy Settings In Memory See page 54 Reducing And Enl...

Page 16: ...sing the and keys or Number keys Stretching and squeezing the image Fitting The Original To A Copy Of A Different Size See page 58 Fitting the image in the copy area as it is Stretching and squeezing...

Page 17: ...Making Two sided Copies See page 61 From one sided originals From two sided originals From book originals Single Multi Making One sided Copies See page 68 na 3 FUNCTIONS 16...

Page 18: ...ls Into One Copy See page 70 Printing Numbers On The Background Of Your Copies See page 74 na 3 From 8 one sided originals From 16 one sided originals From 4 one sided originals From 2 one sided origi...

Page 19: ...Printing Preset Messages On Your Copies See page 75 Printing Your Own Messages On Your Copies See page 79 Printing Dates And Page Numbers See page 81 na 3 FUNCTIONS 18...

Page 20: ...Copying The Image Twice On One Page See page 86 Erasing The Center And The Border Erase Center Border See page 88 na 3 FUNCTIONS 19...

Page 21: ...Adjusting The Margin See page 89 Repeating An Image Over The Entire Copy See page 91 Reversing Black And White See page 93 Merging Images See page 94 na 3 FUNCTIONS 20...

Page 22: ...Optional Finishing Sorting into sets 123 123 123 See page 96 Stapling See page 100 na 3 FUNCTIONS 21...

Page 23: ...et For User Codes 25 USING THE TOUCH PANEL DISPLAY 26 GETTING HELP ON THE DISPLAY 28 RECOMMENDED NON RECOMMENDED ORIGINALS 29 Recommended Originals 29 Non recommended Originals For The Optional Docume...

Page 24: ...pears on the display 3 After warm up v Ready ap pears on the display When The Display Is Off And The Indicator Of The Clear Modes Low Power Mode Key Is Lit The copier is in Low Power mode 1 Hold down...

Page 25: ...lay instructs you to input your user code as shown in the illustration 2 Input your user code 6 digits using the Number keys To change the entered code touch the C key or press the Clear Stop key Then...

Page 26: ...s that have the option of being selected Keys that have been selected Keys that have no option to select In this manual we use the following convention Key on the display In the manual Auto Paper Sele...

Page 27: ...see at a glance all the modes you selected Prev key This key appears in the upper right corner of the display when you touch the Check Modes key Press to go back to the previous display Change Modes k...

Page 28: ...w about on the touch panel display For example if you want to know about How to operate the dis play touch the How to operate the display key To go to the next page touch the Next key To return to the...

Page 29: ...iginals between 40 and 52 g m2 11 and 14 lb the document feeder must be set to Thin Paper mode See page 139 Originals larger than A3 11 x 17 Originals smaller than A5 51 2 x 81 2 Paper with any king o...

Page 30: ...ent feeder SETTING A STACK OF ORIGINALS IN THE OPTIONAL DOCUMENT FEEDER ADF You can insert a stack of originals one sided or two sided of the same size into the document feeder These originals are ind...

Page 31: ...4 Adjust the guide to the original size 5 Set the originals face up into the document feeder until the Insert Original indicator goes off The last page should be on the bot tom The guide must touch th...

Page 32: ...r is lit before setting the originals 3 Confirm that no previous originals remain on the exposure glass 4 Adjust the guide to the original size 5 Set the original face up into the document feeder unti...

Page 33: ...iginal The original is auto matically fed and copied If you have set more than two origi nals the Auto Feed indicator is not lit after the last original is fed In this case press the Start key again a...

Page 34: ...H BOTH SIDES OF ORIGINALS AND COPIES Duplex Series Copies 61 Making Two sided Copies Duplex 61 Making One sided Copies Series Copies 68 COMBINING ORIGINALS INTO ONE COPY Combine 70 PRINTING ID NUMBERS...

Page 35: ...the user tools See pages 141 and 143 1 Set your original on the exposure glass or in the optional document feeder See pages 30 33 2 Enter the number of copies re quired using the Number keys To change...

Page 36: ...press the Start key during the warm up period the copier will start copying automatically when the copier reaches the ready condition To cancel Auto Start press the Clear Stop key Adjusting Copy Imag...

Page 37: ...Background key is dark If not touch it Selecting The Copy Paper Size Manual Paper Select You can select the desired copy pa per size manually by touching one of the tray keys in the display Regarding...

Page 38: ...erent direction from the copy paper in the paper tray and the required paper size is A4 81 2 x 11 or smaller the copier auto matically rotates the original image by 90o to match the copy paper directi...

Page 39: ...x 10 LT type 8 x 10 A or B type A type A3 A4 A5 B type B4 B5 B6 LT type 11 x 17 81 2 x 11 F F4 size selected by user tools See page 138 Inch version Original Possible selected paper sizes for copy LT...

Page 40: ...ifferent direction from the selected copy paper the copier cannot rotate the image by 90o Make sure to set the original in the same direction as the copy paper Regarding functions that cannot be used...

Page 41: ...ument feeder See pages 30 33 3 Select the copy size you require Metric version Touch the A4 paper tray key Inch version Touch the 81 2 x 11 paper tray key 4 Press the Start key The original image is r...

Page 42: ...tter Select Letter mode when your originals contain only letters no picture Letter Photo Select Letter Photo when your originals contain photographs or pictures with letters Photo Delicate tones of ph...

Page 43: ...hat can be stored is as follows A4 81 2 x 11 Approximately 100 pages images You can change the settings of these modes with the user tools See page 151 Regarding functions that cannot be used together...

Page 44: ...Start key The copier starts memorizing the original image Start with the last page to be copied When the Start key turns green or the Auto Feed indicator on the document feeder is lit set the next or...

Page 45: ...the machine will re start scanning automatically You should re order your copies after all copy jobs are finished Memory Full Auto Scan Restart No The machine will wait for you to press the Start key...

Page 46: ...structions on the display You cannot delete the stored images by press the Clear Stop key if copies have been stacked in the unit for two sided copies duplex unit when mak ing two sided copies In this...

Page 47: ...he next copy See page 37 Two paper trays that are identical in size and different in direction are required You can change this setting with the user tools See page 151 The paper sizes that can be use...

Page 48: ...e Start key turns green or the Auto Feed indicator on the document feeder is lit set the next original If you have set the original on the exposure glass in step press the Start key Set the original i...

Page 49: ...sizes you should input vertical and horizontal dimensions Metric version Inch version A3 B4 A4 B5 A5 B6 A6 11 x 17 11 x 17 81 2 x 11 51 2 x 81 2 8 x 13 Regarding the functions that cannot be used tog...

Page 50: ...e beeper sounds The beeper can be canceled with the user tools See page 137 Press the Start key 3 When copying onto non standard size paper Acceptable non standard paper sizes Metric version Vertical...

Page 51: ...the paper using the Number keys Then touch the key in the display or press the Enter key Touch the Exit key to close this menu The Bypass Tray key changes to Special Paper Size key Adjust the guides...

Page 52: ...use this function with the op tional document feeder you might have to reset originals not to be copied after interrupt copying is finished Fol low the instructions on the display Regarding the funct...

Page 53: ...ry 2 Press the Program key If you want to cancel storing touch the Cancel key 3 Touch the Store key 4 Touch one of the 1 10 keys that you want to store your set tings in A key with has already setting...

Page 54: ...ys You can change this default setting with the user tools See pages 141 and 143 Reducing And Enlarging Using Preset Ratios Preset R E You can select one of 12 preset ratios 5 enlargement ratios 7 red...

Page 55: ...from 25 to 400 in 1 steps There are two ways to change ratios 1 Touch the Reduce Enlarge key 2 Touch the Zoom key 3 When using the and keys Enter the desired reproduction ratios touching the and keys...

Page 56: ...larged at different reproduction ratios horizon tally and vertically There are two ways to change ratios 1 Touch the Reduce Enlarge key 2 Touch the D Mag key 3 When using number keys Touch the Horizon...

Page 57: ...o A Copy Of A Different Size Fitting the image in the copy area as it is Size Magnification The suitable reproduction ratio will be automatically selected when you enter the lengths of the original an...

Page 58: ...he copy size by the Num ber keys Touch the key or press the Enter key Stretching and squeezing the image into the copy area Directional Size Magnification Copies can be reduced or enlarged to match in...

Page 59: ...hange the entered size touch the C key or press the Clear Stop key Then enter the new size 4 Touch the key or press the Enter key 5 Repeat steps 3 and 4 to enter the other sizes following the dis play...

Page 60: ...the back side You can change this setting with the user tools See pages 142 and 143 You can change a setting of this mode with the user tools See page 150 Single and Multi modes do not support differ...

Page 61: ...aking two sided copies it is recommended to set Duplex and Page Numbering modes as described below to avoid page numbers and staple position overlap on the reverse side of copies 1 At first set the Du...

Page 62: ...n change this default setting with the user tools See page 143 Notes for 2 Sided 2 Sided Single and Multi With the default setting Duplex mode from an even number of one sided origi nals to two sided...

Page 63: ...to Bottom Referring to the illustration below select one of them Stapling position Original setting Copies on the exposure glass in the document feeder Top to Top direction direction direction Top to...

Page 64: ...key Set your originals see pages 30 33 and make your copies If you set originals in the optional document feeder the last page should be on the bottom If you set one original in the optional document...

Page 65: ...last page to be copied Follow the procedures on pages 32 33 If you place originals on the exposure glass start with the last page to be copied After setting your original press the Enter or Start key...

Page 66: ...you set originals in the optional document feeder the last page should be on the bottom If you place your original on the exposure glass or set one original at a time in the document feeder start wit...

Page 67: ...ogether with this function see page 105 With the default setting Duplex mode from an even number of one sided origi nals to two sided copies in Top to Top orientation and Margin Adjustment 0 2 width r...

Page 68: ...he table on page 67 5 Set your originals see pages 30 33 and make your copies If you set originals in the optional document feeder the last page should be on the bottom See the second illustration on...

Page 69: ...E COPY Combine na 6 2 From 2 One sided Originals To 1 One sided Copy From 4 One sided Originals From 8 One sided Originals To 1 Two sided Copy From 16 One sided Originals To Booklet COMBINING ORIGINAL...

Page 70: ...in the illustration You can change this setting with the user tools See page 150 If you add a blank sheet to the bot tom of the stack of your originals the copies can be made as shown in the illustrat...

Page 71: ...directions together Separation line between originals can be printed using the user tools See page 144 Regarding functions that cannot be used together with this function see page 105 With the default...

Page 72: ...set the original on the exposure glass in step press the Start key Repeat step until all originals are scanned If the number of scanned originals is the required number in the selected mode copying wi...

Page 73: ...s On The Background Of Your Copies Background Numbering You can number your copies by print ing a number on the background of the copy This function can help you to keep track of confidential docu men...

Page 74: ...function cannot be used as a default setting If you want to use this function contact your sales or service representative One of the following seven messages can be stamped on copies URGENT COPY PRI...

Page 75: ...al na 6 2 Original Setting direction direction COPY COPY COPY COPY COPY COPY COPY COPY COPY COPY COPY COPY COPY COPY COPY COPY COPY COPY Original Setting direction direction COPY COPY COPY COPY COPY C...

Page 76: ...y touching a key 4 If changing the stamping position and direction Touch the Change key Select the desired position and direction by touching keys For position and direction refer to the previous page...

Page 77: ...2 two sided originals the number of pages is 4 When you want to change the en tered number touch the C key or press the Clear Stop key Then enter the new number Touch the Exit key 5 Touch the Exit key...

Page 78: ...ing the user tools See page 148 Regarding original setting stamping position and stamping direction see page 76 One message can be stamped at one time Regarding functions that cannot be used together...

Page 79: ...tamping on the front page only Touch the Front Page Only key Enter the number of your origi nals using the Number keys When you want to change the number entered touch the C key or press the Clear Sto...

Page 80: ...g direction selected takes priority Regarding copies in Date Stamping and Combine mode see page 71 The size and fonts of Date Stamping cannot be changed Regarding functions that cannot be used togethe...

Page 81: ...on the display Regard ing position and direction see previous page 4 Touch the Exit key 5 Set your originals see pages 30 33 and press the Start key Page Numbering You can print page numbers on your...

Page 82: ...bering P1 P2 or 1 5 2 5 together when making two sided copies page numbers and staple position might overlap To avoid this do the procedure described on page 62 The size and font of Page Numbering can...

Page 83: ...h the C key or press the Clear Stop key and then enter a new number Touch the Exit key Go to step 5 4 If you selected 1 5 2 5 in step 3 Confirm that the Total pages key is dark If not touch it En ter...

Page 84: ...Enter 40 for the Last page key and make your cop ies 5 When setting one original at a time Set an original on the exposure glass or in the optional document feeder see pages 30 or 32 Then press the St...

Page 85: ...y paper sizes with 100 ratio Metric version Original Copy paper A5 A4 B6 B5 Inch version Original Copy paper 51 2 x 81 2 81 2 x 11 It is impossible to turn lengthwise original images 90 on lengthwise...

Page 86: ...djust Image keys You can change this default setting with the user tools See pages 141 and 143 1 Confirm that the Auto Paper Se lect and Full Size keys are dark 2 Touch the Adjust Image key 3 Touch th...

Page 87: ...ndard size undesired ar eas might be erased If you select copy paper manually make sure to select the same direction as that of your original Regarding functions that cannot be used together with this...

Page 88: ...or right to make a binding margin The margin width default is as follows You can change this setting using the user tools See page 142 Metric version 5 mm Inch version 0 2 Margin for two sided copies...

Page 89: ...ment 0 2 width right margin for the back side are default settings If you want to change the Duplex mode setting touch the Duplex Series Copies key If you want to change the mar gin setting touch the...

Page 90: ...image 51 2 x 81 2 81 2 x 11 65 4 images 51 2 x 81 2 81 2 x 11 32 16 images 51 2 x 81 2 81 2 x 11 100 2 images 50 8 images 25 32 images 51 2 x 81 2 81 2 x 11 Separate lines between repeated images can...

Page 91: ...ou can change this default setting with the user tools See pages 141 and 143 1 Touch the Adjust Image key 2 Touch the Image Repeat key 3 Touch the Change Modes key 4 Select the copy paper size by touc...

Page 92: ...pies in Top to Top orientation and Margin Adjustment 0 2 width right margin for the back side are default settings If you want to change the modes touch the Duplex Series Copies and Adjust Image keys...

Page 93: ...be used together with this function see page 105 With the default setting Duplex mode from an even number of one sided origi nals to two sided copies in Top to Top orientation and Margin Adjustment 0...

Page 94: ...eder is lit set the next original If you have set the original on the exposure glass in step press the Start key Repeat step until your copying is finished To clear the template master or finish your...

Page 95: ...Notes for Sort mode You can make up to 999 copy sets at a time However when the number of copies exceeds the capacity of the shift tray remove copies from the copy tray Regarding the capacity of fini...

Page 96: ...52 g m2 Inch version Paper size Paper weight Maximum capacity Maximum Minimum Maximum Minimum 81 2 x 11 or smaller 1 500 sheets 81 2 x 14 or larger 1 000 sheets 11 x 17 51 2 x 81 2 42 lb 14 lb Regard...

Page 97: ...ass in step press the Start key Set the original in the same direction as step When the memory capacity reaches 0 the copier stops memorizing Press the Start key to finish copy jobs which are already...

Page 98: ...ges in memory are copied the machine will re start scanning automatically You should re order your copies after all copy jobs are finished Memory Full Auto Scan Restart No The machine will wait for yo...

Page 99: ...ts 81 2 x14 or larger from 2 to 30 sheets 81 2 x11 1 500 sheets 30 sets of 50 sheets 11 x17 1 000 sheets 11 x 17 81 2 x 11 21 lb 17 lb Post cards tracing paper OHP sheets and adhesive labels and paper...

Page 100: ...can be rotated is as follows Metric version A4 Inch version 81 2 x 11 The copy image cannot be rotated if you select 2 Staples If your original is A4 81 2 x 11 set originals and select the Top key to...

Page 101: ...Top or Bot tom keys as shown to get copies stapled at the left upper corner Stapling position Original setting Stapled copies Bottom If your original is portrait direction on the exposure glass in th...

Page 102: ...as your original Stapling position Original setting Copies on the exposure glass in the document feeder Top direction direction Bottom direction direction 2 Staples direction direction recommend when...

Page 103: ...original If you have set the original on the exposure glass in step 2 press the Start key Set the original at the same direction in step 2 4 Repeat step 3 until all originals are scanned 5 After all o...

Page 104: ...des can be used together means that the mode after you select will be the mode you re working in means that these modes cannot be used together A Setting originals B Finishing C Selecting copy paper D...

Page 105: ...ed one sided 20 Book one sided G 21 2 one sided 1 one sided 2 in 1 22 4 one sided 1 one sided 4 in 1 23 4 one sided 1 two sided 4 in 1 24 8 one sided 1 two sided 8 in 1 25 4 one sided booklet 4 in 1 2...

Page 106: ...28 29 30 31 32 33 34 35 36 37 38 39 40 41 42 43 44 45 46 47 48 A 1 2 3 B 4 5 6 7 8 C 9 10 11 12 D 13 14 E 15 16 17 18 F 19 20 G 21 22 23 24 25 26 H 27 I 28 29 J 30 31 32 33 34 35 36 K 37 38 39 L 40 4...

Page 107: ...d Paper 117 Notes For Paper 117 Loading Paper In The Paper Tray 118 Loading Paper In The Large Capacity Tray 119 ADDING TONER 120 ADDING STAPLES 121 CLEARING MISFEEDS 122 Check The Display 122 When Mi...

Page 108: ...d Follow the instructions on the display Paper runs out Load paper See page 117 f is displayed Add toner See page 120 i is displayed Add staples See page 121 Y is displayed Remove misfed paper See pag...

Page 109: ...the paper tray Paper size and weight must be within the specification for this copier Is folded wrinkled damp or curled paper in the paper tray Always use dry undamaged paper Is the paper properly set...

Page 110: ...light Damp or rough grain paper is used Use dry paper without rough grain Toner bottle is almost empty Add toner See page 120 The same copy area is dirty whenever making cop ies The platen cover expo...

Page 111: ...copies exceeds the capacity of the stapler Check the stapler capacity See page 100 Staples are wrongly posi tioned Originals are not set correctly Set originals correctly See pages 101 103 Adjust Imag...

Page 112: ...riginal is not set correctly Set originals correctly See page 76 Original image and Auto Stamping overlap on cop ies and original image can not be read You selected the solid density Change the densit...

Page 113: ...es in correct direction Set originals as follows Date Stamping does not ap pear on copies The original is not set correctly Set originals correctly See page 81 Duplex Problem Cause Action Order of cop...

Page 114: ...opy paper from your originals Copy paper must be the same size as your original Select the correct paper size Select the correct reproduction ratio before using Combine mode Your originals are not ide...

Page 115: ...as carbon or silver coating Thermal paper art paper Thin paper that has low stiffness Notes For Paper Load paper with the copy side down in the 500 sheet trays and with the copy side up in the large c...

Page 116: ...er In The Paper Tray 1 Pull out the paper tray until it stops 2 Load paper in the paper tray Do not stack paper above the limit mark inside the paper tray 3 Push the tray in until it stops na 7 LOADIN...

Page 117: ...key will blink while the bottom plate is moving down If the key is lit or blinking proceed to step 2 2 After the Down key stops blinking and lights open the cover 3 Load paper into the tray not more...

Page 118: ...dding toner do not turn off the main switch If you do your copy settings are cleared NOTE Before setting the new toner bottle shake it well at least 5 or 6 times NOTE Do not remove the toner cap of th...

Page 119: ...tridge If you do the staples fall into pieces 1 Open the front door of the fin isher 2 You can find a sticker with i at the top explaining how to add a staple cartridge inside the front door as shown...

Page 120: ...aring misfeeds make sure that all units and levers are returned to their original positions and all covers are closed NOTE Do not touch originals in the optional document feeder when a pa per misfeed...

Page 121: ...ow to re move misfed paper inside the front cover as shown in the illus tration 3 Remove misfed paper following the instructions on the sticker When Misfeed Occurs At The Large Capacity Tray 1 Swing o...

Page 122: ...Remove the misfed original refer ring to the sticker When Misfeeds Occur In R Section 1 Open the front door of the op tional finisher 2 You can find a sticker with Y at the top explaining how to re m...

Page 123: ...the instructions on the sticker inside the finisher s cover After loading a new staple cartridge staples might not be ejected the first few times you try to use the stapler 1 Open the front door of th...

Page 124: ...he 1st Tray 128 Changing The Paper Size In The Optional Tray Unit Trays 2 3 and 4 133 USER TOOLS 134 User Tools Menu 134 How To Change The Basic Settings And Copy Features 136 Basic Settings 137 Copy...

Page 125: ...ect paper of the following sizes Metric version Inch version A3 B4 A4 B5 A5 81 2 x 11 11 x 17 81 2 x 14 81 2 x 11 51 2 x 81 2 A3 A4 A5 1 Pull the paper tray out until it stops 2 Remove the copy paper...

Page 126: ...stack paper over the limit mark 6 While pressing the release lever on the front guide slide the front and rear guides to the paper size you want to use 7 Select the paper size by adjusting the paper s...

Page 127: ...ey 4 Touch the Basic Settings key 5 Touch the Next key three times to reach the paper size setting menu 6 In the Tray 1 F F4 Paper Size Setting menu the present size setting is displayed Touch the Cha...

Page 128: ...x 17 81 2 x 14 51 2 x 81 2 8 x 10 11 x 15 10 x 14 8 x 101 2 8 x 10 B4 1 Follow steps 1 to 6 on pages 128 and 129 2 Select by adjusting the paper size selector on the back side of the tray 3 Press the...

Page 129: ...size setting is displayed Touch the Change key Select the new paper size by touching a key Then touch the Exit key asterisk is displayed on the key for paper sizes that cannot be detected in some mode...

Page 130: ...01 2 8 x 10 A3 B4 A4 8 x 13 81 2 x 13 81 4 x 13 1 Follow steps 1 to 6 on pages 128 and 129 2 Press the User Tools key 3 Touch the Basic Settings key 4 Touch the Next key three times to reach the paper...

Page 131: ...Type Display for each tray page 138 Tray 1 Paper Size Setting page 138 Tray 1 F F4 Paper Size Setting Paper Size Setting for tray 2 3 and 4 option Paper Tray Priority page 139 Original F F4 Size Sett...

Page 132: ...page 146 Stamp Layout Size Density Position page 147 User Stamp page 148 User Stamp Layout Size Density Position Number of Stamps Per Page Date Position Format Date Format Orientation Position page 14...

Page 133: ...settings following the instruction on the display Next Use to go to the next page Prev Use to go back to the previous page Exit Touch this key after entering the new data In the User Tools Main Menu t...

Page 134: ...e depends on these If necessary remember to adjust the clock for daylight saving time summer time or return it to the standard time Next Auto Reset The copier returns to its initial condition automati...

Page 135: ...paper size you can set the paper size for tray 1 Default Metric version 11 x 17 Inch version 10 x 14 Regarding procedures and paper sizes that can be selected see page 131 Make sure to select by adju...

Page 136: ...Reduce Enlarge modes as F size 81 2 x 13 81 4 x 13 or 8 x 13 Default 81 2 x 13 ADF Thin Paper Mode Use when changing the type of originals to be fed into the optional document feeder Select this setti...

Page 137: ...ode or delete all user codes Up to 20 user codes 6 digits can be registered When changing user codes the number of copies made under the old code is added to that made under the new user code When del...

Page 138: ...celed original type setting keys are displayed only when Letter mode is canceled and the manual image density keys are shown only when the Auto Image Density is canceled You can cancel this setting an...

Page 139: ...No see page 137 this function does not work Prev Adjust Image MENU DESCRIPTION Margin Adjust Front Margin Adjust Back The default setting of the margin widths on the front and back page in the Margin...

Page 140: ...a default setting the image on the back side of copies is shifted automatically to create the binding margin when making two sided copies from one sided originals This margin is decided in the Margin...

Page 141: ...Line As a default setting no separation line is printed on copies in the Image Repeat and Combine modes You can cancel this setting and print a solid separation line Default No Prev Stamp MENU DESCRIP...

Page 142: ...e 0 48 from the right edge 1 2 Format Position The printing position of Page Numbering 1 2 can be shifted up down from the bottom edge and left right from the center of paper as follows Metric version...

Page 143: ...sity and position of each message of Auto Stamping UR GENT COPY PRIORITY PRELIMINARY CONFIDENTIAL For Your Information and For Internal Use Only If your machine is the metric version the Auto Stamping...

Page 144: ...tric version in 4 mm steps Inch version in 0 16 steps Next na 8 Top left Top Center Top right Center left Center Center right Bottom left Bottom Center Bottom right Metric version Inch version from th...

Page 145: ...mp Layout on pages 146 and 147 Size See page 146 Density See page 146 Position See page 147 Number of Stamps Per Page As a default setting one user stamp is printed on a copy You can cancel this setti...

Page 146: ...Left Default Metric version 8 mm from the top edge 20 mm from the left edge Inch version 0 32 from the top edge 0 80 from the left edge Bottom Right Default Metric version 8 mm from the bottom edge 12...

Page 147: ...er can exit automatically with the back side blank under the following conditions You can cancel this setting When you select Even although the number of originals are odd When you select Odd although...

Page 148: ...Full Auto Scan Restart When memory runs out during copying the machine can be programmed to behave in two ways with the user tools Yes After all images in memory are copied the machine will re start s...

Page 149: ...overwrite it follow the instructions on the display after touching the key with 5 Place your message on the expo sure glass face down as shown in the illustration Then touch the Scan key The area that...

Page 150: ...machine is the metric version Auto Stamping cannot be used as a default setting You can cancel this setting and use this function A3 11 x 17 Double Count When you use A3 11 x 17 paper your service re...

Page 151: ...156 Copier 156 Document Feeder Option 156 DO S AND DON TS 157 Copier 157 Document Feeder Option 158 Finisher Option 158 REMARKS 159 Copier 159 WHERE TO PUT YOUR COPIER 160 Copier Environment 160 Powe...

Page 152: ...intain high copy quality clean the following parts and units regularly with a damp cloth and wipe them with a dry cloth Copier Exposure glass Platen cover Document Feeder Option Feed in unit Belt na 9...

Page 153: ...do your copy settings are cleared Before setting the new toner shake it well at least 5 or 6 times Do not remove the inner cap of the new toner bottle When removing misfed paper Since some parts of t...

Page 154: ...t the originals Do not lift the document feeder until the last original has been completely fed out Do not press down or hold originals after inserting them Do not press any parts of the document feed...

Page 155: ...the copy side down in the 500 sheet trays and with the copy side up in the large capacity tray If copies are curled try turning the copy paper over in the tray If there is no improvement change the co...

Page 156: ...Dusty areas Areas with corrosive gasses Places higher than 2 000 m above sea level Places where the copier might be subjected to frequent strong vibration Locations directly exposed to cool air from a...

Page 157: ...e as shown Copier Copier with the optional finisher na 9 More than 50 cm or 19 7 More than 39 cm or 15 4 More than 70 cm or 27 6 More than 10 cm or 4 0 More than 72 cm or 28 4 More than 70 cm or 27 6...

Page 158: ...per should be fanned to get air between the sheets and any curls should be corrected before loading Post cards should be fed from the bypass tray It is recommended to feed one post card at a time Corr...

Page 159: ...r low temperature and low humidity conditions store paper in a vinyl bag Do not store paper where it will be exposed to heat Store on a flat surface Use older stock first Do not lay heavy objects on p...

Page 160: ...SPECIFICATIONS na 10 COPIER 166 DOCUMENT FEEDER OPTION 169 FINISHER OPTION 170 1000 SHEET TRAY UNIT OPTION 171 1500 SHEET TRAY UNIT OPTION 171 165...

Page 161: ...tray 60 157 g m2 16 42 lb large capacity tray 60 128 g m2 16 34 lb when making two sided copies 64 105 g m2 17 28 lb Copy paper capacity 1st paper tray 500 sheets or less than 53 mm 2 08 bypass tray...

Page 162: ...ess than 1 20 kW less than 1 20 kW Maximum less than 1 44 kW less than 1 44 kW Full system copier with document feeder finisher and paper tray unit Noise emission Sound pressure level The measurements...

Page 163: ...mm 61 1 655 mm 25 8 1 110 mm 43 8 Weight Copier with platen cover copy tray and 1500 sheet paper tray unit 137 5 kg 303 2 lb Copier with document feeder finisher and 1500 sheet paper tray unit 178 5 k...

Page 164: ...0 50 50 50 50 30 25 A3 lengthwise A4 lengthwise sideways A5 lengthwise sideways B4 lengthwise B5 lengthwise sideways B6 lengthwise sideways ARDF 2 sided originals ADF 1 sided originals SADF Single cop...

Page 165: ...e mode See page 100 Staple position Staple replenishment Cartridge exchange 5 000 pieces cartridge Power source DC 24V from copier Power consumption 48 W Weight 35 kg 77 2 lb Dimensions W x D x H 671...

Page 166: ...5 x 24 9 x 15 4 Specifications are subject to change without notice 1500 SHEET TRAY UNIT OPTION Paper size See page 133 Paper weight 52 105 g m2 14 lb 28 lb Paper capacity 1 500 sheets 500 sheets 80 g...

Page 167: ...138 Auto Reset 137 Auto Response Human Sensor 137 Auto Tray Switching 139 Copy count display 137 Low Power Timer 137 Operation panel beeper 137 Original F4 Size Setting 139 Paper Size SettingTray 2 3...

Page 168: ...epeat Combine Separation Line 144 Input Output 150 Auto Sort Mode 151 Combine Remaining Copy Exit 150 Duplex Remaining Copy Exit 150 Memory Full Auto Scan Restart 151 Mixed Original Sizes 151 Rotate S...

Page 169: ...onal Size Magnification 59 Preset R E 55 Size Magnification 58 Zoom 56 REMARKS 159 Rotate Sort 44 Rotate Sort Auto Paper Continue 151 Rotate Stack 48 S SADF 32 34 SADF Auto Reset Time 151 SAFETY INFOR...

Page 170: ...eproduction Ratio 1 2 142 User Stamp 148 User Stamp Layout 148 User Stamp registering 152 User Stamping 79 User Tools 134 152 Basic Settings 137 Copy Features 141 User Tools key 6 W WARNING i WHERE TO...

Reviews: