background image

2000-Sheet 

Large-Capacity 

Output Stacker

QMS 4060 Print System Getting Started

C-18

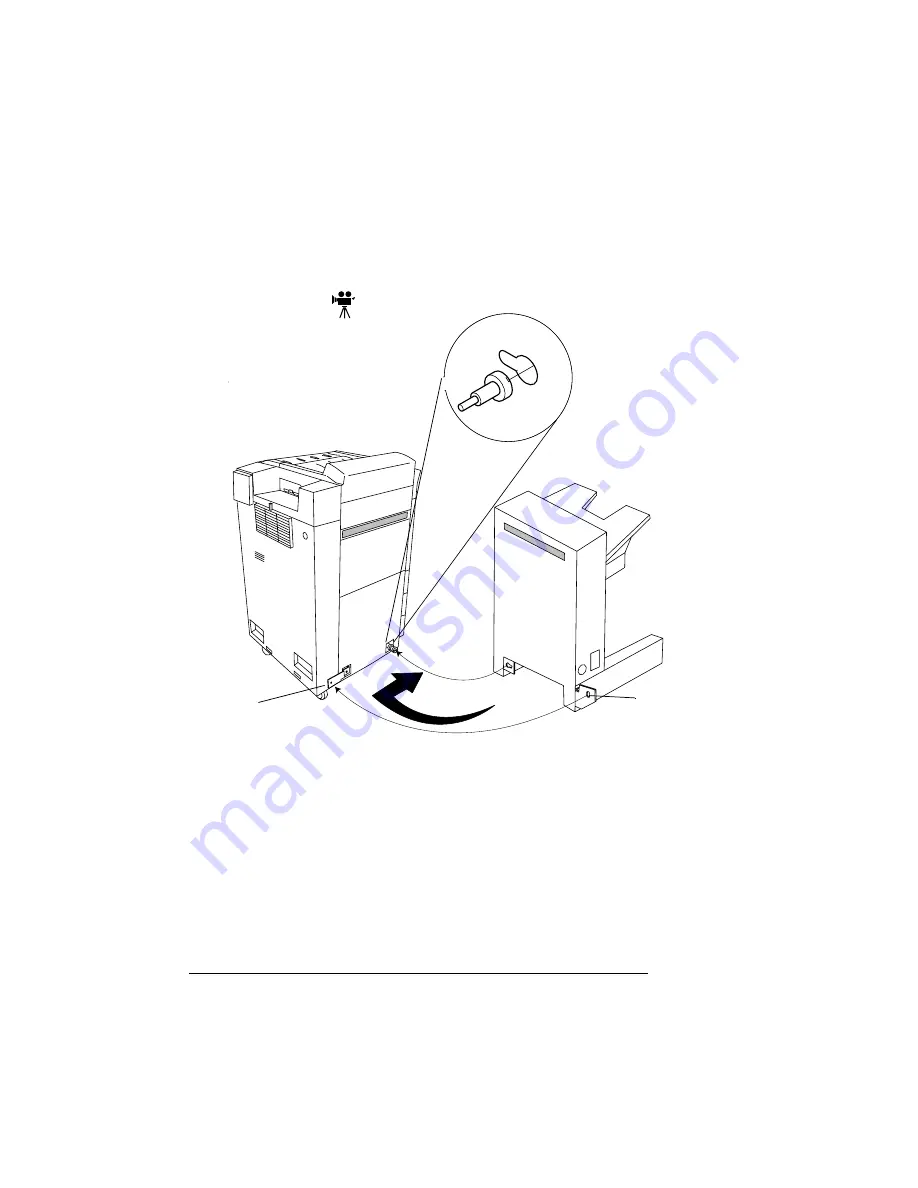
15 Push the output stacker against the printer and fit the con-

nect pin into the larger circular section of the LCOS position-
ing hole.

16 Push the LCOS toward to the front of the printer to lock the 

pins into the positioning holes.

17 Fasten bracket A to bracket B on the printer with the M4x6 

hex type screw included with the LCOS contents.

Bracket B

Bracket A

Summary of Contents for 4060

Page 1: ...QMS 4060 Print System Getting Started 1800462 001C...

Page 2: ...alTalk Macintosh TrueType Apple Computer Inc Banyan VINES Banyan Centronics Centronics Data Computer Corporation CompuServe H R Block DEC DECnet LN03 VMS Digital Equipment Corporation PhoneNET Farallo...

Page 3: ...umentation 1 8 About This Manual 1 8 Typographic Conventions 1 10 Printer Features 1 11 QMS Crown Technology 1 11 Media Flexibility 1 14 PostScript Level 2 Compatibility 1 14 Multiple Resolutions 1 15...

Page 4: ...od Location 2 2 The Printer Must Be Placed 2 2 Operating Area 2 3 Printer Measurements 2 4 Power Requirements 2 5 Checking Shipment Contents 2 6 Registering the Printer 2 7 Unpacking the Printer 2 7 R...

Page 5: ...nnection 3 3 What You Need for a Parallel Interface 3 3 Making the Connection 3 4 PC Printing Software 3 5 Installing a PostScript Printer Driver 3 5 Notes on Installing Printer Description Files 3 6...

Page 6: ...ing Software 5 3 Installing Macintosh Utilities 5 3 Installing Macintosh Printer Drivers 5 3 Installing LaserWriter 8 x and the QMS 4060 4 x PPD 5 4 Macintosh Printer Description Files for Quark and A...

Page 7: ...Menu B 4 Administration Menu B 5 C Installing Options Large Capacity Input Feeder C 2 What s in the Kit C 2 Installation Procedure C 2 2000 Sheet Large Capacity Output Stacker C 10 What s in the Kit C...

Page 8: ...rted vi Using the 3000 Sheet Large Capacity Output Stacker C 45 Adjusting the Paper Guides C 47 Custom Tray C 50 Custom Tray Installation C 50 Standard Paper Sizes C 53 Security Key C 54 What s in the...

Page 9: ...1 Introduction In This Chapter n About the Printer on page 1 2 n About the Documentation on page 1 3 n Printer Features on page 1 11...

Page 10: ...rown operating system n High performance processing n Innovative network features n Flexible emulations support n Toner conservation and energy efficiency n An assortment of printer fonts The printer...

Page 11: ...der Adobe Acrobat PDF formatted manuals give you more flexibility and convenience than do hardcopy manuals when you have to access information Here are some of the advantages PDF formatted manuals pro...

Page 12: ...he navigation features built into Acrobat and your manuals n You may view the document in three different styles page only with bookmarks or with thumbnails Try each to see which you like best Viewing...

Page 13: ...at go qmsprint Refer to appendix A QMS Customer Support for sales and support locations and tele phone numbers Standard Product Documentation You received the following documentation with your produc...

Page 14: ...this manual 4060 Documentation CD ROM QMS 4060 Print System Options This manual guides you through the operation and installation of all options available for your printer It includes information opti...

Page 15: ...nced network users and system administrators need this information Note This manual is provided in encapsulated PostScript EPS format Refer to the README file for information on printing a hard copy o...

Page 16: ...rence Manuals Other manuals that contain PostScript information are the PostScript Language Reference Manual Adobe Systems Inc Reading MA Addison Wesley 1990 ISBN 0201 18127 4 and other PostScript Lan...

Page 17: ...cintosh Explains how to connect the printer to an Macintosh using the optional LocalTalk interface 6 Using the Control Panel Introduces the parts of the printer control panel A QMS Customer Support Pr...

Page 18: ...lten Sie sich exakt an die im Handbuch beschriebene Vorgenhensweise da sonst Verletzungsgefahr bestehen k nnte Mixed Case Courier Text you type and messages and information displayed on the screen Mix...

Page 19: ...ives compiles processes and prints multiple docu ments simultaneously instead of sequentially true multitasking The printer has a variety of resources that it uses to print the page Mem ory emulations...

Page 20: ...one port actively receives data at a time Your printer is unique because SIO allows all of its interface ports Ethernet parallel Centronics and bidirectional IEEE 1284 the optional serial interface a...

Page 21: ...Crown printers convert data received by the input buffers into interme diate compressed blocks until the data is needed for printing These compressed blocks of data are designed to be processed rapidl...

Page 22: ...and B4 JIS in both portrait and landscape orientations from standard trays The optional custom paper tray supports print media sizes Statement B4 ISO and B5 ISO as well as all standard sizes supporte...

Page 23: ...ion for most everyday office needs and 600x600 dpi resolution for PostScript and PCL print jobs that require finer detail such as good camera ready copy or for CAD drawings that demand tighter angles...

Page 24: ...optional large capacity input feeder increases the media capacity to 4 500 sheets Advanced Document Handling Capabilities Your printer offers automatic collation of a complete document high volume dup...

Page 25: ...ish French German or Spanish See chapter 6 Control Panel in this manual for complete information on using the control panel Four Resident Emulations Your printer supports printing in HP PCL 5e HP GL L...

Page 26: ...r has 16 resident PCL 5e type face families in 25 symbol sets each 51 resident scalable PCL 5e fonts including Intellifonts many in up to 32 symbol sets and 40 HP GL fonts See chapter 3 Professional P...

Page 27: ...n be uploaded to any host by copying via the FTP get command if your host supports this com mand This information is useful for billing report generation and site resource planning For further informa...

Page 28: ...nd click tool that allows you to easily configure QMS printers and perform network operations on printers connected to Ethernet or Token Ring networks Refer to the CrownNet manuals included on the Sof...

Page 29: ...fers many options to expand its capa bilities Contact your QMS vendor for purchase information See appendix A QMS Customer Support for locations and telephone numbers BuzzBox Lite BuzzBox Lite is an o...

Page 30: ...s User Benefit Optional fonts increase the printer s functionality and allow you to create more distinctive documents Hard Disk Expandability The QMS 4060 Print System includes an internal IDE hard di...

Page 31: ...w you to run multiple protocols User Benefit Network interfaces provide flexibility and fast data transfer in complex network environments A DECnet TCP IP interface allows your printer to connect dire...

Page 32: ...legacy line printers to new laser print systems RAM Random Access Memory Your QMS 4060 Print System is configured with 32 MB of interleaved RAM It can support up to 128 MB of RAM with additional matc...

Page 33: ...to restrict access to printer configuration information to those users with valid passwords saving time and money and ensuring that default settings are not changed inappropriately What s Next Chapte...

Page 34: ......

Page 35: ...In This Chapter n Finding a Good Location n Checking Shipment Contents n Unpacking the Printer n Getting to Know Your Printer n Installing Consumables n Loading the Paper Trays n Printing a Start up...

Page 36: ...and heating sources extreme temperature changes direct sunlight excessive dust corrosive chemicals or vapors water pipes refrigerators any strong electromagnetic field such as that created by an air...

Page 37: ...650 mm 2140 mm 585 mm 850 mm 850 mm 2285 mm Printer Front mm 33 5 33 5 33 5 84 3 25 5 25 6 23 90 Top View Showing Printer Clearances Printer Front 84 3 2140 mm 850 mm 33 5 640 mm 25 5 650 mm 25 6 311...

Page 38: ...Finding a Good Location QMS 4060 Print System Getting Started 2 4 Printer Measurements Base Unit With LCIF and LCOS 585 mm 640 mm 1038 mm 40 5 25 2 23 1038 mm 640 mm 1414 mm 585 mm 40 5 25 2 55 66 23...

Page 39: ...cy is 50 60 Hz for 100 120 V systems and 50 Hz for 200 240 V systems M WARNING This product is equipped with a 3 wire grounding type plug a plug that has a third grounding pin This plug will only fit...

Page 40: ...heck the Starter Kit for con tents in kit n Warranty and registration card Note Interface cables aren t included in the shipment If you need cables contact your QMS vendor or a local computer store Ch...

Page 41: ...ter during shipment cardboard polystyrene tape and shipping spacers must be removed before you can use the printer Use the following procedures to completely unpack the printer To ensure that your pri...

Page 42: ...nter QMS 4060 Print System Getting Started 2 8 Removing the Box 1 Turn the plastic lock inserts counterclockwise and pull out as shown below Note You may need pliers to turn the knobs There are 16 pla...

Page 43: ...Setting Up Your Printer 2 Remove the box lid 3 Remove the starter kit from the top of the printer box 4 Lay the starter kit aside for now Note The starter kit contains supplies needed to set up the p...

Page 44: ...Unpacking the Printer QMS 4060 Print System Getting Started 2 10 5 Remove the cardboard sleeve from the pallet...

Page 45: ...Unpacking the Printer 2 11 Setting Up Your Printer 6 Remove the six foam shipping blocks and the plastic cover...

Page 46: ...packing the Printer QMS 4060 Print System Getting Started 2 12 Moving the Printer off of the Pallet 1 Locate wheels and leveling feet on the bottom of the printer 2 Remove the wrench taped to the pall...

Page 47: ...ng feet so the printer can roll freely on the pallet Caution Make sure all four leveling feet are fully raised before moving the printer M WARNING The printer is heavy so two people should roll it off...

Page 48: ...Unpacking the Printer QMS 4060 Print System Getting Started 2 14 4 Flip over the two small wood spacers and place them in the groove at the ramp end of the pallet...

Page 49: ...Unpacking the Printer 2 15 Setting Up Your Printer 5 Gently roll the printer to the edge of the pallet and down the ramp to the floor...

Page 50: ...arted 2 16 Removing Shipping Restraints 1 Remove all of the shipping tape from the outside of the printer 2 Open the front door of the printer by gently pulling the right side of the front door 3 Find...

Page 51: ...ing Up Your Printer 4 While holding the transfer assembly guide remove the sponge shipping block then lower the transfer assembly guide 5 Turn lever b1 to the right to the OPEN position Sponge Shippin...

Page 52: ...ipping block has a string and an orange label attached Grasp the orange label and the block and pull them toward you A black rubber shipping restraint attached to the string and the white foam shippin...

Page 53: ...Unpacking the Printer 2 19 Setting Up Your Printer 7 Grasp the orange tab on the magnetic roller protector and pull toward you Orange Tab and Magnetic Roller Protector Magnetic Roller Protector...

Page 54: ...get acquainted to the external components of your QMS 4060 Print System Display Ejection Unit On Off Switch Output Tray Upper Right Cover Lower Right Cover Paper Size Indicator Main Power Switch Pape...

Page 55: ...Getting to Know Your Printer 2 21 Setting Up Your Printer LCOS Connection Ozone Filter Interface Panel LCIF Connector AC Connector...

Page 56: ...r n Toner n The ozone filter Caution When installing consumables for the first time you must follow these procedures in correct order Note After installing consumables for the first time except for pa...

Page 57: ...ged in cardboard boxes for shipment You do not have to unpack these components until you re ready to install them LGR LTR LGL A3 A4 A5 EXEC B4 B5 Cleaning Cloths Paper Size Cards Toner Developer Fuser...

Page 58: ...er 1 Find the fuser box in the starter kit remove the box from the starter kit and unpack the fuser from the box 2 Remove the fuser from its packaging 3 Open the front door of the printer 4 Turn lever...

Page 59: ...25 Setting Up Your Printer 5 Insert the fuser into the printer by aligning the fuser with the guides inside the printer 6 Gently push the fuser all the way to the back of the printer to make sure tha...

Page 60: ...nd tighten the thumbscrew by turning it clockwise to lock the fuser in place 8 If the fuser does not seat properly a Hold the fuser up against the printer using light pressure b Carefully rotate the d...

Page 61: ...ective bag until you are ready to install it Store the cartridge in an environment that is not subject to extreme heat or humidity salty air or corrosive gases such as aerosols 1 Remove the bag contai...

Page 62: ...ng the blue handle on top of the unit Note After removing the drum unit from its protective bag do not touch the OPC drum on the unit because it may deteriorate the drum and reduce print quality Also...

Page 63: ...les 2 29 Setting Up Your Printer 4 While holding the drum by the handle set it on a solid sur face and carefully remove the protective cover from the drum 5 Make sure lever b1 is turned to the right t...

Page 64: ...ng Consumables QMS 4060 Print System Getting Started 2 30 6 Use the drum handles on the top and front to insert the drum unit along the guide rails and gently push it all the way in to make sure it is...

Page 65: ...Installing Consumables 2 31 Setting Up Your Printer 7 Gently push on the drum unit and turn the thumbscrew clockwise to lock the drum unit in place...

Page 66: ...d remove it from its shipping box and cover 2 Make sure lever b1 is turned to the right 3 Insert the transfer assembly into the transfer assembly guide a Locate the alignment pin on the end of the tra...

Page 67: ...ur Printer c Slide the transfer assembly all the way into the transfer assembly guide until it clicks into place 4 Lift the transfer assembly guide and lock it back into place 5 Turn lever b1 to the l...

Page 68: ...System Getting Started 2 34 6 Place the cleaning brush from the starter kit in the front door cleaning brush holder You will use this to clean the transfer assembly when doing main tenance 7 Close th...

Page 69: ...Installing Consumables 2 35 Setting Up Your Printer Installing the Ozone Filter 1 Remove the ozone filter from the starter kit and take it out of its packaging Ozone Filter...

Page 70: ...ozone filter holder on the rear of the printer Caution Failure to install the ozone filter could result in poor print quality and possible damage to internal printer components Removing the Paper Tra...

Page 71: ...ently pull out the cardboard and foam shipping blocks from the center of the tray 3 Close the tray 4 Repeat these steps on the other two trays 5 Place some letter size paper in one of the trays Note T...

Page 72: ...r QMS 4060 is keyed to operate only with this printer Other power cords will not fit this printer Caution Make sure that the printer power switch is turned off 1 Plug the power cord into the connector...

Page 73: ...the bottom right side The stand by switch is located on the front panel Note Under normal circumstances you will use the stand by switch to turn the printer on and off The main power switch can be use...

Page 74: ...e to power on the printer The printer needs this sequence to properly prepare the developer and toner hoppers Failure to power on the printer could result in service problems with your QMS 4060 Print...

Page 75: ...ssage window shows 6 Continue with the next procedure Removing the Plastic Developer Cover 1 Open the front cover of the printer 2 Turn lever b1 to the right to the OPEN position 3 Open the upper righ...

Page 76: ...QMS 4060 Print System Getting Started 2 42 4 Slowly and firmly lift up then pull down and out at an angle to remove the plastic protective cover 5 Turn lever b1 left to the SET position 6 Close the fr...

Page 77: ...er 1 Remove the toner bottle from the starter kit and remove it from its packaging Note The life of the initial toner bottle is less than 6000 pages 2 Shake the contents of the toner bottle to loosen...

Page 78: ...060 Print System Getting Started 2 44 3 Open the toner fill lid 4 Line up the guide pins on the bottle with the guide pin slots on the toner fill opening 5 Insert and turn the toner bottle clockwise 1...

Page 79: ...the toner bottle several times to make sure all of the toner has emptied Note It takes about 30 seconds for the bottle to empty 7 When the bottle is empty turn the toner bottle 180 1 2 turn counter c...

Page 80: ...disposing of it For optimal print quality we do not recommend recycling With toner recycling enabled you may experience lighter print with occasional small voids See chapter 2 Consumables in the Opera...

Page 81: ...Remove the developer bottle from the starter kit and remove it from its packaging 2 Check the message window After you opened the upper right cover earlier it should display Developer Bottle Offline...

Page 82: ...ing Started 2 48 3 Open the developer fill lid 4 Line up the guide pins on the bottle with the guide pin slots on the developer fill opening 5 Insert and turn the developer bottle clockwise 180 1 2 tu...

Page 83: ...sumables 2 49 Setting Up Your Printer 6 When the bottle is empty gently tap it several times to make sure all of the developer has loaded 7 Turn the developer bottle 180 counterclockwise and lift it u...

Page 84: ...s the Select button on the control panel The display message window shows 10 Remove the small cap from the side of the developer bottle 11 Turn the cap around and place it in the storage position on t...

Page 85: ...13 Close the upper right cover 14 Press Select on the control panel 15 Press the Offline button on the control panel to place the printer on line The printer will begin an automatic cycle to set the...

Page 86: ...d only when the tray is set to letter size Since the paper tray sends a paper size signal to the printer controller using a wrong size paper will cause jamming or the image positioned incorrectly on t...

Page 87: ...able to lift up and remove the paper size guide after unlocking it 4 Move the paper size guide to the appropriate slots to align it with the paper size marker You should be able to read the paper siz...

Page 88: ...tray for 11 x17 ledger the left paper guide is stored in a slot near the front section of the tray 7 Set up the tray paper size tabs on the rear of the paper tray Use the following chart for reference...

Page 89: ...n the starter kit containing the paper size cards 2 Break off the label that indicates the correct paper size for each tray 3 Pull out each tray and push out the paper size holder 4 Place the paper si...

Page 90: ...particles to fall into the printer components Note the arrows on the wrapper They show print side of the paper 2 Remove the top and bottom sheets The top and bottom sheets sometimes have residual glue...

Page 91: ...ld result in multiple sheet feeds and other paper handling problems 5 If the paper doesn t fit properly in the tray recheck your paper guides to make sure they are in the proper position 6 Check the d...

Page 92: ...attached n Paper input sources and sizes n Emulation and protocol information of all standard and optional interfaces Note When a font SIMM is installed the following appears in the Options section o...

Page 93: ...up Page in chapter 4 Printer Configuration of the Reference guide for complete information 2 Use CrownAdmin to access either remote console or config uration buttons or use the local console port to...

Page 94: ......

Page 95: ...3 Connecting to a PC In This Chapter n Connecting to a PC n Making a Parallel Connection n Making the Connection n PC Printing Software n Printing from the PC...

Page 96: ...et Network and in your PC docu mentation Note The Ethernet port is standard on your printer s controller board If you ve purchased an optional network interface for your printer see chapter 3 Optional...

Page 97: ...ppendix B in the Reference guide for cable pinout information How to Choose a Parallel Cable Your printer supports both Centronics parallel and IEEE 1284 bidirec tional parallel communication The type...

Page 98: ...rews c Attach the 36 pin end of the cable to the printer s parallel port it s labeled PARALLEL d Close the clips 2 Turn on both the printer and the PC A start up page should print If it doesn t see th...

Page 99: ...indows we recommend that you install the QMS developed Windows driver which is on the disk called Windows Drivers shipped with the printer See Installing the QMS Level 2 Windows 3 1 Windows 95 Driver...

Page 100: ...y default This feature decreases the time the file stays out on the network because the data is compressed at the host transferred to the printer and then decompressed However for users who are not on...

Page 101: ...it 3 Go to Output Resolution and enter the resolution 300 dpi or 600 dpi Adobe Photoshop For best output quality and accurate screening install the QMS devel oped Windows driver as described in Insta...

Page 102: ...sn t PSCRIPT DRV CorelDRAW This application provides a feature to control whether a PostScript driver is actually treated as a PostScript driver or not In the COREL PRN INI file under the PSDRIVERS se...

Page 103: ...your PC 2 Copy the QuarkXPress PDF from its installation directory to the QuarkXPress directory on your PC 3 Restart QuarkXPress 4 Check the Page Setup menu to verify that your printer is in the list...

Page 104: ...4060 Print System Getting Started 3 10 What s Next Now that you ve connected your printer to a PC continue with chapter 6 Control Panel to learn about the printer s control panel keys indi cators and...

Page 105: ...hat s Included in CrownNet on page 4 3 n Setting up the CrownNet Interface on page 4 4 n Network Connection on page 4 4 n Software Installation on page 4 6 n Configuring the CrownNet Interface on page...

Page 106: ...ftware CrownAdmin CrownAdmin 2 CrownNet Manager and CrownNet Print Utility for Windows The Ethernet port also referred to as the QMS CrownNet network interface is a combination of hardware and host so...

Page 107: ...Printer Accounting CrownNet Manager for OS 2 CrownNet Print Utility for Windows QMS UNIX Host Software Windows NT Print Monitor Windows 95 Print Monitor n QMS Software Utilities CD ROM with the follo...

Page 108: ...g up the CrownNet interface using EtherTalk Microsoft Windows Network NetWare OS 2 LAN Man ager LAN Server and TCP IP are included in the CrownNet Setup Guide on the software utilities CD ROM These in...

Page 109: ...ection process 1 Turn off the printer and unplug the power cord 2 If the BNC T connector is already installed go to step 3 Otherwise attach one section of thin wire Ethernet cable to one end of the BN...

Page 110: ...he other end of the cable to the 10BaseT concen trator 4 Plug in the printer and turn it on 5 Go to Software Installation on page 4 6 Software Installation Complete installation instructions for AIX H...

Page 111: ...s Network NetWare OS 2 LAN Man ager LAN Server and TCP IP are included in the QMS CrownNet Setup Guide on the QMS Software Utilities CD ROM Configuring the Network Complete instructions for configurin...

Page 112: ...ty n QMS CrownNet System Administrator s Guide Provides detailed configuration and utility information n QMS Crown Remote Console User s Guide Explains how to use Remote Console to control printing fr...

Page 113: ...5 Connecting to a Macintosh In This Chapter n Connecting to a Macintosh n Macintosh Printing Software...

Page 114: ...e option of using one optional interface to connect your printer to a sec ond Ethernet network a Token Ring network a single Macin tosh or a LocalTalk network If you ve purchased an optional interface...

Page 115: ...he Macintosh Utilities included on the QMS Software Utilities CD ROM we shipped with your printer is a utility program for controlling the printer from the Macintosh For example you can turn off the s...

Page 116: ...your printer so you can take advantage of special features 1 If you haven t already follow the instructions given above in Installing the Macintosh Printer Utilities 2 Open the PSExec 3 xx Folder the...

Page 117: ...Print dialog box Macintosh Printer Description Files for Quark and Adobe Applications If you use any of these applications install the appropriate printer description file PPD PDX and or PDF as descr...

Page 118: ...lder in the Sys tem Folder n If you use QuarkXPress install the QMS 4060 PDF in the QuarkXPress folder in the PDF folder To select the PDF go to Quark s Page Setup dialog box Under Printer Type select...

Page 119: ...6 Control Panel In This Chapter n Control Panel Functions n Message Window n Control Panel Keys...

Page 120: ...ontrol The LCD display contains graphical and textual information on printer sta tus and control button functions The control buttons change function as you take the printer off line or when you acces...

Page 121: ...the five control buttons 4 The Disk symbol turns on whenever the printer is accessing the internal hard disk Otherwise this symbol will not appear 5 The Data symbol flashes on and off periodically whe...

Page 122: ...you re not familiar with using the configuration menu refer to chap ter 4 Printer Configuration of the Reference guide for complete information Menu Administration Miscellaneous Keypad Language Choic...

Page 123: ...When the printer goes off line the communication ports are closed so no new data is accepted The printer continues printing until it has finished all jobs in process Although jobs continue to compile...

Page 124: ...revious and Next to allow you to select a different tray Use the Copy button to print a copy via CrownCopy if that option is installed If CrownCopy is installed this button gives you access to the cop...

Page 125: ...with the above status are canceled or after the current job is ended dependent on your selection the printer resumes printing other jobs that are in the queue See chapter 5 Advanced Printing Features...

Page 126: ...The Menu button gives you access to the configuration menu First press the Online button to take the printer off line and then press the Menu button to access the configuration menu When you re chang...

Page 127: ...the Previous button to return to the previous selection or option for the current menu When changing character information use this button to return to the previous choice for the current input charac...

Page 128: ......

Page 129: ...A QMS Customer Support In This Appendix n Sources of Support on page A 2 n QMS World wide Offices on page A 5...

Page 130: ...ion manufacturer is the best source of help Q FAX Q FAX a QMS information retrieval service provides application notes technical support notes on common printing problems and information about printer...

Page 131: ...MS If you have access to the World Wide Web you can view the QMS home page at http www qms com The QMS ftp resource is ftp qms com QMS Customer Response Center CRC You can contact the QMS Customer Res...

Page 132: ...sted on the status start up pages n Fax You can fax questions to the CRC at 334 633 3716 US Provide the same information as listed above and indicate whether you would like a faxed or a phoned reply n...

Page 133: ...1 334 633 3716 Internet http www qms com Latin America Fax 1 334 639 3347 National Service Service Information Installation and Maintenance Pricing 1 800 762 8894 On Site Service and Depot Repair Info...

Page 134: ...Business Tech Centre 52 2 Railway Parade 2141 Lidcombe NSW Australia 61 2 9901 3235 Fax 61 2 9901 3273 QMS Benelux Belgium Nether lands and all unlisted countries Planetenbaan 60 Corner Plaza 3606 AK...

Page 135: ...Arenav gen 41 6th floor 121 77 Johanneshov Sweden 46 8 600 01 30 Fax 46 8 600 01 33 QMS South Africa Saskay House Unit 24 Sunninghill Business Park Peltier Road Sunninghill Johannesburg Republic of So...

Page 136: ......

Page 137: ...B Configuration Menu In This Appendix n Menu Chart Conventions n Installation Menu n Operator Control Menu n Administration Menu...

Page 138: ...s the Installation Menu n Operator Control Menu Shows the operator printer configurations n Administration Menu Shows the printer administration configurations Menu Chart Conventions The following con...

Page 139: ...B 3 Configuration Menu Installation Menu Use Operator PWD Admin Password Use Admin PWD Idle Installation Operator Control Administration Operator Passwrd Off or On Off or On Enter password Enter passw...

Page 140: ...n or Tumble Off or On Upper Middle or Optional or Face Down Stack Letter Legal Executive 11x17 A3 A4 A5 Statement On Off or On Any Portrait or Upper Face Up Stack Mode Disk Space Resetaccounting or Fi...

Page 141: ...ion Communications Timeouts Parallel Network1 Network2 ESP Default Postscript PCL 5E HP GL LinePrinter Calibration Page Header Page Header Inputbin Trailer Page Trailer Inputbin Status Page Type Do St...

Page 142: ......

Page 143: ...This Appendix n Large Capacity Input Feeder on page C 2 n 2000 Sheet Large Capacity Output Stacker on page C 10 n 3000 Sheet Large Capacity Output Stacker on page C 22 n Custom Tray on page C 50 n Se...

Page 144: ...e and support stand guide Installation Procedure M WARNING The LCIF weighs approximately 44 lb 20 kg Do not attempt to lift or move it by yourself ACHTUNG Der LCIF wiegt ca 20 kg bitte versuchen Sie n...

Page 145: ...Feeder C 3 Installing Options f Remove the sheet guide support stand guide and support stand from the box g Save the packing material for possible repacking of the LCIF Sheet Guide Support LCIF Suppo...

Page 146: ...rt stand the support stand guide and the sheet guide 3 Open the front door of the printer 4 Using a Phillips screwdriver remove the left side paper input cover by loosening the front screw and removin...

Page 147: ...Attach the sheet guide to the printer using the screws you loosened and removed in step 4 6 Install the support stand guide using the screws attached 7 Lift the support stand and place on top of the s...

Page 148: ...C 6 8 Attach the support stand to the support stand guide 9 Pull out the support stand slide rails until they lock in the out position 10 Set the LCIF on the pins of the slide rail 11 Secure the LCIF...

Page 149: ...ing chains are just touching the floor 14 Make sure the red alignment marks on the LCIF and the sheet guide line up If the alignment marks do not line up adjust the leveling feet on the support stand...

Page 150: ...int System Getting Started C 8 17 Connect the interface cable to the connector on the rear lower left side of the printer 18 Slide the LCIF into the sheet guide on the printer until it locks in place...

Page 151: ...n the LCIF open the LCIF door press the but ton on top of the LCIF load paper and close the door 22 Press the Tray button on the printer control panel to select the LCIF for paper feeding Use the Prev...

Page 152: ...LCOS n Interface Cable n Output Stacker Hardware Stacker Hardware Contents After unpacking check for the following LCOS hardware contents Make sure that all items are included in your shipment before...

Page 153: ...ed the following tools n 2 Phillips screwdriver n Medium flat blade screwdriver Installation Procedure M WARNING The LCOS weighs approximately 90 5 lb 41 kg Do not attempt to lift or move it by yourse...

Page 154: ...Getting Started C 12 1 Unpack the output paper stacker from the shipping box 2 With the help of another person carefully lift the LCOS from the box and place it on the floor 3 Remove the plastic from...

Page 155: ...y Output Stacker C 13 Installing Options 4 Loosen the nut holding the Safety Tilt Bar from the back of the LCOS in the bottom right leg 5 Remove the Safety Tilt Bar 6 Turn the bar over and replace it...

Page 156: ...Sheet Large Capacity Output Stacker QMS 4060 Print System Getting Started C 14 7 Raise the four leveling bolts on the LCOS 8 Remove the upper cover from the left side of the printer by removing two sc...

Page 157: ...2000 Sheet Large Capacity Output Stacker C 15 Installing Options 9 Snap the paper guide into place 10 Locate bracket B and the connect pin included in the LCOS box contents...

Page 158: ...MS 4060 Print System Getting Started C 16 11 Use a small flat bladed screwdriver to pop out the two small panels from the bottom cover 12 Attach bracket B to the bottom left side of the printer with t...

Page 159: ...t Large Capacity Output Stacker C 17 Installing Options 13 Attach bracket A to the bottom of the LCOS 14 Position the LCOS so that its positioning hole is aligned with the connect pin on the printer B...

Page 160: ...printer and fit the con nect pin into the larger circular section of the LCOS position ing hole 16 Push the LCOS toward to the front of the printer to lock the pins into the positioning holes 17 Fast...

Page 161: ...rn the two front levelers counter clockwise to tilt the top of the LCOS securely against the printer 19 Plug the signal cable form the LCOS into the connector on the rear bottom right of the back of t...

Page 162: ...feature and the LCOS can be damaged if the plug is modified to work in a non grounded receptacle ACHTUNG Dieses Produkt ist mit einem 3 Phasen Stecker ausgeruestet Bitte verwenden Sie unbedingt ein e...

Page 163: ...turning off the LCOS and printer and turning on the LCOS again and then the printer 22 Check the printer display panel for the LCOS graphic This lets you know the LCOS is connected properly 23 Select...

Page 164: ...r The 3000 sheet Large Capacity Output Stacker LCOS holds 3000 sheets and increases the paper output capacity of the printer to 3500 sheets What s in the Kit n 3000 sheet LCOS n Interface cable n Outp...

Page 165: ...p of the LCOS Note The legs and casters should be on the bottom of the box 4 Firmly grasp the top and bottom of the LCOS and roll it slowly out of the box ensuring that the LCOS doesn t fall back as y...

Page 166: ...3000 Sheet Large Capacity Output Stacker QMS 4060 Print System Getting Started C 24 6 Open the LCOS door and remove the tape on the paper guides inside the LCOS Door...

Page 167: ...are contents Make sure that all items are included in your shipment before setting up your LCOS If any items are missing or damaged contact your shipping company or your QMS vendor See Appendix A QMS...

Page 168: ...following tools n 2 Phillips screwdriver n Medium flat blade screwdriver Installation Procedure M WARNING The 3000 sheet Large Capacity Output Stacker weighs over 66 pounds 30 kg Do not attempt to lif...

Page 169: ...talling Options After unpacking is complete use the following procedure to install the LCOS 1 Attach the stopper to the lower rear of the LCOS using the two screws M4 x 6 Note The stopper prevents the...

Page 170: ...Started C 28 2 Slip the hooks on the back of the tray over the tray base and then attach the tray to the tray base using the six screws M4 x 12 and washers Note The tray has six pre drilled holes for...

Page 171: ...ptions 3 Locate the left paper guide and slide it through the left slot of the paper tray The paper guides are labeled T L for top left and T R for top right The shorter arm should be on top and the f...

Page 172: ...markers appear on both the top and bottom of the LCOS Note When you first install the LCOS we recommend that you set the paper guides as far apart as possible A3 A4 setting There is no need to adjust...

Page 173: ...3000 Sheet Large Capacity Output Stacker C 31 Installing Options 6 Repeat steps 3 through 5 for the right paper guide Paper guide T R Paper tray slot...

Page 174: ...S 4060 Print System Getting Started C 32 Preparing the Printer After assembling the LCOS prepare the QMS 4060 Printer for attach ment of the LCOS 1 Remove the paper output cover from the printer by re...

Page 175: ...33 Installing Options 2 Remove the left screw in the upper cover 3 Insert spacer B bolt into the hole in the upper cover where you just removed the screw Note The bolts are labeled Make sure you use...

Page 176: ...3000 Sheet Large Capacity Output Stacker QMS 4060 Print System Getting Started C 34 4 Remove the right screw in the upper cover Right screw...

Page 177: ...3000 Sheet Large Capacity Output Stacker C 35 Installing Options 5 Insert spacer bolt A into the hole where you just removed the screw Spacer bolt A...

Page 178: ...3000 Sheet Large Capacity Output Stacker QMS 4060 Print System Getting Started C 36 6 Snap the paper guide into place Paper guide...

Page 179: ...3000 Sheet Large Capacity Output Stacker C 37 Installing Options 7 Remove the two screws in the lower cover Lower cover screws 2...

Page 180: ...tem Getting Started C 38 8 Insert the two C spacer bolts into the lower cover holes where you just removed the screws Note The bolts are labeled Make sure you use the correct bolt The spacer bolts are...

Page 181: ...3000 Sheet Large Capacity Output Stacker C 39 Installing Options 9 Use a small flat bladed screwdriver to pop out the two small panels from the bottom cover Panels...

Page 182: ...000 Sheet Large Capacity Output Stacker QMS 4060 Print System Getting Started C 40 10 Use the two knurled screws captive to install the stopper guide where the square panels were located Stopper guide...

Page 183: ...knurled screws captive on the joining frame to attach the joining frame to the spacer bolts Connecting the 3000 Sheet LCOS to the Printer After assembling the LCOS and preparing the printer you re rea...

Page 184: ...rint System Getting Started C 42 2 Lift the LCOS a little to make sure that the connecting pin on the stopper guide is aligned with the stopper hole on the LCOS and then push the LCOS against the prin...

Page 185: ...holes in the joining frame and the printer latch is engaged Note To disconnect the LCOS from the printer pull the latch lever towards you and move the LCOS away from the printer Connecting Cables and...

Page 186: ...er near the bottom 2 Plug one end of the power cable into the LCOS and the other end of the cable into a grounded outlet 3 Turn on the LCOS power switch The power switch is on the lower front of the L...

Page 187: ...bin through the Operator Con trol Outputbin configuration menu Using the 3000 Sheet Large Capacity Output Stacker This section provides information on how to adjust the paper stopper and paper guides...

Page 188: ...00 Sheet Large Capacity Output Stacker QMS 4060 Print System Getting Started C 46 1 Locate the paper stopper on top of the LCOS and position it as shown Paper stopper Paper guide left Paper guide righ...

Page 189: ...Note If you re printing on A3 or Ledger paper you don t need the paper stopper Lift the paper stopper up and out of the way Paper size choices are Legal Executive B5 and A4 LTR Adjusting the Paper Gui...

Page 190: ...heet Large Capacity Output Stacker QMS 4060 Print System Getting Started C 48 1 Locate the paper guides on the LCOS There are two paper guides one on each side of the LCOS Paper guide left Paper guide...

Page 191: ...nd bottom of the LCOS 3 Use the paper size markers at the top and bottom of the LCOS to reposition the guide to the desired paper size 4 Tighten the knurled screws captive to reattach the guide to the...

Page 192: ...hree more paper sizes Statement B4 ISO and B5 ISO This tray also supports all the normal paper sizes supported on the stan dard trays Installation of the tray involves replacing one of the standard in...

Page 193: ...and remove the paper tray Note The custom tray can be installed in any of the three standard tray positions upper middle or lower The printer can support up to three custom trays 3 Insert the custom...

Page 194: ...4060 Print System Getting Started C 52 4 Slide the paper guides to fit your media 5 Place your custom sized media in the custom tray The height of the media stack should not exceed the full mark on t...

Page 195: ...d standard paper sizes You must make sure that your application paper size setup is the same as the paper that is loaded in the custom tray Follow the tab setting in this table to set up the custom tr...

Page 196: ...rity Key Caution Even though both the security and serial options have a DB 9 interface the connectors are keyed and they can t be interchanged Make sure that you install the security key only in the...

Page 197: ...owing procedure 1 Make sure the printer is off line 2 Insert the security key into the port 3 Press the Online button to put the printer off line 4 Press the Menu button 5 Press the Next button until...

Page 198: ...ctivated press the Menu button to exit the menu The following message is displayed 11 Press the Next button until YES is displayed on the bottom line of the display window 12 Press Select and remove t...

Page 199: ...the installation pro cedure again When the correct password is entered the sub menu displays The password for these two menus may be the same or different See Installation Menu in chapter 4 Printer C...

Page 200: ......

Page 201: ...QMS 3 5 PC 3 5 Automatic jam recovery 1 13 C Cabling PC interface 3 3 Cancel key 6 5 CD ROM Manuals on 1 5 Compile ahead processing 1 13 Compressed data formats 1 13 Configuration menu Menu Chart B 2...

Page 202: ...ce 4 7 Configuring the Network 4 7 Software installation 4 6 What is included 4 3 What s included 4 3 Custom Tray Installation C 50 Custom tray Standard paper sizes C 53 Customer Response Center CRC Q...

Page 203: ...Aldus Persuasion 3 8 CorelDRAW 3 8 Microsoft Excel 3 8 PC printing software 3 5 PostScript printer driver 3 5 Printer description files 3 6 QuarkXPress 3 9 Windows 3 1 driver 3 5 Windows 95 driver 3...

Page 204: ...per jams Automatic jam recovery 1 13 Paper trays Loading 2 51 Loading paper 2 56 Setting paper size 2 52 Setting the indicator 2 55 PC Application 3 5 Driver 3 5 5 3 Software 3 5 Software printing 3 5...

Page 205: ...ing off the pallet 2 12 Removing shipping restraints 2 16 Removing the box 2 8 Simultaneous interface operation 1 12 Software PC 3 5 Software loadable system 1 18 Standard interfaces 1 15 Start up pag...

Page 206: ...I 6 QMS 4060 Print System Getting Started W Web address 4 3 Windows Driver 3 5 WWW address 4 3 v...

Reviews: