background image

Chapter 2: Installation

13

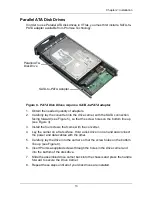
Parallel ATA Disk Drives

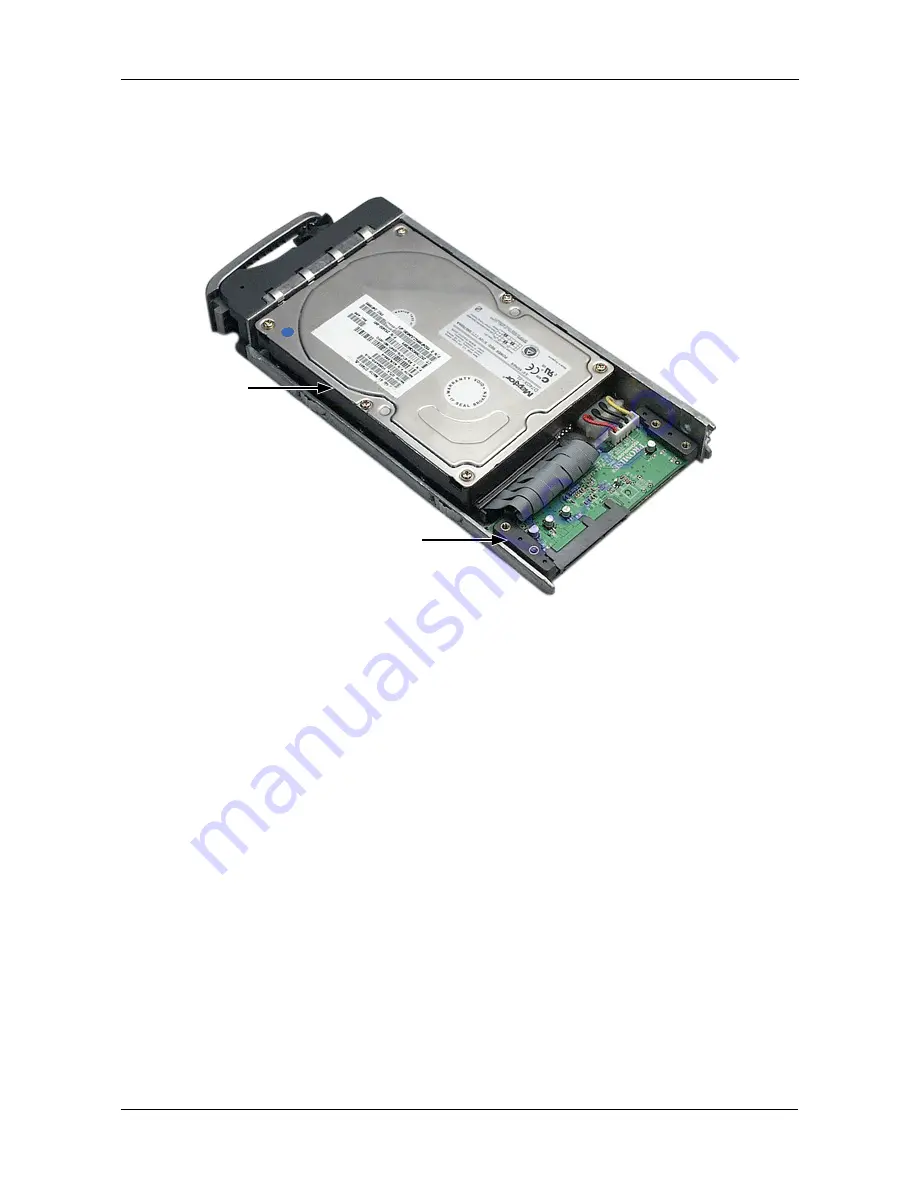
In order to use Parallel ATA disk drives in VTrak, you must first install a SATA-to-
PATA adapter available from Promise Technology.

Figure 6. PATA Disk Drives require a SATA-to-PATA adapter.

1.

Obtain the needed quantity of adapters.

2.

Carefully lay the converter into the drive carrier, with the SATA connection 
facing forward (see Figure 5), so that the screw holes on the bottom line up 
(see Figure 3). 

3.

Install the four screws that came with the converter. 

4.

Lay the carrier on a flat surface. Hold a disk drive in one hand and connect 
the power and data cables with the other.

5.

Carefully lay the drive into the carrier so that the screw holes on the bottom 
line up (see Figure 4). 

6.

Insert Promise-supplied screws through the holes in the drive carrier and 
into the bottom of the disk drive.

7.

Slide the assembled drive carrier back into the chassis and press the handle 
forward to secure the Drive Carrier. 

8.

Repeat these steps until all of your disk drives are installed.

Parallel ATA 

Disk Drive

SATA-to-PATA Adapter

Summary of Contents for VTRAK 15100

Page 1: ...VTRAK 15100 USER MANUAL Version 1 4 PROMISE VTrak 15100 ...

Page 2: ...logy product Notice Although Promise Technology has attempted to ensure the accuracy of the content of this manual it is possible that this document may contain technical inaccuracies typographical or other errors Promise Technology assumes no liability for any error in this publication and for damages whether direct indirect incidental consequential or otherwise that may result from such error in...

Page 3: ...CSI Terminator 17 One VTrak one PC one SCSI card 18 One VTrak one PC two SCSI cards 18 One VTrak two PCs one SCSI card in each 19 Two VTraks one PC one SCSI card daisy chain 20 Two VTraks one PC with two SCSI cards 21 Set Up Network and Serial Connections 22 Connect the Power 23 Set IP Address with the CLU 25 Assign an IP Address 25 Install WebPAM PRO Management Software 26 Installation Locations ...

Page 4: ...Create a Logical Drive 48 Create a Logical Drive Automatically 48 Create a Logical Drive Manually 49 Assign a SCSI Target ID 50 Assign a RAID Console LUN 51 Exit the CLU 51 Chapter 4 Management with WebPAM PRO 53 VTrak Status Indicators 53 Drive Status Indicators 54 Audible Alarm 55 Log in Log out 56 Log in to WebPAM PRO 56 Regular Connection 56 Secure Connection 56 Log out of WebPAM PRO 58 Host M...

Page 5: ... a Logical Drive 92 Migrate a Logical Drive 93 Synchronize a Logical Drive 95 Synchronization Schedule 96 Delete a Logical Drive 98 Enclosure Management 99 Enclosure View 99 Enclosure Information 100 Chapter 5 Management with the CLU 101 VTrak Status Indicators 101 Drive Status Indicators 102 Audible Alarm 103 Log in Log out 104 CLU Connection 104 Exit the CLU 104 Controller Management 105 View Co...

Page 6: ...5 Logical Drive auto creation 115 Create new Logical Drive 116 Delete Logical Drive 117 Modify Logical Drive parameters 118 SCSI assignment 118 Cache policy 120 Retry count 120 Enable Disable SMART of Logical Drive s member disks 121 Logical Drive name 121 Rebuilding migration synchronization priority 122 Hot Spare Policy 123 Automatic rebuilding option 124 Flush frequency 124 Abort Skip when medi...

Page 7: ...roring Striping 146 RAID 50 Striping of Distributed Parity Logical Drives 147 JBOD Single Drive 148 Choosing a RAID Level 149 RAID 0 149 RAID 1 149 RAID 3 150 RAID 5 150 RAID 10 150 RAID 50 151 JBOD 151 Choosing Stripe Block Size 152 Gigabyte Boundary 152 Initialization 152 Hot Spare Drive s 153 Partition and Format the Logical Drive 153 Cache Settings 154 Where to Make Settings 154 Chapter 8 Trou...

Page 8: ... a Hot Spare Drive 165 Without a Hot Spare Drive 165 Connection Problems 166 SCSI Connections 166 Serial Connections 167 Network Connections 167 Chapter 9 Support 169 Frequently Asked Questions 169 Contacting Technical Support 172 Limited Warranty 174 Returning Product For Repair 175 Appendix A Serial Connector Pinout 177 Index 179 ...

Page 9: ...des a full table of contents index chapter task lists and numerous cross references to help you find the specific information you are looking for Also included are four levels of notices Note A Note provides helpful information such as hints or alternative ways of doing a task Important An Important calls attention to an essential step or point required to complete a task Important items include t...

Page 10: ...r If so configured a hot spare drive will automatically replace a failed drive securing the fault tolerant integrity of the logical drive The self contained hardware based RAID logical drive provides maximum performance in a compact external chassis Figure 2 VTrak 15100 rear view The VTrak 15100 is an external disk array subsystem with a capacity of fifteen individual Serial ATA or parallel ATA di...

Page 11: ...nd Benefits Feature Benefit 3U 19 inch wide enclosure Installs easily in any standard rackmount Supports RAID levels 0 1 3 5 10 50 and JBOD mode Allows system to be tuned for maximum performance Supports online logical drive array expansion Lets you add disk drives to an existing logical drive without interrupting data accessibility Supports online RAID migration Allows you to convert a logical dr...

Page 12: ...s Hot swap feature for drive carriers power supplies fans and battery Allows a defective component to be replaced without interrupting data accessibility to the host system Tool less field replaceable units FRUs All FRUs can be replaced without tools saving time and effort for support personnel Hot spare drives Maintains full fault tolerant integrity by automatically rebuilding the data from a fai...

Page 13: ...ID stripe depth 4 8 16 32 or 64 sectors per disk Rebuild priority tuning Adjustment of minimum I O reserved for server use during rebuild Hot spares Multiple global and designated hot spares Maximum Disks LUNs 15 in any combination of RAID levels and drive types Supported Disk Interfaces Serial ATA SATA Parallel ATA with optional Promise adapter Cluster support Supports two node server clusters fo...

Page 14: ...rotocols SNMP SSH WBEM Telnet Notification Email audible and visible alarms Dimensions Height 5 0 12 7 Width 17 6 in 44 8 cm Depth 26 0 in 66 0 cm Weight 65 lbs 25 Kg without drives Approximately 85 lbs 32 Kg w 15 drives Safety Certifications CE FCC Class A BSMI VCCi cUL TUV MIC Maximum SCSI Cable Length 39 ft 12 m total Maximum Units per SCSI Channel 8 Limited Warranty 3 Years See Chapter 9 for d...

Page 15: ...ak 15100 Unit 2 1 0m External VHDCI SCSI cables Quick Start Guide 64 Screws for disk drives 4 spares Null Modem Cable 2 1 5m Power cords 2 SCSI Terminators CD with WebPAM Software User Manual and Quick Start Guide Left and right mounting rails Warning The electronic components within the VTrak disk array are sensitive to damage from Electro Static Discharge ESD Observe appropriate precautions at a...

Page 16: ...plied mounting rails Figure 2 Mounting rail installation PROM I SE VTrak 15100 Vertical Rack Post Direct attach to post Mounting Rail included VTrak 15100 VTrak attaching screw Back side of post Rack front post Rail attaching screw not included Rail adjustment screw Mounting Rail Rail attaching screw not included Back side of post Rack rear post VTrak subsystem ...

Page 17: ...ll Disk Drives Before using the VTrak you must first populate it with Serial ATA SATA disk drives You can also use Parallel ATA PATA disk drives with the optional SATA to PATA adapters available from Promise Technology The VTrak 15100 can support up to fifteen disk drives and provide the RAID configurations listed below See Chapter 7 for a complete explanation of RAID on VTrak Caution Do not pull ...

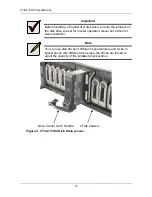
Page 18: ...re the jumpers on the disk drive are set for master operation Never set a drive for slave operation Note You can use disk drives of different manufacturers and sizes In logical drives with different drive sizes the drives are forced to equal the capacity of the smallest physical drive Drive Carrier Latch Handle VTrak Chassis ...

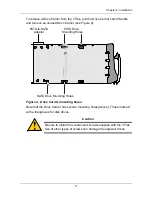
Page 19: ...igure 4 Drive Carrier mounting holes Note that the Drive Carrier has several mounting holes above Those marked with a triangle are for disk drives Caution Be sure to install the counter sink screws supplied with the VTrak Use of other types of screws can damage the adjacent drives PATA to SATA PATA Drive Adapter Mounting Holes SATA Drive Mounting Holes ...

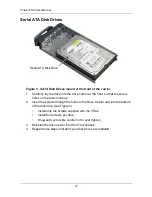
Page 20: ... on the bottom line up 2 Insert the screws through the holes in the Drive Carrier and into the bottom of the disk drive see Figure 4 Install only the screws supplied with the VTrak Install four screws per drive Snug each screw Be careful not to over tighten 3 Reinstall the drive carrier into the VTrak chassis 4 Repeat these steps until all of your disk drives are installed Serial ATA Disk Drive ...

Page 21: ...e up see Figure 3 3 Install the four screws that came with the converter 4 Lay the carrier on a flat surface Hold a disk drive in one hand and connect the power and data cables with the other 5 Carefully lay the drive into the carrier so that the screw holes on the bottom line up see Figure 4 6 Insert Promise supplied screws through the holes in the drive carrier and into the bottom of the disk dr...

Page 22: ...lan to operate your VTrak with fewer than 15 disk drives install all 15 Drive Carriers into the enclosure to ensure proper airflow for cooling Important Be sure each drive is securely fastened to its carrier Proper installation ensures adequate grounding and minimizes vibration Do not install drives with fewer than four screws Note Previous array enclosures from Promise required you to latch the d...

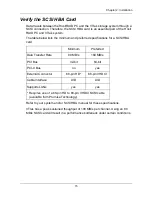
Page 23: ...SI HBA card Refer to your system and or SCSI HBA manual for these specifications VTrak has a peak sustained thoughput of 100 MB s per channel Using an 80 MB s SCSI card will result in a performance bottleneck under certain conditions Minimum Preferred Data Transfer Rate 80 MB s 160 MB s PCI Bus 32 bit 64 bit PCI X Bus no yes External Connector 68 pin HD 68 pin VHDCI Cable Interface LVD LVD Support...

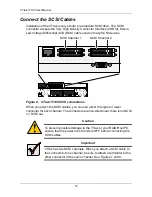
Page 24: ...ach the SCSI cables you can use either the upper or lower connector for each channel The connectors are non directional there is no SCSI in SCSI out Caution To prevent possible damage to the VTrak or your RAID Host PC ensure that the power to both units is OFF before connecting the SCSI cables Important VTrak has two SCSI channels When you attach a SCSI cable to the connector of one channel be sur...

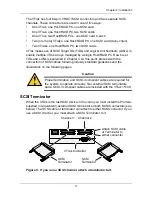
Page 25: ... the connection of SCSI cables following industry standard guidelines and the illustrations on the following pages SCSI Terminator When the VTrak is the last SCSI device in the chain you must install the Promise supplied or equivalent external SCSI terminator on both SCSI Connectors see below The SCSI cable or terminator can attach to either SCSI connector If you use a SCSI channel you must attach...

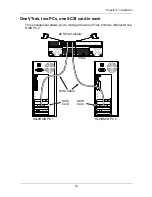
Page 26: ...I cable to either of VTrak s SCSI channels One VTrak one PC two SCSI cards This arrangement offers expanded SCSI addressing increased I O performance and a grater degree of failover protection SCSI Terminator SCSI Cable SCSI Card Host RAID PC VTrak Host RAID PC VTrak SCSI Cards SCSI Cables SCSI Terminators ...

Page 27: ...ation 19 One VTrak two PCs one SCSI card in each This arrangement allows you to manage the same VTrak from two different Host RAID PCs Host RAID PC 1 Host RAID PC 2 SCSI Card SCSI Card SCSI Cable SCSI Terminators VTrak ...

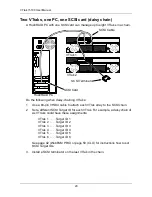
Page 28: ...CSI chain 2 Set a different SCSI Target ID for each VTrak For example a daisy chain of six VTraks could have these assignments VTrak 1 Target ID 1 VTrak 2 Target ID 2 VTrak 3 Target ID 3 VTrak 4 Target ID 4 VTrak 5 Target ID 5 VTrak 6 Target ID 6 See page 42 WebPAM PRO or page 50 CLU for instructions how to set SCSI Target IDs 3 Install a SCSI terminator on the last VTrak in the chain Host RAID PC...

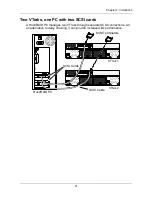
Page 29: ...one PC with two SCSI cards A Host RAID PC manages two VTraks through separate SCSI connections An an alternative to daisy chaining it can provide increased I O performance SCSI Terminators Host RAID PC SCSI Cards SCSI Cable VTrak 1 VTrak 2 ...

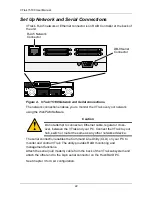
Page 30: ...ommand Line Utility CLU on your PC to monitor and control VTrak The utility provides RAID monitoring and management functions Attach the serial null modem cable from the back of the VTrak subsystem and attach the other end to the 9 pin serial connector on the Host RAID PC See Chapter 3 for CLU configuration Caution Do not attempt to connect an Ethernet cable regular or cross over between the VTrak...

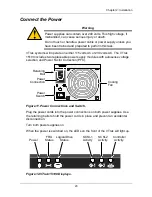
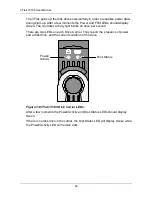
Page 31: ...the power cords in place and prevent an accidental disconnection Turn both power supplies on When the power is switched on the LEDs on the front of the VTrak will light up Figure 12 VTrak 15100 Displays Warning Power supplies can contain over 240 volts This high voltage if mishandled can cause serious injury or death Do not touch or handle a power cable or power supply unless you have been trained...

Page 32: ... on once per second There are two LEDs on each Drive Carrier They report the presence of power and a disk drive and the current condition of the drive Figure 13 VTrak 15100 Disk Carrier LEDs After a few moments the Power Activity and Disk Status LEDs should display Green If there is no disk drive in the carrier the Disk Status LED will display Green while the Power Activity LED will remain dark Di...

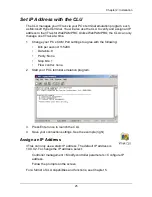
Page 33: ...ngs to agree with the following Bits per second 115200 Data bits 8 Parity None Stop bits 1 Flow control none 2 Start your PC s terminal emulation program 3 Press Enter once to launch the CLU 4 Save your connection settings See the example right Assign an IP Address VTrak can only use a static IP address The default IP address is 10 0 0 2 To change the IP address select Controller management Modify...

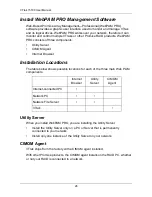
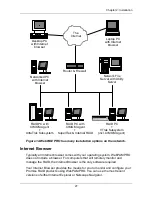
Page 34: ...ation Locations The table below shows possible locations for each of the three main Web PAM components Utility Server When you install WebPAM PRO you are installing the Utility Server Install the Utility Server only on a PC or Server that is permanently connected to your network Install only one instance of the Utility Server on your network CIMOM Agent VTrak ships from the factory with a CIMOM ag...

Page 35: ...equired Your Internet Browser provides the means for you to monitor and configure your Promise RAID products using WebPAM PRO You can use the most recent versions of either Internet Explorer or Netscape Navigator Desktop PC with Internet browser Laptop PC with Internet browser The Internet Networked PC with Internet browser Network File Server with Utility Server Router Firewall RAID PC with CIMOM...

Page 36: ...f your network has a DHCP server inform your MIS administrator 2 If you currently have either of these on your computer Promise Array Manager Windows PAM An earlier version of WebPAM Completely remove them before installing WebPAM PRO Failure to do so will result in compatibility problems 3 If you are planning to use other applications that rely on JRE or JDK always install them first before you i...

Page 37: ...nsert the software CD into your CD ROM drive 3 Double click on the Install CD s icon to open it 4 Double click on the Installer icon to launch it right 5 When the Introduction screen appears above click the Next button 6 When the License Agreement appears above click the I accept the terms radio button then click the Next button If you do not accept the terms of the Agreement the installation will...

Page 38: ...curity options are invisible to authorized users Promise Technology provides a default certificate for the server as well as for internal data communication However in some cases it is always better to install and verify your own certificate for the webserver And and if possible verify certificate by certificate authority like Verisign or Thwate See your MIS Administrator for guidance Click the Ne...

Page 39: ...erver Type in the name of your company s email server Email Sender Type in the email address of the person responsible for maintaining the RAID This address will be the return address on all email notifications sent from the Utility Server to all recipients Click the Next button when you are finished 9 When the Choose Install Folder screen appears below make your selection of a folder for the WebP...

Page 40: ...efault Folder button Click the Next button when you are finished 10 When the WebPAM PRO Installation Configuration screen appears above take a moment to review your choice of install folder and the available disk space on the target hard drive If you need to make changes click the Previous button to return to the Install Folder screen If you are satisfied with the proposed installation click the I...

Page 41: ...ty to do this for you Go to the directory C WebPAM UninstallerData and double click on the uninstall icon right During uninstall process the uninstall program will not remove some critical log files which contain important information such as who created deleted a logical drive what date what time on which Hosts etc Important Registration of your VTrak and WebPAM PRO provides useful information th...

Page 42: ...VTrak 15100 User Manual 34 ...

Page 43: ...Assign a SCSI Target ID page 42 6 Assign a RAID Console LUN page 43 7 Assign an IP Address page 45 8 Log out of WebPAM PRO page 46 9 Internet connection using WebPAM PRO page 46 Log in to WebPAM PRO 1 Launch your Browser 2 In the Browser address field type in VTrak s IP address as explained below If you did not choose the External Security option during WebPAM PRO installation use the Regular conn...

Page 44: ...Note that the IP address shown above is only an example The IP address you type into your browser will be different 3 When the opening screen appears log in as administrator and type in the default password which is password The login and password are case sensitive 4 Click the Sign in button Important Immediately after installation change the Administrator s password Make the change under User Ma...

Page 45: ...you log in to WebPAM PRO there will be no Hosts RAID PCs or Users in the system Promise recommends that you create the Host s first then create the User s Note Make a Bookmark Netscape Navigator or set a Favorite Internet Explorer of the Login Screen so you can access it easily next time ...

Page 46: ...ppears above right 3 Click the Add Host button above The Host Information screen appears below 4 Type in the IP Address of the VTrak not the Host PC you want to add 5 Check the appropriate box to indicate which Promise product the Host controls in this case UltraTrak VTrak 6 When you are done click the Submit button The new Host is added to Host Management and also appears in the Tree View ...

Page 47: ...and its IP Address Below it the Controller appears A host RAID PC is made up of Controller The Promise VTrak Disk View Shows all hard drives assigned or not Logical Drive View Shows all logical drives under this Controller Enclosure View Monitors status of external RAID enclosures Note If you do not see these details in the WebPAM PRO window it means your network connection to VTrak is not working...

Page 48: ...Create Delete logical drive menu in the Logical Drive View window above and select Create logical drive The Create Logical Drive window appears Type in a Logical Drive name select RAID Level and Block Size See Chapter 7 for an explanation of RAID concepts Notes The available RAID selection depends on which Promise product you have and the number of disk drives available The default Block size is 6...

Page 49: ...Disks field 5 Click the Submit button when you are done A confirmation popup message appears when the logical drive has been created 6 Click OK in the confirmation message The new logical drive appears in the Logical Drive View list above If you selected Full Initialization that process will continue for some time When Logical Drive Status shows Functional you have completed logical drive creation...

Page 50: ...nge or delete Target ID numbers 1 Click on the Controller icon The Controller Information window appears below 2 In the Controller Information window click on the Controller Settings menu and select Change Target IDs above The Change Target IDs window appears below 3 In the Change Target IDs window select the new Target IDs for each channel 4 When you are done click Submit The above window informs...

Page 51: ...al Unit Number LUN for the RAID Console The default RAID Console LUN for both SCSI channels is 7 To change the LUN 1 Click on the Controller icon The Controller Information window appears below 2 In the Controller Information window click on the Controller Settings menu and select Change Console LUN Settings above The Change Console LUN Settings window appears below ...

Page 52: ...the Console LUN Settings window select the SCSI Target ID whose LUN you want to change 4 Then select the LUN you want to assign to that Target ID 5 Click Submit when you are done This completes the change procedure for the Console LUN ...

Page 53: ...ler icon The Controller Information window appears below 2 In the Controller Information window click on the Controller Settings menu and select Change IP Address above The View Change IP Address or Mask window appears below 3 In the IP address field type the new IP address for the VTrak 4 In the other fields type in any information given to you by your MIS administrator 5 When you are done click ...

Page 54: ... using WebPAM PRO The above instructions cover connections between VTrak and WebPAM PRO over your company network It is also possible to connect to a VTrak from the Internet Your MIS Administrator can tell you how to access your network from outside the firewall Once you are logged onto the network you can access the VTrak using its IP address Please note that only the Host RAID PC can read and wr...

Page 55: ...xit the CLU page 51 CLU Connection Before you begin be sure the null modem cable is connected between the Host PC and VTrak and that both machines are booted and running 1 Start your PC s terminal emulation program 2 Press Enter once to launch the CLU Notes If you worked though the Setup procedure above using WebPAM PRO your VTrak setup is complete There is no need to repeat the Setup with the CLU...

Page 56: ...hesis beside the prompt Type number of the RAID mode level you want for your logical drive and press Enter 4 The CLU displays a collection of proposed settings for your new logical drive Press Y to accept or N to reject them If you press Y you return to the Logical Drive management menu Under the menu progress reports of logical drive initialization appear When Initialization finished appears your...

Page 57: ...beside the prompt Type number of the RAID mode level you want for your logical drive and press Enter 7 The available Stripe block sizes are in parenthesis beside the prompt Type number of the Stripe block size you want for your logical drive and press Enter 8 Type in a name up to 19 characters for your logical drive and press Enter 9 Choose whether to initialize your logical drive Type Y to initia...

Page 58: ...Please select the SCSI channel 1 2 Press R to return after finished 4 Press the number of the SCSI channel whose TID numbers you want to modify Press R when you are done selecting channel s 5 Press Y to confirm that you want to make a change Note that the TID numbers you type will overwrite the existing ones Type all the TIDs you want for this channel including any numbers you previously assigned ...

Page 59: ...return after finished 4 Press the number of the SCSI channel whose LUN you want to modify Press R when you are done selecting SCSI channels Note that the LUN you type will overwrite the existing one Type the LUN you want for this TID including numbers you previously assigned 5 Press the number of the Target ID whose LUN you want to modify and press Enter If there is only one TID on the SCSI channe...

Page 60: ...VTrak 15100 User Manual 52 ...

Page 61: ...nt Panel LEDs When boot up is finished the LEDs will display green When the VTrak is functioning normally the Controller Activity LED blinks green once per second while the other LEDs remain on continuously The SCSI LEDs display green if there is a connection on that channel See the table below VTrak Status Indicators below User Management page 64 Drive Status Indicators page 54 Controller Managem...

Page 62: ...t condition of the drive Figure 2 VTrak 15100 Disk Carrier LEDs LEDs State Dark Green Flashing Green Amber Red Power System Off Normal n a n a n a FRU System Off Normal n a Fan or Battery Problem Fan or Battery Failed Logical Drive System Off Normal n a Logical Drive Critical Logical Drive Offline SCSI 1 SCSI 2 No Connection Connection Data Transfer n a n a Controller System Off n a Normal n a n a...

Page 63: ...larm has three sound patterns Beep beep beep beep beep beep Indicates that a logical drive is critical Beep Beep Beep Indicates that a logical drive is rebuilding 10 second continuous beep Indicates that a logical drive is offline See Chapter 8 for a discussion of rebuilding and failed disk drives LEDs State Dark Green Flashing Green Amber Red Power Activity No Drive Drive Present Reading or Writi...

Page 64: ...installation see page 30 use the Secure connection Regular Connection WebPAM PRO uses an HTTP connection http Enter the VTrak s IP address 192 168 1 118 Enter the Port number 8080 Add promise to launch WebPAM PRO promise Together your entry looks like this http 192 168 1 118 8080 promise Secure Connection WebPAM PRO uses a secure HTTP connection https Enter the VTrak s IP address 192 168 1 118 Ent...

Page 65: ...word in the Password field The login and password are case sensitive If this is the first time you are running WebPAM PRO log in as administrator and type in the default password which is password The login and password are case sensitive 4 Click the Sign in button Important Immediately after installation change the Administrator s password Make the change under User Management Each user you creat...

Page 66: ...rive If this is the first time you are logging in to WebPAM there will be no Hosts RAID PCs or Users in the system Promise recommends that you create the Host s first then create the User s Log out of WebPAM PRO There are two ways to log out of WebPAM Close your browser window Click Logout on the WebPAM banner below After logging out you must enter your username and password to log in again Clicki...

Page 67: ...rs above right 3 Click the Add Host button above The Host Information screen appears below 4 Type in the Hostname or IP Address of the Host RAID PC you want to add 5 Check the appropriate box to indicate which Promise product the Host controls an UltraTrak VTrak or a SuperTrak Create a Host below Host Management Window page 62 Host User Rights page 60 View Event Log page 62 Access a Host page 61 D...

Page 68: ...n the Tree View Host User Rights 1 Click the Host Management icon under Administration Tools This window displays a list of Hosts RAID PCs configured to this WebPAM installation 2 Click on the hypertext link to see an individual Host This window provides access information on an individual Host RAID PC and editing user permissions ...

Page 69: ...ks like this Each host is identified by an icon and its IP Address or Hostname Below it the Controller appears A host RAID PC is made up of VTrak Controller The Promise RAID Product Disk View Shows all hard drives assigned or not Logical Drive View Shows all logical drives for this Controller Enclosure View Monitors status of external RAID enclosures Right Meaning Creation Permission to create con...

Page 70: ...a different window than clicking the Host Management icon described above From this point you can View the Logfile Access Host User Rights Administrator only View Event Log The Event Window shows events as they happen It is not the same as the Event Log however To see the Event Log 1 In Tree View click on the Host icon for the RAID PC whose log you want to see above left ...

Page 71: ...must log in as the Administrator in order to delete the Logfile To delete it click the Delete LogFile button Delete a Host RAID PC To delete a Host 1 Click the Host Management icon under Administrative Tools The Host List appears 2 Under Select for Deletion click the checkbox of the Host you wish to delete 3 Click the Delete Selection button Notes WebPAM will remove the link from the RAID PC to yo...

Page 72: ...lick the User Management icon above left The User List appears above right Initially there is only an account for the Administrator Create a User below Change Password page 73 Delete a User page 71 Setup User Alert Notification page 74 Manage User Rights page 72 ...

Page 73: ... Email Notification box Check the permissions this User will have Right Meaning Creation Permission to create convert and expand a logical drive and make Controller settings Deletion Permission to delete a logical drive Maintenance Permission to rebuild and synchronize a logical drive Notification Permission to receive notification of events affecting the logical drive Note If no Hosts RAID PCs ha...

Page 74: ...reen 5 Type in the User s email address 6 Select the alert events you want reported via email To save time and effort check Critical Events All Events or the component specific boxes Notes The User can change his her User Name Password email address at any time A User cannot change his her own Rights The Administrator can change a User s Rights as well as create and delete Users ...

Page 75: ...I bus Unrecoverable Error VTrak must restart to recover from an error Abort Task A task was aborted Clear ACA Clear an auto contingent alliance condition LUN Reset A LUN was reset Initiator Error Detected possible error on the SCSI HBA card Illegal Secondary Identify A target received a second Identify message with a different LUN Message Parity Error Detected possible parity error in message betw...

Page 76: ... Drive Event Notification All events related to logical drives Create Logical Drive A logical drive has been created Delete Logical Drive A logical drive has been deleted Logical Drive Critical Malfunctioning disk drive fault tolerance lost Logical Drive Offline Two malfunctioning disk drives data access lost Logical Drive Migration Started A logical drive began expansion and or change of RAID lev...

Page 77: ...a logical drive Logical Drive Full Initialization Completed Full initialization finished on a logical drive Logical Drive Full Initialization Stopped Full initialization on a logical drive halted before completion Logical Drive Quick Initialization Start Quick initialization has begun on a logical drive Logical Drive Quick Initialization Completed Quick initialization finished on a logical drive L...

Page 78: ...Volt Range 5 Volt power is out of specification Enclosure 12 Volt Range 12 Volt power is out of specification Battery Temperature Rise Battery is heating up Battery ceases to charge above 45 C or discharge above 60 C Battery Temperature Dropped Battery is cooling down Battery Capacity below threshold Battery is too weak to function Battery Capacity Normal Battery is ready for use Battery Dischargi...

Page 79: ... list of Users appears below 2 Click the checkbox of the User you wish to delete 3 Click the Delete Selection button Note The User can change his her email address and Notification selections at any time Note WebPAM will maintain at least one user with full access typically the Administrator This action prevents you from being locked out of the application and having to reload it ...

Page 80: ...or Tools A list of Users appears below 2 Click on the hypertext link in the Edit User column for the User you want to manage The Modify View User screen appears In the above example the screen is shortened to save space 3 In the Modify View User screen specify the User Rights Right Meaning Creation Permission to create convert and expand a logical drive and make Controller settings Deletion Permis...

Page 81: ...er Administration Tools In the above example the screen is shortened to save space 2 Change the password email address or event selection as required 3 When you are done click the Submit button at the bottom of the screen To restore the previous settings before you submit them click the Reset button To change a User s rights log on as the Administrator The Administrator cannot access or change a U...

Page 82: ...function 1 Click the User Management icon under Administrator Tools A list of Users appears below 2 Click on the hypertext link in the Edit User column for the User you want to manage The Modify View User screen appears In the above example the screen is shortened to save space 3 Enter the email address if this user will receive email notifications 4 Select the alert events you want reported via e...

Page 83: ...agement with WebPAM PRO 75 5 When you are done click the Submit button The User list appears again Your changes take effect immediately To restore the previous settings before you submit them click the Reset button ...

Page 84: ...Shows all hard drives assigned or not Logical Drive View Shows all logical drives for this Controller Enclosure View Monitors status of external RAID enclosures To access the Controller click on the Controller icon The Controller screen will display below Set Release Lock page 77 Change SCSI Target ID page 79 Change IP Address page 78 Change Alarm Setting page 80 Change Console LUN page 79 ...

Page 85: ...ives and the Enclosure Set Release Lock The Locking Mechanism isolates the controller during maintenance operations and other periods when you want to avoid interruption from other users trying to access the logical drives under this controller You must have Maintenance Rights to use this function To set the lock click the Set Lock button To release the lock click the Release Lock button Only the ...

Page 86: ...eady locked both Lock buttons will be grayed out Change IP Address Correct IP settings are essential for your Host RAID PC and VTrak to communicate You make initial settings during setup and again when the addresses change on your network You must have Creation Rights to access this function 1 Click on the Controller Settings menu and select Change IP Address The Change IP Address screen displays ...

Page 87: ...el 1 in the center column select the SCSI Target ID number under which you want to set the Console LUN 3 In the right column select the LUN for the Console 4 Repeat steps 2 and 3 for SCSI Channel 2 5 Click the Submit button when you are done Change SCSI Target ID The term Target ID refers to the SCSI address of the two channels on the RAID subsystem A SCSI bus has an Initiator such as the SCSI car...

Page 88: ...nel 2 4 Click the Submit button when you are done Change Alarm Setting Your VTrak is equipped with an audible alarm to call your attention to any logical drive problems that might arise The alarm has three signals Beep beep beep beep beep beep Indicates that one or more Logical Drives is Critical Beep Beep Beep Indicates that one or more Logical Drives is Rebuilding 10 second continuous beep Indic...

Page 89: ...ave Creation or Maintenance Rights to access this function 1 Click on the Controller Settings menu and select Disable Audible Alarm A confirmation message displays 2 In the confirmation message click OK to disable to audible alarm Repeat the same procedure to enable the audible alarm ...

Page 90: ... to the drive manufacturer s identification Disk Size The effective data storage capacity in gigabytes This is total capacity not available capacity Disk Status Refers to functional status of an individual hard disk drive Functional means normal Needs Rebuilding means that this drive needs to have its data rebuilt Rebuilding means this drive is the Target Drive of the rebuild operation that is in ...

Page 91: ...play Disk Model Refers to the drive manufacturer s identification Disk Status Refers to functional status of an individual hard disk drive Functional means normal Needs Rebuilding means that this drive needs to have its data rebuilt Rebuilding means this drive is the Target Drive of the rebuild operation that is in progress Disk Size Is the effective data storage capacity in gigabytes This is tota...

Page 92: ...hat examines disk drive behavior for indications of a coming failure Healthy means there are no indications of trouble Alert means there have been indications that the disk drive could fail soon If you see an alert back up your data then remove and test the disk drive You must enable SMART function for each logical drive Firmware Version Refers to the Promise controller not the disk drive Serial N...

Page 93: ...een will display 3 In the Logical Drive Name field type in a name for your logical drive 4 In the RAID Level drop down menu select the type of RAID you want The available choices will vary depending on which Promise product you have Create a Logical Drive below Migrate a Logical Drive page 93 Logical Drive LUN Setting page 86 Synchronize a Logical Drive page 95 Logical Drive Functions page 88 Sync...

Page 94: ...red to the Logical Drive View page See Chapter 7 for information on RAID Levels the required number of Disk Drives and RAID controller capabilities If you checked the Initialize Logical Drive box and selected Full Initialization the process of initialization will continue for some time When Initialization is done you can partition and format the logical drive Logical Drive LUN Setting This functio...

Page 95: ...nge logical drive Settings menu 3 Select Change LUN Settings The Change LUN Settings window displays 4 On the Change LUN Settings window click the drop down menu under Select SCSI TID and select a Target ID number for Channel 1 5 Click the drop down menu under Select New LUN for logical drive and select a LUN number 6 Repeat the TID and LUN selection for Channel 2 ...

Page 96: ...the Logical Drive View icon The Logical Drive View Window appears 2 From the logical drive screen click on the Change logical drive Settings menu 3 Select Logical Drive Functions The View Change logical drive information window appears 4 Make your selections as desired For an explanation of the features and choices see the table on the following page Note Rather than creating multiple Target IDs u...

Page 97: ...he Activates the write caches for the disk drives in this logical drive Enable or disable Enable Write Back Activates write back feature of the caches for the disk drives in this logical drive Enable or disable Automatic Flush Frequency Specifies the flush frequency for the controller cache in seconds Zero means deactivated 2 to 60 For the following three features a High setting speeds the backgro...

Page 98: ...ID Controller will also detect the fault and sound an audible alarm two short beeps repeated The Logical Drive icon on the front of the VTrak enclosure changes to amber When this condition appears click on each component to discover the faulty one below it The last component is the source of the fault In the example above a disk drive has failed As a result the RAID has lost its redundancy althoug...

Page 99: ... Channel 4 is the hot spare drive in this example If the hot spare feature is deactivated or no hot spare drive is available the controller will attempt to rebuild the failed drive During rebuild the alarm sounds a single short beep repeated The disk drive being rebuilt displays an amber Status LED During rebuilding you can still read and write data to the logical drive However fault tolerance is ...

Page 100: ...uild manually You must have Maintenance Rights to perform this function Follow these steps to rebuild your logical drive 1 In Tree View click the icon of the logical drive you want to rebuild 2 In the Management Window click on the Change Logical Drive Settings and select Rebuild Logical Drive from the dropdown menu above The Rebuild Logical Drive screen appears 3 In the Disk Name dropdown menu se...

Page 101: ...al Drive To migrate a logical drive is to Change its RAID level and or Increase the number of disk drives Migration takes place on an existing logical drive without disturbing the existing data While the logical drive is migrating you can access the data as before When migration is complete your logical drive have a different RAID level and or a larger capacity 1 Click on the Logical Drive icon Th...

Page 102: ...evel from the dropdown menu The RAID levels shown are those possible to achieve from the existing logical drive and available disk drives 5 If you want to add disk drives select the drives under Free Disks then click the button to move them to the Used Disks window 6 Click the Submit button when you are done You will be transferred to the Logical Drive page ...

Page 103: ... this function to occur automatically Promise recommends synchronizing your logical drive s once a month You must have Maintenance Rights to perform this function To manually synchronize a logical drive 1 Click on the Logical Drive icon The Logical Drive Window appears 2 Click on the Change logical Drive Settings menu and select Synchronize logical drive 3 Click OK on the confirmation dialog box T...

Page 104: ... drive s once a month You must have Maintenance Rights to perform this function 1 Click on the Logical Drive icon The Logical Drive Window appears 2 Click on the Change Logical Drive Settings menu and select Synchronization Schedule 3 Click on the button corresponding to the unit of time that best fits your schedule By Minute By Hour By Day By Week or By Month In the fields to the right of the but...

Page 105: ... the week or the day of the month through the 28th from the drop down menu 5 When you are done click the Submit button Notes A logical drive must be Functional in order to be synchronized Before the scheduled operation check the logical drive and correct any problems You can synchronize your logical drive on demand Select Synchronize logical drive from the Change logical Drive Settings menu ...

Page 106: ... this function 1 Click on the Logical Drive View icon In the Management window all logical drives belonging to this controller appear 2 Click on Create Delete Logical Drive tab in the logical drive window above and select Delete logical drive The Delete logical drive window appears 3 In the Delete logical drive window select your temporary logical drive name from the drop down menu and click the S...

Page 107: ...nclosures running under the selected controller There can be multiple enclosures but often there is only one To access it click on the Enclosure View icon All enclosures will display The Status field of the Enclosure View lists any problems a specific enclosure might have Click on the Enclosure name such as Enclosure1 in Tree View for additional information ...

Page 108: ...osure provides monitoring of fan ffunction temperature tsub system voltage and battery condition inside the VTrak Normal and actual values are cited If an icon turns red or shows a red circle X the component it represents is malfunctioning and requires your attention See Enclosure Problems in Chapter 8 for more information Using the Enclosure screen you can quickly identify a failing component and...

Page 109: ...ed the LEDs will display green When the VTrak is functioning normally the Controller Activity LED blinks green once per second while the other LEDs remain on continuously The SCSI LEDs display green if there is a connection on that channel See the table below VTrak Status Indicators below Controller Management page 105 Drive Status Indicators page 102 Disk Drive Management page 112 Audible Alarm p...

Page 110: ...nt condition of the drive Figure 2 VTrak 15100 Disk Carrier LEDs LEDs State Dark Green Flashing Green Amber Red Power System Off Normal n a n a n a FRU System Off Normal n a Fan or Battery Problem Fan or Battery Failed Logical Drive System Off Normal n a Logical Drive Critical Logical Drive Offline SCSI 1 SCSI 2 No Connection Connection Data Transfer n a n a Controller System Off n a Normal n a n ...

Page 111: ...arm has three sound patterns Beep beep beep beep beep beep Indicates that a logical drive is critical Beep Beep Beep Indicates that a logical drive is rebuilding 10 second continuous beep Indicates that a logical drive is offline See Chapter 8 for a discussion of rebuilding and failed disk drives LEDs State Dark Green Flashing Green Amber Red Power Activity No Drive Drive Present Reading or Writin...

Page 112: ...lows you view controller information change parameters monitor the enclosure update the firmware and reboot the VTrak Disk management Enables you to view disk drive assignments and change disk drive settings Logical Drive management Allows you to view logical drive information create delete migrate rebuild and synchronize logical drives change TID and LUN settings cache policy retry count SMART se...

Page 113: ...SATA Firmware Revision 01 00 0000 04 Hardware Revision 0 1 0 1 SEP Revision 0 10 Management Port IP Address 192 168 10 203 TFTP Server IP Address 192 168 10 11 Date 2003 10 3 Time 12 25 49 DDR ECC Size 256MB SCSI Channel 1 TIDs 0 SCSI Channel 2 TIDs 0 Modify Controller Parameters Press 2 to access controller parameters The following menu appears Modify controller parameters 1 Modify SCSI Channel T...

Page 114: ...1 2 Press R to return after finished 1 Want to modify TIDs for SCSI channel 1 y n y Please enter the new TIDs 1 3 5 7 9 11 TIDs for SCSI channel 1 changed Press Enter key to return Modify SCSI Channel TID SCSI Channel TIDs 1 1 3 5 7 9 11 2 0 Please select the SCSI channel 1 2 Press R to return after finished Rather than creating multiple Target IDs use one Target ID and assign a LUN to each logica...

Page 115: ...oes not employ error checking and correction Configure TFTP server IP address Current TFTP server IP Address 0 0 0 0 Want to modify TFTP server IP address y n y Please enter the new TFTP server IP address 192 168 10 11 Modify Promise RAID Console SCSI LUN Use this function to change the RAID Console LUN which is the controller s SCSI address LUN stands for Logical Unit Number Essentially it is a s...

Page 116: ...ime Current Date 2003 10 3 Current Time 12 28 35 Want to modify date y n y Please enter the new year 2003 Please enter the new month 10 Please enter the new day 3 Want to modify time y n y Please enter the new hour 12 Please enter the new minute 30 Please enter the new second 0 Current Date 2003 10 3 Current Time 12 30 00 ...

Page 117: ... 5 Battery R Return to previous menu Fan Speed Use this function to monitor fan speed Fans 1 and 2 are on the power supplies turn at and turn 4500 750 rpm The other fans turn at 2100 750 rpm Lower readings indicate trouble Fan speed Fan RPM 1 4560 2 4623 3 2311 4 2235 5 1896 6 1917 Buzzer Use this function to turn the audible alarm on and off Buzzer control Want to silence buzzer now y n y ...

Page 118: ...2 6 41 105 Voltage Use this function to monitor voltages inside the VTrak Normal voltages are 1 3 3 volts 10 2 5 0 volts 10 3 12 0 volts 10 Out of range readings indicatte trouble Voltage Voltage volts 1 3 40 2 5 16 3 12 16 Battery Use this function to montor the condition of VTrak s cache battery The example below reflects a battery in good condition Battery Battery information Voltage 4 15 volts...

Page 119: ...the firmware image from TFTP server Please check to ensure the above management port IP address is correct Press Escape to return if the management port IP address is incorrect Or press any other key to continue with firmware updating Current TFTP Server IP Address 0 0 0 0 Want to modify TFTP Server IP address y n y Please enter the new TFTP Server IP address 192 168 10 11 New TFTP Server IP addre...

Page 120: ...l Drive 1 3 WDC WD360GD 00FNA0 UDMA5 36 GB Assigned In Logical Drive 1 4 WDC WD360GD 00FNA0 UDMA5 36 GB Assigned In Logical Drive 2 5 ST360015AS UDMA5 59 GB Assigned In Logical Drive 2 View disk parameters Press 2 to view the parameters of individual disk drives Specify the channel number of the disk drive you want to view View disk parameters Disk Id Disk Name 1 SAMSUNG SP4002H 2 WDC WD360GD 00FN...

Page 121: ...of a specific disk drive The Disk Status LED of the selected drive will flash red several times Please enter disk id 1 15 Enable Disable disk write cache Use this function to enable or disable the write cache of individual disk drives Id Name Disk Write Cache Status 1 SAMSUNG SP4002H disabled 2 WDC WD360GD 00FNA0 disabled 3 WDC WD360GD 00FNA0 disabled 4 WDC WD360GD 00FNA0 disabled Please enter dis...

Page 122: ... selected Want to wipe out the boot sector for disk 2 y n y Wipe out reserved sector Use this function to wipe out erase the reserved sector of the selected disk drive The reserved sector information tells the controller which logical drive the disk drive belongs to First you select the disk s Then you confirm the action Disk Selection Disk Id Name Size 1 SAMSUNG SP4002H 39 GB 2 WDC WD360GD 00FNA0...

Page 123: ... b RAID5 64K 107 GB Functional 3 c RAID10 64K 71 GB Functional Logical Drive auto creation Press 2 to create a logical drive automatically This function will use all free disk drives and wipe all data on those drives If you do not want to do that select Create a new Logical Drive and input your specifications manually Logical Drive automatic creation Total 4 free disks RAID mode options 0 RAID 0 S...

Page 124: ... WD360GD 00FNA0 36 GB Please enter disk ids and or disk id ranges separated by commas For example 1 5 8 15 Press R to continue after you have finished selecting disks Your input 1 3 Disk Selection Disk Id Name Size 1 SAMSUNG SP4002H 39 GB 2 WDC WD360GD 00FNA0 36 GB 3 WDC WD360GD 00FNA0 36 GB 4 WDC WD360GD 00FNA0 6 GB Total 3 disks have been selected so far Please enter disk ids and or disk id rang...

Page 125: ...er of disks 3 RAID mode RAID 5 Stripe block size 64KB Cache policy write through SMART check enabled Create Logical Drive with the above settings now y n Delete Logical Drive Press 4 to delete a logical drive Select the logical drive by its ID number Delete Logical Drive Id Name Mode Size 2 b RAID5 107 GB 3 c RAID10 71 GB Please select the Logical Drive to delete Press R to return after finished 2...

Page 126: ... IDs use one Target ID and assign a LUN to each logical drive See Modify SCSI Channel TID on page 106 Modify SCSI LUN TID for Logical Drive Id Logical Drive Name LUN TID SCSI Channel 3 c 2 0 1 2 0 2 Please select the Logical Drive to modify LUN TID Press R to return after finished 3 Want to modify LUN for SCSI channel 1 Logical Drive 3 y n y Please enter the new LUN 0 1 3 4 5 6 8 9 10 11 12 13 14 ...

Page 127: ...Please select the Logical Drive to modify LUN TID Press R to return after finished 3 Want to modify LUN for SCSI channel 1 Logical Drive 3 y n y Please enter the new LUN 0 1 3 4 5 6 8 9 10 11 12 13 14 15 255 LUN is set to 255 for SCSI channel 1 Logical Drive 3 Want to modify LUN for SCSI channel 2 Logical Drive 3 y n n Modify SCSI LUN TID for Logical Drive Id Logical Drive Name LUN TID SCSI Channe...

Page 128: ... Policy Id Logical Drive Name Cache Write Policy 3 c write back Select the Logical Drive to modify cache write policy Press R to return after finished Retry count Use this function to specify how many times the controller should retry repeat a command to the logical drive before marking it as critical Modify retry count Id Logical Drive Name Retry Count 3 c 4 Select the Logical Drive to modify ret...

Page 129: ...ease wait Modify SMART check Id Logical Drive Name SMART Check 3 c disabled Select the Logical Drive to modify SMART check option Press R to return after finished Logical Drive name Use this function to change the name of a logical drive Modify Logical Drive name Id Name Mode Size 3 c RAID10 71 GB Select the Logical Drive to modify its name Press R to return after finished 3 Want to modify the nam...

Page 130: ...operations but the selected function takes longer to complete 1 Select the function Rebuilding Synchronization or Migration 2 Then select the logical drive by ID number 3 Select the new priority high or low Modify Logical Drive rebuilding synchronization migration priority 1 Rebuilding priority 2 Synchronization priority 3 Migration priority R Return to previous menu Please enter your menu choice ...

Page 131: ...f you want ot change the existing hot spare policy type Y If not type N 3 Select a free disk by channel number as the hot spare drive 4 Press Enter to complete the action Modify Logical Drive hot spare policy Id Name Hot Spare Policy 3 logdrv Global Select the Logical Drive to modify hot spare policy Press R to return after finished 3 Change to Dedicated hot spare policy for Logical Drive 3 y n y ...

Page 132: ...ter finished 3 Want to disable automatic rebuilding for Logical Drive 3 y n y Repeat the same action to enable automatic rebuilding Flush frequency Use this feature to set the flush frequency of VTrak s cache for each logical drive First you select the logical drive Then you select the frequency from the list Modify flush frequency Id Logical Drive Name Flush frequency seconds 3 logdrv 10 Select t...

Page 133: ...bort Skip when media error detected Id Logical Drive Name Mode Size Option 3 logdrv RAID10 71 GB Skip Enter Logical Drive id to modify its Abort Skip option Press R to return after finished This completes the list of functions under Modify Logical Drive parameters Advanced Logical Drive Operation Press 6 to access the Advanced Logical Drive operation menu Advanced Logical Drive Operation 1 Migrate...

Page 134: ...t 3 4 Disk Selection Disk Id Name Size 3 WDC WD360GD 00FNA0 36 GB 4 WDC WD360GD 00FNA0 36 GB 5 ST360015AS 59 GB Total 2 disks have been selected so far Please enter disk ids and or disk id ranges separated by commas For example 1 5 8 15 Press R to continue after you have finished selecting disks Your input Destination RAID mode selection for Logical Drive migration RAID mode options 0 RAID 0 Strip...

Page 135: ...s any key to return Start Redundancy check Use this feature to conduct a redundancy check on the logical drive of your choice Logical Drive Redundancy Check Id Logical Drive Name Mode Size 1 dggd RAID5 143 GB Select the Logical Drive for redundancy check Press R to return after finished 1 Start reduncancy check for Logical Drive 1 now y n y Logical Drive redundancy check started press any key to r...

Page 136: ... n y This completes the list of functions under Advanced Logical Drive Operation Logical Drive activity progress monitor This feature provides progress reports on logical drive operations such as migration synchronization rebuilding and redundancy check Press 7 to enable or disable the logical drive activity progress monitor Logical Drive activity progress monitor is running now Do you want to sto...

Page 137: ...r are field replaceable but they require you to power down the VTrak Figure 1 Field Replaceable Units FRUs on VTrak The primary means to identify and diagnose problems on VTrak is to observe and interpret LED colors A discussion of this process is found on the next two pages All hot swappable components can be fully diagnosed with LEDs although the Command Line Utility CLU and WebPAM each offer yo...

Page 138: ... address 192 168 10 123 If management port IP address is incorrect you will be unable to download the firmware image from TFTP server Please check to ensure the above management port IP address is correct Press Escape to return if the management port IP address is incorrect Or press any other key to continue with firmware updating Current TFTP Server IP Address 0 0 0 0 Want to modify TFTP Server I...

Page 139: ...the power 3 Unplug the power cord 4 Press the release button and pull the handle downward as shown above left 5 Pull the power supply out of the VTrak enclosure above center To install the power supply do the following 1 Carefully slide the power supply into the enclosure 2 Gently press the handle in and upward until it locks above right 3 Plug in the power cord 4 Switch on the power supply 5 Veri...

Page 140: ...al parts There are two fans in each cooling unit No tools are required for this procedure To replace a fan do the following 1 Verify that the fan LED is amber or red and note whether it is Fan 1 or 2 above 2 Press the release button and pull the handle downward as shown above Battery Fan 1 Fan 2 ...

Page 141: ...t of the VTrak enclosure An example of a VTrak cooling unit appears below To open the cooling unit do the following 1 If there is a battery on the cooling unit disconnect the battery connector above Disconnect the battery if present Loosen the thumbscrew ...

Page 142: ...134 2 Loosen the thumbscrew above A retainer keeps the thumbscrew in place 3 Grasp the top and bottom sections of the cooling unit with your hands as shown above 4 Hold the lower section and pull the upper section to the right ...

Page 143: ...upper fan is Fan 1 the lower fan is Fan 2 From the LEDs on the cooling unit see the diagram on page 132 you know which fan to replace 6 Lift the fan off the mounting pins and detach the electrical connector 7 Attach the electrical connector of the new fan and set it in place Fan 2 Fan 1 ...

Page 144: ... the cooling unit onto the bottom section and slide the top lock it in place 9 Tighten the thumbscrew 10 If there is a battery on the cooling unit reattach the battery connector 11 Carefully slide the cooling unit into the enclosure 12 Gently press the handle in and upward until it locks 13 Verify that the fan LEDs are green This completes the fan replacement procedure ...

Page 145: ...al part No tools are required for this procedure To replace a fan do the following 1 Verify that the fan LED is amber or red and note whether it is Fan 1 or 2 See Figure 2 2 Press the release button and pull the handle downward as shown above 3 Pull the cooling unit out of the VTrak enclosure An example of a VTrak cooling unit appears below ...

Page 146: ...w battery into the bracket and attach the connector 6 Carefully slide the cooling unit into the enclosure 7 Gently press the handle in and upward until it locks above 8 Verify that the battery LED is green This completes the battery replacement procedure Detach the connector Lift the battery out of the bracket ...

Page 147: ...andle and pull it toward you above left 3 Holding the handle pull the SEP out of the enclosure above center 4 Gently slide the new SEP into the enclosure 5 Press on the screen to seat the SEP above right The handle will swing in as the SEP is properly seated 6 Power up the VTrak This completes the Storage Enclosure Processor replacement procedure Important Do not replace the SEP based on LED color...

Page 148: ...em cables 3 Grasp the handle and pull it toward you above left 4 Grasp the Controller and pull it out of the enclosure above center 5 Gently slide the new Controller into the enclosure 6 Press on the front to seat the Controller above right The handle will swing in as the Controller is properly seated 7 Attach the network SCSI and null modem cables 8 Power up the VTrak This completes the RAID Cont...

Page 149: ...gical drive as a single storage device and treats it as such The RAID software and or controller handle all of the individual drives on its own The benefits of a RAID can include Higher data transfer rates for increased server performance Increased overall storage capacity for a single drive designation such as C D E etc Data redundancy fault tolerance for ensuring continuous system operation in t...

Page 150: ...ical drives are recommended for performance as well as data storage efficiency The logical drive s data capacity is equal to the number of drive members multiplied by the smallest logical drive member s capacity Figure 1 RAID 0 Striping interleaves data across multiple drives For example one 100GB and three 120GB drives will form a 400GB 4 x 100GB logical drive instead of 460 GB RAID 0 logical dri...

Page 151: ...rance Moreover if a spare disk drive is present the spare drive will be used as the replacement drive and data will begin to be mirrored to it from the remaining good drive Figure 2 RAID 1 Mirrors identical data to two drives Due to the data redundancy of mirroring the capacity of the logical drive is only the size of the smallest disk drive For example two 100GB disk drives which have a combined ...

Page 152: ... request sizes for your system The block size must be set at the time the logical drive is created and cannot be adjusted dynamically Generally RAID Level 3 tends to exhibit lower random write performance due to the heavy workload going to the dedicated parity drive for parity recalculation for each I O Figure 3 RAID 3 Stripes data and adds a dedicated Parity Drive The capacity of a RAID 3 logical...

Page 153: ...well for file database application and web servers Figure 4 RAID 5 Stripes all drives with data and parity information The capacity of a RAID 5 logical drive is the smallest disk drive size multiplied by the number of disk drives less one Hence a RAID 5 logical drive with four 100 GB disk drives will have a capacity of 300 GB A logical drive with two 120 GB disk drives and one 100 GB disk drive wi...

Page 154: ...over a second drive pair Figure 5 RAID 10 takes a data mirror on one drive pair and stripes it over two drive pairs The data capacity is similar to a RAID 1 logical drive with half of the total storage capacity dedicated for redundancy An added plus for using RAID 0 1 is that in many situations such a logical drive offers double fault tolerance Double fault tolerance may allow your logical drive t...

Page 155: ...liability good overall performance and supports larger volume sizes RAID 50 also provides high reliability because data is still available even if two disk drives fail one in each data stripe Figure 6 RAID 50 Striping of Distributed Parity logical drives RAID 50 logical drives on VTrak consist of 6 to 15 disk drives 5b 5c a parity 3a 3c b parity 1a 1b c parity 6b 6c a parity 4a 4c b parity 2a 2b c...

Page 156: ...drives are of different sizes JBOD appears in the User Interface as one or more individual drives There are no performance or fault tolerance features When a disk fails all data on the disk is lost Other disks are unaffected Figure 7 JBOD manages drives Individually unlike RAID VTrak does not support JBOD unless that feature is specially ordered 1 2 3 4 Disk Drive ...

Page 157: ...ges Disadvantages Implements a striped disk logical drive the data is broken down into blocks and each block is written to a separate disk drive I O performance is greatly improved by spreading the I O load across many channels and drives No parity calculation overhead is involved Not a true RAID because it is not fault tolerant The failure of just one drive will result in all data in an logical d...

Page 158: ...on throughput Parity drive can become bottleneck if a lot of data is being written to the logical drive Advantages Disadvantages High Read data transaction rate Medium Write data transaction rate Good aggregate transfer rate Disk failure has a medium impact on throughput File and Application servers WWW E mail and News servers Intranet servers Most versatile RAID level Advantages Disadvantages Imp...

Page 159: ...JBOD File archiving General fileserver Advantages Disadvantages High Read data transaction rate Medium Write data transaction rate Good aggregate transfer rate High reliability Supports large volume sizes Higher disk overhead than RAID 5 Advantages Disadvantages Uses 100 capacity of all hard drives The failure of one drive will result in all data being lost on that drive Should not be used in miss...

Page 160: ...he same capacity or larger Instead the Gigabyte Boundary feature permits the installation of a replacement drive that is slightly smaller within 1 gigabyte than the remaining working drive for example an 80 5GB drive would be rounded down to 80GB This can be helpful in the event that a drive fails and an exact replacement model is no longer available With VTrak this feature is always enabled Initi...

Page 161: ...esignated drive in the event of disk drive failure See Chapter 4 Command Line Utility or the WebPAM User Manual for information on how to make this setting The spare drive effectively takes the place of the failed drive and the RAID system immediately begins to rebuild data onto the drive When the rebuild is complete the logical drive is returned to fault tolerant status Once the failed drive is r...

Page 162: ...before the data is written to the disk drive the data will be lost The alternative is a write through cache which reports that the data has been written only after it actually has Automatic Flush Frequency Specifies the flush frequency for VTrak s controller cache in seconds from 2 to 60 Zero means deactivated VTrak s controller cache is equipped with a backup battery to power the cache and save t...

Page 163: ...a field replaceable unit FRU 10 second continuous beep Indicates that a logical drive is offline See Critical Offline Logical Drives on page 164 For FRUs see Back of Enclosure on page 158 CLU Reports a Problem The CLU can report a variety of problems with the VTrak In order to see them the CLU must be open Some conditions are only indicated when you select the corresponding function In this exampl...

Page 164: ...ok for the red circles in Tree View In the example above follow the trail of red circles from Host to Controller to Disk View to Disk Drive and to the Logical Drive In this case logical drive FirstLD is critical because of a problem with the disk drive in channel 4 See Critical Offline Logical Drives on page 164 ...

Page 165: ...ine Logical Drives on page 164 LEDs State Dark Green Flashing Green Amber Red Power System Off Normal n a n a n a FRU System Off Normal n a Fan or Battery Problem Fan or Battery Failed Logical Drive System Off Normal n a Logical Drive Critical Logical Drive Offline SCSI 1 SCSI 2 No Connection Connection Data Transfer n a n a Controller System Off n a Normal n a n a Field Replacement Unit n a means...

Page 166: ...play green See Critical Offline Logical Drives on page 164 Back of Enclosure When the FRU Status LED on VTrak s front panel shows Amber or Red check the LEDs on the back of VTrak These LEDs give the status of the field replaceable units LEDs State Dark Green Flashing Green Amber Red Power Activity No Drive Drive Present Reading or Writing n a n a Status No Power Drive OK n a Drive Rebuilding Drive...

Page 167: ...t that you reinstall the original component rather than a new one In most cases this action fixes a bad connection and allows VTrak to detect the component If this action does not correct the problem replace the unit See Chapter 6 for instructions LEDs State Dark Green Amber Red Power supply Not detected OK Fan failed Failed Battery Not detected OK Too hot or Low capacity Failed Fan 1 or 2 Not det...

Page 168: ...roduct to clear the problem Abort Task A normal event Result of user action Clear ACA Cleared an auto contingent alliance condition LUN Reset A normal event Result of user action Initiator Error SCSI error on the HBA card Illegal Secondary Identify A target received a second Identify message with a different LUN Message Parity Error SCSI message parity error Bus Reboot The VTrak rebooted itself An...

Page 169: ...eleted Normal Logical Drive Critical If hot spare is enabled logical drive will rebuild automatically with a new disk drive Identify and replace the failed drive Without a hot spare the logical drive will attempt to rebuild the failed drive If this action repeats remove the drive for test and repair or replacement Logical Drive Offline Go to the Promise website and download a document called Array...

Page 170: ...ialization Start Full Initialization started Normal Logical Drive Full Initialization Completed Full Initialization finished Normal Logical Drive Full Initialization Stopped User aborted logical drive Full Initialization Normal Logical Drive Quick Initialization Start Quick Initialization started Normal Logical Drive Quick Initialization Completed Quick Initialization finished Normal Logical Drive...

Page 171: ...Go to Controller management Enclosure management Voltage in CLU Or click on Enclosure1 in WebPAM to check power supply status Replace as needed Enclosure 5 Volt Range Enclosure 12 Volt Range Battery Temperature Rise Click on Enclosure1 in WebPAM to check for overheat condition Correct any problems Battery Temperature Dropped Normal Battery Capacity below threshold Replace Battery Battery Capacity ...

Page 172: ...tored in the logical drive is no longer accessible If one disk drive fails all of the data on the logical drive is lost You must replace the failed drive Then if the logical drive had more than one disk drive delete the logical drive and re create it Restore the data from a backup source When a Disk Drive Fails VTrak provides both audible and visual indicators to alert you of a disk drive failure ...

Page 173: ... Enclosure 3 Connect the failed drive to the motherboard hard drive controller of a PC If you use the Host RAID PC shut it down before you attach the failed drive for testing 4 Boot the PC using the CD or a bootable diskette 5 Run the diagnostic testing utility If there are problems with the disk drive the utility may be able to correct them 6 Examine the test results Return the disk drive to serv...

Page 174: ...They are in brand new condition and 3 You paid for them with the purchase of your Promise product SCSI Connections Products like the Promise UltraTrak use In Band SCSI technology to pass command and management information between the RAID subsystem and Host RAID PC The Promise VTrak has embedded technology and uses a network connection to pass command and management information With both of these ...

Page 175: ...ke a network connector but it is actually wired as an alternative serial connector for the CLU UltraTrak does not connect directly to a network it goes through the Host RAID PC As mentioned above UltraTrak uses In Band SCSI technology for command and monitoring The VTrak also has an RJ 45 connector on the back of its cabinet This connector is a genuine 1000 100 10BaseT connector designed to connec...

Page 176: ...VTrak 15100 User Manual 168 ...

Page 177: ...a 68 pin VHDCI external connection you can use it with VTrak If your SCSI card has a 68 pin HD external connector you can purchase an optional 68 pin HDCI to 68 pin VHDCI SCSI cable from Promise Technology Will I get maximum performance using my current 80 MB s SCSI card Do I have to buy a 160 MB s SCSI card The VTrak has a measured peak sustained throughput of 100 MB s per channel Using a 80 MB s...

Page 178: ...VTrak come with a Command Line Utility First to assign your VTrak an IP address in order for the WebPAM PRO management software to connect to it Second in the event of a network failure you can still access the VTrak and the data stored on it I created a Host on WebPAM PRO but when I click on it nothing happens What is the problem There is a broken network connection between your PC and the VTrak ...

Page 179: ... two UltraTraks and use WebPAM to monitor them Can I use my existing WebPAM setup to monitor the VTraks also You can use WebPAM PRO to monitor all of your UltraTraks and VTraks Update your WebPAM to the PRO version on the VTrak Software CD Then you can connect to each machine using the IP address of the VTrak or the UltraTrak Host PC The VTrak has no LCD panel How can I set it up and create logica...

Page 180: ...ver version numbers A description of the problem situation System configuration information including motherboard and CPU type hard drive model s ATA ATAPI drives devices and other controllers Technical Support Services USA Tech Support Center Promise Online Web Site http www promise com technical documents drivers utilities etc E mail Support support promise com Fax Technical Support 408 228 6401...

Page 181: ... com tw Fax Technical Support 886 3 564 53 13 Attention Technical Support Phone Technical Support 886 3 578 23 95 ext 8873 9 00 5 30pm Taiwan Time If you wish to write us for support Promise Technology Inc Attn Technical Support 2F No 30 Industry E Rd IX Science based Industrial Park Hsinchu Taiwan R O C E mail Support support china promise com Fax Technical Support 86 10 6872 3940 Attention Techn...

Page 182: ...aster or maintenance by anyone other than a Promise or a Promise authorized service center Disclaimer of other warranties This warranty covers only parts and labor and excludes coverage on software items as expressly set above Except as expressly set forth above Promise DISCLAIMS any warranties expressed or implied by statute or otherwise regarding the product including without limitation any warr...

Page 183: ...r party Some states do not allow the exclusion or limitation of incidental or consequential damages for consumer products so the above limitation may not apply to you This warranty gives specific legal rights and you may also have other rights that vary from state to state This limited warranty is governed by the State of California Your Responsibilities You are responsible for determining whether...

Page 184: ...and shipment of the product to Promise Note that damage incurred due to improper transport or packaging is not covered under the Limited Warranty When repairing returned product s Promise may replace defective parts with new or reconditioned parts or replace the entire unit with a new or reconditioned unit In the event of a replacement the replacement unit will be under warranty for the remainder ...

Page 185: ...r Pinout Below is the pinout diagram for the DB 9 serial connector on all VTraks The diagrams represent the connector as you see it looking at the back of the VTrak Pin Signal 1 2 RXD 3 TXD 4 5 GND 6 7 RTS 8 CTS 9 1 2 3 4 5 6 7 8 9 ...

Page 186: ...VTrak 15100 User Manual 178 ...

Page 187: ...d 113 buzzer 109 configure IP address 107 configure TFTP server IP ad dress 107 connection 47 104 create new logical drive 116 delete logical drive 117 enable disable disk write cache 113 enclosure management 109 exit 51 104 fan speed 109 firmware update 130 flush frequency 124 hot spare drive 123 logical drive auto creation 115 logical drive create 48 logical drive create automati cally 48 logica...

Page 188: ...on 82 LUN mapping 84 move from UltraTrak 169 numbering 14 rebuild 164 status 82 83 usable in VTrak 169 write cache enable disable 89 113 writeback cache enable 89 Disk drives install 9 Disk Information view 83 Disk Status LED 24 103 158 E Email Alert Notification set up 74 email messages meaning 160 Environmental 6 error messages meaning 160 Ethernet connection 22 Event Log 62 Event Notification 1...

Page 189: ...gress monitor 128 auto rebuild 89 cache settings 154 create 40 85 create automatically 48 115 create manually 49 116 critical 171 Critical status 90 164 dedicated hot spare 89 123 delete 98 117 hide from SCSI channel 119 hot spare drive 153 initialization 152 LUN setting 86 migrate 93 125 Offline status 164 partition and format 153 rebuild 92 redundancy check 127 stop redundancy check 128 stop syn...

Page 190: ...C create 38 delete 63 RAID introduction to 141 Rebuild priority 89 122 Redundancy check 127 Redundant Array of Independent Disks 141 Replace battery 137 cooling units 132 enclosure processor 139 fans 132 power supply 131 RAID controller 140 SEP 139 S S M A R T 83 84 SATA disk drive install 12 SATA to PATA Adapter 13 169 Scheduled Synchronization 96 screws counter sink 11 SCSI 1 VTrak 1 PC 1 HBA ca...

Page 191: ...urning for repair 175 subsystems on SCSI chain 169 VTrak Setup CLU 47 WebPAM PRO 35 W warning messages meaning 160 Warranty 174 WebPAM PRO access a Host 61 access host 39 assign Console LUN 43 assign IP Address 45 auto rebuild 89 battery condition 100 cache auto flush frequency 89 change alarm setting 80 change console LUN 79 change IP address 78 change password 73 change Target ID 79 controller m...

Page 192: ... set migration priority 89 set rebuild priority 89 set synchronization priority 89 set release lock 77 setup email alert notification 74 SMART check 89 synchronize logical drive 95 Target ID 42 temperature 100 uninstall 33 user permissions 65 user rights 72 voltage 100 WebPAM vs WebPAM PRO 171 WebPAM earlier version of 28 Wipe boot reserve sector 114 writeback cache enable 120 ...

Reviews: