background image


IntelliTouch

®

 Control System User’s Guide


87


Go to the 

Advanced

 screen. 

5.   From the ADVANCED screen, press 

Buttons 2 and 4 at the same time

. The Service Personnel screen 

is displayed. 

6.   Press the left or right side button next to 

Erase EEPROM All!!

7.   At the prompt, press the lower button to select 

YES

.

8.   Press the 

ERASE

 button. The screen will blink a few times then 

return to the main screen.  All system configuration data should 

now be erased and returned to the factory settings.

9.   Repeat steps 5-8 for other controllers.
10.  

At the Outdoor Control Panel press 

Reset 

and wait for the 

system to return to “AUTO” mode.

MENU

SETUP

ADVANCED

Getting There

Erasing the System Memory

IntelliTouch system circuit settings, equipment setup configuration information and screen display 

information is stored in the main Outdoor Control Panel and the Indoor Control Panel and MobileTouch 

wireless control panel. The current system configuration information automatically downloads from 

programmed control panels to update non-programmed control panels in case of accidental memory 
loss. If a circuit board replacement is necessary, system programmed memory can be erased and returned 
to the factory default settings. Once this is done, the main Outdoor Control Panel (located in the main 
Load Center or Power Center) will auto-enable all connected Indoor Control Panels. If there are multiple 

Expansion Center, iS10’s, or Indoor Control Panels or a MobileTouch control panels, each one of the 

controllers will need to be manually enabled (see page 26). 

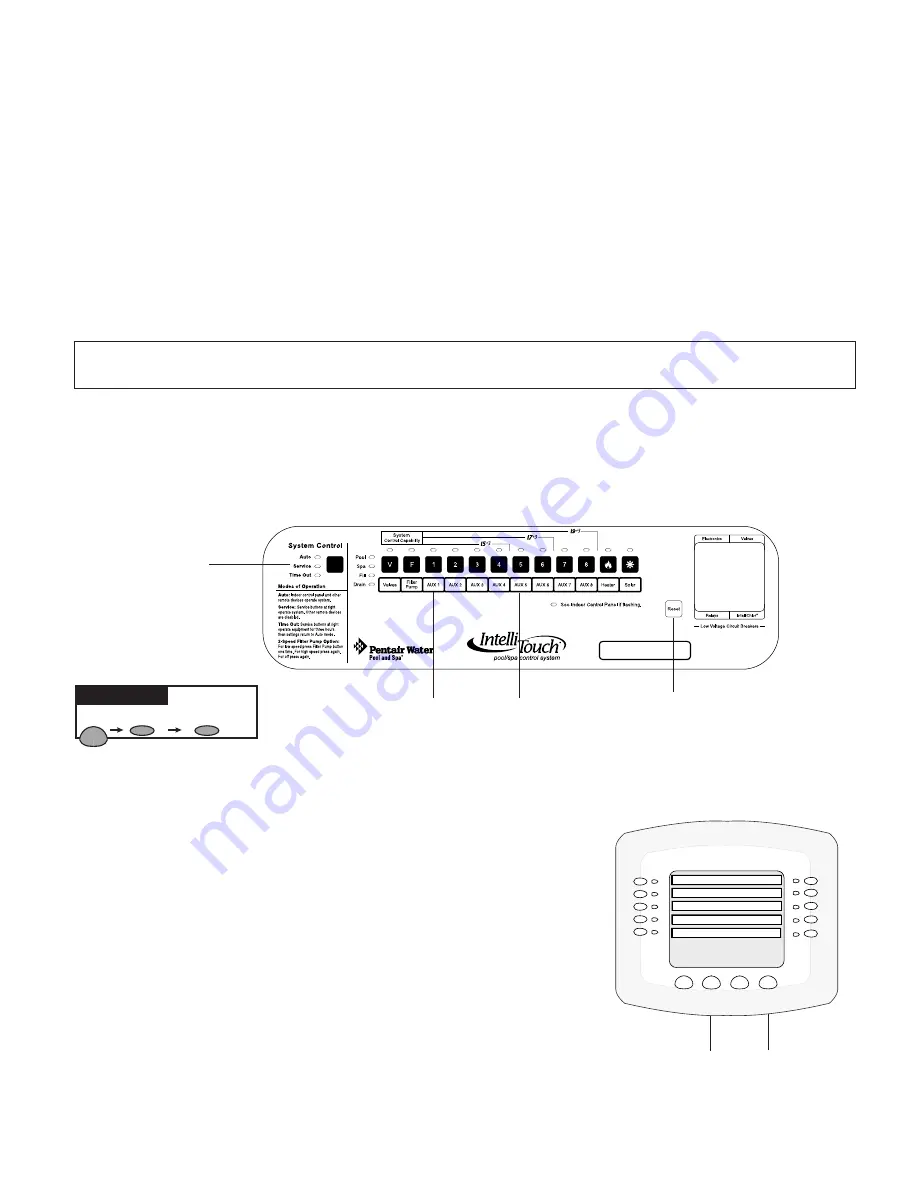
To reset to the system to the factory default settings: 

CAUTION: 

This procedure will erase all system settings. All controllers will need to be manually 

enabled again. For more information, see page 26.

1.   On the main Outdoor Control Panel (located in the main Load Center or Power Center), press the 

Reset button

. The three (3) System Control lights will be lit.

2.   Press the number 

5

 button. The System Control lights will flash OFF then back ON.

3.   While the System Control LED lights are ON, press the number 

1

 button.

4.   The System Control LED lights will begin flashing on and off.

MENU/SETUP/ADV

BACK

EXIT

CIRCUIT NAMES

CIRCUIT FUNCTIONS

CONFIGURE VALVES

SPA, RF,  &  PHONE REMOTES

CALIBRATE

Press both buttons at the same 

time to access the Service 

Personnel screen

button

button

Reset button

System 

Control Lights

Summary of Contents for INTELLITOUCH

Page 1: ...INTELLITOUCH CONTROL SYSTEM FOR POOL AND SPA IMPORTANT SAFETY INSTRUCTIONS READ AND FOLLOW ALL INSTRUCTIONS SAVE THESE INSTRUCTIONS USER S GUIDE...

Page 2: ...ater Pool and Spa Inc Aqua Rite is a registered trademark of Hayward Industries Inc AutoClear is a registered trademark of Zodiac Pool Care Crestron is a registered trademark of Crestron Electronics L...

Page 3: ...TELLITOUCH SYSTEM 7 Main Screen Indoor Control Panel and MobileTouch wireless control panel 7 IntelliTouch Menus 8 IntelliTouch Indoor Control Panel Menus 9 Heating your Spa and Pool 10 Adjust Spa or...

Page 4: ...ary Circuits 38 Assign Circuit Functions and Freeze Protection 39 Freeze Protection 39 Assigning a function and freeze protection to a circuit 39 Special Functions for Circuits 41 Setting up Lighting...

Page 5: ...t pump screen HEATPUMPCOM 72 Setting up IntelliChem Water Chemistry Controller 73 Setup Solar Equipment and Heat Pump Option 74 Setting up solar equipment 74 Setting up a heat pump and gas heater 74 S...

Page 6: ...figuration to all the systems I install 100 Fixing mismatched system personalities 101 Indoor Control Panel and Outdoor Control Panel Connection Problem 101 MobileTouch Temperature Readout Not Accurat...

Page 7: ...alcohol drugs or medication can greatly increase the risk of fatal hyperthermia in hot tubs and spas WARNING GAS HEATER The IntelliTouch automation control system is designed to supply high voltage 12...

Page 8: ...he load side of the ground fault circuit interrupter shall not occupy conduit junction boxes or enclosures containing other conductors unless such conductors are also protected by a ground fault circu...

Page 9: ...vii IntelliTouch Control System User s Guide BlankPage...

Page 10: ...Moorpark California 8 A M to 5 P M PS Phone 800 831 7133 Fax 800 284 4151 Web sites http www pentairpool com and staritepool com Download the IntelliTouch User s Guide PDF from the Web Related Intell...

Page 11: ...Module P N 520406 can be installed for use to dim any high voltage incandescent light such as Pentair Amerlite and Pentair SpaBrite Lights The dimmer module supports multiple lights from 100 watts up...

Page 12: ...spa functions of your choice This controller transmitter operates up to 150 feet range from the Load Center or Power Center SpaCommand P N 521176 10 function SpaCommand and 4 function iS4 spa side rem...

Page 13: ...tems The Tablet is custom configured for IntelliTouch systems Indoor Control Panel This control panel consists of a 3 75 monochrome backlit LCD and connects to the Personality Board in the Load Center...

Page 14: ...lity Kit models are i5 3 P N 521219 Four auxiliary circuits plus filter pump operation create a Feature circuit for valve actuators without using an existing output auxiliary circuit and special light...

Page 15: ...75 Select Menu Alarm IntelliChem Water Chemistry Controller P N 521356 Optional Equipment IntelliChem IntelliChem no pump P N 521357 one pump P N 521356 two pump P N 521355 IntelliChem Installation an...

Page 16: ...ogic2 Interface Kits The following items are included in your ScreenLogic2 Kit iPhone iPad Touch Interface Kit P N 520500 Protocol adapter for use with existing Desktop or Laptop PC iPhone iPod Touch...

Page 17: ...ote For information about the KEYPAD LOCK feature see page 80 14 53 34 33 79 33 53 54 56 71 74 75 76 7 38 34 39 81 35 79 35 36 78 81 84 12 81 44 44 12 42 46 83 76 INTELLITOUCH INDOOR CONTROL PANEL BUT...

Page 18: ...E ENABLE PROGRAM SETUP MENU PROGRAM SELECT DISPLAY EXIT BACK MENU SETUP BACK EXIT EQUIPMENT CLOCK PREFERENCE ADVANCED CIRCUIT MACROS Press MENU button PROGRAM menus SETUP menus POOL other pool circuit...

Page 19: ...33 53 54 56 71 74 75 76 7 38 34 39 81 35 79 35 36 78 81 84 12 81 44 44 12 42 46 83 76 INTELLITOUCH INDOOR CONTROL PANEL BUTTONS Pg Also see page 42 HEATPUMPCOM Pg 72 SPA OPTIONS Pg 77 MAGIC STREAM TH...

Page 20: ...or Down buttons top left and right side to raise or lower the spa water temperature The set point water temperature is displayed in the middle of the screen The spa temperature setting can be adjuste...

Page 21: ...m of the screen SPA Press the left or right side button next to SPA MODE to select the heating mode for the spa POOL Press the left or right side button next to POOL MODE to select the heating mode fo...

Page 22: ...to the name of the light Up to six 6 light circuits can be displayed in the upper part of the Light screen 2 If there are more than six 6 light circuits assigned press the NEXT GROUP to see these circ...

Page 23: ...ze their colors Note For SAm and SAL lighting setup information see Setting up Lighting Options on page 42 To activate the special lighting features press the Lights button on the bottom of the main s...

Page 24: ...then turned on at 1 10 PM the circuit will turn OFF at its programmed OFF time of 4 00 PM But if the circuit is turned on after 4 00 PM the factory set Egg Timer of 12 hours is now engaged So if the c...

Page 25: ...een will be displayed 5 Press Save to save the current program The program counter displays 1 1 indicating that you have saved one 1 program for the selected circuit To erase a program press the Clear...

Page 26: ...e button under CLEAR to reset the default settings 4 Press the left side button next to DAYS to specify the day s to run the program one time Choose EVERYDAY to run the program one time each day of th...

Page 27: ...o switch on and off at a specific time press the button next to SPA to access the Program Select screen If this is the first program the program counter displays 1 0 After this program is saved 1 1 is...

Page 28: ...on located under the display The temperature display will blink while being changed After setting the desired temperature the display will return to steady and show the actual temperature as it meets...

Page 29: ...posed to temporary splashing or wet hands However the controller is not intended to be submersed Remove unit immediately if it is dropped in the water or exposed to rain Store the unit indoors in a dr...

Page 30: ...quires replacement only use Pentair Water Pool and Spa replacement battery P N 520815Z Using the MobileTouch Wireless Controller The range of the MobileTouch wireless controller can be up to 300 feet...

Page 31: ...ler IntelliChlor Salt Chlorine Generator Accessory The IntelliChlor salt chlorinator uses a process known as electrolysis to produce Sodium Hypochlorite liquid chlorine from a low concentration of sal...

Page 32: ...scheduled water features for your pool spa cleaner waterfall and other applications The IntelliFlo VF 3050 pump can adapt to any application up to 130 gallons per minute you simply program IntelliFlo...

Page 33: ...1 for the complete list of circuit functions 5 Create and assign a feature circuit name page 79 Review the temporary circuit names from the worksheet page 89 create and assign circuit names to the aux...

Page 34: ...ators 9 Configuring the heater system options page 11 Setup gas heater heat pump or heat pump used in combination with other heating systems 10 Create Macros and Feature Circuits page 80 After the mai...

Page 35: ...liTouch system will automatically enable one each of the following wired controllers Outdoor Control Panel located in the main Load Center or Power Center Indoor Control Panel wired to the Personality...

Page 36: ...i10x which is connected to the main Load Center or Power Center Note If the first Expansion Center was installed at the same time as the main Load Center or Power Center it will automatically be assi...

Page 37: ...dditional Expansion Center 7 After each Expansion Center is enabled press Reset on the Outdoor Control Panel Wait until the red Auto and Pool LED is lit The system is ready for normal operation Note E...

Page 38: ...ait a few seconds then press the V button or 1 button 3 The three red System Control LEDs and the auxiliary button LEDs will begin cycling Wait until the LEDs stop cycling The three System Control LED...

Page 39: ...LED is illuminated the process is complete and the system is ready for operation Note For MobileTouch firmware version 1 160 2 160 The Lock On Address line displays MAN ADDRESS LOCK AUTO Press AUTO t...

Page 40: ...rt flashing 2 On the SpaCommand remote press Down arrow bottom and the first botton at the same time and the 1 button at the same time while the Outdoor Control Panel LEDs are flashing 3 SHA will be d...

Page 41: ...nel check that the red Auto LED is on The LED next to See Indoor Control Panel if Flashing is not on 4 Press the Service button to place the Load Center or Power Center in Service Mode for testing Not...

Page 42: ...hese circuit names with the circuit names of the main Load Center or Power Center 10 The system is automatically configured if there is no more than one Load Center one Expansion Center an Indoor Cont...

Page 43: ...the brightness of the LED lights Press either the left or right side button to set the LED brightness level to 100 75 50 or 25 4 To change the display backlight brightness Press either the left or rig...

Page 44: ...number of expansion Load Centers or Power Centers see page 27 for more information Assigning the system circuit names allows you to identify equipment from the Indoor Control Panel or MobileTouch wir...

Page 45: ...its SPA AUX 1 AUX 2 in the Load Center you need to assign equipment names to the corresponding auxiliary circuits in the Indoor Control Panel Using the written list of circuit names button 1 button 2...

Page 46: ...n Screen is selected Display 1 Displays the auxiliary AUX 1 AUX 2 etc circuits connected to the main Load Center The number 1 icon located in the middle lower part of the screen indicates that circuit...

Page 47: ...USER NAME 03 ____________________ USER NAME 04 ____________________ USER NAME 05 ____________________ USER NAME 06 ____________________ USER NAME 07 ____________________ USER NAME 08 _________________...

Page 48: ...able names 01 10 can be created on the first screen and ten on the next screen 11 20 Press the DISPLAY button to toggle between the two screens 2 To navigate through the alphanumeric characters use th...

Page 49: ...stop the pipes from freezing This is especially important for a pool and spa combination dual body shared equipment If freeze protection is set to both the spa and pool circuits the filter pump switc...

Page 50: ...ecial Functions for Circuits on page 41 Note When using pressure cleaners assign the circuit to Master Cleaner 3 Use the left and right side button next to ON WITH FREEZE to select YES for freeze prot...

Page 51: ...on the Indoor Control Panel when used with SAM pool lights For example you can have ALL lights on or ALL lights off or use Color Swim Color Set or Color Synch SAL Light Activates special color lighti...

Page 52: ...c time automatically begin changing their colors For more information see page 15 Setting up Color Swim and Color Set with SAm SAL or FIBERworks Both the Color Swim and Color Set feature can be config...

Page 53: ...CUIT NAMES to assign a name to the AUX AUX 1 AUX light circuit From the Circuit Names screen you can assign circuit names for the main screen and create custom names 7 Press the button next to DISPLAY...

Page 54: ...to the selected button Light names can be setup to display on the left side for Spa features and on the right side for the Pool features LIGHTS CONFIGURE NEXT TO NONE PRESS BUTTON Getting There Availa...

Page 55: ...zed For example to make the colors swim right to left make your right most light POSITION 1 You may need to go back to Step 1 and scroll through your lights to find the right most light and set it as...

Page 56: ...n different sequences of color Setting up IntelliBrite Lights To setup IntelliBrite LED light circuits first assign each light auxiliary relay circuit a circuit name then assign that light relay circu...

Page 57: ...es are circuit names that were previously assigned when assigning a circuit function If there are no circuits available for selection refer to Assigning Circuit Names on page 35 and Assigning Circuit...

Page 58: ...ment Romance mode Slow color transitions creating a mesmerizing and calming effect Caribbean Transitions between a variety of blues and greens American Mode Patriotic red white and blue transition Sun...

Page 59: ...ite light will momentarily illuminate followed by the color selection If the light was previously on pressing the color button will momentarily illuminate the previously selected color before changing...

Page 60: ...olor modes turn Thumper on off Hold and Reset For more information see the MagicStream Installation Guide P N 520969 Setting up MagicStream Laminar LED Lights To setup MagicStream laminar circuits fir...

Page 61: ...for other laminar circuits i e Pool Laminar 1 If there are no circuits available for selection refer to Assigning Circuit Names on page 35 and Assigning Circuit Functions and Freeze Protection on page...

Page 62: ...am circuits in the Circuit Functions screen and also define the AUX circuits in the Lights screen CONFIGURE 0 6 or 7 12 Random Colors will change at ten second intervals in a random sequence In this m...

Page 63: ...r Celsius Manual Priority Override of Timed Program Circuits The following example describes how the Manual Operation Priority feature affects scheduled programs Manual Op Priority OFF Default If the...

Page 64: ...SPA POOL 0 100 Displays the current spa and pool chlorination output level from 0 to 100 CONTROL ENABLED Press the button next to YES until NO is displayed to disable the control of the chlorination i...

Page 65: ...nator screen 1 Press the SUPERCHLOR button 2 The default run time for super chlorination is 24 hours Press the buttons next to HOURS TO RUN to change the run time to super chlorinate 3 Press Save when...

Page 66: ...it was in when power was removed This setup maybe appropriate if you need to use existing relays or timers Assigning an IntelliFlo VF 3050 pump address Before assigning a pump address in the IntelliT...

Page 67: ...operation that actually switches on a circuit will cause the pump to run at that speed if it is higher NOTE INTELLIFLO IN SERVICE MODE The IntelliFlo pump will STOP when IntelliTouch is in Service mod...

Page 68: ...re linked to 3 To assign a circuit name press the PREV or NEXT lower button to select a circuit name for the pump The selected circuit name must also be assigned a circuit function For details about a...

Page 69: ...r the pool volume The volume number can be a close estimate although the more accurate the better the turns will be done when employing filter mode Filter mode uses this value in coordination with the...

Page 70: ...ress the EXIT button to return to the Equipment screen Description Value Max Prime Flow GPM Default is 55 GPM Every time the pump starts this parameter will negotiate the maxi mum flow of the pump If...

Page 71: ...y to achieve the commanded flow Be sure that the system can withstand the resultant pressures To set the backwash parameters 1 From the main pump screen press the left side button next INTELLIFLO 2 On...

Page 72: ...he user will be at the pool the Blocked System will be switched off it is important not to use any kind of automatic cleaners such as Kreepy Krauly etc with Vacuum mode To set the vacuum parameters 1...

Page 73: ...st assign a circuit name Press the left side button for the selected circuit Use the PREV and NEXT button to set the circuit Then press the right side button to set the flow rate in GPM The selected c...

Page 74: ...ce watts are computed convert watts to kilowatts kilo is 1000 and multiply this number by kilowatt hour cost 1 watt 01 Kilowatt 100 watts 1 Kilowatt 1000 watts 1 Kilowatt 1 HP E WhisperFlo 1532 watts...

Page 75: ...d hold both the Start and Stop buttons until the red LED will starts flashing then press one of the four speed buttons 1 4 to select which address to assign the pump For example if you are assigning t...

Page 76: ...ndicates that you can change the pump type displayed or no change to the selected pump type Pressing the lower NO button returns you to the previous screen Pressing the same selected pump type again f...

Page 77: ...button next to PRIMING PARAMETERS 3 From the next screen you can set the pump priming time and speed Set priming time Press the top left or right side button to set the priming time from 0 to 5 minute...

Page 78: ...to adjust the speed from 400 RPM to 3450 RPM 4 Press the lower SAVE button to save the circuit and speed setting To set another circuit and pump speed press the button next to ASSIGN CUSTOM SPEEDS to...

Page 79: ...d circuit name must also be assigned a circuit function For details about assigning a circuit function see page 39 4 Press the lower SAVE button to save the circuit name and return to the previous scr...

Page 80: ...URE SETTINGS PSI when using GPM Press the right side button next to the current PSI setting Press the DOWN and UP buttons to adjust the PSI setting Press the SAVE button to save the setting 9 When fin...

Page 81: ...published on the screen convert to kilowatts and multiply by the kilowatt hour The formula is 210 watts 210 kilowatt X 08 016 per hour Remember to also consider the amount of water moved for the cost...

Page 82: ...ng it can heat or cool When cooling is selected an option heat control is displayed in the HEAT screen below the pool heat settings labeled as POOL MAX This setting allows you to set the maximum heat...

Page 83: ...y set a high and low alarm for the pH level The Delay time is the amount of time between the detected alarm condition and when IntelliChem displays the alarm message on the main screen The Delay setti...

Page 84: ...page and a natural gas heater the heat pump should be installed first in line then the gas heater The heat pump will run until the ambient air temperature is approximately 50 F at which point the heat...

Page 85: ...Cool Down and Delays For Valves MENU SETUP EQUIPMENT 2 SPEED PMP Getting There Master Spa Pool This feature keeps the pump running for ten minutes after the heater is switched off to cool down the hea...

Page 86: ...m which runs the filter pump an additional ten minutes to dissipate residual heat built up inside the heater combustion chamber The DELAY CANCEL feature is mainly for use by service technicians when t...

Page 87: ...protection time of 30 minutes to a maximum of 240 minutes in 30 minutes increments 3 Press the Save button when finished 3 Press the Exit button to return to the main screen Changing the Display to S...

Page 88: ...nal valve operators can be added to the system Configuring Valve Actuators Note If Expansion Centers are a part of the system before this screen you must select which main Load Center or Power Center...

Page 89: ...er Pump to high speed Assign a Circuit Name to a Feature Circuit Note When assigning circuit names in the Indoor Control Panel use the written list of circuit names and assigned buttons for the Outdoo...

Page 90: ...ro circuit go to the CIRCUIT MACRO screen Note To create a Macro first assign a FEATURE circuit name see page 79 assign a function to the Feature circuit see page 39 then go to the Circuit Macro scree...

Page 91: ...screen Press the button next to the circuit you wish to assign A small arrow is displayed pointing to the name of that circuit Use the Up and Down buttons at the bottom of the screen to scroll through...

Page 92: ...ontrol Go to the Spa RF and Phone Remotes screen 1 Press the button next to CONFIGURE MOD PHONE to access the Phone Remote setup screen 2 Press the top left button next to NONE 3 Press the Up or Down...

Page 93: ...operations cannot be accessed To access a locked control panel the correct previously assigned four digit passcode must been entered before access is granted Go to the KEYPAD LOCK screen To assign a...

Page 94: ...7 3 or i9 3 system there is a water sensor and an air sensor Make sure to locate the air sensor in the shade for accurate readings Make sure to locate the solar sensor in the sun for accurate readings...

Page 95: ...xit to return to the main screen Note Different controllers may have different revision levels depending on when they were installed To determine the firmware version of each controller repeat the abo...

Page 96: ...press the 2nd and 4th buttons at the same time The Service Personnel screen is displayed 2 Press the button next to Get Image from Outdoor to download system configuration data residing in the outdoo...

Page 97: ...oss If a circuit board replacement is necessary system programmed memory can be erased and returned to the factory default settings Once this is done the main Outdoor Control Panel located in the main...

Page 98: ...multiple relay connections if set up as a Macro Feature Circuits may have multiple valves assigned to them and 2 Speed without being set up as a Macro and with no other relay connection Valves A E may...

Page 99: ...IntelliTouch Control System User s Guide 89 WORKSHEET FOR SHARED EQUIPMENT SYSTEMS i5 3 i7 3 i9 3 Sheet 1 of 2...

Page 100: ...IntelliTouch Control System User s Guide 90 WORKSHEET FOR SHARED EQUIPMENT SYSTEMS i5 3 i7 3 i9 3 Sheet 2 of 2...

Page 101: ...IntelliTouch Control System User s Guide 91 WORKSHEET FOR SINGLE BODY SYSTEMS i5S 3 i9 3S Sheet 1 of 2...

Page 102: ...IntelliTouch Control System User s Guide 92 WORKSHEET FOR SINGLE BODY SYSTEMS i5S 3 i9 3S Sheet 2 of 2...

Page 103: ...IntelliTouch Control System User s Guide 93 WORKSHEET FOR DUAL EQUIPMENT SYSTEMS i10 3D Sheet 1 of 2...

Page 104: ...IntelliTouch Control System User s Guide 94 WORKSHEET FOR DUAL EQUIPMENT SYSTEMS i10 3D Sheet 2 of 2...

Page 105: ...fines the type of equipment installed The Outdoor Control Panel can be used to override the Indoor Control Panel functions for pool service and for equipment set up The Outdoor Control Panel is hinged...

Page 106: ...d P buttons operate independent filter pumps and the Heater and Solar buttons operate independent heating systems and no valve controls Expansion Centers Model i5x i10x Expansion Centers provide addit...

Page 107: ...pa Side remotes or Indoor Control Panels each one of the controllers will need to be manually enabled see pages 26 and 27 for details For instructions about erasing system memory from both the Outdoor...

Page 108: ...system equipment has been properly installed and connected to the Load Center and Power Center Testing Valve Actuators and Pumps Use the following steps to test the valve actuators CVA24T P N 263045...

Page 109: ...ed by the Pool Spa high temp or low temp circuits or any other circuit that may be tied to the filter pump such as circuits with freeze protection etc The second relay turns the pump from low speed to...

Page 110: ...details Can I copy a standard configuration to all the systems I install Yes you can but only if you maintain a standard system configuration on a system in your headquarters An Indoor Control Panel...

Page 111: ...ileTouch System information is automatically downloads from programmed components to non programmed components in case of accidental memory loss and to ease board replacement If for some reason the co...

Page 112: ...ectly to the power centerCorrect the wiring order between all units In some cases this may cause permanent damage If this occurs con tact Technical Support for replacement PCBs This is most effectivel...

Page 113: ...panel Press MENU and insure the selection reads SPA SIDE REMOTE ENABLED If it reads SPA SIDE REMOTE DISABLED press the button beside the option to toggle the selection Incorrect configu ration or cir...

Page 114: ...ption to toggle the selection Defective Wiring Verify iS10 setup Press MENU SETUP AD VANCED SPA RF PHONE REMOTES Select CONFIGURE iS10 s Ensure the iS10 in question has the expected circuit assignment...

Page 115: ...attached to the Load Center or Power Center is not correctly wired Verify Wiring and wiring order Check for broken wires and loose connections Defective Transceiver at the Load Center or Power Center...

Page 116: ...of the board using known good cable set Check all wiring Defective Receiver board Contact Technical Support COMM LINK LED does not light or blink In normal op eration LED will blink at least every 2...

Page 117: ...iver I e change the switches on both boards to an alternate but matching setting Unit dependably turns equip ment ON but once equip ment is running it does not dependably turn equipment OFF or range i...

Page 118: ...ch system Freeze protection is provided by selecting YES at the ON WITH FREEZE portion of the IntelliTouch s appropriate circuit function menu To re enable the IntelliFlo s internal anti freeze protec...

Page 119: ...troubleshooting information see the following manuals IntelliFlo VS 3050 P N 357269 and IntelliFlo VSF SVRS P N 351420 Number of time the LED will blink Alarm Description Action 2 Drive Temperature W...

Page 120: ...IntelliTouch Control System User s Guide 110 IntelliTouch Load Center System Wiring Diagram IntelliTouch System Wiring Diagram i5 3 i7 3 i9 3...

Page 121: ...IntelliTouch Control System User s Guide 111 IntelliTouch Control System Wiring Diagram i10 3D i5 3S i9 3S and i10 3D...

Page 122: ...rs PIN 4 RED 15 VDC RED PIN 3 YELLOW DATA BLACK PIN 2 GREEN DATA YELLOW PIN 1 BLACK GROUND GREEN Wiring UltraTemp to IntelliTouch Be sure to check the UltraTemp terminal block wire colors and pinouts...

Page 123: ...l that allows Each IntelliTouch system the ability to group all its attached components under a single system identification prevents the system from confusing its components from components on a neig...

Page 124: ...o 12 to receive wires from controllers and sensors wires held by screw terminals multiple wires of a small enough gauge usually 22 AWG may be coupled to a single socket of a terminal connector System...

Page 125: ...lliFlo pump with IntelliTouch first set IntelliTouch in SERVICE mode press the System Control button adn select Service on the IntelliTouch outdoor control panel 1 Shut off the power to the pump 2 Pre...

Page 126: ...NOTES...

Page 127: ...NOTES SAVE THESE INSTRUCTIONS...

Page 128: ...1620 HAWKINS AVE SANFORD NC 27330 919 566 8000 10951 WEST LOS ANGELES AVE MOORPARK CA 93021 805 553 5000 WWW PENTAIRPOOL COM 2011 Pentair Water Pool and Spa Inc All rights reserved P N 521075 REV A 0...

Reviews: