background image

6-5

6

6

1

2

7

12

17

3

13

18

8

4

14

19

9

5

10

15

20

6

11

16

21

22

27

32

37

23

33

38

28

24

34

39

29

25

30

35

40 


26

31

36

*2:

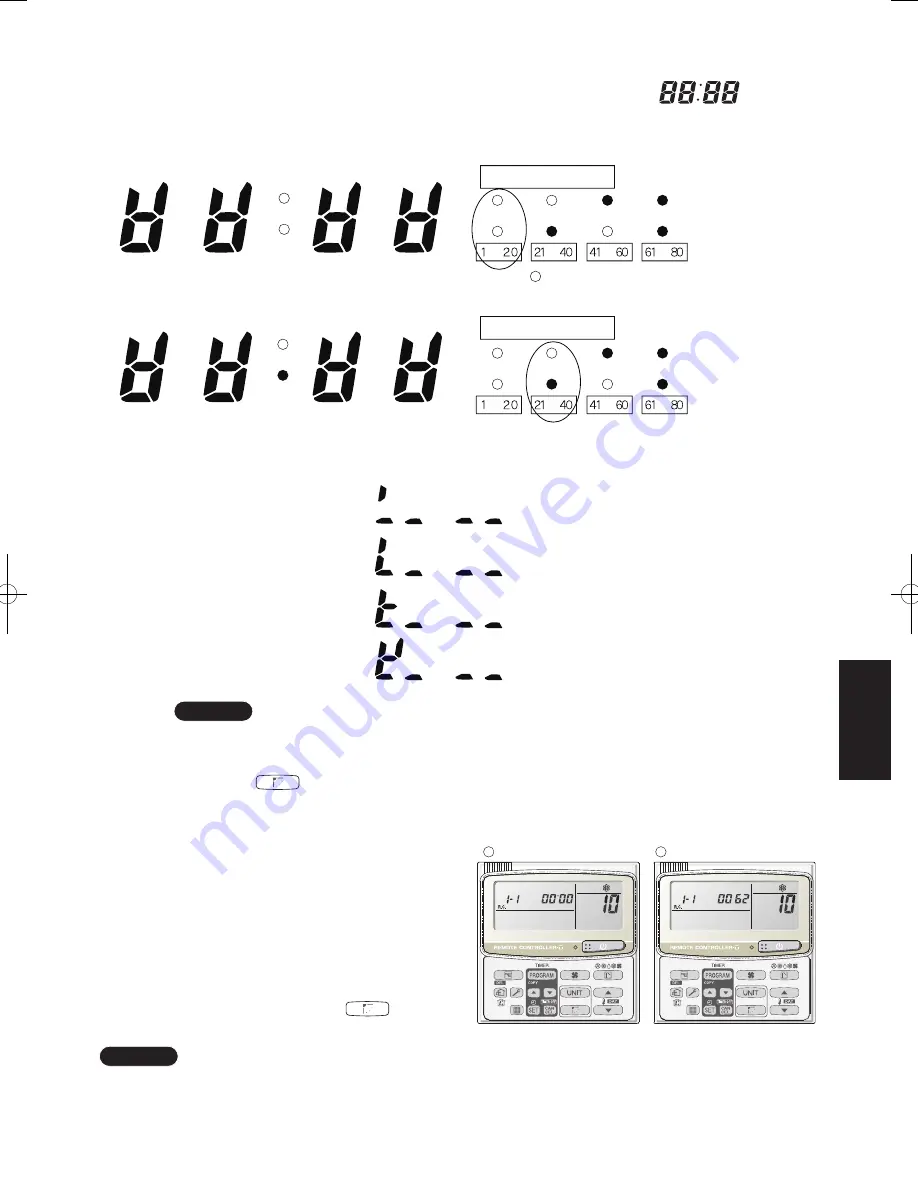
  7-segment, 4-digit display for remote controller timer display 


The connected unit Nos. are displayed as shown below, using the 7-segment 4-digit (

) display and 

the colon.

NOTE

The colon display (Unit Nos. 1 – 20, 21 – 40) changes automatically every 10 seconds.

(The display does not change if higher unit numbers do not exist.)
Pressing the 

 button switches the display immediately to the next higher level, even if 10 seconds 

have not passed.

 (A) and (B) are displayed alternately.

B

A

10: <Total compressor operating time>

*3:

  The total compressor operating time is displayed 

(in 1-hour units) using 8 digits.
• When the first 4 digits are displayed, the top 

point of the colon is lit.

• When the last 4 digits are displayed, the colon 

points are not lit.

• The display of the first 4 and last 4 digits 

changes automatically every 10 seconds. It can 

also be changed by pressing the 

 button.

NOTE

With the outdoor unit maintenance remote controller (when connected to the outdoor unit), the unit remote controller 
check functions will not operate.

10: <Total compressor operating time>

 (A) and (B) are displayed alternately.

 

Display for unit Nos. 1 – 20

 

Display for unit Nos. 21 – 40

 

The meaning of the colon display changes in the same way, allowing unit Nos. up to 80 to be displayed.

 

Sample displays of the unit Nos. of connected indoor units

Not lit

Lit

Not lit

Lit

Not lit

Lit

Not lit

Lit

Meaning of display colon

is not displayed.

Meaning of display colon

Not lit

Lit

Not lit

Lit

Not lit

Lit

Not lit

Lit

• Display of unit No. 1

• Display of unit Nos. 1 and 2

• Display of unit Nos. 1, 2, and 3

• Display of unit Nos. 1, 2, 3, and 4

SM830194-04_Single_BigPAC.indb   5

2014/10/31   13:21:22

Summary of Contents for S-200PE1E8

Page 1: ...85464849294004 REFERENCE NO SM830194 04 TECHNICAL DATA SERVICE MANUAL Outdoor Unit Indoor Unit S 200PE1E8A S 200PE1E8 S 250PE1E8 Type E1 S 200PE2E5 S 250PE2E5 Type E2 U 200PE1E8 U 250PE1E8 SM830194 11CE ...

Page 2: ...efully refer to the wiring diagram and these instructions when wiring Improper connections and inadequate grounding can cause accidental injury or death Connect all wiring tightly Loose wiring may cause overheating at connection points and a possible fire hazard Provide a power outlet to be used exclusively for each unit Provide a power outlet exclusively for each unit and full disconnection means...

Page 3: ...frigeration parts Handle liquid refrigerant carefully as it may cause frostbite When Servicing Turn the power OFF at the main power box mains before opening the unit to check or repair electrical parts and wiring Keep your fingers and clothing away from any moving parts Clean up the site after you finish remembering to check that no metal scraps or bits of wiring have been left inside the unit bei...

Page 4: ...onditioner systems is on the increase because of the need for effective use of floor space individual control and energy conservation by curtailing heat and carrying power etc Most importantly the multi air conditioner system is able to replenish a large amount of refrigerant compared to conventional individual air conditioners If a single unit of the multi air conditioner system is to be installe...

Page 5: ... Compressor 5 16 5 7 How to Remove the Electrical Component Box 5 17 5 8 Symptom Thermostat in OFF continues or cycles OFF ON too frequently 5 1 Meaning of Alarm Messages 2 2 2 2 2 2 Caution 2 2 2 3 Test Run Procedure 2 3 2 4 Items to Check Before the Test Run 2 3 2 5 Test Run Using the Remote Controller 2 3 2 6 Precautions 2 4 2 7 Table of Self Diagnostic Functions and Corrections 2 5 2 8 System ...

Page 6: ...8 2 Warning about Installing Remote Controls 8 1 Warning about Installation of Receivers 6 1 6 2 6 2 Section 6 OUTDOOR UNIT MAINTENANCE REMOTE CONTROL 6 2 Functions 6 3 6 3 Normal Display Operations and Functions 6 6 6 4 Monitoring Operations Display of Indoor Unit and Outdoor Unit Sensor Temperatures 6 7 6 5 Monitoring the Outdoor Unit Alarm History Display of Outdoor Unit Alarm History 6 7 6 6 S...

Page 7: ...37 8 SELECTING THE INSTALLATION SITE 1 55 1 68 1 76 1 78 4 Dimensions of Air Discharge Chamber 6 Dimensions of Snow proof Duct 7 HOW TO INSTALL THE OUTDOOR UNIT 9 HOW TO INSTALL THE INDOOR UNIT 1 56 1 4 Dimensional Data 1 5 Refrigerant Flow Diagram 1 6 Operating Range 1 7 Capacity Correction Graph According to Temperature Condition 1 8 Noise Criterion Curves 1 9 ELECTRICAL WIRING 1 10 Installation...

Page 8: ...wer Level dB 75 73 70 NOISE OUTDOOR H L 57 72 43 41 38 Power Level dB dB A dB A Power Level dB 75 73 70 57 72 H E A T I N G CAPACITY 22 4 76400 CURRENT 1 95 INPUT POWER W 305 22 4 76400 1 95 305 22 4 76400 1 95 305 9 70 6 015k 9 35 6 015k 9 05 6 015k 6 320k COP COP CLASS 3 54 6 320k 3 54 B 6 320k 3 54 Erp 6 Tbivalen C SCOP NOISE INDOOR H M L NOISE OUTDOOR H L EXTRALOWTEMP Total CAPACITY kW INPUT P...

Page 9: ...dB 79 77 74 NOISE OUTDOOR H L 57 72 47 45 42 Power Level dB dB A dB A Power Level dB 79 77 74 57 72 H E A T I N G CAPACITY 28 0 95500 CURRENT 3 30 INPUT POWER W 560 28 0 95500 3 20 560 28 0 95500 3 10 560 9 70 6 015k 9 35 6 015k 9 05 6 015k 6 320k COP COP CLASS 3 54 6 320k 3 54 B 6 320k 3 54 Erp 6 Tbivalen C SCOP NOISE INDOOR H M L NOISE OUTDOOR H L EXTRALOWTEMP Total CAPACITY kW INPUT POWER W COP...

Page 10: ...tdoor unit is lower than indoor unit 30 98 Refrigerant tube outer diameter Liquid tube Gas tube m ft m ft m ft mm in mm in mm in mm in mm in kg Refrigerant amount at shipment DIMENSIONS WEIGHT Unit dimensions Height Width Depth Package dimensions Height Width Depth mm in mm in mm in kg lb kg lb Net weight Shipping weight m3 cu ft Shipping volume 1 Indoor unit 9 52 3 8 25 4 1 Indoor unit 479 18 55 ...

Page 11: ...m ft m ft m ft 100 328 5 30 16 98 Outdoor unit is higher than indoor unit 30 98 Outdoor unit is lower than indoor unit 30 98 Refrigerant tube outer diameter Liquid tube mm in Gas tube mm in kg Refrigerant amount at shipment DIMENSIONS WEIGHT Unit dimensions Height mm in Width mm in Depth mm in Package dimensions Height mm in Width mm in Depth mm in kg lb kg lb Net weight Shipping weight m Shipping...

Page 12: ...ge range A Running amperes A Max Running amperes kW Power input W W C O P A Max Starting amperes FEATURES Controls Thermostat control Timer Fan speeds Indoor Outdoor Airflow direction Indoor Air filter Remote controller Option Refrigerant control Drain pump Drain connection Compressor Operation sound Indoor Hi Me Lo dB A dB A Outdoor Hi Color Approximate value Indoor Outdoor REFRIGERANT TUBING Lim...

Page 13: ...put Power source rpm No of pole r p m 230V High Coil resistance Ambient temperature 20 C Ω VAC µF Run capacitor Electronic expansion valve Coil Coil resistance at 20 C Ω Valve body Heat exchanger Coil mm Rows fin pitch m Face area 2 S 200PE2E5 220 230 240V single phase 50Hz CR 280ME2E5 SIROCCO 2 ø250 DMUB6D1AC 560W DMUB6D2AC 560W 100 391 VDC 8P 860 Aluminium plate fin Copper tube 3 1 8 0 648 ...

Page 14: ...m No of pole r p m 230V High Coil resistance Ambient temperature 20 C Ω VAC µF Run capacitor Electronic expansion valve Coil Coil resistance at 20 C Ω Valve body Heat exchanger Coil mm Rows fin pitch m Face area 2 S 250PE2E5 220 230 240V single phase 50Hz CR 280ME2E5 SIROCCO 2 ø250 DMUB8D1AC 560W DMUB8D2AC 560W 100 391 VDC 8P 1020 Aluminium plate fin Copper tube 4 1 8 0 648 1 ...

Page 15: ... ORG 6 159 1 08 0 77 ORG YEL YEL BLK BLK PNK 0 87 2 87 5 98 Safety device Operating temperature Open C Close C VAC µF Run capacitor Electronic expansion valve Coil Coil resistance at 20 C Ω Valve body Heat exchanger Coil mm Rows fin pitch m Face area 2 S 200PE1E8A 220 230 240V single phase 50Hz CR UXRP71B P Microprocessor Centrifugal 2 ø250 KFC4X 401B3P 400W 220 230 240V single phase 50Hz 4P 1 211...

Page 16: ...4 47 VLT ORG 1 20 ORG YEL 2 21 YEL BLK 10 33 BLK PNK 12 90 Safety device Operating temperature Open C Close C VAC µF Run capacitor Electronic expansion valve Coil Coil resistance at 20 C Ω Valve body Heat exchanger Coil mm Rows fin pitch m Face area 2 S 200PE1E8 220 230 240V single phase 50 60Hz CR UXRP71B P Microprocessor Centrifugal 2 ø220 KFC4X 201B5P 180W 220 230 240V single phase 50Hz 4P 1 01...

Page 17: ...r p m 230V High Coil resistance Ambient temperature 20 C Ω Safety device Operating temperature Open C Close C VAC µF Run capacitor Electronic expansion valve Coil Coil resistance at 20 C Ω Valve body Heat exchanger Coil mm Rows fin pitch m Face area 2 S 250PE1E8 220 230 240V single phase 50Hz CR UXRP71B P Microprocessor Centrifugal 2 ø250 KFC4X 401B3P 400W 220 230 240V single phase 50Hz 4P 1 211 1...

Page 18: ...h Set pressure MPa OFF 4 15 0 0 15 3 15 0 3 MPa ON Fan mm Number diameter m3 h Air circulation Fan speeds Max Fan motor Model No Source No of pole W Nominal output Safety device Operating temperature Open C Close C VAC µF Heat exchanger Coil mm Rows fin pitch m2 U 200PE1E8 380 400 415V 3 phase 50 60Hz CR C906VH8P Microprocessor 20A C 9RVN273H0K 246V DC 3 phase 60Hz Inverter drive 4 200 1 400 Disch...

Page 19: ...h Set pressure MPa OFF MPa ON Fan mm Number diameter m3 h Air circulation Fan speeds Max Fan motor Model No Source No of pole W Nominal output Safety device Operating temperature Open C Close C VAC µF Heat exchanger Coil mm Rows fin pitch m2 Face area Run capacitor U 250PE1E8 380 400 415V 3 phase 50 60Hz CR C906VH8P Microprocessor 20A 282V DC 3 phase 60Hz Inverter drive 5 500 1 900 25 R410A 6 5 2 ...

Page 20: ... 5 50 C 2 1 5 Thermistor Discharge gas sensor TH5 Resistance kΩ 60 C 12 4 5 90 C 4 6 5 70 C 8 7 5 100 C 3 4 7 75 C 7 4 5 110 C 2 5 7 80 C 6 3 5 120 C 1 9 7 85 C 5 3 5 130 C 1 5 7 Relay Comp Magnetic Contactor VAC Coil rated VAC A Contact rating Coil resistance at 20 C Ω Sol Control Valve 4 way valve 4 way valve Electro magnetic coil Thermal cut off temperature Sol control valve Magnetic coil U 200...

Page 21: ... Discharge gas sensor TH5 Resistance kΩ Relay Comp Magnetic Contactor VAC Coil rated VAC A Contact rating Coil resistance at 20 C Ω Sol Control Valve 4 way valve 4 way valve Electro magnetic coil Thermal cut off temperature Sol control valve Magnetic coil 10 C 23 7 5 20 C 6 5 5 5 C 18 8 5 30 C 4 4 5 0 C 15 0 5 40 C 3 1 5 5 C 12 1 5 45 C 2 6 5 10 C 9 7 5 50 C 2 1 5 60 C 12 4 5 90 C 4 6 5 70 C 8 7 5...

Page 22: ...ical component box 28 ø3 2 hole 26 ø3 2 hole Suspension bolt pitch 10 100 pitch 1000 Unit mm Refrigerant liquid tubing Flare Type 200 ø9 52 Type 250 ø12 7 Refrigerant gas tubing Brazing ø25 4 mm Power supply port Communication wiring port Port for optional wiring part Drain port 25A Air intake duct connecting side flange Air discharge duct connecting side flange 1 4 Dimensional Data A Indoor Units...

Page 23: ... for suspension bolt 26 ø3 5 Holes all around 28 ø3 5 Holes all around 10 100P 1000 106 44 1070 1310 67 67 1200 Suspension bolt pitch 113 236 364 364 1334 60 43 320 100 50 178 23 209 344 1230 41 Refrigerant liquid line 200 ø9 52 250 ø12 7 Refrigerant gas line ø25 4 Power supply outlet Drain port OD 32 mm Duct connection for suction Duct connection for discharge unit mm ...

Page 24: ...efrigerant tubing joint gas tube ø25 4 mm Brazing Power supply outlet Drain port O D 32 mm Duct connection for suction Duct connection for discharge 1170 Suspension bolt pitch 28 ø3 5 Holes all around 1200 Suspension bolt pitch Hole for suspension bolt 26 ø3 5 Holes all around Unit mm Min 600 Space for service Air suction side Suspension bolt pitch Min 700 Space for service Refrigerant tubing Insp...

Page 25: ...plugs to seal the remaining 3 holes Mounting hole 4 R6 5 anchor bolt M10 Refrigerant tubing liquid tube flared connection ø9 52 Refrigerant tubing gas tube flared connection ø19 05 Refrigerant tubing port Electrical wiring port ø16 Electrical wiring port ø19 Electrical wiring port ø29 Electrical wiring port ø38 Bottom removable connection port Refrigerant tubing connection port Remark There are tw...

Page 26: ...cal wiring port ø38 Bottom removable connection port Refrigerant tubing connection port Remark There are two types of supplied tubings The one tubing port ø19 05 flare process is connected to the flared connection of the gas port side s service valve The other L shaped tubing port is brazed in connection after cutting the tube at the proper length Then make a brazing connection to the main tubing ...

Page 27: ...ed to the heat exchanger Strainer Heat exchanger Strainer Distributor Heat exchanger Strainer Distributor Heat exchanger Distributor Accumulator Compressor Accumulator Gas line service valve 4 way valve Liquid line service valve Strainer Freeze prevention coil Attached to the heat exchanger Accumulator Strainer Cooling cycle Heating cycle Solenoid valve Solenoid valve Distributor Liquid tank Strai...

Page 28: ...Heat exchanger Accumulator Gas line service valve Check valve 4 way valve Liquid line service valve Freeze prevention coil Attached to the heat exchanger Strainer Heat exchanger Strainer Distributor Accumulator Cooling cycle Heating cycle Solenoid valve Solenoid valve Distributor Liquid tank Strainer ø25 4 brazing ...

Page 29: ...t exchanger Strainer Heat exchanger Strainer Distributor Heat exchanger Strainer Distributor Heat exchanger Distributor Accumulator Compressor Accumulator Gas line service valve 4 way valve Liquid line service valve Strainer Freeze prevention coil Attached to the heat exchanger Accumulator Strainer Cooling cycle Heating cycle Solenoid valve Solenoid valve Distributor Liquid tank Strainer ø25 4 bra...

Page 30: ...ir intake temp 43 C DB 15 C DB 15 C DB 20 C DB Indoor air intake temp 32 C DB 18 C DB 30 C DB 16 C DB Temperature Minimum Minimum Maximum Maximum 1 6 Operating Range Temperature Cooling Heating Outdoor air intake temp 43 C DB 15 C DB 15 C WB 20 C WB Indoor air intake temp 32 C DB 23 C WB 18 C DB 14 C WB 30 C DB WB Minimum Minimum Maximum Maximum ...

Page 31: ...atio Capacity kW Rated capacity ratio for heating 1 The graphs of the characteristics show the value under the following conditions Equivalent tubing length 7 5m Difference of elevation 0m Wind speed High 2 marking indicates the maximum capacity maximum power consumption under the JIS condition Maximum capacity indicates the maximum value in the parentheses of the specifications cooling and heatin...

Page 32: ...C 40 NC 30 NC 20 63 250 10 20 30 40 50 60 70 80 90 125 NC 70 NC 60 NC 50 NC 40 NC 30 NC 20 63 MODEL SOUND LEVEL CONDITION Sound pressure level dB 0dB 0 0002µbar Approximate minimum audible limit for continuous noise Frequency at center of sound pressure band Hz S 200PE1E8 48 dB A 45 dB A Under the unit 1 5 m Overall MODEL SOUND LEVEL CONDITION Sound pressure level dB 0dB 0 0002µbar Approximate min...

Page 33: ... minimum audible limit for continuous noise Overall Frequency at center of sound pressure band Hz Octave Band Level dB 0dB 0 0002 µbar Standard Quiet mode REMARKS NOTE 1 Value obtained in the actual place where the unit is installed may be slightly higher than the values shown in this graph because of the conditions of operation the structure of the building the background noise and other factors ...

Page 34: ...enter of sound pressure band Hz Octave Band Level dB 0dB 0 0002 µbar U 250PE1E8 72 dB A Cooling MODEL SOUND POWER LEVEL REMARKS NOTE 1 Value obtained in the actual place where the unit is installed may be slightly higher than the values shown in this graph because of the conditions of operation the structure of the building the background noise and other factors 2 The test results were obtained fr...

Page 35: ...ield wiring rules please refer to your LOCAL ELECTRICAL CODES before beginning You must ensure that installation complies with all relevant rules and regulations To prevent malfunction of the air conditioner caused by electrical noise care must be taken when wiring as follows The remote control wiring and the inter unit control wiring should be wired apart from the inter unit power wiring Use shie...

Page 36: ... installation instructions supplied with the outdoor unit Auto address setting can be executed by remote controller automatically Refer to the installation instructions supplied with the remote controller optional L2 L1 L3 N Outdoor Unit Indoor Unit 5P terminal board Power supply Power supply 2P terminal board Inter unit control wiring Inter unit control wiring U2 U1 R2 R1 L N 2 1 D B L N 2 1 L1 L...

Page 37: ... unit Outdoor unit Branch point More than 2m required Fig 1 3 Outdoor unit Indoor unit Indoor unit Indoor unit Indoor unit NO Branch point 5 Use shielded wires for inter unit control wiring c and ground the shield on both sides otherwise misoperation from noise may occur Fig 1 4 Connect wiring as shown in Section Wiring System Diagrams 6 Connecting cable between indoor unit and outdoor unit shall ...

Page 38: ...2P Black location right bottom on the outdoor main control PCB from all outdoor units except any one of the outdoor units When shipping In shorted condition 2 Do not install the inter unit control wiring in a way that forms a loop Fig 1 5 3 Use shielded wires for inter unit control wiring c and ground the shield on both sides otherwise misoperation from noise my occur Fig 1 6 Connect wiring as sho...

Page 39: ...the signal wires and the shield wires insulated in Step 2 Fig 1 12 Screw and Special washer Ring pressure terminal Terminal plate Ring pressure terminal Screw Special washer Wire Wire Ring pressure terminal Strip 10 mm Stranded wire Wiring sample Outdoor Unit 1 Earth Use this screw when connecting to ground for the Inter unit control wiring Power Supply Inter unit Control Wiring 2 Earth Use this s...

Page 40: ... mm in 9 52 3 8 12 7 1 2 Gas tube mm in Limit of tubing length L m Height Differential of Indoor Outdoor Units H1 Outdoor unit is placed higher m Outdoor unit is placed lower m Max allowable tubing length at m t n e m p i h s 25 4 100 30 30 5 30 Required additional refrigerant m g 40 80 Refrigerant charged at shipment g k 5 3 6 5 No additional charge of compressor oil is necessary If the total tub...

Page 41: ...1 L L1 2 L L2 3 L L2 4 100 Maximum distribution tubing length Maximum length following the first branch point No 1 distribution 1 2 1 2 3 L1 1 L1 2 L2 3 L2 4 20 Maximum length following the second branch point double twin 1 2 3 4 15 Sum Total Length Maximum allowable tubing length and the sum total of other tubing L 1 2 3 L L1 L2 1 2 3 4 120 Maximum branch tubing length Difference between the maxi...

Page 42: ...ubing ø9 52 c Total length of distribution tubing ø6 35 Refrigerant charge per 1 m of actual length 40 g m Refrigerant charge per 1 m of actual length 80 g m Refrigerant charge per 1 m of actual length 40 g m Refrigerant charge per 1 m of actual length 20 g m Additional refrigerant amount g Additional refrigerant for main tubing g Additional refrigerant for distribution tubing g Outdoor unit charg...

Page 43: ...ion which is interlocked with a leak detector Total refrigerant charged amount kg Min indoor volume where the indoor unit is installed m Limit density 0 3 kg m3 The limit density of refrigerant which is used in this unit is 0 3 kg m3 ISO 5149 The shipped outdoor unit comes charged with the amount of refrigerant fixed for each type so add it to the amount that is charged at the field For the refrig...

Page 44: ... Unit Type 50 Type 60 Type 71 Type 100 Type 125 Gas tube 12 7 1 2 15 88 5 8 Liquid tube 6 35 1 4 9 52 3 8 Table 1 6 Size of connection point on each part shown is inside diameter of tubing Size Part A Part B Part C Part D Part E mm ø19 05 ø15 88 ø12 7 ø9 52 ø6 35 Unit mm Distribution Joint Insulation for gas tube Distribution Joint Insulation for liquid tube Unit mm Liquid distribution joint for l...

Page 45: ...pacity If the size is the same as the tube end size cutting is not necessary If the reducer that was supplied in the package is used perform brazing on site Do not cut in such a way that applies excessive force and causes deformation of the tube This will prevent insertion of the connecting tube Cut at a position that is as far away as possible from the dowel pin After cutting the tube be sure to ...

Page 46: ... the distribution joints are horizontal with respect to the ground The collective tubes are vertical with respect to the ground The collective tube and distribution joint are horizontal with respect to the ground Collective tube Gas tube side Distribution joint Only the distribution joints are horizontal with respect to the ground The collective tubes are vertical with respect to the ground The co...

Page 47: ...er than 10 mm and fits inside the ceiling opening Outdoor Unit AVOID Heat sources and exhaust fans etc Fig 1 13 Damp humid or uneven locations DO Choose a place as cool as possible Choose a place that is well ventilated and outside air temperature does not exceed maximum 45 C constantly Allow enough room around the unit for air intake exhaust and possible maintenance Fig 1 14 Use lug bolts or equa...

Page 48: ...compressor replacement 50 cm or more is required on the front side even when using the air discharge chamber 3 Obstructions on the front side and above the unit Left side right side and rear side are opened Fig 1 16 In case of multiple installations Provide a solid base concrete block 10 40 cm beams or equal a minimum of 15 cm above ground level to reduce humidity and protect the unit against poss...

Page 49: ...ult to keep a space of min 1 m between the air discharge outlet and an obstacle The air discharge outlet is facing to the sidewalk and discharged hot air annoys the passers by Fig 1 18 Air discharge Fig 1 18 Installing the Unit in Heavy Snow Areas In locations with strong wind snow proof ducting should likewise be fitted and direct exposure to the wind should be avoided as much as possible Counter...

Page 50: ... the chamber before using Reference diagram for U 200PE1E8 U 250PE1E8 Reverse side Unit mm Air intake Reference diagram for air discharge support field supply hole Unit mm Reverse side Air discharge Air discharge Air intake Air intake Air discharge support Downward Left side installation fixture T1 0 Downward Right side installation fixture T1 0 Downward Center side installation fixture T1 0 Upwar...

Page 51: ...5 562 9 1 8 8 7 34 5 8 25 15 11 33 23 21 32 3 Reference diagram for downward left side installation fixture field supply Reference diagram for downward right side installation fixture field supply Unit mm hole Unit mm hole h o l e 2 ø3 3 protrusion hole reverse side 2 ø3 3 protrusion hole reverse side h o l e Cyclic bending ...

Page 52: ... 3 212 R 2 5 70 212 100 100 50 25 50 25 R 2 5 R 25 R 25 560 495 100 100 75 75 135 125 300 4 Reference diagram for downward center side installation fixture field supply Unit mm h o l e Cyclic bending Same on reverse side 3 ø3 3 protrusion hole reverse side ...

Page 53: ...erence diagram for upward right side installation fixture field supply Unit mm Unit mm h o l e h o l e ø3 3 protrusion hole reverse side ø3 3 protrusion hole reverse side 3 o 5 3 o 5 5 6 10 5 25 R 5 20 10 10 145 5 15 5 5 43 50 13 7 10 35 7 35 13 10 10 5 25 15 10 5 5 135 5 20 10 50 43 ...

Page 54: ... side installation fixture field supply Unit mm Unit mm h o l e hole 2 ø3 3 protrusion hole reverse side 2 ø3 3 protrusion hole reverse side Cyclic bending o 5 7 8 15 7 53 26 561 5 10 23 33 20 15 7 15 3 10 11 7 589 8 0 518 1 2 6 578 13 34 11 53 25 10 23 33 31 20 556 15 500 o 5 3 11 7 589 8 0 518 1 2 6 578 13 34 11 ...

Page 55: ...bstacles must be no taller than the height of the outdoor unit Installation in front rear rows Installation with intakes facing intakes or outlets facing outlets The front and both sides must remain open Reference diagram for air discharge chamber field supply The models of U 200PE1E8 U 250PE1E8 with Air Discharge Chamber CAUTION NOTE The amount of space required for removing the screws on the rea...

Page 56: ...owy regions if there is concern that snow may enter the wind proof duct remove the base of the chamber before using Reference diagram for U 200PE1E8 U 250PE1E8 Reference diagram for wind proof duct field supply Unit mm Unit mm hole Air intake Air discharge Air discharge Air discharge Air discharge Air discharge Air discharge rectangular hole 6 10 elongated hole 6 10 elongated hole pentagonal hole ...

Page 57: ...uct Reference diagram for U 200PE1E8 U 250PE1E8 Air Intake Air discharge Unit mm Air Intake Air discharge Reference diagram for snow proof duct field supply Unit mm 7 ø7hole Unit fixing hole Air discharge Unit top snow proof duct Unit right side Unit left side Unit front side Unit reverse side Unit reverse side Unit reverse sides reinforcement brackets for snow proof vent Unit reverse sides reinfo...

Page 58: ...es 2 and 3 the height of the obstacle must be no taller than the height of the outdoor unit 2 The amount of space required for removing the screw on the rear of the unit If in case the sufficient space for maintenance is ensured on the rear of the outdoor unit installation is possible with the space of both sides of not less than 150mm where marked with mark Notes M i n B or more M i n C or more M...

Page 59: ... ensured on the rear of the outdoor unit installation is possible with the space of both sides of not less than 150mm where marked with mark 1 Single unit installation 2 Obstacles on both sides Installation is possible with the maximum 3 outdoor units Dimension Q If a snow protection duct is attached after the unit is installed verify that dimension Q is 500 mm or more Installation in front rear r...

Page 60: ...ght of 15 cm or more at the feet on both sides of the unit 3 Routing the Tubing and Wiring The tubing and wiring can be extended out in 4 directions front rear right and down The service valves are housed inside the unit To access them remove the inspection panel To remove the inspection panel remove the 3 screws then slide the panel downward and pull it toward you 1 2 If the routing direction is ...

Page 61: ...elect a location where tubing and drain pipe have the shortest run to the outdoor unit Allow room for operation and maintenance as well as unrestricted airflow around the unit Install the unit within the maximum elevation difference above or below the outdoor unit and within a total tubing length L from the outdoor unit as detailed in Table 1 1 Allow room for mounting the remote controller about 1...

Page 62: ...0 pitch 1000 Unit mm 1 Refrigerant liquid tubing Flare Type 200 ø9 52 Type 250 ø12 7 2 Refrigerant gas tubing Brazing ø25 4 mm 3 Power supply port 4 Communication wiring port 5 Port for optional wiring part 6 Drain port 25A 7 Air intake duct connecting side flange 8 Air discharge duct connecting side flange Fig 1 24 For communication wiring port For power supply wiring port Min 800 Space for servi...

Page 63: ...e unit If the ceiling is already constructed lay the tubing into position for connection to the unit before placing the unit inside the ceiling 2 Screw in the suspension bolts allowing them to protrude from the ceiling as shown in Fig 1 25 Cut the ceiling material if necessary 3 Suspend and fix the indoor unit using the 2 hexagonal nuts field supply and special washers supplied with the unit as sh...

Page 64: ...azing Gas tubing Insulation tube Dampened shopcloths wet cloths Longer screw Cover plate The Type 200 indoor unit comes with a tube connector that is for liquid tubing Configure as shown in the illustration and connect it When flaring the tube put the flare nut onto it first and then flare it Remove the ø12 7 flare nut from the liquid tubing of the indoor unit and use it To Indoor unit Flare the t...

Page 65: ...d drain water may result in splashing out of the drain pipe 8 When the drain piping is completed perform the water leak test and check for a water leak If detected it may result in water leakage or condensation 9 When the drain piping is completed perform the drainage test if the water drains smoothly If not draining smoothly it may result in water leakage or condensation 10 When the drain piping ...

Page 66: ...nd absorbing chamber Sound absorbing chamber Air filter field supply Inspection opening Ceiling panel Indoor unit Thermal insulation Thermal insulation Air discharge Air intake Canvas connection Sound absorbing chamber Airflow control damper Fig 1 30 Use incombustible duct materials Use thermal insulation to prevent duct condensation An air filter field supply must be installed at the air intake s...

Page 67: ... setting switching OFF positions When b Manual setting has not been cancelled c Manual setting will be activated if selected but b Manual setting takes precedence when the power is switched back on after power outages etc Make sure the external static pressure is in a range of specifications Then proceed the external static pressure setting Improper settings can cause noise a shortage of airflow v...

Page 68: ...volume 270 Pa 270 Pa 140 Pa 140 Pa 60 Pa 72 Pa 6 2 1 5 1 4 3 NOTE Failure to set this parameter may result in decreased airflow and condensation 9 6 2 Operating the Timer Remote Controller CZ RTC2 How to set the external static pressure 1 Press and hold down the and buttons simultaneously for 4 or more seconds the Unit No Item Code and Detailed Data will blink on the LCD display 2 The indoor unit ...

Page 69: ...y pressing the or button Change the Code no to 5D by pressing the or button or keeping it pressed Detailed settings Unit no Code no Set data 1 0 0 0 1 3 Sel Next 20 30 THU 5D 4 Select the Set data by pressing the or button Select one of the Set data among 0006 0003 or 0001 according to the desired external static pressure setting by pressing the or button Then press the button See the table below ...

Page 70: ...0 55 60 65 70 5 3 1 9 7 4 8 6 2 L M H L M H L M H Pa External static pressure Airflow Volume m3 min Airflow Volume m3 min L i m i t l i n e Limit line Limit line Limit line Limit line Limit line Type 250 0 20 40 60 80 100 120 140 160 180 200 220 240 260 280 300 320 45 50 55 60 65 70 75 80 85 90 5 3 1 9 7 4 8 6 2 L L L M M M H H H Pa External static pressure L i m i t l i n e Limit line Limit line ...

Page 71: ...pension bolt pitch Min 700 Space for service Air suction side Refrigerant tubing Inspection access Electrical component box Min 130 Min 610 Drain port Drain pan Ceiling face It is recommended that space be provided 600 600 mm for checking and servicing the electrical system Fig 1 34 shows the detailed dimensions of the indoor unit 479 300 100 2 100 100 42 1428 1310 71 1100 51 964 9x100P 900 10x100...

Page 72: ...s supplied with the unit as shown in Fig 1 37 3 Installing the Refrigerant Tubing The size of the refrigerant tubing is as shown in Table 1 5 Table 1 9 Type 200 Type 250 Gas tube mm ø25 4 Brazing connection ø25 4 Brazing connection Liquid tube mm ø9 52 Flare connection ø12 7 Flare connection When brazing the gas tubing cool the tubing with dampened shopcloths as you work as shown in Fig 1 38 to pr...

Page 73: ...lt in water leakage from condensation Plug all gaps at tube through holes in the unit with insulation or a similar substance to prevent air leakage Fig 1 39 4 Installing the Drain Pipe 1 Prepare standard hard PVC pipe O D 32 mm for the drain and use the supplied drain socket to prevent water leaks The PVC pipe must be purchased separately When doing this apply adhesive for the PVC pipe at the conn...

Page 74: ...pper tubing with a tube reamer or file This process is important and should be done carefully to make a good flare Be sure to keep any contaminants moisture dirt metal filings etc from entering the tubing Figs 1 40 and 1 41 When reaming hold the tube end downward and be sure that no copper scraps fall into the tube Fig 1 41 3 Remove the flare nut from the unit and be sure to mount it on the copper...

Page 75: ...he tubing be sure to use 2 adjustable wrenches or spanners Fig 1 45 If the flare nuts are over tightened the flare may be damaged which could result in refrigerant leakage and cause injury or asphyxiation to room occupants For the flare nuts at tubing connections be sure to use the flare nuts that were supplied with the unit or else flare nuts for R410A Type 2 The refrigerant tubing that is used m...

Page 76: ...ed Heat resistant 120 C or above Flare union Flare nut Unit side Fig 1 47 Insulation material The material used for insulation must have good insulation characteristics be easy to use be age resistant and must not easily absorb moisture After a tube has been insulated never try to bend it into a narrow curve because it can cause the tube to break or crack Never grasp the drain or refrigerant conne...

Page 77: ...tubing with a tube reamer or file This process is important and should be done carefully to make a good flare Be sure to keep any contaminants moisture dirt metal filings etc from entering the tubing Figs 1 50 and 1 51 When reaming hold the tube end downward and be sure that no copper scraps fall into the tube Fig 1 51 3 Remove the flare nut from the unit and be sure to mount it on the copper tube...

Page 78: ...t with each other then screw on the flare nut lightly at first to obtain a smooth match Fig 1 54 Fig 1 54 Adjust the shape of the liquid tube using a tube bender at the installation site and connect it to the liquid tubing side valve using a flare Apply refrigerant lubricant Flare nut Union 2 Connecting Tubing Between Indoor and Outdoor Units 1 Preparing the Tubing The tubing of the gas main has a...

Page 79: ... When removing or tightening the gas tube flare nut use 2 adjustable wrenches together one at the gas tube flare nut and the other at part A Fig 1 56 For the flare nuts at tubing connections be sure to use the flare nuts that were supplied with the unit or else flare nuts for R410A Type 2 The refrigerant tubing that is used must be of the correct wall thickness as shown in the table below Tube dia...

Page 80: ... be heat resistant to 80 C or above Insulation material thickness must be 10 mm or greater If the conditions inside the ceiling exceed DB 30 C and RH 70 increase the thickness of the gas tubing insulation material by 1 step Two tubes arranged together Fig 1 58 If the exterior of the outdoor unit valves has been finished with a square duct covering make sure you allow sufficient space to access the...

Page 81: ...lf of each previous tape turn 3 Clamp the tubing bundle to the wall using 1 clamp approx each meter Fig 1 60 Fig 1 60 Do not wind the armoring tape too tightly since this will decrease the heat insulation effect Also ensure that the condensation drain hose splits away from the bundle and drips clear of the unit and the tubing 5 Finishing the Installation After finishing insulating and taping over ...

Page 82: ...t the time of shipment is only guaranteed sufficient for a tubing length of up to 30 m The tubing may exceed this length up to the maximum permitted length however an additional charge is necessary for the amount that the tubing exceeds 30 m No additional refrigerating machine oil is needed 1 Leak Test 1 With the service valves on the outdoor unit closed remove the 7 94 mm flare nut and its bonnet...

Page 83: ...harge using the liquid tube service valve Fig 1 66 Use a balance to measure the refrigerant accurately If the additional refrigerant charge amount cannot be charged at once charge the remaining refrigerant in liquid form by using the gas tube service valve with the system in Cooling mode at the time of test run Fig 1 67 If an additional refrigerant charge has been performed list the refrigerant tu...

Page 84: ...plied G Thermistor for Liquid pipe E1 H Thermistor for Heat exchanger pipe middle E2 I Thermistor for Suction air TA J Inter unit wiring K Magnetic relay for operating the blower Field supplied Strainer Liquid pipe Gas pipe Min ø25 4 100 Field supply System piping length Charging with refrigerant At the time of shipment from the factory the outdoor unit is charged with enough refrigerant for an eq...

Page 85: ...liquid pipe thermistor to the liquid pipe located in the lowest position after distributer in heat exchanger Cover the thermistor and pipe with aluminum tape Cover the thermistor and pipe with aluminum tape Thermal insulation and wiring are fixed in two bands Cover the aluminum tape with thermal insulation Installation of Strainer Field supplied Attach the strainer to the side of the outdoor unit ...

Page 86: ...ont area is shown in the following Table 1 10 1 11 1 12 The limitation of temperature range is shown below Table 1 10 Inside volume of heat exchanger Table 1 11 Air volume of heat exchanger Table 1 12 Front area of heat exchanger Cooling Capacity 20 kW 25 kW 1 0 m2 1 0 m2 0 54 m2 0 66 m2 Front area 1 2 3 4 X1 Minimum applicable load DC 5 V 1 mA Maximum applicable load AC 230 V 2 A SW 1 operation c...

Page 87: ...t exchanger hairpin Minimum number of passes Number of steps Distance between tube sheets Number of rows 1 5 10 4 For example Number of steps 12 Distance between tube sheets 1000 mm Number of rows 3 Minimum number of passes 12 1000 3 1 5 10 4 5 4 6 passes ...

Page 88: ...1 82 MEMO ...

Page 89: ...ntrol 2 8 Test Run Procedure 2 9 Items to Check Before the Test Run 2 10 Preparation for Test Run 2 11 Test Run 2 12 Precautions 2 13 Table of Self Diagnostic Functions and Corrections 2 14 System Control 2 15 Caution 2 16 Test Run Procedure 2 17 Items to Check Before the Test Run 2 18 Test Run Using the Remote Controller 2 19 Table of Self Diagnostic Functions and Corrections 2 20 Automatic Addre...

Page 90: ...sed in a single type refrigerant system where 1 outdoor unit is connected to 1 indoor unit The indoor and outdoor unit control PCB utilizes a semiconductor memory element EEPROM The settings required for operation were made at the time of shipment Only the correct combinations of indoor and outdoor units can be used This test run section describes primarily the procedure when using the wired remot...

Page 91: ...m of 10 minutes in order to check for open phase When performing a test run using a wired remote controller operation is possible without attaching the cassette type ceiling panel P09 will not be displayed 2 6 Precautions Request that the customer be present when the test run is performed At this time explain the operation manual and have the customer perform the actual steps Be sure to pass the m...

Page 92: ...s not connected correctly Same at left Refer to 2 8 System Control and make the correct settings E15 displayed Indoor unit capacity is too low Same at left Same at left Check that the total capacities of the indoor and outdoor units are appropriate E16 displayed Indoor unit capacity is too high E20 displayed No serial signal is being received at all from the indoor units Check that the indoor unit...

Page 93: ...tdoor units 1 2 Connect the other outdoor units and indoor units with different refrigerant systems in the same way Inter unit control wiring Connect the remote controller communication wiring to the indoor units U1 U2 for each refrigerant system Inter unit control wiring 3 Connect the remote controller communication wiring 2 wires from the remote controller wiring terminal plate 1 2 on the indoor...

Page 94: ... is completed the units return to normal stopped status To select each refrigerant system individually and perform automatic address setting press the remote controller timer time button and button simultaneously Hold for 4 seconds or longer Then press either of the temperature setting buttons Item code A1 appears Individual system automatic address setting Use either the or button to select the o...

Page 95: ... operating and indicate the address on the indoor unit Press the button again to return to the normal remote controller mode For details refer to the separate manual 2 8 5 Main sub remote controller control Control using 2 remote controller switches Main sub remote controller control refers to the use of 2 remote controllers to control 1 or multiple indoor units A maximum of 2 remote controllers c...

Page 96: ...Automatic Address Setting See 2 12 Can operation be started Slide the indoor unit control switch back to ON See 2 12 Turn ON the indoor and outdoor power Automatic Address setting See 2 15 2 In case of group control Confirm wiring is done in accordance with Fig 2 Basic Wiring See 2 15 3 to 2 15 6 How to Set Automatic Address Set the automatic address setting from outside unit See 2 14 Refer to Tab...

Page 97: ...s selected the sensor will be automatically switched to the indoor unit body sensor if no temperature signal has been received from the remote controller for 10 minutes Install the remote controller in a position where the signal can be reliably received by the unit When group control is engaged be sure to use the body sensor 2 11 2 Using the remote controller Face the remote controller toward the...

Page 98: ... explain the operation manual and have the customer perform the actual steps Be sure to pass the manuals and warranty certificate to the customer Check that the 220 240 V AC wiring is not connected to the inter unit control wiring connector terminal If 220 240 V AC is accidentally applied the indoor or outdoor unit control PCB fuse 0 5 A for both indoor and outdoor units will blow in order to prot...

Page 99: ...ot connected correctly Refer to 2 15 System Control and make the correct settings E15 displayed displayed Indoor unit capacity is too low Same at left Check that the total capacities of the indoor and outdoor units are appropriate E16 displayed Indoor unit capacity is too high Same at left Reverse 2 phases of the outdoor unit 3 phase power and connect them correctly P05 displayed Operation lamp an...

Page 100: ...nd outdoor unit power is turned ON automatic address setting is performed when there is only 1 outdoor unit or when the system address is 0 If the system address is 0 automatic address setting is performed when the power is turned ON in the case shown in Basic wiring diagram 1 This requires approximately 4 5 minutes when the outdoor indoor unit ratio is 1 1 as shown in Basic wiring diagram 1 Durin...

Page 101: ...r unit where the power was turned ON Communication for automatic address setting begins LED 1 and 2 on the outdoor unit control PCB blink alternately and turn OFF when address setting is completed Approximately 4 5 minutes are required 2 Next turn ON the power only at the indoor and outdoor units in a different system Press the automatic address setting button black on the outdoor unit LED 1 and 2...

Page 102: ...ntroller address display ALL 1 2 3 Indoor unit PCB address DIP switch 1 2 3 6 5 4 3 2 1 ON ON OFF Address 1 2 3 6 5 4 3 2 1 ON ON OFF Address 1 2 3 6 5 4 3 2 1 ON ON OFF Address 1 2 3 6 5 4 3 2 1 ON ON OFF Address For address switches 1 2 and 3 turn DIP switch 1 to OFF For address switches 4 5 and 6 turn DIP switch 1 to ON 1 2 3 ON Address Address Address Address Address switch Test Remote control...

Page 103: ... customer Check that the 220 240 V AC wiring is not connected to the inter unit control wiring connector terminal If 220 240 V AC is accidentally applied the indoor or outdoor unit control PCB fuse will blow in order to protect the PCB Correct the wiring connections then disconnect the 2P connectors indoor blue OC outdoor blue serial 1 that are connected to the PCB and replace them with 2P connect...

Page 104: ...s setting from outside unit or remote controller Indicate mark the combination number See 2 21 3 4 Turn ON the indoor and outdoor power Automatic Address Set the remote controller to test run See 2 19 Can operation be started Return the remote controller to normal control Turn ON the indoor and outdoor power Automatic Address See 2 20 Refer to Table of Self Diagnostic Functions to check the system...

Page 105: ...eration lamp is blinking Automatic address setting has not been completed Inter unit control wiring is cut or is not connected correctly Remote controller is not connected with indoor unit correctly Check the remote controller and inter unit control wiring Perform automatic address setting 2 21 E02 displayed Remote controller is not connected with indoor unit correctly Connect the remote controlle...

Page 106: ...controller Indoor unit NOTE Automatic address setting from the outdoor unit Case 1 If the power can be turned ON separately for the indoor and outdoor units in the system the indoor unit addresses can be set without running the compressor 1 Turn on the indoor and outdoor unit power for refrigerant system 1 Press and hold the automatic address setting button black for 1 second or longer at the outd...

Page 107: ...ils LED 1 and 2 blink simultaneously and the alarm contents are displayed at the remote controller 4 After 1 system is completed be sure to press the automatic address setting button black at the other outdoor units to complete automatic address setting in the same way for each system 5 Operation using the remote controller is now possible Automatic address setting using the remote controller Case...

Page 108: ...ting is completed Fig 2 16 2 21 2 Setting Outdoor unit system addresses For the basic wiring diagram Set the system addresses 1 2 3 8 10 HP Fig 2 17 System address No System address 10s digit 2P DIP switch System address 1s place Rotary switch 0 Automatic address Setting at shipment 0 Both OFF ON 1 2 ON OFF 0 setting 1 If outdoor unit is No 1 Both OFF ON 1 2 ON OFF 1 setting ON 1 2 DIP switch Syst...

Page 109: ... to the normal remote controller mode Fig 2 18 2 21 4 Indicating marking the Indoor and Outdoor unit combination number Indicate mark the number after automatic address setting is completed 1 So that the combination of each indoor unit can be easily checked when multiple units are installed ensure that the indoor and outdoor unit numbers correspond to the system address number on the outdoor unit ...

Page 110: ...service port of the gas tube service valve Short circuit the PUMP pin on the outdoor unit control PCB for over 1 second Refrigerant recovery will start and the unit starts driving During the refrigerant recovery LED1 blinks and LED2 lights up on the outdoor unit control PCB Remote control display shows blinks 4 Fully close the liquid tube service valve after 2 or 3 minutes Pump down will start 5 W...

Page 111: ...3 1 3 3 ELECTRICAL DATA 3 1 Outdoor Units Electric Wiring Diagram Schematic Diagram 3 2 3 2 Indoor Units Electric Wiring Diagram Schematic Diagram 3 4 High Static Pressure Ducted Type ...

Page 112: ...3 2 3 3 1 Outdoor Units Electric Wiring Diagram U 200PE1E8 U 250PE1E8 ...

Page 113: ...3 3 3 Schematic Diagram U 200PE1E8 U 250PE1E8 ...

Page 114: ...3 4 3 3 2 Indoor Units High Static Pressure Ducted Type S 200PE2E5 S 250PE2E5 Electric Wiring Diagram ...

Page 115: ...3 5 3 3 2 Indoor Units High Static Pressure Ducted Type S 200PE1E8A Electric Wiring Diagram ...

Page 116: ...3 6 3 3 2 Indoor Units High Static Pressure Ducted Type S 200PE1E8A Schematic Diagram ...

Page 117: ...3 7 3 3 2 Indoor Units High Static Pressure Ducted Type S 200PE1E8 Electric Wiring Diagram ...

Page 118: ...3 8 3 3 2 Indoor Units High Static Pressure Ducted Type S 200PE1E8 Schematic Diagram ...

Page 119: ...3 9 3 3 2 Indoor Units High Static Pressure Ducted Type S 250PE1E8 Electric Wiring Diagram ...

Page 120: ...3 10 3 3 2 Indoor Units High Static Pressure Ducted Type S 250PE1E8 Schematic Diagram ...

Page 121: ...rol Functions 4 2 4 2 Outdoor Unit Control PCB 4 8 4 3 Outdoor Unit Filter PCB FIL C906VH8 4 9 4 4 Outdoor Unit HIC Board HIC C906VH8 4 10 4 5 Outdoor Unit Control PCB CR C906VH8P 4 11 4 6 Indoor Unit Control PCB Switches and Functions 4 13 ...

Page 122: ...verter is limited by either of the following controls depending on whether the cooling or heating mode is in operation Cooling Mode Indoor air temperature control Maximum and minimum frequency control Current release control Cooling high load prevention control Cooling freeze prevention control Discharge temperature control Heating Mode Indoor air temperature control Maximum and minimum frequency ...

Page 123: ...ance with outdoor air temperature 2 Current release control with secondary current Values are fixed regardless of outdoor air temperature U 200PE1E8 U 250PE1E8 I A 14 5 15 5 4 Cooling High Load Prevention Control This control is performed to limit the inverter frequency in order to restrict abnormal increases in pressure and high load operations in the cooling mode In accordance with the temperatu...

Page 124: ... compressor is decreased The operation frequency is amended every 30 seconds as long as the temperature is in this zone 2 If the temperature is in the K zone operating frequency increase prevention zone the operating frequency of the compressor is maintained 3 If the temperature is in the H zone operating frequency restriction zone and the outdoor air temperature is less than 32 C the maximum oper...

Page 125: ...e sensor TD such controls are performed as to limiting the increase of inverter frequency decreasing it or halting operation of the compressor TD discharge 115 105 100 95 80 13 0 Y 10 3 8 19 4 X If the discharge temperature exceeds 115 C operations of the compressor are halted and then restarted 3 minutes later If this start stop activity is repeated 4 times consecutively the alarm P03 abnormal di...

Page 126: ...e controls the amount of refrigerant that is allowed to flow in accordance with the operation status The valve is adjusted in accordance with the discharge temperature TD the outdoor heat exchanger temperature sensor C1 the suction temperature sensor TS and the indoor unit s heat exchanger temperature sensors E1 and E2 1 Cooling Mode Controlled so that the section temperature TS indoor heat exchan...

Page 127: ... chapter on the outdoor maintenance remote controller Refor to the section 6 6 Settings Modes Setting the Outdoor Unit EEPROM A value amendments Parameters are amended with item code 50 demand 1 B value amendments Parameters are amended with item code 51 demand 2 2 Demand Control with No External Input Demand control is carried out proportionally with the normal settings from the outdoor unit with...

Page 128: ... RC_P CN039 LED2 LED1 MODE CN038 R C ADD S002 S003 EEPROM memory IC TEST CN033 EXCT CN030 SILENT CN037 PUMP DOWN CN048 Sensor at upper side of heat exchanger C2 Sensor at lower side of heat exchanger C1 A ADD CN047 Suction temp TS Outdoor air temp TO Comp discharge temp TD ...

Page 129: ...4 9 4 4 3 Outdoor Unit Filter PCB FIL C906VH8 ...

Page 130: ...4 10 4 4 4 Outdoor Unit HIC Board HIC C906VH8 ...

Page 131: ... be connected In the case of group control or central control set the system address to a setting other than 0 1 or above If the number of systems is greater than 9 this switch can be used in combination with DIP switch S003 to set up to 30 systems The setting can be made as high as 39 however all settings above 30 are handled as 30 for control For details refer to Table 4 1 If system addresses ar...

Page 132: ...ethod of System Address Setting S002 rotary black S003 2P DIP switch blue Outdoor system address No S002 setting system address switch S003 setting 1P 10s digit place 2P 20s digit place 1 system only 1 0 OFF OFF Central control 1 2 3 4 5 6 7 8 9 1 2 3 4 5 6 7 8 9 OFF OFF OFF OFF OFF OFF OFF OFF OFF OFF OFF OFF OFF OFF OFF OFF OFF OFF 10 11 12 13 14 15 16 17 18 19 0 1 2 3 4 5 6 7 8 9 ON ON ON ON ON...

Page 133: ... be used for short term tests JP1 JP001 Jumper wire Allows selection of the T10 terminal start stop signal Refer to the Remote Control Section Setting at time of shipment Pulse signal Jumper wire cut Static signal continuous signal Fan drive 2P plug WHT This terminal sends the signal to the ventilation fan when a commercially available ventilation fan is operated by the FAN button on the wired rem...

Page 134: ...4 14 4 For AC Fan Motor CR UXRP71B P X EMG CN044 DISP CN072 CHK CN071 T10 CN061 EXCT CN073 GRL CN020 JP001 FAN DRIVE CN032 POWER LED D002 OC CN040 EEPROM IC010 ...

Page 135: ...4 15 4 Indoor Unit Control PCB CR 280ME2E5 S 200PE2E5 S 250PE2E5 X POWER LED D002 EEPROM IC010 EMG CN044 OC CN040 DISP CN063 CHK CN062 T10 CN061 EXCT CN073 JP001 FAN DRIVE CN032 ...

Page 136: ... MEMO 4 16 ...

Page 137: ... Unit Control PCB 5 4 5 3 Symptoms and Parts to Inspect 5 5 5 4 Details of Alarm Messages 5 8 5 5 Table of Thermistor Characteristics 5 14 5 6 How to Remove the Compressor 5 15 5 7 How to Remove the Electrical Component Box 5 16 5 8 Symptom Thermostat in OFF continues or cycles OFF ON too frequently 5 17 ...

Page 138: ... unit Error in receiving serial communications signal E04 Error in transmitting serial communications signal E05 Outdoor unit is detecting error signaled from indoor unit Error in receiving serial communications signal including unit quantity verification failure E06 Error in transmitting serial communications signal E07 Automatic address setting failed Indoor unit capacity too low E15 Indoor unit...

Page 139: ... fan trouble P22 Inverter compressor trouble HIC PCB P26 Inverter compressor trouble MDC P29 Simultaneous operation multi control trouble P31 Compressor current failure overload H01 Thermistor fault Thermistor open circuit Short circuit indoor Indoor heat exchanger temperature sensor E1 F01 Indoor heat exchanger temperature sensor E2 F02 Indoor temperature sensor F10 Thermistor open circuit Short ...

Page 140: ...ow Insufficient gas indicator Refrigerant recovery mode Automatic address setting Automatic address setting in progress Automatic address setting alarm E15 Automatic address setting alarm E20 Automatic address setting alarm Other than E15 and E20 0 25 0 75 0 75 0 25 0 25 0 75 0 75 0 25 Blinking alternately Blinking simultaneously Blinking simultaneously Blinking simultaneously ON Blinking 0 25 0 7...

Page 141: ...xchanger temperature drops even though the compressor is switched on during the heating mode min E1 E2 is 10 or lower The indoor unit heat exchanger temperature rises even though the compressor is switched on during the cooling mode E2 is 50 or higher Pre trip 2 times Recovery at restart 1 Check 4 way valve 2 Check 4 way valve wiring 3 Check outdoor unit control PCB P20 High pressure protection er...

Page 142: ...sensor TO 2 Check outdoor unit control PCB F12 Disconnection open circuit or short circuit in suction temp sensor TS Open circuit or short circuit Automatic recovery 1 Check suction temp sensor TS 2 Check outdoor unit control PCB F31 EEPROM trouble Reading writing failure Power reset recovery 1 Check EEPROM IC007 2 Check outdoor unit control PCB L02 Indoor and outdoor units incompatible Indoor uni...

Page 143: ...iring 2 Check indoor and outdoor unit control PCB E20 Automatic address setting failure Outdoor unit cannot receive any serial signals from indoor units Power reset recovery 1 Check inter unit control wiring 2 Check indoor and outdoor unit control PCB E22 Miswiring error Inter unit connection are miswiring error Missing phase for the outdoor unit power supply Power reset recovery Check wiring E31 ...

Page 144: ...the outdoor unit HIC PCB side U CN202 pink V CN203 white W CN204 blue As the compressors used with the U 200PE1E8 and U 250PE1E8 are different there is a possibility that a P29 error will be triggered if the unit s capacity settings are incorrect No Abnormal resistance value No problem with the resistance value Inspection Method Remove the HIC PCB and measure the resistance at all areas See attach...

Page 145: ...checked Is the high pressure for the refrigerant cycle within the range High load operating Does the alarm P26 occur when the U V W wires pink white blue are disconnected from the HIC PCB and operation was started Was everything OK when to in the diagnosis flow of alarm P29 were checked Replace the compressor Correct the connection between the HIC PCB and heat sink Operating on high load Recovery ...

Page 146: ...versed tester measuring terminal Between terminals Resistance Between terminals Resistance Tester terminal Tester terminal Tester terminal Tester terminal HIC 100 k HIC HIC 100 k U 100 k 100 k 100 k 5 k V 5 k W HIC HIC HIC W 1 k 1 k 1 k 5 k Be sure to measure by an analog tester The table shows the value measured in k Normal No Is E31 displayed even after the power voltage is reset Yes Replace out...

Page 147: ...ontrol PCB Yes Start of defect diagnosis Does the fan rotate without resistance when spun manually after the connectors CN003 CN005 CN041 and CN042 are disconnected from the outdoor unit control PCB Normal operation Outdoor unit control PCB is faulty Replace Complete No Yes No Yes Correct the connections Fan motor trouble Replace Fan motor trouble Replace ...

Page 148: ...ectly to the outdoor unit control PCB Yes Start of defect diagnosis Correct the connections Are the characteristics of resistance values of the sensors C2 C1 TS TO and TD sensors normal Replace the sensors C2 C1 TS TO and TD No Yes Check the outdoor unit control PCB Replace if PCB has failed Refer to 5 5 Table of Thermistor Characteristics ...

Page 149: ...emote controller operation NOTE The temperature display reads for units that are not connected If monitor mode is selected during normal operation the only parts of the LCD that change are those shown in the figure 2 All other displays do not change and remain as they were during normal operation Sensor Temperature Correlation Table Sensor installation location Sensor address Sensor type Sensor ad...

Page 150: ...0 80 90 100 110 0 40 60 80 100 120 140 160 180 200 20 5 5 Table of Thermistor Characteristics 1 Outdoor Air Temp TO Sensor Intake Temp TS Sensor Heat Exchanger Temp C1 Sensor Heat Exchanger Temp C2 Sensor 2 Discharge Temp TD Sensor Resistance k Temperature C Resistance k Temperature C Resistance k Temperature C ...

Page 151: ...eater 5 Remove the bolts 3 and then remove the washer and rubber spacer 6 Cut off the compressor side s suction tube because the suction tube is solid and unmovable See the diagram below 7 Remove the discharge side s brazing part 1 See the diagram below NOTE Protect the sensor part sheet metal rubber lead wire and clamper 8 Pull the compressor toward you 9 Remove the suction side s brazing part 1 ...

Page 152: ...h fan motor and wires for connecting compressor connected to the electrical component box in the unit 4 Remove the fixture screws 6 as shown in the diagram and remove the electrical component box NOTE Be sure to remove the upper left side screw marked by in the diagram because that screw cannot be seen from the front side Front panel Electrical component box after removal Fixture screws 6 for elec...

Page 153: ...ages See operational status 2 2 Yes No 2 2 Discharge temperature is over 80 C in stop mode and does not decrease Connect outdoor maintenance remote controller to RC socket on outdoor unit main control PC board and check alarm messages Replace discharge temperature sensor 2 3 Yes No 2 3 Demand value always stays low The value is lower than 70 Excluding 1 unlimited Connect outdoor maintenance remote...

Page 154: ... MEMO 5 18 ...

Page 155: ...2 6 3 Normal Display Operations and Functions 6 3 6 4 Monitoring Operations Display of Indoor Unit and Outdoor Unit Sensor Temperatures 6 6 6 5 Monitoring the Outdoor Unit Alarm History Display of Outdoor Unit Alarm History 6 7 6 6 Settings Modes Setting the Outdoor Unit EEPROM 6 7 ...

Page 156: ...tions 1 Functions Button operations can be used to perform the following functions Start stop of all indoor units Switching between cooling and heating Test run of all indoor units High speed operation of indoor units Do not use with actual units This may damage the devices 2 Display The following can be displayed Alarm details display No of indoor outdoor units Unit Nos of connected indoor outdoo...

Page 157: ... modes The specifications are equivalent to the heating cooling input that was present on earlier outdoor unit PCBs The display shows the operating mode of the indoor unit with the lowest number All units test run Fig 6 2 Operation The button switches test run ON OFF for all indoor units Press and hold for 4 seconds to turn ON Test run is displayed while the test run is in progress Conditions of t...

Page 158: ...tus of outdoor units in that refrigerant system blinks when alarms occur 2 08 09 0A 0b 0C 0d 0E 0F 10 Total compressor operating time in 1 hr units 3 11 12 13 14 15 16 Total power ON time of outdoor unit in 1 hr units 17 Compressor start count 18 19 FE Outdoor unit microcomputer firmware version FF Outdoor unit microcomputer software version See following page for 2 and 3 XX YY R C Displays the ou...

Page 159: ... the top point of the colon is lit When the last 4 digits are displayed the colon points are not lit The display of the first 4 and last 4 digits changes automatically every 10 seconds It can also be changed by pressing the button NOTE With the outdoor unit maintenance remote controller when connected to the outdoor unit the unit remote controller check functions will not operate 10 Total compress...

Page 160: ...ect the item code of the temperature to monitor The selected indoor unit No and the temperature data are displayed 4 To end monitoring press the button The display returns to the normal display The display does not blink Item code Meaning of Code Indoor unit data 02 Indoor unit intake temp 03 Indoor unit heat exchanger temp E1 04 Indoor unit heat exchanger temp E2 05 06 07 08 09 Outdoor unit data ...

Page 161: ...f there have been no alarm codes is displayed 4 To clear the alarm history press the button The outdoor unit alarm history will be cleared 5 To end press the button The display returns to the normal remote controller display 6 6 Settings Modes Setting the Outdoor Unit EEPROM Setting mode 1 Operating procedure 1 Press and hold the button and button simultaneously for 4 seconds or longer 2 Use the t...

Page 162: ...0 minutes operating regardless of whether the unit is running or stopped 3 At all times 4 hours stopped 20 minutes operating 4 At all times 2 hours stopped 20 minutes operating 0d Control system schedule Do not set 0E Cooling only 0 Heat pump 1 Cooling only 0F Control system schedule Do not set 10 Control system schedule Do not set 11 Multi floor installation 0 Non 1 Available 12 Control system sc...

Page 163: ...splay returns to the normal display mode List of Item Codes Item code Parameter 80 Refrigerant type 407 R407C 22 R22 410 R410A 81 Outdoor unit capacity 0 Disabled 22 25 28 32 36 40 45 50 56 63 71 80 90 100 112 125 140 160 180 200 224 250 280 340 355 400 450 500 560 600 630 670 710 800 840 82 Control system schedule Do not set 83 Control system schedule Do not set 84 3 phase or single phase 0 3 pha...

Page 164: ... MEMO 6 10 ...

Page 165: ...g Items 7 3 7 3 Detailed Settings Function 7 4 7 4 List of Detailed Setting Items 7 5 7 5 Simple Setting Items 7 9 7 6 Detailed Setting Items 7 11 7 7 Remote Controller Servicing Functions 7 14 7 8 Test Run Function 7 14 7 REMOTE CONTROLLER FUNCTIONS SECTION 7 1 ...

Page 166: ...blinking on the remote controller LCD display Fig 7 1 At this time the indoor unit fan or all indoor unit fans in the case of group control begins operating 3 If group control is in effect press the button and select the address unit No of the indoor unit to set At this time the fan at the indoor unit begins operating If unit No is displayed the same setting will be made for all indoor units 4 Pre...

Page 167: ... LL 0001 Lo LL 0002 LL LL 0004 Lo 1 min LL 3 min Lo 0005 Lo Lo 0006 LL Lo Heating intake temperature shift 0000 No shift 0001 Shifts intake temperature 1 C down 0002 Shifts intake temperature 2 C down 0003 Shifts intake temperature 3 C down 0004 Shifts intake temperature 4 C down 0005 Shifts intake temperature 5 C down 0006 Shifts intake temperature 6 C down Electric heater installation 0000 No he...

Page 168: ...ttings data are displayed blinking on the remote controller LCD display Fig 7 2 At this time the indoor unit fan or all indoor unit fans in the case of group control begins operating 3 If group control is in effect press the button and select the address unit No of the indoor unit to set At this time the fan at the indoor unit begins operating 4 Press the temperature setting buttons to select the ...

Page 169: ...t All group control indoor units except for main unit 0099 Not set Cooling intake temperature shift 010 Shifts intake temperature 10 C down 009 Shifts intake temperature 9 C down 001 Shifts intake temperature 1 C down 0000 No intake temperature shift 0001 Shifts intake temperature 1 C up 0009 Shifts intake temperature 9 C up 0010 Shifts intake temperature 10 C up Automatic stop time after operatio...

Page 170: ...C Upper limit at shipment Upper limit Lower limit Drying 0018 18 C Lower limit at shipment 0019 19 C 0029 29 C 0030 30 C Upper limit at shipment Upper limit Lower limit Auto heat cool 0017 17 C Lower limit at shipment 0018 18 C 0026 26 C 0027 27 C Upper limit at shipment Humidifier operation 0000 Normal 0001 Ignore heat exchanger temperature conditions Filter CN70 input switching 0000 Filter input...

Page 171: ... Output linked with fan ON when indoor unit fan is operating 0001 Fan mode operation output Drain pump delayed start time 0000 No delayed start 0001 1 sec delayed start Indoor unit Type E1 1 min delayed start Indoor unit Type E2 0002 2 sec delayed start 2 min delayed start 0058 58 sec delayed start 58 min delayed start 0059 59 sec delayed start 59 min delayed start 0060 60 sec delayed start 60 min...

Page 172: ...For low static pressure filter Antibacterial high performance filter 90 Antibacterial high performance filter 65 Air cleaning unit air cleaning unit optical regenerative deodorizing filter deodorant activated charcoal filter For air blocking material For 3 Way discharge when discharge duct is connected 0006 For air blocking material For 2 Way discharge Humidifier ON time ON time per 60 seconds 000...

Page 173: ...ime setting at the time of shipping for cases when filter fouling is more severe than normal Filter sign ON times for each model Model data Model Filter sign ON time Standard Long life 0006 Ducted High Static Pressure E2 E1 NOTE indicates that there is no corresponding filter 7 5 Simple Setting Items 03 Central control address Set when using a central control device Used when setting the central c...

Page 174: ...g intake temperature shift Shifts the intake temperature during heating Can be set when the body thermostat is used 07 Electric heater installation Set when cost distribution is performed using an AMY central control system or similar system and when an optional electric heater is installed This is unrelated to control of the electric heater 08 Humidifying when heater thermostat is OFF Normally hu...

Page 175: ...ter operation starts can be set in increments of 5 minutes 1b Forced thermostat ON time Use this setting to change the time for forced operation at installation or servicing from 5 minutes to 4 minutes 1E Temperature shift for cooling heating change in auto heat cool mode Auto heat cool selects the operating mode automatically based on the difference between the room temperature and the temperatur...

Page 176: ...OFF reminder or for fire prevention input 31 Ventilation fan operation from remote controller It is possible to install a ventilation fan in the system which can be started and stopped by the wired remote controller The ventilation fan can operate linked with the start and stop of the indoor unit or can be operated even when the indoor unit is stopped Use a ventilation fan that can accept the no v...

Page 177: ...uction mode 46 DC flap swing mode Selects the swing operation mode for the flap 5d DC fan tap setting Sets the DC fan tap according to the purpose of use Change the settings data at the same time 5E Humidifier ON time Sets the humidifier output ON time for when the humidifier is operating ON OFF control is performed during humidifier operation This setting therefore sets the ON time per 60 second ...

Page 178: ...buttons for 4 seconds or longer When settings are made from a remote controller the indoor unit where that remote controller is connected stops Detailed settings System address indoor unit address central control address and other settings Press and hold the and buttons for 4 seconds or longer Automatic address Automatic address setting based on command from the wired remote controller Press and h...

Page 179: ...ature display appears as for units that are not connected If monitor mode is engaged while normal operation is in progress only the parts of the LCD display shown in the figure will change Other parts continue to display the same information as during normal operation Fig 7 4 Indoor unit sensors Outdoor unit sensors 02 Intake temp Unit No 1 Unit No 2 Unit No 3 Unit No 4 03 E1 0A 2A 4A 6A Discharge...

Page 180: ... MEMO 7 16 ...

Page 181: ... Batteries 8 5 Setting the Current Time 8 6 Operation 8 7 Timer Operation 8 8 Adjusting the Wind Direction 8 9 Operating Multiple In Outdoor Units Simultaneously Group Control 8 10 Using the Remote Control 8 11 8 12 For Best Results Addresses 8 13 8 14 Emergency Operation Miscellaneous Settings 8 15 Before Requesting Service How to Install the Wireless Remote Controller Receiver 8 16 8 HOW TO INST...

Page 182: ...Remote Controls 1 If a remote control is to be operated from a remote control holder that is hung on a wall turn on the lights in the room as well as any electrical appliances and then check to make sure the air conditioner works with the remote control in the location where it will be installed If it works continue with installation 2 If the air conditioner is to be switched from the main sensor ...

Page 183: ...ontrol by the sensor button 10 Temperature setting buttons raises the temperature setting 1 at a time lowers the temperature setting 1 at a time 11 Filter button Press to turn off the filter lamp on the receiver 12 Mode Select button Press to switch the operation mode 13 Ventilation button Use this when connected to an aftermarket fan Pressing this button starts and stops the fan When the air cond...

Page 184: ...be on remote control main It is also possible to use both in conjunction with a wired remote control sold separately Consult with the dealer where the product was purchased about making the settings Test On switch This is used during service It is not for normal use Test Run On switch This is used during service It is not for normal use 9 Address switch Differentiate between incoming and outgoing ...

Page 185: ...Press for two seconds or more Once the clock displays starts blinking the clock can be set 2 Set the hour with of the If you press and hold the button the time changes quickly 3 Set the minutes with of the If you press and hold the button the time changes quickly 4 Pressing completes the time setting While you are setting the current time the time display flashes but the colon does not If the butt...

Page 186: ... Initial Setting 1 2 3 Stop Press When the unit is stopped with the remote control even though the compressor of the outdoor unit stops the fan on the outdoor unit may continue to run for a while If the unit is not heating very effectively with a Low fan speed switch the fan speed to High or Medium Depending on the indoor unit being used it may indicate a function that it does not have The fan spe...

Page 187: ...se Press from the location you wish to mount the remote and make sure the signal is received correctly Pull the remote control forward to remove it Fasten the remote control mount with screws Fitting the remote control in the mount Remote control mount 1 2 Put in Press Wireless Remote Control Signal Line Indoor Unit Indoor Unit Receiver Changing a timer setting Press for the or the and then when t...

Page 188: ...talk By setting the address switches on the receivers and matching them with the number of addresses on the remote control up to six indoor units can be controlled separately with the remote control When using units in a flexible combination or operating multiple units simultaneously as they are operated at the same time they cannot be controlled individually These settings are saved in nonvolatil...

Page 189: ...ection flap indicator operation mode indicator time display 24 hour AM PM heat max temp For information about the flap function refer to the users manual of the unit being used These settings are saved in nonvolatile memory in the remote control so even when its batteries are changed the settings do not have to be made again First check the display of the remote control when the unit is stopped an...

Page 190: ...remote control is The timer cannot be set in Operation Display See Page 8 6 If the problem persists even after you check the foregoing items stop the unit disconnect the power to the indoor unit and contact the dealer where the product was purchased with the model number and problem you are having As it is dangerous under no circumstances should you undertake repairs yourself Further when the rece...

Page 191: ...If the wired remote control is to be the sub remote change the wired remote control to the sub remote If the wireless remote control is to be the secondary turn the 3 switch on the wireless receiver operation panel from OFF to ON When 1 indoor unit is operated by 2 remote controls Either of the remotes can be set to main sub Use wiring of 0 5 mm2 to 2 mm2 for field supply Use a total wire length o...

Page 192: ...crewdriver or the like into the groove on the bottom of the receiver unit and twist it to remove the bottom of the case Fig 8 2 2 To enable the receiver s wiring to stick out from the upper part of the case thin part at center top use side cutters or the like to cut a hole in the case big enough for the remote control cord sold separately Fig 8 3 3 Disconnect the wires that were connected at shipm...

Page 193: ...ing so may warp or damage the case Move the receiver by hand and check that it can move just a little Fig 8 8 8 Attach the face plate 6 Wiring the Receiver Use wiring of 0 5 mm2 to 2 mm2 for field supply Use a total wire length of no more than 400 m Polarity does not matter If it is to be used as an embedded model Wiring Diagram If it is to be used as an exposed model Wiring Diagram Use remote con...

Page 194: ...possible to adjust the temperature After completing a test run be absolutely sure to return the Test Run switch to OFF Up sure none of the display lamps are blinking Also put the face plate back in place NOTE 1 2 3 4 This is hard on the device so only use this for the test run After turning on the power the unit will not receive any commands from the remote control for about 1 minute This is not a...

Page 195: ...a model without auto temp settings Alternately Oil Alarm Same as operation of outdoor protection device Alternately Test Run Simultaneously Off On Blinking 0 5 sec intervals When using CZ RWSC2 If you have either an outdoor maintenance remote control or a wired remote control and a service checker special wiring CV6231785082 for service use at hand you can get more detailed information about an al...

Page 196: ...e to be changed as well repeat steps 2 to 4 When all settings have been made press the Start Stop button Example Operation mode setting screen Item Number Setting Item Setting Content Setting when Shipped 1 Operation Mode 2 Flap Display No display Note 1 3 Select Fan Speed No display 4 Display of Set Temperature C F Setting Off Note 2 C 5 Time Display 24 Hour No Display AM PM 24 Hour 6 Ventilation...

Page 197: ...201411 ...

Reviews: