106
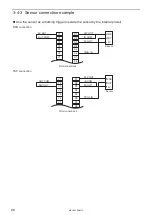
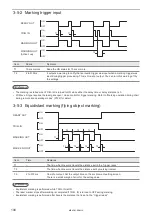
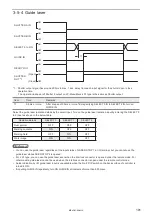
3-5-10 Rank / external offset marking
ON
OFF
ON
OFF
ON
OFF
ON
OFF
ON
OFF
ON
OFF
ON
OFF
T1
*1
*1
*1
T1
T6
T2
T4
T5
T2
T2
T3
T3
T3
T2
T2
T2
T7
SET IN
SET OK OUT
READY OUT
MARKING OUT
D0 to D15 IN *2
TRIG. IN
SELECT 0 to 2 IN
Data A
Data A
Data B
Data B
Data C
Data C
Item
Period
Remarks
T1
―
Time for data creation. It varies depending on the quantity of data to be marked.
T2
0 ms or more
Keep the inputs of SELECT 0 to 2 and the number until the SET OK turns on.
T3
2 to 510 ms
One-shot output. Set the output time on the environment setting screen. There is a
margin for the setting value.
T4
―
•
When T5 < T1 = T1 - T5.
• When T5 > T1 is 1 ms or less.
T6
0 ms or more
Turn ON the SET after MARKING is turned to ON.
T7
0.5 ms or more
After a lapse of 0.5ms or more from specifying SELECT 0 IN to SELECT 2 IN and D0 IN
to D15 IN, turn on SET IN.
*1 : Input SELECT 0 to 2 as the table below.
Number input target
SELECT 0 (No. 20)
SELECT 1 (No. 21)
SELECT 2 (No. 22)
Data No. of rank/external offset
ON
OFF
OFF
*2 : Specify the data number of rank/external offset function by using D0 to D15. For details, see “3-3-4 Signals on I/O
ンㄆㄇㄆㄓㄆㄏㄆ
• SET IN for the rank/external offset is acceptable when the laser pumping is completed and the internal shutter is
opened.
• When the rank/external offset function is set, the ready output will not turn ON until the data number and SET input are
input.
• Enter the data number input and SET input every time for each marking trigger even there is no change to the marking
data.
• Close the shutter to reset the data number that was set.
• Do not input the SET input for the next data until the marking output turns on by inputting the marking trigger after
inputting SET input.
• The ready output will turn ON even when the marking data is not configured to the data number input.
• If the rank or external offset functions are used with the marking to the flying object, make sure that the marking interval
time is enough to the required period to input the marking data and to confirm the marking ready output.
ME-LPM-SSM-10
Summary of Contents for LP-M Series
Page 16: ...16 MEMO ME LPM SSM 10...
Page 27: ...27 Chapter 1 Specification ME LPM SSM 10...
Page 37: ...37 Chapter 2 Preparation ME LPM SSM 10...
Page 69: ...Chapter 3 Connection for External Control ME LPM SSM 10...
Page 128: ...Chapter 4 Maintenance ME LPM SSM 10...
Page 148: ...Troubleshooting ME LPM SSM 10...
Page 169: ...Index ME LPM SSM 10...
Page 172: ...172 MEMO No 9000 0066 34V ME LPM SSM 10...
Page 173: ...No 9000 0066 34V...


