- 211 -
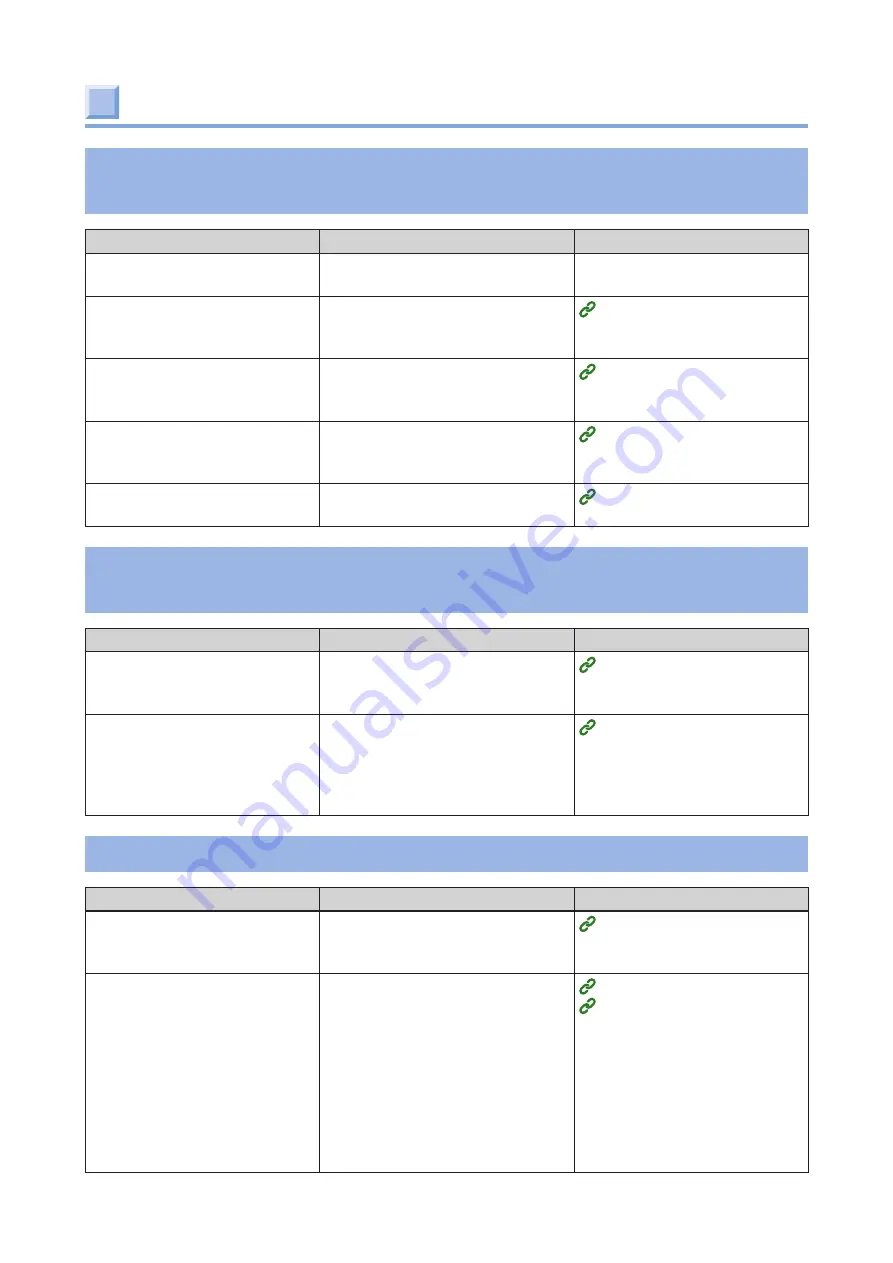
Troubleshooting for the paper
Paper jams occur frequently. The paper is pulled in
an inclined direction
Possible causes
Solution
Reference
This machine is tilted.
Install it on a stable and flat
surface.
-
The paper is either too thin
or too thick.
The paper is either too thin
or too thick. Use the paper
appropriate to this machine.
The paper is moist or charged
with static electricity.
Use the paper stored at
appropriate temperature and
humidity.
The paper is wrinkled or
folded.
Use the paper appropriate to
this machine. Straighten the
paper if it is curled.
The paper is not loaded
straight.
Fit the paper guide to the paper.
The machine is not restored even after the jammed
paper is removed
Possible causes
Solution
Reference
The machine may not recover
unless you open and close
the top cover or feeder cover.
Open and close the top cover or
feeder cover.
The cut type settings of the
machine and the position
of the paper sensor do not
match.
Check the type of the paper
loaded in the machine on the
operator panel, and adjust the
position of the paper sensor
accordingly.
The paper gets curled. The paper is wrinkled
Possible causes
Solution
Reference
The paper is moist or charged
with static electricity.
Use the paper stored at
appropriate temperature and
humidity.
Thin paper is used.
Set a thinner value for [Media
Weight] in the user-defined paper
settings of the printer driver.
If you do not use the printer
driver, change the setting value
in [MENUS] - [FEEDER CONFIG] -
[MEDIAWEIGHT] on the operator
panel.
Alternatively, set a thinner value
for [MEDIAWEIGHT].
Summary of Contents for PRO330S
Page 1: ...User s Manual...
Page 14: ...Unpacking 2 Unpacking 15 Checking the accessories 16 Installing consumables 18...
Page 102: ...102 8 Close the feeder cover...
Page 151: ...151 8 Remove the toner cover 9 Close the top cover 10 Open the toner cartridge cover...
Page 162: ...162 8 Close the top cover...
Page 172: ...172 15 Close the top cover...
Page 178: ...178 7 Install the image drum back to the machine 8 Close the top cover...
Page 182: ...182 11 Close the top cover...
Page 263: ...263 10 Input the admin password and click OK 11 Con rm the setting result and click Back...
Page 266: ...266 11 Con rm the setting result and click Back...
Page 280: ...EE8001 2750Z002 Rev1...


