Maintenance
5‐14
P/N 213828_11
2014 Nordson Corporation
VersaBlue_PPA
Cleaning Filter Cartridge (Until Week 17/2012)
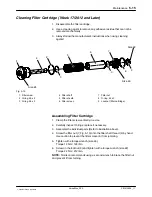
1. Disassemble the filter cartridge.
2. Use a cleaning agent to remove any adhesive residue that can not be
removed mechanically.
3. Always follow the manufacturer's instructions when using cleaning
agents!
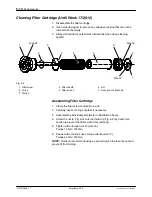
5
2
2
7
4
Size 16
6
1
3
2
Size 13
Size 24
1 Filter
screw
2 O-ring
3 Thread
4 Filter
sheath
5 Filter
screen
6 Nut
7 Hexagon nut (locknut)
Assembling Filter Cartridge
1. Clamp the filter screw vertically in a vice.
2. Carefully inspect O‐rings; replace if necessary.
3. Assemble the individual parts (Refer to illustration above).
4. Screw the nut (6, Fig. 5‐9) onto the thread (3, Fig. 5‐9) by hand. Use
caution to prevent the filter screen from jamming.
5. Tighten with a torque wrench (size 16).
Torque 14 Nm / 124 lbin.
6. Secure with a locknut; use a torque wrench (size 13).
Torque 24 Nm / 212 lbin.
NOTE:
Nordson recommends using a second wrench to brace the nut and
prevent it from turning.
Summary of Contents for VersaBlue VA
Page 12: ...Table of Contents X P N 213828_11 2014 Nordson Corporation VersaBlue_PPA...
Page 28: ...Safety Instructions 1 14 P N 213828_11 2014 Nordson Corporation VersaBlue_PPA...
Page 40: ...Introduction 2 12 P N 213828_11 2014 Nordson Corporation VersaBlue_PPA...
Page 62: ...Installation 3 22 P N 213828_11 2014 Nordson Corporation VersaBlue_PPA...
Page 74: ...Operation 4 12 P N 213828_11 2014 Nordson Corporation VersaBlue_PPA...
Page 142: ...Operation 4 80 P N 213828_11 2014 Nordson Corporation VersaBlue_PPA...
Page 174: ...Maintenance 5 26 P N 213828_11 2014 Nordson Corporation VersaBlue_PPA...
Page 204: ...Troubleshooting 6 30 P N 213828_11 2014 Nordson Corporation VersaBlue_PPA...
Page 234: ...Repair 7 30 P N 213828_11 2014 Nordson Corporation VersaBlue_PPA...
Page 248: ...Password A 4 P N 213828_11 2014 Nordson Corporation VersaBlue_PPA...
Page 272: ...Glossary D 16 P N 213828_11 2014 Nordson Corporation VersaBlue_PPA...

