SECTION 2 -- CONTROLS, INSTRUMENTS AND OPERATION
2--41
LIQUID CRYSTAL DISPLAYS
Clock
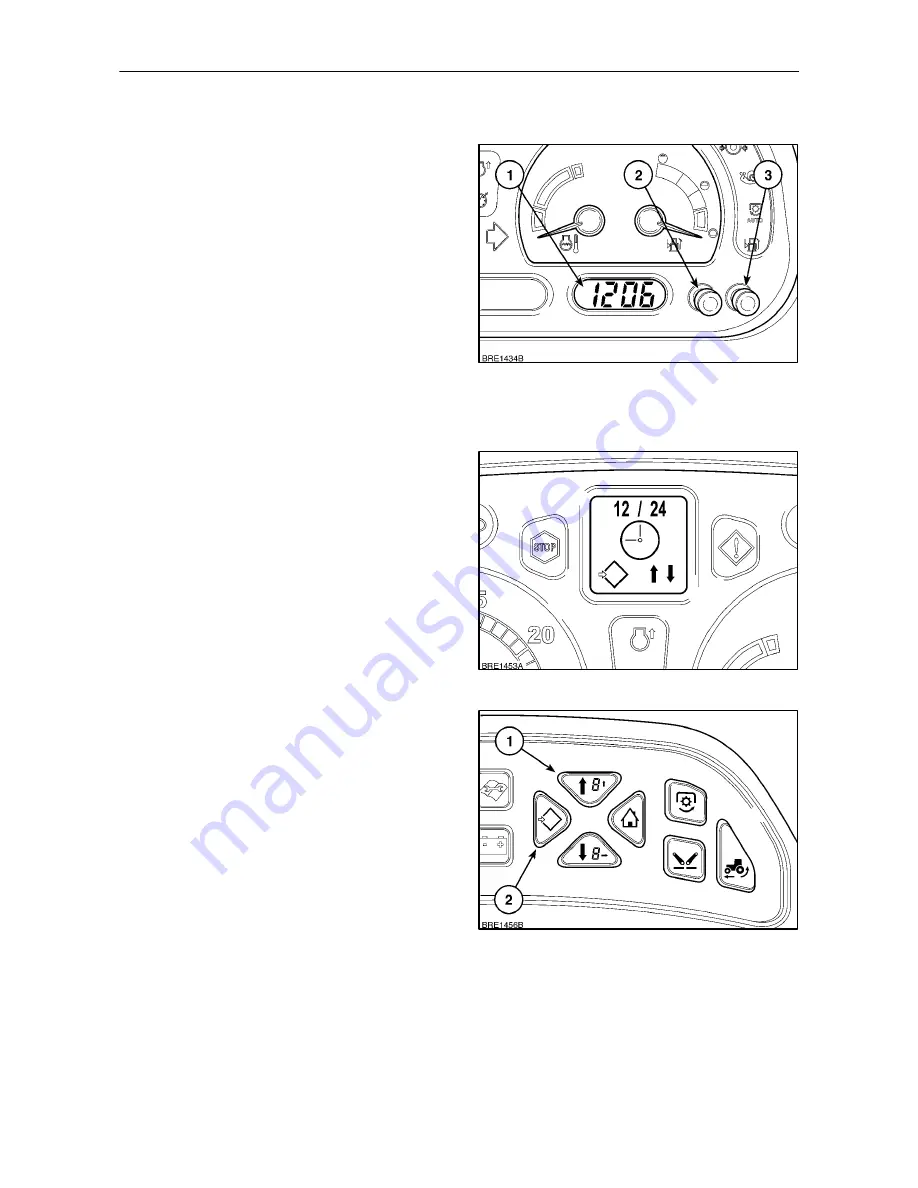
A digital clock (1) is installed on the right--hand side
of the instrument panel.
To adjust the time display turn the key--start on,
depress and hold the Hour or Minute button until the
read out starts to Flash. To advance the hour,
depress the ’H’ button (2). Each time the button is
depressed the time will advance by 1 hour.
Alternatively, hold in the button and the display will
advance automatically. Release the button when the
time setting is correct.
Repeat the procedure using the ’M’ button (3) for the
minute display. To memorise the setting do not touch
either button for 10 seconds.
75
Changing the display with ’H’ and ’M’ buttons
The clock is set at the factory to display a 12 hour
reading. To change to a 24 hour reading, depress and
hold both ’H’ and ’M’ buttons with the key--start off.
Turn the key--start on and continue to hold both
buttons for three seconds, the clock will change to
show a 24 hour display. Repeat the procedure to
change back to a 12 hour reading. Turn the key--start
off to store the setting.
76
Changing the display with Enhanced Keypad
(where fitted)
With the key--start in the ON position, depress and
hold the Menu/Enter key (2) for 3 seconds. The DMD
will read
SETUP MENU
, this will change to
CAL
after
2 seconds. Using the Menu Up key (1), scroll through
the menu until the clock symbol appears in the
display accompanied by
12 / 24,
Figure 76.
Depress the Menu/Enter key again and the display
will change to show an arrow pointing to 12 or 24.
Using the Menu Up/Down keys move the arrow up or
down to the setting required and then depress the
Menu/Enter key to save and return to the main menu.
77
Summary of Contents for T6010 DELTA
Page 1: ...OPERATOR S MANUAL T6010 T6020 T6030 T6050 T6070 Delta and Plus Tractors ...
Page 6: ...BLANK ...
Page 28: ...SECTION 1 GENERAL INFORMATION AND SAFETY 1 22 NOTES ...
Page 280: ...SECTION 3 FIELD OPERATION 3 146 NOTES ...
Page 366: ...SECTION 5 FAULT FINDING 5 12 NOTES ...
Page 368: ...SECTION 6 VEHICLE STORAGE 6 2 NOTES ...
Page 400: ...SECTION 8 SPECIFICATIONS 8 24 NOTES ...
Page 402: ...SECTION 9 1ST 50 HOUR SERVICE SHEETS 9 2 ...
Page 404: ...SECTION 9 1ST 50 HOUR SERVICE SHEETS 9 4 ...
Page 410: ...SECTION 10 INDEX 10 6 ...
Page 412: ...sblank ...


