background image


 Using Your System   2-9

Cooling Fans

 Two cooling fans in your system provide proper ventilation
to cool system components and prevent overheating. One
fan is an integral part of the power supply. The second fan
is mounted on the processor. For proper ventilation, keep
the areas around the system clear of obstructions.

Voltage Selector Switch

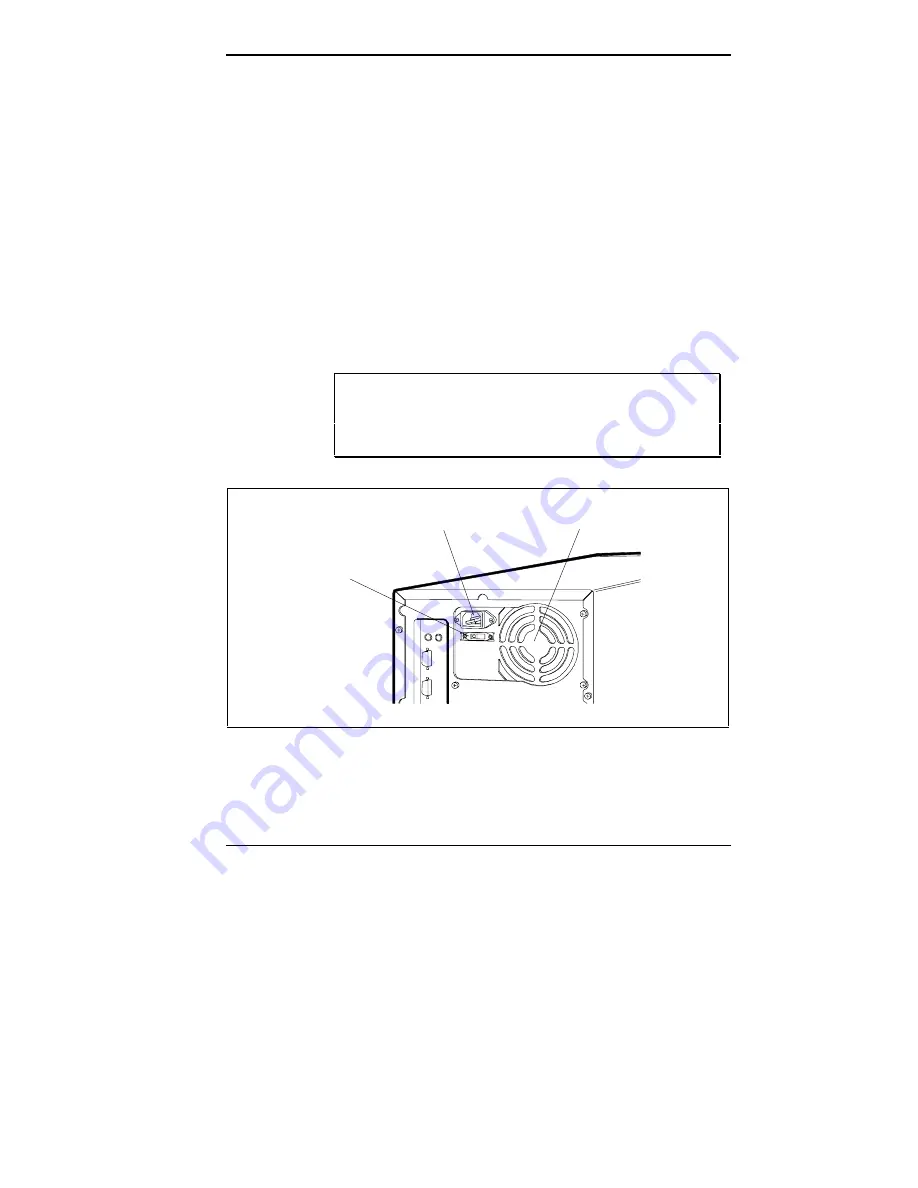
 The voltage selector switch is on the rear of the system, as
shown in the following figure. The switch sets the voltage
for your system to 115 volts (V) or 230 V. Most outlets in
the United States, Canada, and Taiwan are 115 V. Most
outlets in Europe, Australia, and Asia are 230 V.

 CAUTION:   Be sure that the voltage selector switch
is set correctly for the voltage in your area (115 V or
230 V.

 Rear panel power supply features


Voltage Selector

Fan

Switch

Socket

System Power

Summary of Contents for IMAGE P100E - SERVICE

Page 1: ...nying each product However actual performance of each such product is dependent upon factors such as system configuration customer data and operator control Since implementation by customers of each product may vary the suitability of specific product configurations and applications must be determined by the customer and is not warranted by NEC To allow for design and specification improvements th...

Page 2: ...7 IDE Interface Controller 1 7 System I O Controller 1 8 Video Features 1 8 Flash ROM 1 9 IDE Quad Speed CD ROM Reader 1 9 Asset Management and System Security 1 10 Product Information 1 10 NEC FastFacts 1 10 2 Using Your System System Hardware Features 2 2 Front Panel Controls 2 2 Power Button 2 2 Lamps 2 2 Reset Button 2 3 Front Panel Storage Devices 2 3 Diskette Drive 2 4 IDE Quad Speed CD ROM ...

Page 3: ...r Switch 2 9 System Power Socket 2 10 Keyboard 2 10 Mouse 2 12 System Operation 2 12 Powering On 2 13 Diskette Loading 2 15 CD Disc Loading 2 16 System Reset 2 17 Manual Reset 2 17 Automatic Reset 2 19 Backup 2 19 Powering Off 2 19 3 Setting System Parameters How to Start Setup 3 3 How to Use Setup 3 4 The Menu Bar 3 4 The Legend Bar 3 5 Selecting a Menu Item 3 6 Displaying a Submenu 3 7 The Item ...

Page 4: ...ervisor Information Parameters 3 25 Edit User Information Parameters 3 27 The Exit Menu 3 29 Save Changes Exit 3 29 Discard Changes Exit 3 30 Get Default Values 3 30 Load Previous Values 3 31 Save Changes 3 31 4 Using ECU and SCSI Utilities The EISA Configuration Utility ECU 4 6 When to Use the ECU 4 7 How to Load the ECU 4 8 How to Use the ECU 4 9 Configure Computer or Peripheral Devices 4 10 Set...

Page 5: ...tility 5 6 6 Maintaining Your Computer System Care 6 1 Protective Measures 6 1 Routine Care 6 3 Mouse Care 6 4 CD Care 6 6 Moving Guidelines 6 7 7 Adding Options Optional Hardware 7 1 Safety Precautions 7 3 Removing and Replacing the System Unit Cover 7 4 Expansion Boards 7 7 Precautions 7 8 Slot Locations 7 9 Board Installation 7 10 Board Removal 7 13 SIMM Upgrade Kits 7 14 Cautions 7 14 SIMM Ins...

Page 6: ... Drive Signal Cable 7 36 Internal SCSI Cable 7 37 PCI IDE Cables 7 38 Storage Device Installation 7 39 Installing an Accessible Storage Device 7 39 Installing an Internal Storage Device 7 48 External Peripherals 7 52 Parallel Printer 7 52 RS 232C Device 7 54 Connecting External SCSI Devices 7 55 8 Setting System Board Switches Changing Switch Settings 8 3 Clearing CMOS 8 4 9 Solving Problems Probl...

Page 7: ...Positioning Your Monitor A 3 Adjusting the Keyboard and Mouse A 4 Modifying Your Workday A 6 Physical and Psycho Social Factors A 6 B Specifications C Quad Speed CD ROM Reader Configuration D Memory Upgrade Path Glossary Index List of Tables Startup Functions 3 6 Main Menu Parameters 3 8 IDE Hard Disk Adapter Parameters 3 11 Memory Cache Parameters 3 12 Memory Shadow Parameters 3 13 Boot Parameter...

Page 8: ...eters 3 22 Large Disk Parameters 3 23 Security Menu 3 24 Edit Supervisor Information Parameters 3 26 Edit User Information Parameters 3 27 Quick Reference to Configuring Expansion Devices 4 2 EISA Configuration Utility Parameters 4 16 SCSI Device Configuration Options 4 33 Advanced Configuration Options 4 34 Troubleshooting 9 2 ...

Page 9: ...amiliarize yourself with system components and system operation Chapter 3 Setting System Parameters to check or change system setup parameters Chapter 4 Using ECU and SCSI Utilities to use configuration utilities for configuring expansion options See Chapter 5 for information on mouse parameters video drivers and BIOS update procedures For information on maintaining your computer see Chapter 6 Cha...

Page 10: ...OM reader installed in your system Appendix D lists the optional memory upgrade path for your system Use this guide with the software documentation that comes with your system TEXT CONVENTIONS This guide uses the following text conventions Warnings cautions and notes have the following format WARNING Warnings alert you to situations that could result in personal injury CAUTION Cautions indicate si...

Page 11: ...tional software and related documentation See the label on the carton for your system configuration and a list of shipped software and documentation NEC Image P90E P100E Quick Setup Contains information for quickly getting your system up and running Use this information to set up your system for the first time Microsoft Windows for Workgroups and MS DOS User s Guide Provides a comprehensive source...

Page 12: ...is designed To purchase the service and reference manual call NEC at 1 800 632 4525 and follow the prompts When prompted provide the document name and part number NEC also offers FastFacts an automated service that sends the latest information about NEC and its products directly to a fax machine The service is available 24 hours a day 7 days a week With FastFacts you can obtain product literature ...

Page 13: ... Image P90E and Image P100E series of mini tower systems consist of powerful computers featuring Intel s 90 megahertz MHz and 100 MHz Pentium microprocessors exceptional balanced system performance expandability and upgradeability NEC Image P90E P100E system 1 ...

Page 14: ... and Image P100E systems is the PCI EISA Bridge Component The Bridge provides a link between the system s SCSI or IDE devices and the PCI bus and between any optional SCSI PCI EISA ISA or IDE devices that you may install SYSTEM CONFIGURATIONS The Image P90E and Image P100E systems come in several configurations Image P90E single processor diskless systems no hard disk or CD ROM reader single proce...

Page 15: ... get the most out of your computer Key features include Intel 90 MHz Pentium microprocessor Image P90E or Intel 100 MHz Pentium microprocessor Image P100E for powerful processing 16 kilobyte KB internal dual write back cache integrated on the microprocessor 256 KB standard write back secondary cache memory 16 megabyte MB standard RAM memory upgrade able to 256 MB Optional upgrade for adding a seco...

Page 16: ...S support for Plug and Play ISA expansion boards Display Data Channel DDC support for automatic configuration of resolutions and refresh rates for DDC compliant monitors System security for ensuring system use by authorized users only See the following sections for descriptions of the key features of the Image P90E and Image P100E systems Refer to Appendix B for system specifications Processor Sub...

Page 17: ...The socket supports an optional second processor for dual processor capability System Memory Each system comes standard with 16 MB of memory and supports base and extended memory System memory can be expanded up to 256 MB using optional single in line memory modules SIMMs installed in SIMM sockets PCI Local Bus The industry standard PCI local bus is a highly integrated 32 bit I O interface that of...

Page 18: ... EISA are EISA s 33 MB per second burst mode data transfer rate increases the speed of I O operations which is very important for configurations with multiple storage devices EISA s bus mastering capability allows maximum sys tem throughput by distributing the workload to intelli gent subsystems This creates balanced system performance where no one subsystem impedes the activity of another EISA bo...

Page 19: ...lar SCSI asynchronous data transfer rates up to 5 MB per second support for the common command set CCS for com patibility a command queuing feature that enhances multi tasking performance and helps reduce bottlenecks in I O opera tions IDE Interface Controller The IDE controller provides an enhanced IDE interface to the PCI bus The controller supports up to 11 MB per sec ond 32 bit wide data trans...

Page 20: ...e Color graphics The graphics accelerator speeds the movement of large blocks of image data in video memory As display resolu tions increase image creation and movement into video memory are critical factors in graphics performance The graphics accelerator is specifically designed for graph ics intensive bit block transfers pattern fill operations text and color pixel amplification and scrolling T...

Page 21: ...ce when replacing ROMs facilitates adopting new technology while maintaining corporate standards gives network administrators company wide control of BIOS revisions IDE Quad Speed CD ROM Reader The IDE quad speed CD ROM reader comes standard with all hard disk systems The reader features quad speed tech nology allowing it to operate at different speeds depending on whether the CD ROM disc you are ...

Page 22: ... Board Service BBS the Internet or America Online to obtain NEC product support NEC s FastFacts service is described in the following section For information on using the BBS Internet or America Online refer to Chapter 9 in this guide NEC FastFacts NEC s FastFacts is a self help automated electronic infor mation service that you can use to obtain up to date product application notes installation p...

Page 23: ...42228 A catalog of current illustrated parts breakdowns can by ordered by requesting document number 42228 A set of instructions for using FastFacts can be ordered by requesting document number 63233469 Due to the dynamic nature of FastFacts documents are added and removed constantly therefore all catalog and document subjects and order numbers are subject to change at any time and without notice ...

Page 24: ...x num ber and telephone number For international use first enter the international long distance access number 011 your country code your area code or city code then your fax number The information requested will be automatically sent to your fax machine Please wait for the ordered document to arrive at your fax machine before calling to order more documents If FastFacts attempts to send the secon...

Page 25: ...one the above familiarize yourself with the system s hardware features including the system unit CD ROM reader mouse and keyboard These features are described next under System Hardware Features See System Operation in this chapter for procedures that you will use regularly to operate your computer Information includes system start up diskette loading CD loading reset backup procedures and system ...

Page 26: ...descriptions of these features follow the figure Front panel controls and lamps Power Button The power button controls power to the system unit Pressing the button turns power on and off The power button is almost flush with the front panel when power is off and indented when power is on Lamps The front panel contains a power lamp and a disk lamp A lit power lamp green indicates that the system un...

Page 27: ...button by accident thus avoiding accidental resets which can damage your hard disk or data Front Panel Storage Devices The diskette drive standard on all systems and CD ROM reader hard disk systems only are on the front panel of the system unit as shown in the following figure Brief descriptions of the devices follow the figure Front panel storage devices Diskette Release Button Busy Lamp Diskette...

Page 28: ... diskette CAUTION To prevent damage to your diskette drive and data do not turn off the system or remove the diskette while the diskette drive busy lamp is lit IDE Quad Speed CD ROM Reader All hard disk systems come with an IDE quad speed CD ROM reader The reader is assigned as drive E Use your CD ROM reader to load and start programs from a compact disc CD You can also use the reader to play your...

Page 29: ...ting the headphone volume when using optional headphones Activity indicator for monitoring operation of the reader CD disc tray for loading a CD disc Emergency eject allows manual opening of the CD tray if the eject function is disabled by software or if a power failure occurs Eject button opens and closes the CD tray CD Disc Tray Headphone Jack Volume Control Emergency Eject Screw Activity Indica...

Page 30: ...isk configurations The hard disk is designated as drive C NEC formatted your hard disk and installed your software on the hard disk at the factory CAUTION Do not format the hard disk Formatting the hard disk destroys all of the data on the disk Rear Panel The rear panel provides connectors for setting up the system as shown in the following figure Each connector is briefly described in the followi...

Page 31: ... United Kingdom and Germany only with a 6 pin mini DIN connector Your keyboard attaches to this port CAUTION Always turn off system power before connecting or disconnecting the keyboard Failure to do so can damage the keyboard or the system Mouse Port Keyboard Port Serial Port 1 Serial Port 2 VGA Monitor Connector External SCSI 2 Connector Parallel Printer Port ...

Page 32: ...en external SCSI 2 devices such as a CD ROM hard disk or tape drive Printer Port The printer port is the system s parallel interface connector This enhanced bidirectional parallel port supports Enhanced Parallel Port EPP and Extended Capabilities Port ECP standards for increased data transfer rates to your printer Use this port to connect a parallel printer with a 25 pin connector to the system Ex...

Page 33: ... obstructions Voltage Selector Switch The voltage selector switch is on the rear of the system as shown in the following figure The switch sets the voltage for your system to 115 volts V or 230 V Most outlets in the United States Canada and Taiwan are 115 V Most outlets in Europe Australia and Asia are 230 V CAUTION Be sure that the voltage selector switch is set correctly for the voltage in your ...

Page 34: ... supports A general description of the keyboard follows Keyboard key functions depend on the operating system or software application program you use Check the documentation that comes with your operating system or software for function information NOTE Most of the keys have a repeat function When you hold down a key the character or function repeats until you release the key You can set keyboard ...

Page 35: ...ursor key NOTE The system enables Numeric Keypad mode at power on You can set the Numeric Keypad mode off at power on with the Setup utility see Chapter 3 1 2 F1 F2 F3 F4 F5 F6 F7 F8 F9 F10 F11 F12 7 1 5 2 3 4 6 8 3 4 5 6 7 8 9 0 _ Backspace Insert Delete Home End Page Up Page Down Num Lock Num Lock Home Q W E R T Y U I O P 0 A Caps Lock Esc Shift Tab S D F G H J K L Enter Z X C V B N M Shift Ctrl...

Page 36: ... to use Your mouse lets you take full advantage of applications with a Graphical User Interface GUI CAUTION To prevent damage to your mouse and to the system turn off the system power before you connect or disconnect your mouse Also the system fails to recognize that a mouse is attached if you connect the mouse after system power is on SYSTEM OPERATION The following sections describe procedures yo...

Page 37: ...selector switch is set correctly for the voltage in your area 115 V or 230 V 2 If you are booting from the hard disk make sure that the diskette drive is empty If you are booting from the diskette drive be sure that you have a diskette in drive A containing operating system files NOTE The system looks for the drive containing operating system files If you have a diskette with MS DOS or another ope...

Page 38: ...ion NOTE You can pause the start up screen at any time by pressing the Pause key Restart by pressing the F1 key The start up screen also briefly displays an F2 to run SETUP message at the bottom left of the initial screen and a Press Ctrl A for SCSI Select Utility message at the last screen The appropriate utility can be accessed by pressing F2 for setup or Ctrl A for SCSI immediately on message d...

Page 39: ...repancies in its configuration test the computer loads system files into memory Once the system files are loaded the system automatically loads Microsoft Windows for Workgroups Your system is ready for use Diskette Loading Use the following procedure to insert and remove a 3 1 2 inch diskette in the standard diskette drive 1 Hold the diskette label side up and insert it into the diskette drive unt...

Page 40: ...button to open the disc tray 2 With the printed side facing up hold the CD by its edges and place it in the tray see the following figure Loading a CD disc into the tray 3 Press the Eject button to close the tray The activity lamp flashes on and off when the reader is doing data access or data transfer The lamp is constantly on when you are playing an audio disc At all other times the lamp is off ...

Page 41: ...vents you from using the system You can initiate a reset automatically under certain conditions The following sections describe conditions for manual and automatic resets CAUTION Resetting the system removes information from RAM disks volatile system memory and application programs Information saved in files on disk like program and data files are not usually affected by a system reset Manual Rese...

Page 42: ... reset the system check the following Adjust the contrast and brightness controls on the monitor Check that your monitor is properly connected and the monitor power is on You can reset the system in two ways CAUTION Unless absolutely necessary do not reset the system when the hard disk lamp or diskette drive busy lamp is on Information on the hard disk or diskette might be lost or damaged With a s...

Page 43: ...kup procedures See your MS DOS and Windows for Workgroups documentation for information about backup procedures Make backup copies of your program and data files that are on diskette and on the hard disk The standard practice for diskette backup is to copy each diskette store the original in a safe place and use the copy as your working diskette You can use the MS DOS DISKCOPY command for making c...

Page 44: ...d disk and diskette drive are not in use A lit hard disk lamp or diskette drive busy lamp indicates that a drive is in use 4 Power off the system by pressing the power button Turn off power to your monitor CAUTION Unless absolutely necessary never power off the system when the hard disk lamp or diskette drive busy lamp is lit Information on the hard disk or diskette might be lost or damaged ...

Page 45: ...he Setup utility to operate your system However you might wish to run Setup to set the time date and security features NOTE If you are adding moving or removing an optional EISA PCI Plug and Play ISA non Plug and Play ISA or SCSI expansion device use the ECU and SCSI utilities See Chapter 4 Using the ECU and SCSI Utilities for information Use the Setup utility to check or change the time and date ...

Page 46: ...ST displays an error message and prompts you to run Setup reset system parameters in the event that you need to replace the RTC battery module System configuration information is stored in nonvolatile memory Nonvolatile memory is a complementary metal oxide semiconductor CMOS chip backed up by a battery The battery is part of the real time clock RTC battery module on the system board The battery s...

Page 47: ...end upon the hardware installed in your system Main menu PhoenixBIOS Setup Copyright 1985 94 Phoenix Technologies Ltd Main Advanced Security Exit System Time 10 19 20 Item Specific Help System Date 1 27 1995 Diskette A 1 44 MB 3 Tab Shift Tab or Diskette B Not Installed Enter selects field IDE Adapter 0 Master C 540 Mb IDE Adapter 0 Slave None IDE Adapter 1 Master None IDE Adapter 1 Slave None Vid...

Page 48: ...isted at the bottom of the screen Item Specific Help provides help information for the Setup option currently selected Legend bar provides a summary of command keys for using Setup General Help window appears any time during Setup when you press F1 or Alt H The help window provides two pages of general information about using Setup The following sections describe how to use the Setup menu to set s...

Page 49: ... with Windows NT Some of the Advanced features may be accessible only with a Supervisor password Security Use this menu to edit and set Supervisor and user IDs and passwords set Backup and Virus check reminders set network and diskette access and enable write protection for the hard disk Exit Exits the current menu To select an option from the menu bar use the left and right arrow keys See Exiting...

Page 50: ...tom of window F5 or Selects the Previous Value for the field F6 or or Space Selects the Next Value for the field F9 Loads the Default Configuration values for this menu F10 Loads the Previous Configuration values for this menu Enter Executes Command or Selects submenu Alt R Refreshes screen Selecting a Menu Item To select a menu item use the arrow keys to move the cur sor to the field you want The...

Page 51: ...p Window Pressing F1 or Alt H on any menu brings up the General Help window that describes the legend keys and their alternates The scroll bar on the right of any window indicates that there is more than one page of information in the window Use Page Up and Page Down to display all the pages Pressing Home and End displays the first and last page Press Esc to exit the current window THE MAIN MENU T...

Page 52: ...M DD YYYY Sets the system date Diskette A Diskette B 360KB 5 1 4 1 2MB 5 1 4 720KB 3 1 2 1 44MB 3 1 2 default 2 88MB 3 1 2 Not Installed Selects the type of diskette drive in your system IDE Adapter 0 Master Autotype fixed disk Type Multi sector transfers Configures the IDE adapter IDE Adapter 0 Slave Autotype fixed disk Type Multi sector transfers Configures the IDE adapter IDE Adapter 1 Master A...

Page 53: ...umlock and keyboard System Memory Automatically detected by the system Displays the amount of conventional memory detected at power on Extended Memory Automatically detected by the system Displays the amount of extended memory detected at power on Parameter contains submenus IDE Adapters IDE adapters control the IDE devices such as IDE hard disk drives and IDE CD ROM readers Your system has two ID...

Page 54: ...er IDE Adapter 1 Slave IDE Adapter 0 configures the PCI IDE primary port IDE Adapter 1 configures the PCI IDE secondary port Each IDE Adapter parameter has a right pointing arrow to the left of it Selecting the option displays IDE hard disk parameters Select an IDE Adapter option and set parameters for each hard disk separately Use the following table to configure the IDE hard disk If your IDE har...

Page 55: ...nders 1 to 2099 Specifies number of cylinders Heads 1 to 16 Specifies number of read write heads Sectors Track 1 to 63 Specifies number of sectors per track Write Precomp 0 to 512 None Specifies number of the cylinder at which to change the write timing Multi Sector Transfers 2 4 8 16 Sectors Specifies number of sectors in multisector transfers LBA Mode Control Enabled default Disabled Sets LBA mo...

Page 56: ...isabled Controls caching of system BIOS area Cache Video BIOS Area Enabled default Disabled Controls caching of video BIOS area Cache Memory Regions Enabled Disabled default Determines configuration of specified block of upper memory Disabled default shadow memory not cached for this region Enabled shadow memory is cached for this region Memory Shadow For memory shadowing parameters select the Mem...

Page 57: ...y Boot Sequence Your system may require a Supervisor password to set Boot Sequence parameters Select the Boot Sequence menu from the Main menu to display boot parameter submenus Use the legend keys to make selections and exit to the Main menu Use the following table to select boot parameters Boot Parameters PARAMETERS OPTIONS DESCRIPTION Boot sequence A then C default C then A C only The BIOS atte...

Page 58: ...Main menu Use the following table to configure the Numlock and keyboard parameters Numlock and Keyboard Parameters PARAMETERS OPTIONS DESCRIPTION Numlock Auto default On Off On or Off turns NumLock on or off at bootup Auto turns NumLock on if it finds a numeric key pad Key Click Enabled Disabled default Turns audible key click on or off Keyboard auto repeat rate 30 sec default 26 7 sec 21 8 sec 18...

Page 59: ...inting triangle to the left of the parameter name These parameters can be modified by pressing the F5 F6 or keys Parameters with submenus that are available from the Advanced menu have a right pointing triangle to the left of the parameter Use the arrow keys to move the cursor to the parameter then press Enter to open the submenu See the sections following the table for a description of Advanced m...

Page 60: ...ture Plug and Play operating system PCI Devices Enabled Disabled default Enables or disables the Combed I O resource allocation If enabled PCI devices requesting I O resources are checked for requests Large Disk Access Mode DOS Other Select DOS if using the DOS Windows or Windows NT operating system Select Other if you have Novell Netware or other operating system Parameter contains submenus Integ...

Page 61: ...erial Port 1 Serial Port 2 Disabled User selectable settings Auto Selects a unique address and interrupt request for the listed COM ports Auto selects the next available combination COM1 default 3F8 IRQ4 COM2 default 2F8 IRQ3 Parallel Port Disabled 378 IRQ7 default User selectable settings Auto Selects a unique address and interrupt request for the parallel port Auto selects the next available com...

Page 62: ...ver information VGA DAC Broadcast Disabled Enabled Select Enabled only when using an option board that has its own DAC and requires use of the VGA connector When Enabled VGA DAC writes Go to the option board s DAC and not to the onboard VGA s DAC Be sure to connect the monitor to the option board s video connector Monitor Types The following table lists the monitor types and the resolution and ver...

Page 63: ... Hz 70 Hz 1024 by 768 by 256 colors 87 Hz 1280 by 1024 by 16 colors Interlaced Advanced Chipset Control Select the Advanced Chipset Control submenu on the Advanced menu to set the 1 MB gap parameter and PCI parameters NOTE A Supervisor password might be required to select parameters from the Advanced Chipset Con trol submenu Use the legend keys to make your selections and exit to the Main menu Use...

Page 64: ... stored in the buffers before writing data CPU to DRAM Write Buffers Enabled Disabled Enables CPU to DRAM Write Buffers allowing data to be temporarily stored in the buffers before writing data PCI Memory Burst Cycles Enabled Disabled Enables PCI memory burst write cycles Latency Timer Value A0 through F0 20 through 90 Sets maximum number of PCI bus clocks that PCMC may burst as a master CAS Befor...

Page 65: ...lled and ready for installation of a Plug and Play operating system O S Once the Plug and Play O S is installed your system will automatically configure newly added Plug and Play ISA boards You need only to install the board and boot the system The system automatically allocates resources to the board You can enable Plug and Play directly from the Advance menu using the command keys Selecting Yes ...

Page 66: ...ce decoders rather than the full 16 bit I O space Select the PCI Devices parameter and enable the Combed I O Resource Allocation parameter if you need to allocate I O resources see the following table Use the legend keys to make your selections and exit to the Main menu PCI Device Parameters PARAMETER OPTIONS DESCRIPTION Combed I O Resource Allocation Enabled Disabled default If Enabled PCI device...

Page 67: ...lection DOS or Other and try again A large disk is one that has more than 1024 cylinders more than 16 heads or more than 63 tracks per sector THE SECURITY MENU The following table lists and describes the available security parameters when you select the Security menu in the legend bar Parameters that can be modified directly from the Security menu do not have the right pointing triangle to the lef...

Page 68: ...directly select Use the legend keys to make your selections and exit to the Main menu See the sections following the table for a description of the Security submenus and their parameters Security Menu FEATURE OPTIONS DESCRIPTION Edit Supervisor Information See the following Edit Supervisor Information parameter table Selects security options associated with Supervisor login Allow User Login Yes No...

Page 69: ...perating systems and viruses and application programs which attempt to modify the boot sector will not be able to do so System Backup Reminder Disabled default Daily Weekly Monthly Sets how often you are prompted to do a system backup Virus check reminder Disabled default Daily Weekly Monthly Sets how often you are prompted to do a virus check Parameter contains submenus Edit Supervisor Informatio...

Page 70: ...sword Numbers Required in Password Yes No Defines if numbers are required in password Password Lifetime 1 to 511 days Sets maximum permitted lifetime of password Minimum Password Change 0 to 255 days Sets minimum period between password changes Expired Password Life 0 to 127 days Sets maximum period that an expired password may be used Pressing Enter at the Edit Supervisor Login parameter on the m...

Page 71: ...he following table for a description of the Edit User Informa tion parameters Edit User Information Parameters PARAMETER OPTIONS DESCRIPTION Edit User Login ID Press Enter Pressing Enter allows the user to change a login ID Edit User Password Press Enter Pressing Enter allows the user to add or change a password Note The Supervisor may add change or delete a password A user may only add or change ...

Page 72: ...ID parameter on the menu displays a Edit Login dialog box with the following prompt Enter login ID Enter your ID number and press Enter to accept the ID CAUTION Passwords and security information can only be changed on a cold boot Pressing Enter at the Edit User Password parameter displays an Edit Password dialog box with the following prompts Enter new password Re enter new password Changes have ...

Page 73: ...ct one of the items from the menu or menu bar to exit Save Changes Exit After making your selections on the Setup menus always select Save Changes Exit to make them operative Unlike standard RAM memory CMOS is sustained by an onboard battery and stays on after you turn your system off After you save your selections the program displays this message Changes have been saved continue Pressing Enter a...

Page 74: ...e Setup menus select Get Default Values from the Main menu The program displays this message Default values have been loaded continue Pressing Enter at Continue exits Setup and reboots your system If during bootup the BIOS program detects a problem in the integrity of values stored in CMOS it displays these messages System CMOS checksum bad run SETUP Press F1 to resume F2 to Setup The CMOS values ...

Page 75: ...e Exit menu updates all the selections and displays this message Previous values have been loaded continue Save Changes Save Changes saves all the selections without exiting Setup You can return to the other menus if you want to review and change your selections Selecting Save Changes on the Exit menu saves your changes and displays the following message Changes have been saved Continue Pressing E...

Page 76: ...ECU utility comes on a diskette shipped with your system NOTE Do not copy the EISA Configuration Utility to your hard disk The utility program must start with a cold boot from the EISA Configuration Utility diskette The SCSI utility is used to check or change the settings of your installed SCSI 2 devices or to configure your system for any optional SCSI devices that you may install The SCSI utilit...

Page 77: ...board in your system see Chapter 7 for procedures 2 Load the ECU utility see How to Load the ECU in this chapter 3 Read the overview of selecting and configuring EISA or ISA expansion boards see Configure Computer or Peripheral Devices Step 1 Important EISA Configuration Information in this chapter 4 Configure your system and EISA ISA board see Configure Computer or Peripheral Devices Step 2 Add o...

Page 78: ...re Computer or Peripheral Devices Step 3 View or Edit Details in this chapter 6 Save your changes and exit the ECU utility see Configure Computer or Peripheral Devices Step 5 Save and Exit in this chapter Plug and Play ISA Board 1 If your system has a Plug and Play O S system installed enable Plug and Play O S in the Setup utility See Chapter 3 Setting System Parameters Select the Advanced menu fr...

Page 79: ...install move or remove the non Plug and Play board in your system until after the configuration procedure is completed 2 Configure your system and non Plug and Play ISA board see Configure Computer or Peripheral Devices Step 2 Add or Remove Boards in this chapter Also check the documentation that comes with the board for resource allocations 3 Check or change your configuration see Configure Compu...

Page 80: ...evice in your system see Chapter 7 for procedures 3 Open the SCSI utility see the SCSI Select Utility section at the end of this chapter 4 Select SCSI Disk Utilities to review what SCSI devices are currently installed and to set the SCSI ID on any optional device you installed 5 Select Configure View Host Adapter Settings from the SCSI Select utility menu see SCSI Select Utility at the end of this...

Page 81: ... tion CFG file The ECU uses the CFG file which describes the characteristics and the required system re sources of the board to create a conflict free configuration Once you complete the configuration process configuration information is saved to the system s nonvolatile memory for use any time you power on the system The ECU utility supports EISA and ISA boards PCI devices and Plug and Play ISA b...

Page 82: ...ge or check system parameters when you add move or remove an expansion board print out the required settings of a particular board or option correct a hardware discrepancy when the Power On Self Test POST displays an Invalid EISA Configura tion Storage RUN ECU error message and prompts you to run the ECU program boot the system and check parameters when you have a problem with the system change fu...

Page 83: ...h the system powered off insert the NEC EISA Configuration Utility ECU diskette into drive A The ECU requires a cold boot each time you load it 2 Power on the system After performing POST the sys tem loads and starts the ECU An ECU preparation screen and NEC logo screen briefly appears then the Main Menu screen appears similar to the following Main Menu Help Configure Computer or Peripheral Device...

Page 84: ...e following sections for a description of Main Menu options and how to use them Options are described in the sequence that they appear on the Main Menu NOTE For your system configuration you might not need to use all of the selections listed under each Main Menu option Read the information in the following sections to select the options you need NOTE It is strongly recommended that you make a back...

Page 85: ...ve or remove an expansion board you installed a PCI device you want to change board functions or resources you want to view switch and jumper settings for a specific board the RTC battery module was replaced in the system and you need to set the system parameters If you installed an EISA or ISA board and you select Configure Computer or Peripheral Devices the ECU might display an Automatic Add scr...

Page 86: ...s the system for the addition or removal of an expansion board to or from the system Step 3 View or edit details lets you view and change system board settings If you do not have a hard disk con figuration you must select this step when you are setting up the system for the first time NOTE If you are setting up the system for the first time you must select Step 3 even if you did not install an exp...

Page 87: ...lect Step 2 whenever you install or remove any EISA boards or ISA boards with CFG files from the system NOTE If you are adding an EISA board to your system first install the board Then run the ECU and select Step 3 Configure Computer and Periph eral Devices This step automatically loads configu ration information and adds the EISA board to your system configuration If you are adding a non Plug and...

Page 88: ...your system and the available expansion board slots Scroll through the list of boards displayed and proceed as follows If the list shows all your boards installed press F10 NOTE If a CFG file comes with your board and a CFG file already exists on the ECU diskette you still need to copy the CFG file from the option con figuration diskette see Maintain System Configu ration Diskette in this section ...

Page 89: ...ontain ing the CFG file NOTE If a CFG file comes with your board and a CFG file already exists on the ECU diskette you still need to copy the CFG file from the option con figuration diskette see Maintain System Configu ration Diskette in this section This ensures that the system uses the latest version of the file In the rare event that the CFG file on the ECU diskette is newer the system displays...

Page 90: ...stem board settings or to config ure your system when you are setting up for the first time System board settings include the following configuration categories System and video BIOS caching and system and video BIOS shadowing Port configurations parallel port serial port 1 and serial port 2 addresses and interrupts Peripheral controllers diskette drive controller PCI SCSI controller PCI IDE contr...

Page 91: ... Region D400 Cache Memory Region D800 Cache Memory Region DC00 Enabled Enabled Enabled Enabled Enabled Enabled Enabled Shadow Video BIOS Area Shadow Memory Region C800 Shadow Memory Region CC00 Shadow Memory Region D000 Shadow Memory Region D400 Shadow Memory Region D800 Shadow Memory Region DC00 Enabled Disabled Disabled Disabled Disabled Disabled Disabled Embedded PCI SCSI Controller Adaptec 785...

Page 92: ... arrow keys or Page Up and Page Down keys to view the parameters To view parameter choices highlight the parameter and press Enter 3 Make any parameter changes To view and in some cases to edit parameter resources for example interrupts I O addresses or I O ports press F6 4 When you are through viewing and changing parameter settings press F10 to exit the Step 3 View or edit details procedure NOTE...

Page 93: ... board prevents the ECU from using the selected resources to resolve resource conflicts Locking system resources for a Generic ISA Adapter board can cause changes to the switch and jumper settings of other boards in the system View additional system information menu provides options to display detailed information about system specifications and resources Set verification mode menu allows you to s...

Page 94: ...have a SCSI device installed in the system check that the Embedded PCI SCSI Controller parameter is en abled If you have both internal and external SCSI devices in stalled and connected to the on board SCSI 2 host adapter use the SCSI Select Utility to set External SCSI device termination Run the SCSI Select Utility when you complete the system configuration with the ECU See SCSI Select Utility la...

Page 95: ...nnected to a printer Press F7 for a list of print options Step 5 Save and Exit Select Step 5 to save your configuration and reboot your system Set Date or Time Set the date and time if you are setting up the system for the first time or you need to correct the settings The settings remain in memory even after the system is powered off To set the date and time choose Select Date or Time from the Ma...

Page 96: ...at determine how the board works within the system These settings are in a con figuration file and are copied to and stored in the system All EISA boards should come with CFG files If not check the configuration files that come on the ECU diskette or contact the EISA board manufacturer to obtain the appro priate files If your ISA boards did not come with a CFG file see ISA Boards without CFG Files...

Page 97: ... first time and you have a SCSI device such as a SCSI hard disk and CD ROM reader see SCSI Select Utility later in this chapter PCI Devices and Plug and Play ISA Boards Whenever you install a PCI device or Plug and Play ISA board in the system run the ECU and select Configure Computer or Peripheral Devices This configuration procedure automatically loads configu ration information and adds the PCI...

Page 98: ...n the Generic ISA CFG File is not available Using the Generic ISA CFG File The ECU provides one Generic ISA CFG file that you can use with an ISA board that does not have a corresponding file However if you have a multifunction ISA board you may have to manually create a configuration file see Using the Create CFG File Facility next NOTE The ECU provides only one Generic ISA CFG file If you alread...

Page 99: ...pears 6 Select Generic ISA Adapter and press Enter The Add confirmation screen appears with the manufac turer s comments and instructions to configure the board resources manually 7 Read the manufacturer s comments and press Enter when you are finished The Add screen appears 8 Select the slot in which you want to install the ISA board and press Enter The Step 2 Add or remove boards screen appears ...

Page 100: ...vanced menu 13 Select Lock unlock boards Then select the Generic ISA Adapter board from the list An exclamation point next to the board indicates that it is locked NOTE Locking the Generic ISA Adapter board reserves the selected system resources and pre vents the ECU from using them to resolve resource conflicts CAUTION Do not remove a locked board after it is locked and saved and you exited from ...

Page 101: ...ically verify or that a software statement with additional information about the board is provided NOTE Locking system resources for the Generic ISA Adapter board can cause changes to the switch and jumper settings of other boards in the system 16 Press F7 to select a print option to print the configura tions of the boards marked with an arrow If you do not choose a print option be sure to write d...

Page 102: ...pter 7 in this guide Using the Create CFG File Facility Use the Create CFG File Facility when you cannot locate the CFG file for a particular board and the Generic ISA configuration CFG file is not available Use the following procedure 1 Run the ECU and select Configure Computer or Peripheral Devices from the Main Menu 2 Select Step 2 Add or remove boards 3 Press Insert to select the Add function ...

Page 103: ...e New Board Setup screen reappears NOTE Press F7 if you need to check the current allocation of your system s resources If the board requires DMA channels choose Select DMA Channels Select the DMA channels used by the board s current configuration You must limit your selections to four DMA channels Press F10 when done The New Board Setup screen reappears If the board requires a port address choose...

Page 104: ... Board Setup screen reappears 10 Press F10 when you finish selecting the resources used by the board The View Current Settings screen appears Press Enter to save the current settings The Add confirmation screen appears 11 Read the manufacturer s comments and press Enter when you are done The Add screen appears 12 Select the slot in which you want to install the board Press Enter If you add a board...

Page 105: ...Press F10 The Steps in configuring your com puter screen appears Select Step 5 Save and Exit Select Save the configuration and restart the com puter At the Reboot screen press Enter 15 Turn off the system and remove the ECU diskette If you printed any configuration settings to a file install the diskette in a computer attached to the printer so you can print a hard copy 16 Compare the settings of ...

Page 106: ...reen Press Ctrl A for SCSI Select tm Utility A screen similar to the following displays Adaptec AIC7850 SCSISelect tm Utility V1 11 AIC 7850 at Bus Device 00 03h Would you like to configure the host adapter or run the SCSI disk utilities Select the option and press Enter Press F5 to switch between color and monochrome modes Options Configure View Host Adapter Settings SCSI Disk Utilities Arrow key...

Page 107: ...our system The actual items on the menu depend upon the hardware installed in your system AIC 7850 at Bus Device 00 03h Configure View Host Adapter Settings SCSI Bus Interface Definitions Host Adapter SCSI ID 7 SCSI Parity Checking Enabled Host Adapter SCSI Termination Enabled Additional Options SCSI Device Configuration Press Enter Advanced Configuration Options Press Enter F6 Reset to Host Adapt...

Page 108: ...ts The following tables summarize the SCSI Device Configu ration Option and the Advanced Configuration Option sub menu parameters SCSI Device Configuration Options PARAMETERS OPTIONS DESCRIPTION Initiate Sync Negotiation Yes default No Enables or disables the sync negotiation for each SCSI device Maximum Sync Transfer Rate 10 0 default 8 0 6 7 5 0 Sets maximum sync transfer rate for each SCSI devi...

Page 109: ...vable hard disks as fixed hard disks under BIOS control Extended BIOS Translations for Drives Greater than 1 GByte Enabled default Disabled Enables or disables extended BIOS for 1 GByte or larger drives BIOS Support For More Than 2 Drives MS DOS 5 0 and above Enabled Disabled Enables or disables BIOS support for more than two drives SCSI Disk Utilities Use the SCSI Disk Utilities option to check w...

Page 110: ...on the menu depend upon the hardware installed in your system AIC 7850 at Bus Device 00 03h Select SCSI Disk and Press Enter SCSI ID 0 SEAGATE ST3255ON SCSI ID 1 No device SCSI ID 2 No device SCSI ID 3 No device SCSI ID 4 CD ROM Drive SCSI ID 5 No device SCSI ID 6 No device SCSI ID 7 AIC 7850 Arrow Keys to Move Cursor Enter to Select Option ESC to Exit default Use the arrow keys to move the cursor...

Page 111: ...text cursor or graphics pointer on the screen based on information from your mouse and application See the following sections to run mouse drivers for your operating system NOTE Use the following information to run mouse drivers for MS DOS The information is not appro priate for using your mouse in Windows The MS DOS mouse driver is LMOUSE COM and works with all applications that use the Microsoft...

Page 112: ...parameters using a DOS command line is as follows LMOUSE parameter parameter The following list describes the parameters that you can use Ballistic Effect BHIGH BLOW BON BOFF The ballistic effect gives you speed and precision as you require them Moving your mouse quickly lets you sweep the cursor across your screen quickly Moving it slowly lets you zero in on an exact position The ballistic effect...

Page 113: ...rom your wrist so that your fingers rest on top of the buttons The mouse s compass direction south points towards your wrist east points towards your right west towards the left The screen cursor moves in the same direction that your mouse moves With the driver orientation set to the default NORTH the cursor moves in the following directions in response to the mouse movement NORTH moves the cursor...

Page 114: ...ee button mouse using the K command This parameter displays the current mouse settings Type the following command and press enter to view a listing of mouse settings lmouse The following example sets the ballistic effect to high the mouse orientation to NORTH sets the sensitivity level to 5 and specifies a 3 button mouse lmouse bhigh north s05 3k VIDEO DRIVERS Video drivers let you take advantage ...

Page 115: ...00 by 600 with 16 8 million colors 1024 by 768 with 16 colors 1024 by 768 with 256 colors 1024 by 768 with 64 000 colors 1280 by 1024 with 16 colors 1280 by 1024 with 256 colors The default Windows video resolution is 640 by 480 with 256 colors For an optimum screen display you can set video modes and refresh rates through the TLIMODE utility also preinstalled on your system To change the video dr...

Page 116: ...ette The diskette which contains the latest version of the BIOS code can be obtained through NEC Technologies Inc See Chapter 9 for the NEC telephone number to call to obtain the diskette If you have access to a modem check the NEC Bulletin Board Service for available updates to your system BIOS See NEC Bulletin Board Service in Chapter 9 for infor mation about using the bulletin board U S and Can...

Page 117: ... the BIOS Press Enter to continue with the flash upgrade and Cancel to quit 6 On completion of the upgrade remove the flash diskette from drive A 7 Reboot the system and run the Setup utility see Chapter 3 Check and reset your parameters using the copy of the Setup parameters that you made earlier ...

Page 118: ...age and to maintain its condition and performance Protective Measures There are several ways that you can protect your system from possible damage NEC strongly recommends the following protective measures Connect a surge suppressor between your computer and a grounded wall outlet A surge suppressor protects your system from sudden transient increases and decreases in electrical power Be sure to co...

Page 119: ...ou take the necessary steps such as virus checks to protect your system Place your computer away from direct sunlight and extreme hot and cold temperatures The recommended operating environment is from 50 F to 95 F 10 C to 35 C The recommended non operating environment shipping or storage is from 14 F to 158 F 10 C to 70 C Back up all hard disk information on a regular basis After turning off powe...

Page 120: ...aner or solvent on any part of the system Check the system regularly for any loose material such as paper books magazines that blocks air circulation around your unit Keep food and liquids away from your computer Periodically clean the keyboard with a vacuum cleaner brush attachment Do not use any liquid cleaners on the keyboard as they can damage the keyboard If an object such as a paper clip fal...

Page 121: ...the fol lowing procedure to clean the mouse 1 Turn off your computer and any peripherals attached to it 2 Turn your mouse upside down Locate the mouse ball cover see the following figure 3 Turn the ball cover counterclockwise and remove the cover 4 Gently turn the mouse over and let the ball fall into your palm 5 Clean the mouse as follows Use tap water or tap water and a mild detergent to clean t...

Page 122: ...ntaining Your Computer 6 5 Locating the mouse ball cover 6 Gently put the ball back into its socket 7 Fit the ball cover over the ball and turn the cover clockwise until it locks in place Mouse Ball Cover ...

Page 123: ...d Always pick up the disc by its edges Handle a disc by its edges Avoid touching the side of the disc that has no printing or writing on it This is the data side of the disc Do not write on or apply labels to either side of the disc Keep the disc away from direct sunlight or high tempera tures ...

Page 124: ...pellent or any other chemical on the disc Chemicals and cleaners can damage the disc Wipe a disc from the center and toward the edge MOVING GUIDELINES Use the following steps to prepare your system for moving or shipping 1 Back up your hard disk files onto diskettes or tape cartridges Be sure to take precautions for storing and transporting diskettes or cartridges so that they are not exposed to m...

Page 125: ...f the system power 4 Unplug the system unit power cable from the wall outlet or surge suppressor then from the unit 5 Unplug any external options from the wall outlets or surge suppressor then disconnect them from the system unit 6 Pack the system components in the original shipping materials and cartons If these are not available be sure to use adequate packing materials to protect the components...

Page 126: ...sor upgrade kit SCSI 2 and IDE storage devices such as hard disks and diskette drives external peripherals such as a printer device a serial device or SCSI 2 devices OPTIONAL HARDWARE Many optional components are available for customizing your computer to fit your needs See your authorized NEC dealer for assistance in determining which options are best for you The following describes the hardware ...

Page 127: ...p to 256 MB of high speed memory See SIMM Upgrade Kits later in this chapter for information on installing SIMMs Dual processor upgrade A 320 pin ZIF upgrade socket on the system board supports an optional Intel 90 MHz or 100 MHz proces sor for dual processor capabilities See Dual Processor Upgrade Kit in this chapter for installation procedures Drives The system accommodates a total of six data s...

Page 128: ...a board or chip in its anti static packaging until you are ready to install it Dissipate static electricity before handling any system components boards chips and so on by touching a grounded metal object such as the system s unpainted metal chassis If possible use anti static devices such as wrist straps and floor mats Always hold a chip or board by its edges Avoid touch ing the components on the...

Page 129: ... cover Remove the system unit cover as follows WARNING Before you remove the system unit cover turn off all system power and disconnect the system and its peripherals from their power sources 1 Turn off and unplug the system unit and monitor 2 Disconnect the keyboard and mouse from the rear of the system 3 Unplug any external options such as a printer connected to the rear of the system unit 4 If ...

Page 130: ...Adding Options 7 5 5 Remove the four screws that secure the cover to the system unit Removing the cover screws Screws Keylock Screws ...

Page 131: ...7 6 Adding Options 6 Pull the cover back about one inch from the front of the unit Releasing the cover 7 Lift the cover off of the system unit ...

Page 132: ...k of the chassis 3 Secure the cover with the four screws previously re moved 4 Connect the monitor keyboard mouse and any other external options to the rear of the system unit 5 Plug in your power cables 6 If desired lock the cover to the chassis EXPANSION BOARDS You can add PCI Plug and Play ISA EISA and non Plug and Play ISA expansion boards to your system The PCI and Plug and Play ISA boards ar...

Page 133: ...meters for information on the Setup utility See Chapter 4 Using ECU and SCSI Utilities for information on the ECU and SCSI utilities Use the following procedures for installing an expansion board in the system Precautions Always remove an expansion board from the shipping material very carefully Static discharge can damage board components Take the following precautions when handling a board Avoid...

Page 134: ... support industry standard 8 16 32 bit expansion boards All slots accommodate full length boards or smaller The PCI EISA shared slot accommodates either a PCI board or an EISA board If you are installing a PCI board in the shared slot it must be connected to the PCI 2 connector on the system board If you are installing an EISA board in the shared slot it must be connected to the EISA 1 connector d...

Page 135: ... Plug and Play ISA board first install the board then run the ECU utility to configure your system If you are installing a non Plug and Play ISA board first use the ECU to configure your sys tem then install the board If you are installing a mix of boards install the non Plug and Play board last after configuring the system See Chapters 3 and 4 for information on using the utilities PCI Slot PCI E...

Page 136: ...t power is turned off and the system is unplugged before you begin the installation procedure 2 Remove the system unit cover See Removing and Replacing the System Unit Cover at the beginning of this chapter 3 Remove the screw securing an expansion slot cover and remove the cover Save the screw and expansion cover for possible future use Removing a slot cover Slot Cover Screw ...

Page 137: ...on slot connector on the system board You might have to gently rock the board from side to side to seat it into the connector Inserting the board 5 Secure the board to the support bracket with the previ ously removed slot cover screw 6 Replace the system unit cover See Removing and Replacing the System Unit Cover 7 Turn the system power on Expansion Board Guide Rail ...

Page 138: ...e installation of some options might require the removal of a board that is already installed Use the following steps to remove a board from the system CAUTION Be sure that the system unit power is turned off and the system is unplugged before you begin the removal procedure 1 If you have any cables connected to the board label the connector s then unplug the cable s 2 Remove the screw that secure...

Page 139: ...M sticks installed in the sockets on the SIMM memory board increase the total system high speed memory The system supports up to 256 MB of high speed memory Use the following procedures to install a SIMM stick CAUTION Static discharge can damage SIMMs Heed all cautions in the following sections Cautions Always remove a SIMM from its shipping material care fully Static discharge can damage SIMM com...

Page 140: ... the SIMM memory board from the system board 1 Remove the system cover see Removing and Replacing the System Unit Cover earlier in this chapter CAUTION Be sure that the system unit power is turned off and the system is unplugged before you begin the installation procedure 2 Remove the two screws holding the SIMM memory board to the underside of the bracket bar see the following figure If you have ...

Page 141: ...teps to locate SIMM sockets and to check the memory configuration in your system 1 Locate the SIMM sockets on the memory board see the following figure The SIMM sockets are assigned as banks as follows bank 0 bank 1 bank 2 bank 3 Screws SIMM Memory Board Bracket Bar underside of bracket bar ...

Page 142: ...ons 7 17 Locating the SIMM banks on the memory board 2 Check the memory in your system Your system ships with 16 MB 2 8 MB SIMM sticks of memory installed in bank 0 on the memory board Bank 0 Bank 1 Bank 2 Bank 3 ...

Page 143: ...n two banks for interleaving The following SIMMs are supported 4 MB SIMM stick 1 MB by 36 bit 8 MB SIMM stick 2 MB by 36 bit 16 MB SIMM stick 4 MB by 36 bit 32 MB SIMM stick 8 MB by 36 bit Fill SIMM banks in any order as long as each bank gets two of the same capacity SIMM stick Refer to Appendix D for the memory upgrade path Installing SIMMs Use the following steps to install SIMM sticks CAUTION ...

Page 144: ...s follows Release the SIMM by pressing outward on the metal clips at the outer edges of the socket see the follow ing figure The SIMM tilts forward allowing you to remove it from the socket NOTE Depending on which SIMM you are remov ing you may have to release one or more SIMMs in front of the SIMM being removed Removing a SIMM Clips ...

Page 145: ...fore you install a SIMM reduce static discharge by touching the system s metal chassis Locate the notched end of the SIMM Locating the notched end of the SIMM Locate the appropriate SIMM socket see the previ ous figures and Appendix D Memory Upgrade Path Notch ...

Page 146: ... figure CAUTION Be sure to install the SIMMs in the correct sockets Inserting the SIMM Carefully push the SIMM towards the metal clips Using equal pressure at the ends of the SIMM push it until it locks under the metal clips at the ends of the socket CAUTION Be careful when handling the SIMM The SIMM and socket tabs are fragile Clip Notched End Of SIMM ...

Page 147: ...he following figure 3 Align the memory board edge connector with the mem ory board connector on the system board 4 Carefully insert the memory board into the connector You might have to gently rock the board from side to side to seat it into the connector Installing the SIMM memory board 5 Fasten the memory board to the bracket bar with the two previously removed screws Screws SIMM Memory Board Br...

Page 148: ... SIMM sticks correctly DUAL PROCESSOR UPGRADE A 320 pin ZIF socket on the system board makes it easy for you to add a second processor to your system for dual processor capability Use the following procedures and the instructions included with the upgrade option kit to install the upgrade in your system CAUTION Incorrect installation of the processor kit can damage the processor system board or bo...

Page 149: ...dure 2 Reset configuration jumpers J33 and J34 on the system board as follows Locate jumpers J33 and J34 on the system board see the following figure You may have to tag and disconnect any cables blocking access to the jumpers Locating the jumpers and upgrade processor socket Jumper J34 Jumper J33 Processor Upgrade Socket Socket Secondary Cache ...

Page 150: ...rs 4 Install the upgrade processor in the upgrade socket as follows NOTE The speed of the upgrade processor 90 MHz or 100 MHz must match the speed of the factory installed processor 90 MHz or 100 MHz Locate the upgrade socket on the system board see the previous figures J34 J33 Upgrade Socket Socket Secondary Cache J33 1 2 3 J34 2 3 1 ...

Page 151: ... the following figure CAUTION Before picking up the upgrade proces sor reduce static discharge by touching the metal frame of the system unit Align the upgrade processor with the socket as shown in the following figure Aligning the upgrade processor Dot Notched Corner of Chip Alignment Mark on System Board Lever Locking ...

Page 152: ...ssor in place by swinging the socket lever down towards the socket until it locks in place 5 Install the upgrade processor heat sink as follows Align the heat sink over the processor as shown in the following figure Position the short end of the spring clip on the heat sink under the two tabs on the socket Installing the heat sink Tabs Spring Clip Spring Clip short end ...

Page 153: ...rage devices supported by your system the device slots in your computer device preparation such as switch and jumper settings device cables and cable connector locations procedures for installing storage devices Storage Device Support The system board in your computer supports SCSI 2 and IDE storage devices including up to two diskette drives including the standard 3 1 2 inch 1 44 MB diskette driv...

Page 154: ...accessible device slots for 1 6 inch high devices one slot contains the standard CD ROM reader in hard disk configurations two internal 3 1 2 inch device slots for 1 6 inch or 1 0 inch high devices one slot contains the standard IDE or SCSI 2 hard disk in hard disk configurations You can install accessible devices such as a diskette drive or tape drive with a 5 1 4 inch form factor frame in the 5 ...

Page 155: ...mple check the following items for these devices Diskette drive remove any termination on the optional diskette drive See the drive documentation SCSI 2 device check the documentation that comes with the device and the following sections for informa tion on setting interface termination termination power motor start at power on SCSI identification ID num ber and any other device functions 5 1 4 In...

Page 156: ...ed to the last connector on the SCSI cable terminates the other end of the cable NOTE The SCSI 2 hard disk configurations come with the hard disk properly connected to the internal SCSI cable The hard disk termination is properly set and the disk drive is connected to a connector on the SCSI cable Use the following guidelines for proper SCSI termination Terminate the device attached to the last co...

Page 157: ...wer On In multiple SCSI drive configurations disable the SCSI drive s motor start at power on feature Set the motor to start with a Start Unit command from the SCSI controller Disabling the motor start at power on allows the SCSI de vices to start up one at a time and prevents a power surge SCSI IDs SCSI identification ID numbers configure all SCSI devices on internal and external SCSI cables with...

Page 158: ...e a SCSI 2 interface cable system power cables Your system ships with the diskette drive signal cable con nected to the system board and to the standard 3 1 2 inch diskette drive The cable has an additional connector for an optional diskette drive For systems shipped with an IDE hard disk the primary PCI IDE interface cable comes connected to the primary PCI IDE connector on the system board and t...

Page 159: ... and to the standard IDE CD ROM reader The PCI IDE cable has a connector for an additional optional IDE device The secondary PCI IDE cable comes connected to the system board and allows connection of up to two additional optional IDE storage devices The following figure shows cable connector locations on the system board and power supply Cable and connection information follows the figure System b...

Page 160: ... variety of sup ported storage configurations Power cable connectors are keyed to fit only in the correct position There are a total of 12 power connectors including those connected to the standard 3 1 2 inch diskette drive hard disk drive and CD ROM reader Power cable connectors Large Power Cable Connector Cable Connector Small Power ...

Page 161: ...tte drive The cable connector for the diskette drive is keyed to fit only in the correct position The red edge of the cable goes to pin 1 on the cable connector Align the red edge of the cable with pin 1 the notched end on the drive connector Diskette drive cable connectors Edge Connector for Optional Diskette Drive Pin Connector for Optional Diskette Drive Attaches to System Board Attaches to 1 4...

Page 162: ...7 36 Adding Options Adding Options 7 ...

Page 163: ...e connection of up to five internal SCSI devices The SCSI hard disk configurations ship with the internal SCSI hard disk connected to the SCSI cable Internal SCSI 2 Interface Cable End Connector attaches to system board One of Five SCSI Device Connectors attaches to a SCSI device without termination SCSI Device End Connector attaches to last SCSI device with termination ...

Page 164: ...condary PCI IDE connectors on the system board The IDE hard disk configurations ship with the IDE hard disk and standard IDE CD ROM connected to the primary PCI IDE cable The SCSI hard disk configurations ship with the primary PCI IDE cable connected to the standard IDE CD ROM reader The secondary PCI IDE cable is ready for connection of up to two optional IDE storage devices PCI IDE cable Connect...

Page 165: ...ers incorrectly or installing a device incorrectly can disable your sys tem See Chapter 3 Setting System Parameters for information on the Setup utility See Chapter 4 Using ECU and SCSI Utilities for information on the ECU and SCSI utilities Installing an Accessible Storage Device Use the following procedure to install an accessible storage device in the system NOTE When installing an accessible s...

Page 166: ...ny rails already attached See the documentation that comes with the device 3 Remove the system unit cover see Removing and Re placing the System Unit Cover earlier in this chapter WARNING Be sure that system power is off and the system and its peripherals are unplugged before you begin the installation procedure 4 Remove the device bracket from the system as follows Remove the four screws two to a...

Page 167: ...Adding Options 7 41 Removing the front panel screws Front Panel Screws ...

Page 168: ...7 42 Adding Options Remove all slot covers from the metal cover plates by pressing in on their panel tabs Save the slot covers for reuse Removing the slot covers Panel Tab 1 of 2 Slot Cover ...

Page 169: ...ove the two screws holding each metal cover plate to the device bracket Remove and save the plates for reuse Removing the cover plate screws Remove the five screws holding the device bracket to the chassis Cover Plate Screws ...

Page 170: ...7 44 Adding Options Removing the device bracket screws Tag and unplug the power and signal cables from the CD ROM reader Carefully pull the device bracket out of the chassis Screws Screws ...

Page 171: ... in the lowest empty bay If you do not you cannot reinstall the blank slot cover plates over any remaining empty bays 6 Align the device mounting holes with the bracket mounting holes Secure the device to the bracket with the four screws two to a side provided with the device 7 Insert the device bracket into the chassis Securing the device Screws Screws ...

Page 172: ...onnector on the SCSI cable or PCI IDE cable and on the power cable into the device Use care to prevent bending drive connector pins Align the SCSI or IDE cable connector as shown in the figure Connecting the SCSI or PCI IDE device cable SCSI or PCI IDE Cable Red Edge Power Cable ...

Page 173: ...d se cure in place with the five previously removed screws 10 Install the metal cover plates over any empty slots and secure with the previously removed screws If you installed a hard disk in the 5 1 4 inch slot install a metal cover plate over the slot 11 Install the slot covers over the empty slots by snapping them into the slots in the metal cover plates If you installed a hard disk in the 5 1 ...

Page 174: ...ity to set your new configuration see Chapter 3 and Chapter 4 Installing an Internal Storage Device Use the following procedure to install a device in the 3 1 2 inch internal device bracket NOTE The internal device bracket holds up to two 1 0 inch high devices or one 1 0 inch high and one 1 6 inch high device 1 Follow the pre installation instructions that come with your device such as setting jum...

Page 175: ... cables attached to any installed device in the internal device bracket 5 Remove the internal device bracket as follows Remove the three screws holding the device bracket to the back of the chassis Remove the two screws holding the device bracket to the bracket bar Remove the device bracket from the chassis Removing the device bracket screws Screws Screws Internal Device Bracket Bracket Bar ...

Page 176: ...e device connectors are facing the inside of the chassis when reinstalled Align the device mounting holes with the mounting holes in the device bracket see the following figure Secure the device in the device bracket with the four screws two to a side provided with the device Securing the device in the bracket Screws Device Device Bracket 2 of 4 ...

Page 177: ...ector on the power cable and on the SCSI or IDE signal cable into the device see the following figure Use care to prevent bending drive connector pins Align the SCSI or IDE connectors as shown in the figure Connecting the internal device cables SCSI or IDE Cable Red Edge Power Cable ...

Page 178: ...als and power cables 11 Run the Setup ECU or SCSI utility to set your new configuration see Chapters 3 and 4 EXTERNAL PERIPHERALS This section contains instructions for connecting the follow ing external peripherals to the system unit ports a parallel printer to the parallel printer port two RS 232C devices such as a serial printer and a pointing device to the serial 1 and serial 2 ports up to sev...

Page 179: ... is unplugged 3 Connect the printer cable to the printer port on the rear of the system unit Secure the cable as follows Secure the system unit connection with the screws provided Lock the connector to the printer with the connector clips Connecting a printer cable to the system unit 4 Plug in the system and printer power cords and turn power on Printer Port Printer Cable ...

Page 180: ...system Follow the instructions that come with the option 1 Turn off and unplug the system unit and any external option connected to the system unit 2 Make sure that any power to your RS 232C device is off and the power cable is unplugged 3 Connect your RS 232C cable to one of the system s serial ports and to the device Secure the cable with the screws provided Connecting an RS 232C cable to the sy...

Page 181: ...en SCSI devices includ ing both internal and external devices Also the maximum length of the external SCSI 2 cable cannot exceed 19 68 feet 6 meters If you are connecting SCSI devices to both the standard internal SCSI cable and to the external SCSI 2 port use the shortest external SCSI cable possible Connect an external SCSI device after you install all your internal hardware options NOTE If you ...

Page 182: ...g an external SCSI cable 4 Connect your external SCSI devices to the external SCSI cable NOTE The last device connected to the external SCSI cable must be terminated See the documen tation that comes with the SCSI device for termina tion information 5 Turn system power on 6 Run the SCSI Select utility to change your configuration see Chapter 4 External SCSI 2 Cable SCSI 2 Port ...

Page 183: ...ration switches SW4 a block of four switches on the system board Situations that require changing switch settings include the following You want to clear the CMOS You want to disable the password security feature CAUTION The switches are set correctly at the factory for your system configuration If your system requires a switch change change only the switch setting for that condition Otherwise kee...

Page 184: ...ange the switches use the procedures that follow the figures Locating the system configuration switches System Configuration switch settings System Configuration Switches CMOS CLEAR ON BIOS clears CMOS OFF Normal operation OFF 1 2 3 4 CPU CLOCK ON 90 MHz OFF 100 MHz OFF Enabled ON Disabled PASSWORD SECURITY NOT USED Default Setting Default Setting for P90E Default Setting for P100E ...

Page 185: ... power must be off before changing a switch setting 2 Remove the system unit cover see Chapter 7 3 Locate SW4 on the system board see the figure earlier in this chapter You may have to remove any installed expansion boards to access SW4 see Board Removal in Chapter 7 Change the appropriate switch setting using a ball point pen Check that the setting is correct 4 If you removed any expansion boards...

Page 186: ...on the system board see the figure earlier in this chapter 4 Locate configuration switch 1 on SW4 5 Position switch 1 to ON BIOS clears CMOS using a ball point pen 6 Replace the system unit cover see Chapter 7 7 Connect system power cables and external options 8 Power on the system The system displays a system configuration error message 9 Power off the system unplug the system and any ex ternal o...

Page 187: ... yourself PROBLEM CHECKLIST First check the items in the following list If these do not help see the table that follows the list If you still cannot determine the problem see If You Need Assistance in this chapter Check that the following conditions are true for your computer The power switch for each component is on All cables and power cords are tightly connected The electrical outlet to which y...

Page 188: ...ck that the parameters are set correctly If you installed an option run the ECU see Chapter 4 The system makes a continuous sound pattern Turn system power off wait 5 seconds and turn the power on again If the sound continues call the NEC Technical Support Center See If You Need Assistance later in this chapter for the telephone number The system no longer maintains the date time or your system co...

Page 189: ...played If you are starting from the diskette drive insert a diskette with system files into drive A If a bootable diskette does not boot use Setup to verify that the initial boot parameter is set to diskette drive A and not a hard disk Monitor Problems The monitor screen remains dark Check that the monitor power cable is connected to the monitor and a power outlet Be sure that the monitor signal c...

Page 190: ...ms An image appears on the screen but nothing happens when you use the keyboard Check and tighten the keyboard cable connection If this doesn t help power off the system Wait 5 seconds or more and power on the system Quad Speed CD ROM Problems CD ROM disc tray does not eject due to a power failure or software error Power off the system See Emergency Eject in this chapter System Performance Problem...

Page 191: ...e tray see the following figure Emergency eject 3 Insert a thin shaft flat bladed screwdriver into the eject hole 4 Turn the screwdriver in a counterclockwise direction until the tray moves out far enough for you to remove the disc Turn the screwdriver in a clockwise direction if you want to close the tray before powering up the system 5 Restore power to the system 6 Press the Eject button to clos...

Page 192: ...rt personnel can then contact the appropriate dealer or NEC support staff if needed Getting Help from Your Dealer The dealer from whom you purchased your system is backed by complete support resources and programs within NEC Your dealer can provide you with details on all avail able support options Getting Help from NEC If you have a problem that you cannot resolve yourself within your company or ...

Page 193: ...l E mail or fax NEC Technical Support through America Online NEC s Bulletin Board Service If you have a modem the NEC Bulletin Board Service BBS can be used to provide you with the latest informa tion on hardware and software The BBS allows you to download files for system enhancements and upgrades Use the following steps to log onto the NEC BBS NOTE The first time you use the BBS you will be requ...

Page 194: ...er the BBS phone number 508 635 4706 Your business phone system and or location might require a 91 or 1 prefix Click OK 4 Press Enter twice 5 Enter your first name last name and password Press Enter after each 6 Follow the screen prompts until the NECTECH Main Menu is displayed 7 At the Main Menu press F and Enter for the file menu To hang up and log off follow these steps at the NEC Technologies ...

Page 195: ...ubject field for prompt response from the appropriate technical person Monitor Printer CD ROM Desktop for minitower or desktop systems Notebook You should also provide as much specific information about your question as possible Also if you are sending a fax please include your fax number with the question You will receive a response to your questions sent by Internet or fax within one business da...

Page 196: ...u 3 Click on Keyword in the Go To menu 4 At the prompt type either NECTECH or NEC then either press Enter or click on Go 5 At the NEC menu double click on one of the following topics to open it then follow the prompts About NEC NEWS Product Information Questions and Answers 6 Exit at anytime by double clicking on the rectangle in the upper left corner of the screen ...

Page 197: ...itive activities improper work environments and incorrect work habits Some people are more susceptible to developing these disorders due to pre existing physical or psychosocial conditions see Physical and Psychosocial Factors at the end of this appendix It is still unclear whether a casual relationship exists between working at a computer and developing musculoskeletal or nervous system disorders...

Page 198: ...nd of rest reduce your keyboard use to a minimum and see a physician as soon as possible Arranging Equipment Arrange your office equipment so that you can work in a natural and relaxed position Make sure the table or stand supporting your computer monitor keyboard and mouse is at the proper height as described here Be sure the table or stand is large enough to hold the equipment and necessary work...

Page 199: ...t Check that it does not allow pressure to your calves Keep the angle between your thigh and lower leg slightly more than 90 degrees Place your feet flat and firmly on the floor to provide stability and reduce pressure to the underside of the thighs Only use a footrest when all other attempts at adjusting your chair and monitor fail Ensure that you have adequate clearance between the top of your t...

Page 200: ...monitor s brightness and contrast controls for good character and image quality Keep the monitor at a 90 degree angle to windows or light sources to minimize glare and reflections on the screen Adjust the monitor so that overhead lights do not reflect on your screen If necessary use an anti glare filter on your screen Clean the anti glare filter regularly Maintain proper lighting at all times Clea...

Page 201: ...lel to the floor and at keyboard height Your upper arms should hang freely at your sides nearly vertical and at approximately a 90 degree angle to the forearms Move your entire hand to press hard to reach keys Keep your hands and fingers relaxed straight and parallel to the floor Keep your hands and fingers free to move forward backward and sideways over the entire keyboard Keep from bending your ...

Page 202: ...minal standards ANSI HFS 100 1988 developed by the Human Factors Society and issued by the American National Standard Institute ANSI Also see literature by experts in the field of ergonomics and human factors PHYSICAL AND PSYCHO SOCIAL FACTORS Examples of musculoskeletal and nervous systems disorders that have been associated with certain forms of repetitive activities include carpal tunnel syndro...

Page 203: ...t by management and or lack of control over one s work Review the instructions in this appendix and see a physician if you experience extended periods of discomfort after working at your computer including pain tenderness swelling burning cramping throbbing weakness soreness tingling and or numbness in the back neck shoulders arms wrists hands and or legs ...

Page 204: ...y and 66 MHz externally Integrated math coprocessor 16 KB dual write back internal cache 8 KB for data 8 KB for instructions Integrated Processor Sockets Two integrated sockets on the system board in all system configurations 296 pin light insertion force LIF socket supports the standard installed processor in all configurations 320 pin zero insertion force ZIF socket supports an optional second p...

Page 205: ...rated 32 bit super VGA with graphics accelerator on 32 bit PCI local bus 2 MB of 45 ns video DRAM integrated on the system board Supports NEC s Display Data Channel DDC Plug and Play monitors 8 bit by 24 bit RAMDAC for High Color and True Color modes High Color mode 1024 by 768 pixels with 256 colors 800 by 600 pixels with 64K colors 640 by 480 pixels with 16 8 million colors True Color mode up to...

Page 206: ...D shell VESA Feature VESA compliant 8514 A standard connector Keyboard PS 2 compatible style 6 pin connector mini DIN Mouse PS 2 compatible 6 pin connector mini DIN Diskette Drive supports two diskette drives 34 pin connector SCSI 2 External Port supports up to seven external Fast SCSI 2 devices dependent on installed internal SCSI devices Expansion Slots Five I O expansion slots One 32 bit dedica...

Page 207: ...egrated PCI IDE controller supports up to four IDE devices two primary and two secondary Keyboard PS 2 compatible 101 key membrane keyboard U S Canada Australia and Asia 102 key membrane keyboard UK and Germany 12 function keys separate numeric and cursor pads Mouse PS 2 compatible 6 pin connector Storage Devices 3 1 2 inch 1 44 MB diskette drive standard in all configurations 3 1 2 inch IDE or SC...

Page 208: ...mat ISO 9660 file format Data and buffer capacity 12 cm disc mode 1 540 MB disc mode 2 630 MB disc 8 cm disc mode 1 180 MB disc mode 2 210 MB disc 128 KB built in buffer Data transfer rate quadruple speed mode 1 600 KB sec mode 2 700 KB sec Burst transfer rate 3 34 MB sec IDE 16 bits PIO mode Access time 1 3 stroke normal speed 0 28 second quadruple speed 0 25 second ...

Page 209: ... one slot contains the standard quad speed IDE CD ROM reader hard disk configurations only Two 3 1 2 inch internal slots One slot contains the standard IDE or SCSI 2 hard disk hard disk configurations only Hardware Setup ISA setup through Setup utility EISA setup through EISA Configuration utility SCSI 2 setup through SCSI Configuration utility PCI Plug and Play support Security Features Asset man...

Page 210: ...it Height 14 5 in 36 8 cm Width 8 5 in 21 6 cm Depth 16 44 in 41 8 cm Keyboard Height 1 6 in 4 1 cm Width 19 0 in 48 3 cm Depth 8 4 in 21 3 cm Weight The following weights are averages Weights depend upon the system configuration System Unit 27 1 lb 12 3 kg Keyboard 3 5 to 4 lb 1 6 to 1 8 kg Power 260 Watt Power Supply 115 230 V switch selectable Recommended Operating Environment Temperature 50 F ...

Page 211: ...site service within a 50 mile radius of a NECTECH Total Service Preferred Dealer location or a NECTECH authorized third party maintenance organization The second and third year of service requires the unit to be returned to an authorized NECTECH Service Center or directly to the NECTECH factory for repair Qualified technical support available toll free Monday through Friday from 8 30 a m to 8 00 p...

Page 212: ...e reconfigure or reinstall the CD ROM reader The rear panel of the CD ROM reader provides features for cabling and configuring the reader These features are shown in the following figure and then described Rear view of the IDE quad speed CD ROM reader C AUDIO R G G 39 40 2 1 5V G G 12V C S M S L A Cable Select Slave Mast IDE INTERFACE DC INPUT Audio Output Connector Configuration Jumpers IDE Cable...

Page 213: ...this connector Configuration jumpers These jumpers enable or disable the cable select feature the slave device configuration and the master device configuration see the following jumper descriptions IDE connector The IDE connector allows the connection of the reader to the PCI IDE connector on the system board via the PCI IDE cable Power connector The power connector allows the connection of the r...

Page 214: ...eed CD ROM Reader Configuration C 3 Cable select C S jumper is factory set at disabled not jumpered Slave S L jumper is factory set at enabled jumpered Master MA jumper is factory set at disabled not jumpered ...

Page 215: ... Upgrade Path TOTAL MEMORY 4 MB STICKS 8 MB STICKS 16 MB STICKS 32 MB STICKS 16 MB 4 4 MB sticks 16 MB 2 8 MB sticks 24 MB 6 4 MB sticks 24 MB 2 4 MB sticks 2 8 MB sticks 32 MB 8 4 MB sticks 32 MB 4 4 MB sticks 2 8 MB sticks 32 MB 4 8 MB sticks 32 MB 2 16 MB sticks 40 MB 2 4 MB sticks 4 8 MB sticks 40 MB 2 4 MB sticks 2 16 MB sticks 40 MB 6 4 MB sticks 2 8 MB sticks 48 MB 2 8 MB sticks 2 16 MB sti...

Page 216: ...4 MB sticks 4 16 MB sticks 72 MB 4 4 MB sticks 2 8 MB sticks 2 16 MB sticks 80 MB 2 8 MB sticks 2 32 MB sticks 80 MB 4 4 MB sticks 2 32 MB sticks 80 MB 2 8 MB sticks 4 16 MB sticks 80 MB 4 4 MB sticks 4 32 MB sticks 80 MB 6 8 MB sticks 2 16 MB sticks 88 MB 2 4 MB sticks 2 8 MB sticks 2 32 MB sticks 88 MB 6 4 MB sticks 2 32 MB sticks 88 MB 2 4 MB sticks 2 8 MB sticks 4 16 MB sticks 96 MB 2 16 MB st...

Page 217: ...6 16 MB sticks 120 MB 2 4 MB sticks 2 8 MB sticks 2 16 MB sticks 2 32 MB sticks 128 MB 4 32 MB sticks 128 MB 4 16 MB sticks 2 32 MB sticks 128 MB 4 8 MB sticks 2 16 MB sticks 2 32 MB sticks 128 MB 8 16 MB sticks 136 MB 2 4 MB sticks 4 32 MB sticks 136 MB 2 4 MB sticks 4 16 MB sticks 2 32 MB sticks 144 MB 2 8 MB sticks 4 32 MB sticks 144 MB 4 4 MB sticks 4 32 MB sticks 144 MB 2 8 MB sticks 4 16 MB ...

Page 218: ...STICKS 16 MB STICKS 32 MB STICKS 176 MB 2 8 MB sticks 2 16 MB sticks 4 32 MB sticks 192 MB 6 32 MB sticks 192 MB 4 16 MB sticks 4 32 MB sticks 200 MB 2 4 MB sticks 6 32 MB sticks 208 MB 2 8 MB sticks 6 32 MB sticks 224 MB 2 16 MB sticks 6 32 MB sticks 256 MB 8 32 MB sticks Two 8 MB sticks ship standard ...

Page 219: ...atch program file that the operating system runs to define hardware device characteristics B base RAM Area of system memory between 0 and 640 kilobytes available to the user for operating system and application programs BIOS Basic Input Output System A collection of primitive computer routines usually burnt into ROM that controls the real time clock keyboard disk drives video display and other per...

Page 220: ...nt of the diskette drive that lights when the drive is writing to or reading from a diskette byte Group of eight contiguous bits C chip A small piece of semiconductor material usually silicon that contains miniaturized electronic circuits CD Compact Disc A non erasable storage disc that is read op tically by means of a laser Holds more than 500 megabytes of data CD ROM reader Compact Disc Read Onl...

Page 221: ... boot reinitializes all devices CONFIG SYS A text file that tells the computer where in memory to load the operating system what device drivers to install and what memory management features to activate conventional RAM The first megabyte of RAM in the system which contains 640 KB of base memory and 384 KB of reserved memory cursor A movable image on the display screen that indicates where the nex...

Page 222: ...connecting an optional printed circuit board extended RAM The area of RAM above the first megabyte of memory in the system available for enhancing system performance F formatting The process of preparing a disk or diskette to accept data function key The set of keys on the keyboard usually F1 through F12 that let you get help and error message information or quickly select frequently used commands...

Page 223: ...that enables two devices to communicate interrupt A special control signal from an I O device that diverts the attention of the microprocessor from the program to a special address ISA Industry Standard Architecture expansion bus A 16 bit ex pansion bus used in computers ISA enables expansion de vices network boards video adapters modems to send data to and receive data from the CPU and memory 16 ...

Page 224: ...c unit control logic and control memory unit millisecond ms One thousandth of one second 0 001 second mode A method of operation for example the system operates in either normal or power saving modes N nonvolatile memory Storage media that retains its data when system power is turned off Nonvolatile memory in your system is a com plementary metal oxide semiconductor CMOS chip which is backed up by...

Page 225: ...ws access or system privileges PCI Bus Peripheral Component Interconnect A local bus technology that allows hard disk drives and other peripherals to send data directly to and receive data from the CPU Transfers data faster than ISA or EISA bus peripheral Input or output device not under direct computer control A printer is a peripheral device pixels Picture elements Tiny dots that make up a scree...

Page 226: ...in a nonsequen tial manner read To extract data from a storage device such as a diskette ROM Read Only Memory Memory in which stored data cannot be modified by the user except under special conditions reset The process of returning a device to zero or to an initial or arbitrarily selected condition resolution The degree of screen image clarity Video display resolution is determined by the number o...

Page 227: ...ce s are con nected to a SCSI host adapter through the SCSI bus Each adapter has eight available SCSI IDs serial interface An interface that communicates information one bit at a time serial printer A printer with a serial interface shadowing To copy the system and video BIOS from chip to RAM for enhanced system performance software Programs that run on a computer such as operating systems word pr...

Page 228: ...memory W wait state The additional cycle beyond the minimum cycles required by the microprocessor to complete a memory transaction When additional cycles are required the microprocessor must wait for the additional cycle before the transaction is completed A zero wait state means that the operation required no additional cycles to complete the memory transaction warm boot Process of resetting the ...

Page 229: ...Glossary 11 write protection Allows reading from a diskette but prevents writing to a diskette ...

Page 230: ...3 2 clearing 8 4 memory 3 2 switch setting 8 2 Cold boot 2 13 Connectors 2 6 2 8 Cooling fans 2 9 Cover removal 7 4 replacing 7 7 D Diskette drive 2 4 Diskette loading 2 15 Dual processor upgrade installation 7 23 installing heat sink 7 27 installing processor 7 25 setting configuration jumpers 7 24 E ECU utility add or remove boards 4 12 advanced menu 4 18 configuration information 4 12 configure...

Page 231: ...0 I I O controller 1 8 IDE adapters 3 9 IDE controller 1 7 Installing options dual processor upgrade 7 23 expansion board installation 7 10 expansion board removal 7 13 expansion board slots 7 9 external SCSI devices 7 55 parallel printer 7 52 precautions 7 8 RS 232 serial device 7 54 SIMM upgrade 7 14 storage devices 7 28 types of expansion boards 7 7 Integrated fast SCSI 2 1 7 Internal storage d...

Page 232: ...eed CD ROM 1 9 2 4 operation 2 4 R Regulatory compliance B 8 Reset 2 3 2 17 automatic 2 19 manual 2 17 RTC battery module 3 2 4 10 S Safety precautions installing options 7 3 SCSI device cables 7 33 IDs 7 32 motor start 7 32 termination 7 31 termination power 7 32 SCSI utility booting 4 31 configure view host adapter settings 4 32 device advanced options 4 33 device configuration options 4 33 disk...

Page 233: ... memory 7 16 handling cautions 7 14 installing SIMMs 7 14 7 18 removing SIMM memory board 7 15 replacing SIMM memory board 7 22 selecting SIMMs 7 18 upgrade path D 1 Specifications B 1 B 8 Storage device installation accessible device 7 39 internal device 7 48 Storage devices 2 3 System care 6 1 6 8 System configuration switches 8 1 location 8 2 setting 8 3 System features 1 1 1 10 asset managemen...

Page 234: ...Index 5 Voltage selector switch 2 9 W Warranty B 8 Work environment A 1 A 7 ...

Page 235: ...ons However there is no guarantee that interference will not occur in a particular in stallation If this equipment does cause harmful interference to radio or television reception which can be determined by turning the equipment off and on the user is encouraged to try to correct the interference by one or more of the following measures Reorient or relocate the receiving antenna Increase the separ...

Reviews: