background image


1-8

User’s Guide

Getting Started

1


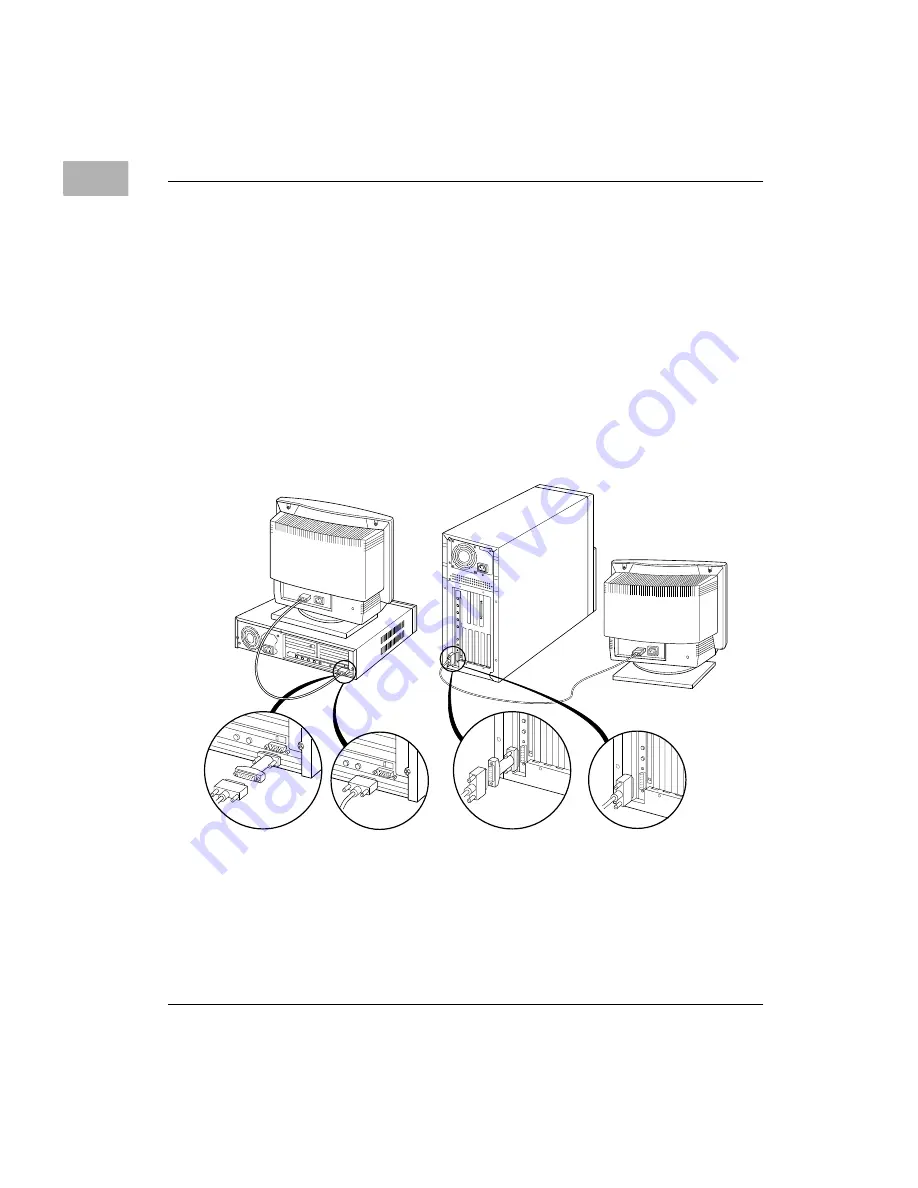
3. Attach the monitor cable to the monitor port on the back panel of 

the computer.


If you are using a SVGA monitor, the monitor connector attaches 
directly to the monitor port on the back panel of the computer.

If you are using an Apple-compatible (DB15) monitor, the monitor 
connector attaches to the monitor port via an adapter. If you do not 
find this adapter in your accessory kit, contact your Motorola-
authorized dealer for details on obtaining this adapter.

See the information that came with the monitor to use its special 
features. 

ADB

ADB

SVGA

SVGA

Summary of Contents for StarMax

Page 1: ...Motorola StarMax Desktop System and Motorola StarMax Minitower System User s Guide ...

Page 2: ...rior written permission of Motorola Inc It is possible that this publication may contain reference to or information about Motorola products machines and programs programming or services that are not announced in your country Such references or information must not be construed to mean that Motorola intends to announce such Motorola products programming or services in your country Restricted Right...

Page 3: ...tosh PowerTalk and QuickTake are trademarks of Apple Computer Inc registered in the U S and other countries and are used under license Apple Desktop Bus Balloon Help Disk First Aid Extensions Manager Finder Macintosh PC Exchange and QuickDraw are trademarks of Apple Computer Inc PowerPC and the PowerPC logo are trademarks of International Business Machines Corporation used under license therefrom ...

Page 4: ...ial process measurement and control equipment Part 3 Radiated electromagnetic field requirements IEC 801 4 Electromagnetic compatibility for industrial process measurement and control equipment Part 4 Electrical fast transient burst requirements EN 60950 Safety of information technology equipment including electrical business equipment In accordance with European Community directives a Declaration...

Page 5: ...erates uses and can radiate radio frequency energy and if not installed and used in accordance with the instructions may cause harmful interference to radio communications However there is no guarantee that interference will not occur in a particular installation If this equipment does cause harmful interference to radio or television reception which can be determined by turning the equipment off ...

Page 6: ... commercial environment This equipment generates uses and can radiate radio frequency energy and if not installed and used in accordance with the instruction manual may cause harmful interference to radio communications Operation of this equipment in a residential area is likely to cause harmful interference in which case the user will be required to correct the interference at his own expense WAR...

Page 7: ...g lenses with this product increases the potential hazard to your eyes For your safety have this equipment serviced only by an authorized service provider If you have an internal CD ROM drive in your computer your computer is a Class 1 laser product The Class 1 label located in a user accessible area indicates that the drive meets minimum safety requirements A service warning label is located in a...

Page 8: ...ecommandé par le constructeur Mettre au rébut les batteries usagées conformément aux instructions du fabricant Software notice Application software programs have been installed on the computer and compact discs have been included with your StarMax See the label on the box for a complete list of all your programs LIMITATION OF LIABILITY MOTOROLA INC MAKES NO WARRANTIES WITH RESPECT TO THE COMPACT D...

Page 9: ...rence received including interference that may cause undesired operation Tested Equipment Name StarMax Manufacturer s Name Motorola Inc Computer Group Manufacturer s Address 2900 S Diablo Way Tempe Arizona 85282 USA Manufacturer s Phone 602 438 3000 Type of Equipment Personal Computer Model Numbers 3000 160DT 3000 180DT 3000 200 DT 4000 160 DT 4000 200DT 3000 160MT 3000 180MT 3000 200MT 3000 240MT...

Page 10: ...abrikantens instruksjoner Apparetet må kun tilkoples jordet stikkontakt Jordet stikkontakt skal benyttes når apparatet tilkoples datanett VARNING Explosionsfara vid felaktigt batteribyte Använd samma batterityp eller en ekvivalent typ som rekommenderas av apparattillverkaren Kassera använt batteri enligt fabrikantens instruktion Apparaten skall anslutas till jordat uttag VAROITUS Paristo voi räjäh...

Page 11: ...power cable must meet International Electrotechnical Commission IEC safety standards Keep Away From Live Circuits Operating personnel must not remove equipment covers Only Factory Authorized Service Personnel or other qualified maintenance personnel may remove equipment covers for internal subassembly or component replacement or any internal adjustment Do not replace components with power cable co...

Page 12: ......

Page 13: ... Connecting external SCSI devices 1 20 Before you connect a device 1 21 Connecting a SCSI device 1 23 Connecting other equipment 1 24 Chapter 2 Turning the Computer on for the First Time Problems starting up 2 4 What s next 2 5 Using the mouse 2 6 Reviewing the basics 2 8 Menus 2 8 Icons 2 9 Windows 2 9 Inserting a CD ROM disc or other CD 2 10 Turning the computer off 2 12 Using the Shut Down comm...

Page 14: ...on Programs Installing application programs 4 1 Working with several applications at a time 4 3 Finding out which applications are open 4 3 Switching applications 4 3 Increasing memory available to run applications 4 4 Hiding and showing windows on the desktop 4 6 Backing up your files 4 6 Using PowerPC Mac OS application programs 4 7 Special memory requirements 4 7 Shared libraries 4 7 Chapter 5 ...

Page 15: ...rve 6 34 Internet World Wide Web 6 34 Internet FTP servers 6 35 Internet gopher server 6 36 Testing and repairing a damaged disk 6 37 When do you need to repair a disk 6 37 Try these suggestions first 6 37 How to verify and test a disk 6 38 How to repair a hard disk or floppy disk 6 40 If Disk First Aid cannot correct the problem 6 41 Initializing a hard disk 6 42 When do you need to initialize a ...

Page 16: ... A 5 If you cannot eject a floppy disk A 6 Handling compact discs A 7 Power supply A 8 Cleaning your equipment A 9 Cleaning the computer case A 9 Cleaning the monitor A 9 Cleaning the mouse A 10 Unlocking and locking the mouse A 12 Appendix B Installing an Expansion Card Before you begin B 2 Expansion card power requirements B 3 Card installation B 3 Appendix C Expanding Memory General information...

Page 17: ...xvii Figures The Fully Assembled Systems 1 2 Desktop System Rear Panel 1 5 Minitower System Rear Panel 1 6 SCSI Cable 1 21 SCSI Peripheral Interface Cable 1 21 SCSI Terminator 1 22 ...

Page 18: ......

Page 19: ...uide you through the setup procedure tell you how to expand your computer and provide many tips on using your new computer Place your equipment on a sturdy flat surface near a grounded wall outlet Your computer was designed to be used and carried in an upright position It should not be tipped on its side during operation Before following the setup instructions you may want to read Safety instructi...

Page 20: ...ket carefully read all the setup instructions in this chapter Then before you connect anything to your computer follow the instructions in this section to plug it in The plug grounds the computer and protects it from electrical damage while you are setting up Figure 1 1 The Fully Assembled Systems ...

Page 21: ...eatures 1 3 1 Front panel features CD ROM drive CD ROM drive Open Close button Power on light Power switch Floppy disk drive CD ROM drive Open Close button Power on light Power switch Floppy disk drive CD ROM drive ...

Page 22: ...onal Peripheral Component Interconnect PCI slot expansion card Monitor Port Y Connects a monitor to your computer Sound output port k Connects your computer to sound output equipment such as externally powered amplified speakers Sound input port Connects your computer to another audio source such as a microphone compact disc or audio cassette player PS 2 Keyboard port K Connects a PS 2 style keybo...

Page 23: ...orts 1 5 1 Figure 1 2 Desktop System Rear Panel SCSI port PS 2 Mouse port PS 2 Keyboard port Modem port Apple Desktop Bus ADB port Printer port Sound input port Sound output port Monitor port PCI card access covers ...

Page 24: ...tting Started 1 Figure 1 3 Minitower System Rear Panel SCSI port PS 2 Mouse port PS 2 Keyboard port Modem port Apple Desktop Bus ADB port Printer port Sound input port Sound output port Monitor port PCI card access covers ...

Page 25: ... it Monitors up to 17 inches weighing less than 40lb 18kg can be placed on top of the StarMax Desktop System Monitors larger than this must be used beside the computer Provide space for air circulation around the computer and monitor Make sure that the top of the screen is slightly below eye level when you are sitting at the keyboard Position the monitor to minimize glare and reflections ...

Page 26: ... the monitor port on the back panel of the computer If you are using an Apple compatible DB15 monitor the monitor connector attaches to the monitor port via an adapter If you do not find this adapter in your accessory kit contact your Motorola authorized dealer for details on obtaining this adapter See the information that came with the monitor to use its special features ADB ADB SVGA SVGA ...

Page 27: ...nto their respective ports on the rear of the computer The StarMax computer is shipped with an Apple Desktop Bus ADB keyboard and mouse ADB Connector and Icon ADB keyboards and mice have the connector type shown above they may also have ADB icons molded into the connector shells b ...

Page 28: ...rd the keyboard then plugs into the port on the rear of the computer The ports are marked with the b icon Both connectors are keyed to prevent incorrect orientation Important Do not force a connector into a port If it does not insert easily check the connector and port orientation If your computer fails to recognize these devices check that they are connected correctly ADB icon ADB icon ...

Page 29: ...theh icon Both of these devices have the same type of connector and it is possible to swap connectors The mouse and keyboard connectors are keyed to prevent incorrect orientation Important Do not force a connector into a port If it does not insert easily check the connector and port orientation If your computer fails to recognize these devices check that they are connected correctly PS 2 keyboard ...

Page 30: ...different locations on page 1 15 Warning If the voltage switch is set incorrectly and you plug it into an outlet even before powering the computer on the power supply will blow a safety capacitor 115 230 Set the switch to show 115 for voltages in the 100 130V range Set the switch to show 230 for voltages in the 220 270V range Check to see that the voltage switch is properly set before you plug it ...

Page 31: ...in easy reach in order to make it easy to unplug the computer Important To protect both yourself and the computer from electrical hazards the computer should remain powered off until you are finished connecting all equipment to the computer Warning Before plugging in the computer to the electrical outlet be sure the voltage switch is set correctly If the switch is not set correctly you may damage ...

Page 32: ... third grounding pin This plug will fit only a grounded AC outlet This is a safety feature If you are unable to insert the plug into the outlet contact a licensed electrician to replace the outlet with a properly grounded outlet Do not defeat the purpose of the grounding plug IMPORTANT The only way to disconnect power completely is to unplug the power cord Make sure that at least one end of the po...

Page 33: ...20 250 Israel Pakistan Singapore 230 Australia Kuwait Malta New Zealand Northern Ireland Papua New Guinea Oman Qatar United Kingdom 240 Austria Belgium Denmark Finland France Germany Greece Italy Luxembourg Netherlands Norway Portugal Spain Sweden Switzerland 220 230 Bahrain Chile China People s Republic Czechoslovakia Egypt Greenland Hungary Iceland Indonesia Iran Jordan Liechtenstein Nepal Parag...

Page 34: ...s on the computer You can also use your internal CD ROM drive to play and record sound from audio compact discs CDs For information on using Mac OS system software to choose audio input and output options record an alert sound or play audio CDs see the Sound topic of Mac OS Guide available in the Guide T menu Sound ports The sound input port is marked with an icon of a microphone j The sound outpu...

Page 35: ...ape recorder headphones or a pair of speakers When you have headphones connected you do not hear beeps or other computer noises through the built in speaker For instructions on connecting a microphone go to the next section Connecting and positioning a microphone For specific instructions on connecting speakers see Connecting external stereo speakers on page 1 19 Follow these steps to connect most...

Page 36: ... OS Guide available in the Guide T menu Connecting and positioning a microphone Follow these steps to connect and position a microphone 1 Shut down the computer 2 Plug the microphone s connector into the sound input port j on the back of the computer 3 Place the microphone at the top center of the monitor If you cannot place the microphone on top of the monitor position the microphone according to...

Page 37: ... sound output port k on the computer 4 Plug a stereo miniplug into the Audio In port on one of the speakers If the speakers take a dual plug cable connect both plugs 5 Connect the speakers together with speaker wires if necessary Your finished connections should look something like this 6 Power on the computer Now you hear the computer s sound through the external speakers To control the volume of...

Page 38: ...SCSI port in a chain The first device in the chain plugs into the SCSI port the second device plugs into the first device and so on You can attach up to seven SCSI devices to the SCSI port All SCSI devices connected to this chain must have their own unique ID number no two devices can use the same ID number IMPORTANT Before you connect a device on page 1 21 and Connecting a SCSI device on page 1 2...

Page 39: ...IMPORTANT If you use two or more devices attached to the same SCSI interface with the same ID number your equipment could malfunction and you could lose data as a result Make sure you have the appropriate cable for attaching the SCSI device to your computer If the device is the first or only one you are connecting use a SCSI cable to connect it to the computer s SCSI port Figure 1 4 SCSI Cable If ...

Page 40: ... SCSI device has a terminator Some external SCSI devices have built in terminators Check the information that came with the device If the device at the end of the SCSI chain does not have a built in terminator you need to attach an external terminator If your SCSI device has a built in terminator it should be the last device in the chain You can attach or remove external terminators yourself Refer...

Page 41: ...ain be sure that a terminator is installed on that device A terminator must be installed on the last device in the chain 4 Power on all devices in your SCSI chain Important Always power on any external SCSI devices connected to your computer before powering on the computer itself Otherwise your computer will not be able to recognize that the SCSI devices are connected to it and your computer may n...

Page 42: ... Connecting other equipment For instructions on how to connect other equipment such as a modem or a printer refer to the manual shipped with the unit See Rear panel ports on page 1 4 to locate the correct port on the rear of the computer ...

Page 43: ...ter on for the first time follow these steps 1 Power on your monitor See the information that came with your monitor for the location of the power switch The power switch is usually located on the front of the unit 2 Power on your computer by pressing the Power Switch on the front of the computer or by pressing the Power key on your keyboard Power switch ...

Page 44: ...g the Computer on for the First Time 2 The Power key on the keyboard is marked with a triangle e The location of the Power key depends on which type of ADB keyboard you have You hear a tone from your computer as it starts up ...

Page 45: ...blinking question mark see Solutions to common problems on page 6 7 If you see anything else on your screen or if you see nothing at all see the section Problems starting up next in this chapter If you see the Mac OS desktop shown here your system software is working correctly Now go to the section What s next on page 2 5 Hard disk icon The desktop ...

Page 46: ...ted to the computer and is the cord plugged into a power source If the computer is plugged into a power strip is the power strip turned on Is the monitor power cord plugged in Is the monitor cable attached firmly to both the monitor and computer Is the monitor turned on Check the power on light on the front of the monitor Is the brightness control on the monitor adjusted correctly Is the computer ...

Page 47: ... information when working with the Mac OS If you want to install application software on your computer see Chapter 4 Installing and Using Application Programs You need this information to properly set up any applications specifically designed for computers with PowerPC processors IMPORTANT If you need to power off your computer at any point see Turning the computer off on page 2 12 It is important...

Page 48: ...button Do not press the mouse button Notice the arrow on the screen moves in the same direction you move the mouse If the arrow does not move make sure the cables connecting the mouse and keyboard are secure and your mouse is positioned as shown in the illustration 2 Move the tip of the arrow to the question mark T in the upper right portion of the screen If you run out of room on your mouse pad o...

Page 49: ...on mark T press and hold down the mouse button A list of choices called a menu appears This is the Guide menu which is the place to go when you have a question about how to use your computer Note If your mouse has more than one button only the left button functions ...

Page 50: ...screen is called the menu bar The symbols and words in it represent menus of commands To open a menu place the pointer or arrow on the symbol or word for the menu and press the mouse button Icons Window Menu Application menu You can have several application programs open at once Use this menu to see which program is active or to switch from one program to another Guide menu To find an answer to a ...

Page 51: ...and do other work Icons like this one represent documents which you can create and edit Icons like this represent folders A folder contains other icons To throw away an item you no longer want drag it to the Trash icon and choose Empty Trash from the Special menu Title bar To move a window drag it by the middle of the title bar anywhere in the bar except the small boxes Close box To close a window...

Page 52: ...ther CD into your CD ROM drive Then follow the instructions provided with your disc as well as the instructions in this manual 1 Power up your computer if it is not already on 2 Press the Open Close button to open the tray of the CD ROM drive The tray opens 3 Place a disc in the tray with the disc label facing up Make sure the disc is lying flat and centered in the tray If you are using a small 8c...

Page 53: ...lose button to close the tray In a few moments an icon for the disc appears on your screen For instructions on ejecting a CD ROM disc or other CD see the CD ROM Discs topic area of Mac OS Guide available in the Guide T menu For instructions on using Mac OS Guide see Chapter 3 Getting Help ...

Page 54: ...nd in the Special menu Follow these steps 1 Move the tip of the arrow to the word Special at the top center of the screen If the word Special does not appear in the menu bar at the top of the screen youarenotworkingintheFinder Finderistheapplicationyou need to be in when you power down your computer Choose Finder from the Application menu at the far right of the menu bar and try again ...

Page 55: ...he button Using the Shut Down desk accessory You do not need to return to the Finder to power off your computer Most programs allow you to use the Apple A menu which contains an alternate shut down method Follow these steps 1 With the tip of the arrow on the Apple A icon press and hold down the mouse button 2 While holding down the mouse button move the arrow until the words Shut Down are highligh...

Page 56: ...ts you from using the previous methods of shutting down you can power off the computer by pressing the Power switch on the front of the computer You can also restart the computer by pressing the Reset switch on the front of the computer or pressing the Command Z Control Power keys IMPORTANT You will lose unsaved work if you use the Power switch Reset switch or Command Z Control Power keys Only use...

Page 57: ...u The Guide menu marked with the T icon is your main source of information about the Mac OS To learn how to get different kinds of help from the Guide menu see Chapter 3 Getting Help In other manuals For answers to questions about other equipment or about application programs you have purchased see the manuals that came with the equipment or programs Welcome to StarMax File The Welcome to StarMax ...

Page 58: ......

Page 59: ...this chapter to learn about the help available to you in the Guide menu The Guide menu is your main source of information when you are working with your computer The menu is identified by a question mark T in the upper right corner of the screen ...

Page 60: ... working with your computer you can get the answer by choosing Mac OS Guide from the Guide T menu 1 Pull down the Application menu in the upper right corner of the screen and choose Finder to make it the active application program A checkmark in the menu indicates that Finder is the active program ...

Page 61: ...ide T menu and choose Mac OS Guide The Mac OS Guide window appears Whenever you use Mac OS Guide its window remains in front of other windows If the window obstructs your viewing area move it by dragging its title bar the gray bar across the top of the window ...

Page 62: ...u choose from a list of general subjects It is similar to the table of contents in a book Index lets you choose from an alphabetical list of more specific subjects It is similar to the index in a book Look For lets you search for information related to a specific word or phrase that you type If you have problems while using Mac OS Guide see Tips for using Mac OS Guide on page 3 11 ...

Page 63: ... of the Mac OS Guide window Depending on the hardware and software you have the list of topics may be different 2 Click either Customizing Your Computer or Setting Options whichever is available in the list of topics When you click any topic area a list of related questions appears on the right side of the Mac OS Guide window To get instructions click a question and then click OK ...

Page 64: ... by step instructions to answer the question you selected When you have completed each step click the right arrow in the lower right corner to see the next step 5 When you have completed all the steps click the Topics button in the lower left corner to return to the main Mac OS Guide window Continue with the next section Click here to see the next step if there is one If you want to return to the ...

Page 65: ...cal list until the phrase background pattern is visible You can scroll through the list either by dragging the slider to the letter B or by using the scroll bar at the right of the list 3 Click the phrase background pattern in the alphabetical list When you click any index entry a list of related questions appears on the right side of the Mac OS Guide window Slider Scroll bar To get instructions c...

Page 66: ...provides step by step instructions to answer the question you selected When you have completed each step click the right arrow in the lower right corner to see the next step 6 When you have completed all the steps click the Topics button in the lower left corner to return to the main Mac OS Guide window Continue with the next section Click here to see the next step if there is one If you want to r...

Page 67: ...can type text 2 Click the arrow button to activate the text box 3 Type trash in the text box and then click Search When you click Search a list of questions related to the word or phrase you typed appears on the right side of the Mac OS Guide window To activate the text box click here Type a word or phrase in the text box and then click here To get instructions click a question and then click OK ...

Page 68: ...the instructions in the window Mac OS Guide provides step by step instructions to answer the question you selected When you have completed each step click the right arrow in the lower right corner to display the next step 6 When you have completed all the steps click the close box in the upper left corner to close Mac OS Guide Click here to see the next step if there is one If you want to close Ma...

Page 69: ...n the screen so that your instructions are never covered If you need to move the Guide window out of the way drag it by the title bar at the top of the window You can also move the window out of the way by clicking the zoom box Click the box once to shrink the window Click it a second time to expand the window to its original size If you need more information about an instruction or a term click t...

Page 70: ...omic strips Follow these steps to use Balloon Help 1 Pull down the Guide menu and choose Show Balloons 2 Point to any object on the screen that you want to identify A balloon appears next to the object In the following illustration for example pointing to the Trash displays a balloon that explains how to use the Trash to throw items away Although balloons appear next to items when you point to the...

Page 71: ...lick the icon to open it Follow these steps to learn keyboard and mouse shortcuts 1 Pull down the Guide T menu and choose Shortcuts The main Mac OS Shortcuts window appears 2 Click one of the category buttons Another window appears describing shortcuts for that category Click here to see the next window if there is one If you want to close the window click here Click the Topics button to return to...

Page 72: ... arrow in the lower right corner of the window to display the next window if there is one 4 When you finish reading about the shortcuts for your category click the Topics button in the lower left corner to return to the main Mac OS Shortcuts window Or click the close box in the upper left corner to close the window ...

Page 73: ...are license agreement that comes with your application program before you install the program on your computer The license agreement specifies how many copies of the program you can make for yourself and others In most cases you will install an application program on your internal hard disk from either a CD ROM disc or floppy disc that contains the program The illustrations below show how to inser...

Page 74: ...computer while holding down the Space bar Use Apple Extensions Manager to turn off all system extensions except Mac OS Easy Open this extension is needed to rebuild the desktop correctly To turn extensions back on use Apple Extensions Manager to turn them on then restart your computer Put only one copy of each application on your hard disk Having more than one copy of the same application can caus...

Page 75: ...d out which application is active and which other applications are open by pulling down the Application menu Switching applications You can switch to another open application or desk accessory by choosing its name from the Application menu If an application s icon is dimmed in the menu that means its windows are hidden Choosing the application from the Application menu displays its windows You can...

Page 76: ...n result in slightly slower performance Also some application programs may not perform optimally when virtual memory is turned on To turn virtual memory on or off use the Memory control panel See the Memory topic area of Mac OS Guide available in the Guide T menu for more information Removing software that you may not need You can remove or uninstall the software if you are not using it Removing s...

Page 77: ... component you want to remove To get additional information about each component listed click the box containing the letter i to the right of the component 6 Click Remove 7 Follow the instructions that appear on the screen 8 When you see a message reporting that the removal was successful click Quit 9 Restart your computer The software is removed and your computer is ready to use If you want to re...

Page 78: ...ws choose Show All from the Application menu Backing up your files Making backup copies of important files is good protection against possible damage to the originals You can back up files stored on your hard disk by copying them to floppy disks You can back up an entire floppy disk by copying it to another floppy disk or to a hard disk You can use a commercial backup application to copy new and c...

Page 79: ...onal memory For instructions on how to use hard disk space as memory see the Memory topic area of Mac OS Guide available in the Guide T menu You can also install additional memory in your computer See the Technical Information booklet for more information Shared libraries Mac OS applications use special files called shared libraries These files help Mac OS applications run more efficiently and can...

Page 80: ...will see a message that the application could not be opened because the shared library could not be found If this happens follow the directions that came with your application to reinstall the application If the shared library is still missing contact the application s manufacturer for assistance ...

Page 81: ...audio compact discs CDs and single session or multisession photo CDs Your CD ROM drive provides access to large amounts of information However you cannot save information on CD ROM discs ROM stands for read only memory meaning that the player cannot write information onto CD ROM discs A wide selection of CD ROM discs are available for entertainment education and business A typical disc can hold ov...

Page 82: ...f it is not already on 2 Press the open close button to open the tray of the CD ROM drive The tray opens 3 Place a CD ROM disc in the tray with the disc label facing up Make sure the disc is lying flat and centered in the tray If you are using a small 8cm disc make sure it is centered within the inside ring on the tray 4 Push the tray in or press the open close button to close the tray Inafewmomen...

Page 83: ...isc icon then choose the Put Away command in the file menu While the AppleCD Audio Player window is active choose Eject CD from the file menu or simultaneously press the Z and E keys AppleCD Audio Player is a program that allows you to control your CD ROM drive and is available in the Apple A menu If no CD ROM disc icon appears on your screen Press the open close button for your CD ROM drive 2 Tak...

Page 84: ...udio discs use the AppleCD Audio Player program available in the Apple menu Your audio CD software will only play tracks that contain audio information You can listen to an audio CD or audio tracks in the background while you do other work on your computer For more information about playing audio CDs see the CD ROM Discs topic of Mac OS Guide available in the Guide A menu Sharing a CD ROM disc ove...

Page 85: ...if you experience problems using your computer When you have questions If you want to know how to do a particular task with your computer refer to Mac OS Guide in the Guide A menu For instructions on using Mac OS Guide see Chapter 3 Getting Help ...

Page 86: ...on questions relating to your system software see the Troubleshooting topic area of Mac OS Guide If you are unable to access Mac OS Guide refer to this chapter to see if you can resolve the problem Warning If you have a problem with your computer and nothing presented in this chapter solves it consult the service and support information that came with your computer for instructions on how to conta...

Page 87: ...ystem Folder For instructions on printing the contents of a folder see the Printing topic area of Mac OS Guide available in the Guide A menu Check the screen for any clues Is a menu selected What programs and document icons are open Note anything else that seems relevant If you were typing text and were not able to save it before the problem occurred you can write down the parts of the text still ...

Page 88: ...estart the computer To restart your computer try the following steps If you can choose Restart from the Special menu or from the dialog box Dialog boxes contain messages from the computer If something goes wrong a message may appear on the screen asking you to restart the computer If you cannot choose Restart press the Power key on the keyboard or on the front of the computer Select Restart from t...

Page 89: ...by application specific icons and are instead represented by generic icons on the desktop or when a document will not open when you double click it Some extensions may interfere with rebuilding your desktop To prevent problems you will need to turn off all extensions except Mac OS Easy Open before you rebuild your desktop When you finish rebuilding the desktop turn the extensions you normally use ...

Page 90: ...e Option and Z keys Do not release the keys until you see a message asking whether you want to rebuild the desktop 8 Click OK The desktop is rebuilt IMPORTANT Do not stop the desktop rebuilding process Doing so could cause problems with your system software 9 Open the Extensions Manager control panel by choosing Control Panels from the Apple A menu When the Control Panels window appears double cli...

Page 91: ...d to both the computer and monitor Check that the computer s power cord is firmly connected to the computer and plugged into a grounded electrical outlet and that the outlet has power If you have more than one monitor and only one is dark check that it is set up correctly in the Monitors control panel For information on using more than one monitor see the Monitors topic of Mac OS Guide available i...

Page 92: ... the startup hard disk is external make sure that it is powered on and that its cable is connected firmly then restart the computer Check the ID numbers of all SCSI equipment connected to your computer Each SCSI device must have its own unique ID number See the manuals that came with your SCSI equipment for information on setting SCSI ID numbers Start your computer using the CD ROM disc that conta...

Page 93: ...omputer is powered off a battery keeps the clock running If your clock begins to keep time inaccurately have a Motorola authorized service provider replace the battery Consult the service and support information that came with your computer for instructions on how to contact a Motorola authorized service provider or Motorola for assistance ...

Page 94: ...If you have a printer connected to your computer s SCSI port make sure your printer is not supposed to be connected to the printer port instead Check the manuals that came with your printer for information on how to connect it properly System software is not installed on the startup hard disk the system software is damaged or the hard disk is not working properly Start up your computer using the C...

Page 95: ...ll not start up This icon indicates that your system cannot start up because of a problem with the system software or the computer hardware Eject any floppy disks by powering off the computer and then holding down the mouse button while you power the computer on again Try starting up with the CD ROM disc that contains system software For instructions on how to start up your computer from the CD RO...

Page 96: ... system software This CD ROM disc is in the accessory kit shipped with your StarMax For instructions on how to start up your computer from the CD ROM disc see Starting up from a CD ROM disc on page 6 45 Follow instructions in Testing and repairing a damaged disk on page 6 37 to test your startup hard disk and repair any damage If repairing the disk does not help follow the instructions in Installi...

Page 97: ...ter to copy the disk s contents onto a properly formatted disk The disk may have been formatted for use on another kind of computer You may be able to use a special program that allows you to work with such disks If you are trying unsuccessfully to use a floppy disk created in a PC personal computer DOS Disk Operating System or Windows environment consider the following When formatting floppy disk...

Page 98: ...isk drive Power off the computer If the disk is not ejected then hold down the button on your mouse or other pointing device while you power the computer on again Locate the small hole near the disk drive s opening and carefully insert the end of a large straightened paper clip into it Push gently until the disk is ejected Do not use excessive force If none of these solutions works take the comput...

Page 99: ...ing are compatible with the system software Reinstalling the system software may correct the problem If the bomb occurs in one application program try reinstalling the program from the original disks If reinstalling does not solve the problem contact the manufacturer of the program Sometimes incompatible system extensions or control panels can cause system software problems Restart while holding d...

Page 100: ...debugging application installed your screen displays a caret prompt To return to the desktop type G and then press the Return key The pointer does not move when you move the mouse One of the following situations is probably the cause The mouse is not connected properly Power down the computer Check that the mouse and keyboard cables are connected properly and then restart the computer IMPORTANT Do...

Page 101: ...If your computer starts up normally there may be an extension conflict If the problem recurs you may need to reinstall system software See Installing or reinstalling system software on page 6 48 for instructions If none of these procedures solves the problem consult the service and support information that came with your computer for instructions on how to contact a Motorola authorized service pro...

Page 102: ...g it instead Power the computer off before connecting it If the new keyboard works there is probably something wrong with the one you replaced If the computer beeps every time you press a key Easy Access is probably turned on Open Easy Access from the control panels listed under the Apple A menu and turn it off If none of these procedures solves the problem consult the service and support informat...

Page 103: ... a separate floating point unit FPU for example a 68882 FPU Check the documentation that came with the program or contact the program s manufacturer to find out if the program requires the FPU found in a non PowerPC chip If it does you may need to upgrade to the PowerPC Mac OS compatible version of the program or install software that emulates a non PowerPC FPU Sometimes incompatible system extens...

Page 104: ...ile menu to try to open the document Purchase and install the correct software to use the document or find out if the creator of the document can convert it to a form that one of your programs can use Do not try to open the files in your System Folder Most of the files in your System Folder are used by your computer for internal purposes and are not intended to be opened Rebuild your desktop See R...

Page 105: ...d incorrectly or you see strange codes or characters in the document try one of the following Your application program may have special procedures for opening and saving documents with different file formats See the information that came with your program Try opening the document in another program Note Some characters that can be displayed on a Mac OS compatible computer are not accurately displa...

Page 106: ... installed automatically when you install PowerPC Mac OS compatible programs Follow the directions that came with your program to reinstall the program If the shared library is still missing contact the software program s manufacturer for assistance You experience problems using an older Mac OS program Some older Mac OS programs are not completely compatible with PowerPC Mac OS compatible computer...

Page 107: ...Computer topic of the Mac OS Guide Your computer starts up and you see large folder shaped areas containing labeled pictorial buttons instead of the usual Mac OS desktop Your computer may have started up from a CD ROM disc containing At Ease an alternative to the Mac OS desktop You need to have the Mac OS desktop on your screen before you can use any of the installation instructions in this manual...

Page 108: ... the CD ROM tray opening Insert the end of a large straightened paper clip firmly and horizontally into the pinhole Push gently until the tray is released then carefully pull the tray open Do not force the tray open wait until the paper clip has dislodged it or you may break the front of the tray Warning Power off your computer before you attempt to eject the tray using a paper clip If you do not ...

Page 109: ...r computer If only the hard drive icon appears on the desktop then there may be a hardware problem with your CD ROM drive If the CD ROM icon appears above the hard drive icon try reinstalling your software following the instructions in Installing or reinstalling system software on page 6 48 Your computer displays the message This is not a Mac OS disk Do you want to initialize it when you insert a ...

Page 110: ...other disc in the drive If you have access to another computer try the original disc in its CD ROM drive If the original drive reads other discs or if the original disc does not work in another drive the disc is probably damaged You need to replace the disc You cannot open a document on a CD ROM disc Try opening the application program first then open the document Read the manual that came with yo...

Page 111: ...ing should now be able to locate filenames on that CD ROM disc Make sure that Foreign File Access ISO 9660 File Access and High Sierra File Access are present in the Extensions folder in your System Folder Problems playing audio CDs You do not hear any sound when you play an audio CD or an audio track on a CD ROM disc using the AppleCD Audio Player If you have headphones or speakers connected to t...

Page 112: ...to record sound from an audio CD Check your computer s sound input port to see if a microphone or other device is connected You may need to reset the sound options in a sound control panel Refer to the Sound topic area of Mac OS Guide available in the Guide T menu Problems using Photo CDs Your CD ROM drive will not open Photo CDs Reinstall the CD ROM software available through the Multimedia Softw...

Page 113: ...ign more memory to the program see the Memory topic area of Mac OS Guide available in the Guide T menu for more information on managing memory If your computer s performance decreases If you notice a decrease in your computer s speed and general performance and you often use networks connect to bulletin boards or share files with other computer users your computer may have a computer virus Compute...

Page 114: ...e Guide T menu If the computer performs better when an extension is turned off contact the extension s manufacturer for information or an upgrade Drag special software items out of the System Folder or remove them permanently The special software may be in the Control Panels or Extensions folder inside the System Folder If the computer performs better when the software is removed contact the softw...

Page 115: ...e computer and printer and check the printer cable connections If neither of these suggestions solves the problem reinstall your printer driver If your printer is an older model do not use the driver that came with the printer Instead use the updated printer drivers provided on the system software CD ROM that came with your computer These drivers are created especially for use with the PowerPC Mac...

Page 116: ... also get all of the latest versions of Mac OS software including most printer drivers system enablers and updates to utilities networking and communication software IMPORTANT Be sure to read the posted Software License Agreement before installing any software For Mac OS software updates look in the following online services America Online CompuServe Internet World Wide Web site Internet FTP serve...

Page 117: ...ea which is located in the Apple Computer Inc folder You can use the keyword applecomputer to go directly to the Apple Computer Inc folder or follow this path to find the software updates Computing window Company Connection window Technical Support window Hardware folder Hardware window Apple Computer Inc folder USA Apple SW Updates folder ...

Page 118: ...e files and software updates for U S and international customers The address for the Apple systems operator on CompuServe is 74431 1472 via the Internet 74431 1472 compuserve com Internet World Wide Web You can also download Apple software updates via Apple s World Wide Web server www info apple com The Apple web site allows you an easy way to download Apple software updates from ftp info apple co...

Page 119: ...SW Updates You can log onto Apple s ftp info apple com server via the America Online file transfer protocol ftp gateway To do this you ll need an America Online account Once you re online follow these steps 1 Use the keyword ftp to take you to the ftp area 2 Click the FTP button disk with sunglasses icon 3 In the favorite sites list double click ftp info apple com A dialog box will appear with the...

Page 120: ...pher server The Apple Support Area folder is located in the following path Home Gopher Server Computer Information Apple Computer Higher Education gopher server Apple Support Area Apple SW Updates TurboGopher Client software is available via anonymous file transfer protocol ftp to boombox micro umn edu in the pub gopher directory Host name info hed apple com ...

Page 121: ...isk First Aid testing the disk with an application called Drive Setup repairing any problems detected by Drive Setup by using Disk First Aid or another disk repair application a second time or if the problem cannot be repaired by reinitializing the disk Before you begin verifying and testing a disk you think is damaged try the following possible solutions Try these suggestions first If you cannot ...

Page 122: ... that came with your SCSI equipment If none of these steps solves the problem verify and test the disk by following the instructions in the next section How to verify and test a disk How to verify and test a disk The Drive Setup and Disk First Aid applications are used to verify and test disks They can be found on the CD ROM disc that contains system software To verify and test the disk follow the...

Page 123: ... to test 5 Open the Functions menu and choose Test Disk 6 When a message tells you that testing is complete click Quit If the Drive Setup test reveals a problem you may be able to correct it by using Disk First Aid again or another disk repair program see the instructions that follow or you may need to reinitialize the disk see Initializing a hard disk on page 6 42 Consult a Motorola authorized se...

Page 124: ...ftware This CD ROM disc is in the accessory kit shipped with your StarMax 1 Start up your computer from the CD ROM disc that contains system software See Starting up from a CD ROM disc on page 6 45 2 Open the Disk First Aid icon You may need to look in a folder called Utilities to find Disk First Aid 3 Click the icon of the disk you want to repair Disk icons appear in a box at the top of the Disk ...

Page 125: ...en click Repair 5 When testing and repair are finished choose Quit from the File menu If Disk First Aid cannot correct the problem Try repairing the disk with Disk First Aid again Sometimes repeating the process corrects the problem Use another disk repair or recovery program Some disk repair programs let you recover information from a damaged disk Consult a computer repair specialist for help Onc...

Page 126: ...ory so you should not need to initialize it You need to initialize a hard disk only if one of the following conditions is true You purchase a hard disk that has not been initialized at the factory Your hard disk is damaged A hard disk may need to be initialized if the disk s icon does not appear on the desktop when you start up the computer using another disk Warning Initializing a disk erases any...

Page 127: ...ility software that came with the hard disk Warning Initializing a disk erases all information on it Before you initialize a damaged disk try to repair it as described in How to repair a hard disk or floppy disk on page 6 40 1 Start up your computer from the CD ROM disc that contains system software See Starting up from a CD ROM disc on page 6 45 2 Open the Drive Setup program You may need to look...

Page 128: ...alize the hard disk 5 Click Quit when you see a message reporting that initialization was successful If a message reports that initialization failed try again If initialization fails a second time take the disk to your Motorola authorized service provider for repair Click the drive you want to initialize then click Initialize ...

Page 129: ...ur StarMax To start up the computer using the CD ROM disc either use the Startup Disk control panel to set the CD ROM drive as your startup drive or follow these steps 1 Power your computer on 2 Immediately press the open close button on your CD ROM drive and quickly insert the CD ROM disc containing system software into the drive 3 Immediately press the C key on your keyboard Continue to hold dow...

Page 130: ...d to start up your computer from another device You can start up the computer using the Disk Tools floppy disk In order to do this you will first need to create that floppy disk Find the Disk Tools Image in the Disk Images Folder on the CD ROM disc and follow the instructions in the Using Disk Copy read me file To start up you computer using a floppy disk follow these steps 1 Power down your compu...

Page 131: ...he other hard disk as your startup disk or follow these steps 1 If the other hard drive is external power it on and wait a moment for it to start up 2 Power your computer on 3 Immediately press the Z Option Shift Delete keys on your keyboard Continue to hold down these keys until you see the Welcome to Mac OS message If a blinking question mark appears or if the computer starts up from your primar...

Page 132: ...r provides system software on a CD ROM disc You can use the CD ROM disc to install the system software on your computer if you need to do so Note For instructions on reinstalling any additional software that originally came with your computer refer to the Read Me file on your CD ROM disc When should you install system software Your computer came with all the necessary system software installed on ...

Page 133: ...e this icon in the middle of the screen If this icon appears follow the instructions in How to repair a hard disk or floppy disk on page 6 40 to test your startup hard disk and repair any damage If repairing the disk does not help follow the instructions in Installing system software on page 6 50 to reinstall system software on your startup hard disk ...

Page 134: ...icon on the desktop the disk has been initialized If no disk icon appears see Initializing a hard disk on page 6 42 for instructions To do a normal installation follow these steps 1 Start up your computer from the CD ROM disc containing system software See Starting up from a CD ROM disc on page 6 45 2 Find and open the Disk First Aid icon You may need to look in the Utilities folder to find Disk F...

Page 135: ...Installing or reinstalling system software 6 51 6 4 Find and open the Install Mac OS icon 5 Follow these four steps in the Install Mac OS program ...

Page 136: ...ck the Agree button to continue the installation 6 When you see a message stating the selected software has been successfully installed click the Quit button If a message states that the installation was not successful try installing again Follow the instructions on the screen 7 Reset the Startup Disk to the hard disk Open the Startup Disk control panel select the hard disk and close the control p...

Page 137: ...s or application programs that were originally on your hard disk may not be installed with the Installer program If you notice that a certain extension or program was not installed you may need to install it separately You can find these additional extensions and programs on the CD ROM disc that contains system software This disc is in the accessory kit shipped with your system System extensions o...

Page 138: ...em Folder was the source of the problem Do a clean installation if you cannot determine what is damaged in your System Folder Do this if you think any special software such as control panels system extensions or custom utilities may be causing problems You should also do a clean installation if you are having problems after you have reinstalled system software by doing a normal installation To do ...

Page 139: ...Installing or reinstalling system software 6 55 6 4 Find and open the Install Mac OS icon 5 Follow these four steps in the Install Mac OS program ...

Page 140: ...arts to install Click the Customize button The button changes to Don t Customize The list of software also changes slightly showing the previously hidden Easy Install items Click the Options button When the options dialog appears check the Create new System Folder item then click OK ...

Page 141: ...nstalling again Follow the instructions on the screen 7 Reset the Startup Disk to the hard disk Open the Startup Disk control panel select the hard disk and close the control panel 8 Select Restart from the Finder s Special menu IMPORTANT Certain system extensions or application programs that were originally on your hard disk may not be installed with the Installer program If you notice that a cer...

Page 142: ... software items from the Previous System Folder back to your System Folder one item at a time restarting the computer after copying each item Special software consists of items such as control panels system extensions or custom utilities that you may have added to your System Folder IMPORTANT Be very careful not to replace copy over any of the files in the System Folder with files from the Previou...

Page 143: ...system software installation You use custom installation to install or update one or more specific files or to save space on your hard disk by installing only the files you want To install customized system software follow these steps 1 Start up your computer from the CD ROM disc containing system software See Starting up from a CD ROM disc on page 6 45 or How to initialize a hard disk on page 6 4...

Page 144: ...s Guide Troubleshooting 6 3 Open the Installer program The Installer welcome screen appears 4 Click Continue You will be shown a software license agreement If you agree with the license the installation continues ...

Page 145: ...Installing or reinstalling system software 6 61 6 The Easy Install dialog box appears 5 Choose Custom Install from the pop up menu ...

Page 146: ...component listed click the box containing the letter i 7 Click Install 8 Follow the instructions appearing on the screen 9 When you see a message stating the installation was successful click Quit If a message states the installation was not successful try installing again Follow the instructions on the screen 10 Reset the Startup Disk to the hard disk Open the Startup Disk control panel select th...

Page 147: ...er completely and disconnect the power plug by pulling the plug not the cord if any of the following conditions exists The power cord or plug becomes frayed or otherwise damaged You spill something into the case Your computer is exposed to rain or any other excess moisture Your computer has been dropped or the case has been otherwise damaged You suspect that your computer needs service or repair Y...

Page 148: ...ust always be supervised by an adult Do not allow children access to the interior of any electrical product and do not permit them to handle any cables Handling your computer equipment Follow these guidelines for handling your computer and its components When setting up your computer place components on a sturdy flat surface and carefully follow all setup instructions When connecting or disconnect...

Page 149: ...pment you may have to bring your equipment to a Motorola authorized service provider Protect the computer and its components from direct sunlight and rain or other moisture Keep all ventilation openings clear and unobstructed Without proper air circulation components can overheat causing damage or unreliable operation Warning This equipment is intended to be electrically grounded Your computer is ...

Page 150: ...a television or radio near your computer move the computer farther away Handling the keyboard Take care not to spill any liquid on the keyboard If you do power off your computer immediately If you spill liquid that is thin and clear unplug the keyboard turn it upside down to let the liquid drain out and let it dry for 24 hours at room temperature If after you take these steps the keyboard does not...

Page 151: ...see the Disks topic area of Mac OS Guide available in the Guide T menu Store disks at temperatures between 50 F and 125 F 125 F 52 C 50 F 10 C Do not use a pencil or an eraser on a disk or disk label Keep disks dry Do not touch the exposed part of the disk behind the metal shutter Keep disks away from magnets Avoid exposing disks to extremely hot temperatures ...

Page 152: ...ternal disk drive 2 Power off the computer If the disk is not ejected hold down the button on your mouse or other pointing device while you power the computer on again 3 Locate the small hole near the disk drive s opening and carefully insert the end of a large straightened paper clip into it Push gently until the disk is ejected Do not use excessive force If nothing works take the computer to you...

Page 153: ... cleaning agent To avoid damage to your discs keep these points in mind Other important safety instructions to keep in mind as you use your CD ROM drive Position your computer so that when the tray opens it does not bump into anything Do not leave the disc tray open If dust gets on the lens of the CD ROM drive the drive may have problems reading your compact discs Do not put anything for example a...

Page 154: ...et weather If your computer is near a window be sure the window is closed in rainy weather The tray on your CD ROM drive automatically closes when you power down your computer You may want to open the tray and take your disc out before shutting down Power supply Warning To protect the power supply from damage make sure the voltage switch on the back of the computer is set correctly before you plug...

Page 155: ...lvents or abrasives Cleaning the computer case To clean the case do the following 1 Shut down and power off the computer completely and then disconnect the power plug Pull the plug not the cord 2 Wipe the surfaces lightly with a clean soft cloth dampened with water Cleaning the monitor To clean the screen put household glass cleaner on a soft cloth and wipe the screen Do not spray the cleaner dire...

Page 156: ...e surface and by cleaning it occasionally You need a few cotton swabs and a clean soft lint free cloth 1 Power off your computer 2 Turn the mouse upside down and turn the plastic ring on the bottom counterclockwise to disengage it On some mouse devices you may need to press the plastic ring rather than turn it to disengage it If the mouse is locked see the next section Unlocking and locking the mo...

Page 157: ... around them 5 Wipe the mouse ball with a clean soft dry and lint free cloth 6 If necessary wash the mouse ball with warm soapy water use a mild soap such as a dishwashing liquid and then dry the mouse ball thoroughly 7 Gently blow into the mouse case to remove any dust that has collected there 8 Put the ball and the ring back in place Your mouse should roll smoothly across your mouse pad or desk ...

Page 158: ...he plastic ring 2 Press down on the paper clip while you turn the ring counterclockwise Turn the ring a very short distance When the recessed area on the ring is lined up with the recessed area surrounding the ring the mouse is unlocked Insert a straightened paper clip into this hole The hole may be located here on your mouse The mouse ring is unlocked when the recessed area on the ring lines up w...

Page 159: ...ring a very short distance until it stops When the recessed area on the ring is not lined up with the recessed area surrounding the ring the mouse is locked Insert a straightened paper clip into this hole The hole may be located here on your mouse The mouse ring is locked when the recessed area on the ring does not line up with the recessed area surrounding the ring Recessed area on ring Recessed ...

Page 160: ......

Page 161: ...osest to the main board Depending on the version of the motherboard the slot closest to the motherboard may accept half length cards only Warning To avoid damaging your computer and expansion card do not attempt to install any expansion card without first checking the documentation for that card If the documentation specifies that a Motorola certified technician must install the card usually becau...

Page 162: ...earing an antistatic wrist strap available at electronics stores Wrap one end of a wrist grounding strap around your wrist Attach the grounding end usually a piece of copper foil or an alligator clip to an electrical ground An electrical ground can be a piece of metal that literally runs into the ground such as an unpainted metal pipe or a metal part of a grounded electrical appliance An appliance...

Page 163: ...lled check the information that came with your cards to make sure that their power consumption is within the limits specified in the Technical Information booklet Card installation 1 Power off the computer Leave the computer plugged in to ground it and protect its components from static electricity damage 2 Remove the cover retaining screws The StarMax Desktop Computer has three retaining screws l...

Page 164: ...B 4 User s Guide Installing an Expansion Card B The StarMax Minitower Computer has four retaining screws located on the rear panel ...

Page 165: ...Card installation B 5 B 3 Remove the cover from the computer Slide the cover backward about one inch lift it straight up and then off the computer ...

Page 166: ... wrist strap as described on page B 2 If you do not have an antistatic wrist strap touch the metal part of the power supply case inside the computer to discharge static electricity Always do this before you touch any parts or install any components inside the computer ...

Page 167: ...B 5 Remove the PCI expansion slot cover Desktop Computer Being careful not to touch the sharp edges remove the screw and port access cover from the expansion slot you want to use and set the screw and access port cover aside ...

Page 168: ... computer down on its right side and slide the internal chassis outward by one inch 3cm before removing the screw and port access cover from the Minitower Computer 6 Remove the expansion card from its static proof bag Hold the card by its edges to avoid touching the connector ...

Page 169: ... firmly until the connector is fully inserted Do not force the card If you meet a lot of resistance pull the card out and try again To see if the card is properly connected pull it gently If it resists and stays in place it is connected Do not pull the card so much that you accidentally disconnect it Desktop Computer ...

Page 170: ... 10 User s Guide Installing an Expansion Card B Minitower Computer 8 Fix the card in place with the screw removed earlier If you have other cards to install put them in now by repeating steps 5 through 8 ...

Page 171: ...the way down onto the case leaving a one inch 3cm gap Slide the cover forward until the forward edge aligns with the front bezel Replace the retaining screws to fix the cover in place You are now finished installing the card You may power on the computer and start using the new card Warning Never power on your computer unless all of its internal and external parts are in place Operating the comput...

Page 172: ......

Page 173: ...e installed in pairs Warning Motorola recommends that you have a Motorola approved technician install additional DRAM VRAM or cache DIMMs Consult the service and support information that came with your computer for instructions on how to contact a Motorola approved service provider or Motorola for service If you install additional DIMMs yourself you risk damaging your equipment and this damage wou...

Page 174: ......

Page 175: ...me keyboards do not have all the keys listed here Special keys on Mac OS compatible keyboards Arrow keys Use to move the insertion point as an alternative to using the pointer In some programs the arrow keys have other functions Caps Lock key Use to capitalize a series of letters numbers and symbols are not affected Clear key Use to delete the current selection or use the Delete key In some progra...

Page 176: ... symbols Some programs use these keys as function keys to initiate actions Power key On some models press to power on the computer Also press to power down the computer to put the computer to sleep or to restart the computer Return key or Use to move the insertion point to the beginning of the next line In a dialog box pressing Return is the same as clicking the outlined button Shift key or Use to...

Page 177: ...e Apple A menu then choose the font from the Key Caps menu To have Key Caps show more options for special characters press each of these keys or key combinations Option Shift Shift Option Shift Z and Option Z If you press the Option key Key Caps outlines lightly the keys that you can use in combination with letter keys to type letters with accents or other diacritical marks Characters appear here ...

Page 178: ...he Space bar as well as letter keys producing the mark without a letter The most common diacritical marks and how to create them are summarized next To type a letter or a space with a specific diacritical mark press the Option key and the key for the mark simultaneously Then type the letter that needs the mark If you are having trouble getting a mark and letter to appear together try again Be sure...

Page 179: ...installed your screen displays a caret prompt To return to the desktop type G To do this press this key combination Force a program to quit Z Option Esc Force the computer to restart Z Control Power key Start a debugging program used by software programmers Z Power key To do the following at startup press this key combination Reset PRAM Z Option p r Start the computer from a CD ROM disc C key Igno...

Page 180: ......

Page 181: ...removing B 3 C cable for external SCSI 1 21 cards installing expansion cards B 1 CD disc inserting into drive 2 10 4 1 CD discs ejecting from drive 5 3 handling A 7 inserting into drive 5 2 playing audio 5 4 sharing over network 5 4 CD ROM drive playing CDs 1 16 using 5 1 using the drive 2 10 clean installation 6 54 cleaning computer equipment A 9 combinations special keys D 5 command shut down 2 ...

Page 182: ...connecting 1 19 F features system 1 3 files making backup copies 4 6 floppy disks inserting into drive 4 1 starting up 6 46 storage and care A 5 front panel indicators 1 3 G graphics cards restrictions in Minitower computer B 1 grounding plug 1 14 guide menu getting help 3 1 guidelines using applications 4 2 H hard disk initializing 6 42 starting up 6 47 headphones attaching to system 1 17 help gu...

Page 183: ...ecommendations 1 7 look for button getting answers 3 9 M Mac OS applications shared libraries 4 7 Mac OS basics 2 8 Mac OS compatible keyboard D 1 Mac OS guide getting help 3 2 tips 3 11 Mac OS shortcuts 3 13 Mac OS software getting updates 6 32 maintenance monitor and keyboard A 4 maintenance tips A 1 memory expanding C 1 increasing available 4 4 virtual 4 4 memory requirements 4 7 menu bar 2 8 m...

Page 184: ...tting answers 6 1 R rear panel ports 1 4 recording sound 1 17 removing software 4 4 repairing a disk 6 37 restarting the system 6 4 S safety instructions A 1 screen identifying objects 3 12 screen elements 2 8 SCSI cable for external device 1 21 SCSI daisy chain 1 20 total length 1 22 SCSI device drivers 1 23 SCSI devices connecting external 1 20 SCSI ID number 1 20 SCSI terminator 1 22 setting up...

Page 185: ...system 1 17 terminating external SCSI devices 1 22 terminator external SCSI 1 22 topics button getting answers 3 5 troubleshooting 6 1 starting up 2 4 turning off computer 2 12 V virtual memory 4 4 virus detection programs 6 29 voltage switch 1 12 W windows definition 2 9 showing hiding 4 6 ...

Page 186: ......

Reviews: