


6-11
O w n e r ’ s M a n u a l
Starting a New Session
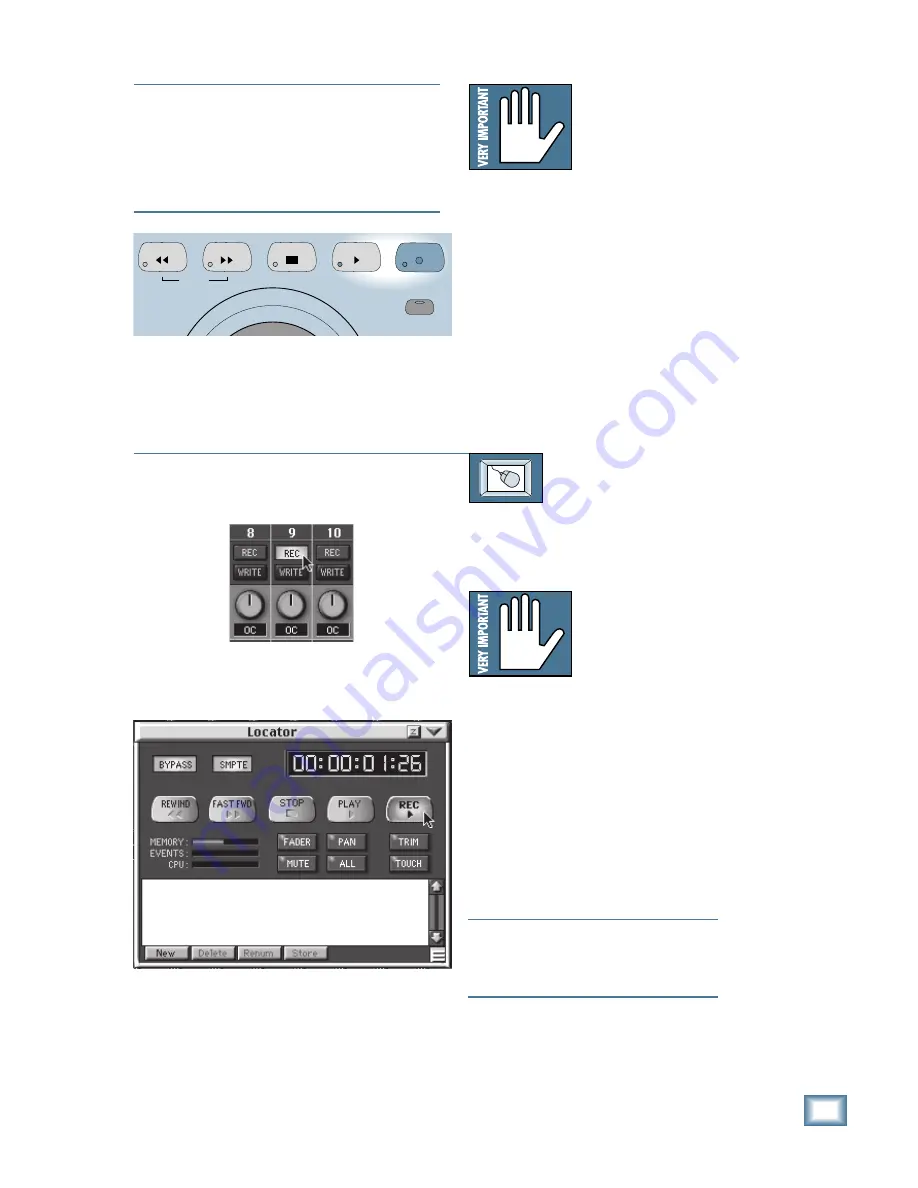
The REC/RDY button
corresponds to the Tape
Out assignment. For ex-
ample, if you’ve routed
Channel 1 to Tape Out
9, press the REC/RDY
button on Channel 9 to record the signal
on Channel 1 to Track 9.
2. Press the Master RECORD button in
the Transport Section. The red LED in
the button lights steadily, and all the
REC/RDY button LEDs also light
steadily. The MDM/DAW goes into
Record Pause mode.
3. Press the PLAY button. The green LED
in the PLAY button lights and the tape
deck/DAW begins to record. The time-
code display should begin counting.
TO ARM CHANNELS FOR RECORDING
From the screen:
1. Click on the REC/RDY button for each
Tape Out you want to record. The red
LED in the button flashes.
The REC/RDY button
corresponds to the
Tape Out assignment. If
you’ve routed Channel
1 to Tape Out 9, click
on the REC/RDY but-
ton on Channel 9 to record the signal
on Channel 1 to Track 9.
2. Click on the Locator button in the
lower menu to open the Locator window.
3. Click on the Master REC button in the
Locator window. The red LED in the
Master RECORD button on the console
lights steadily, and all the REC/RDY
button LEDs also light steadily. The
tape deck/DAW goes into Record
Pause mode.
Note:
Depending on the MDM model,
pressing the Record switch may start the
deck in record mode. Usually, Play and
Record are both pressed together.
4. Click on the PLAY button. The green
LED in the PLAY button lights and the
tape deck/DAW begins to record. The
timecode display in the Locator window
and on the console should begin counting.
JOG & SHUTTLE
SHUTTLE
REWIND
FAST FWD
STOP
PLAY
RECORD
Note:
The Master Record button in the transport sec-
tion performs double duty as a dynamic automation
Master Write button. The function of the button is de-
termined by whether the Write buttons in the channel
strips are engaged (Write standby), or if the Rec/Rdy
buttons are engaged (Record standby). Make a note of
which mode you are in, Write or Record.
Summary of Contents for 8-BUS Series
Page 49: ...3 16 D i g i t a l 8 B u s Start Up ...
Page 57: ...4 8 D i g i t a l 8 B u s Connections ...
Page 77: ...5 20 D i g i t a l 8 B u s Preparing for a Session ...
Page 177: ...7 20 D i g i t a l 8 B u s Automation ...
Page 207: ...D 2 D i g i t a l 8 B u s Apogee UV22 ...
Page 219: ...F 4 D i g i t a l 8 B u s Optional I O Cards ...
Page 227: ...H 2 D i g i t a l 8 B u s Upgrading ...
Page 235: ...K 2 D i g i t a l 8 B u s ...
Page 237: ...D i g i t a l 8 B u s ...
Page 239: ...D i g i t a l 8 B u s ...


