


3-6
D i g i t a l 8 • B u s
Start-Up
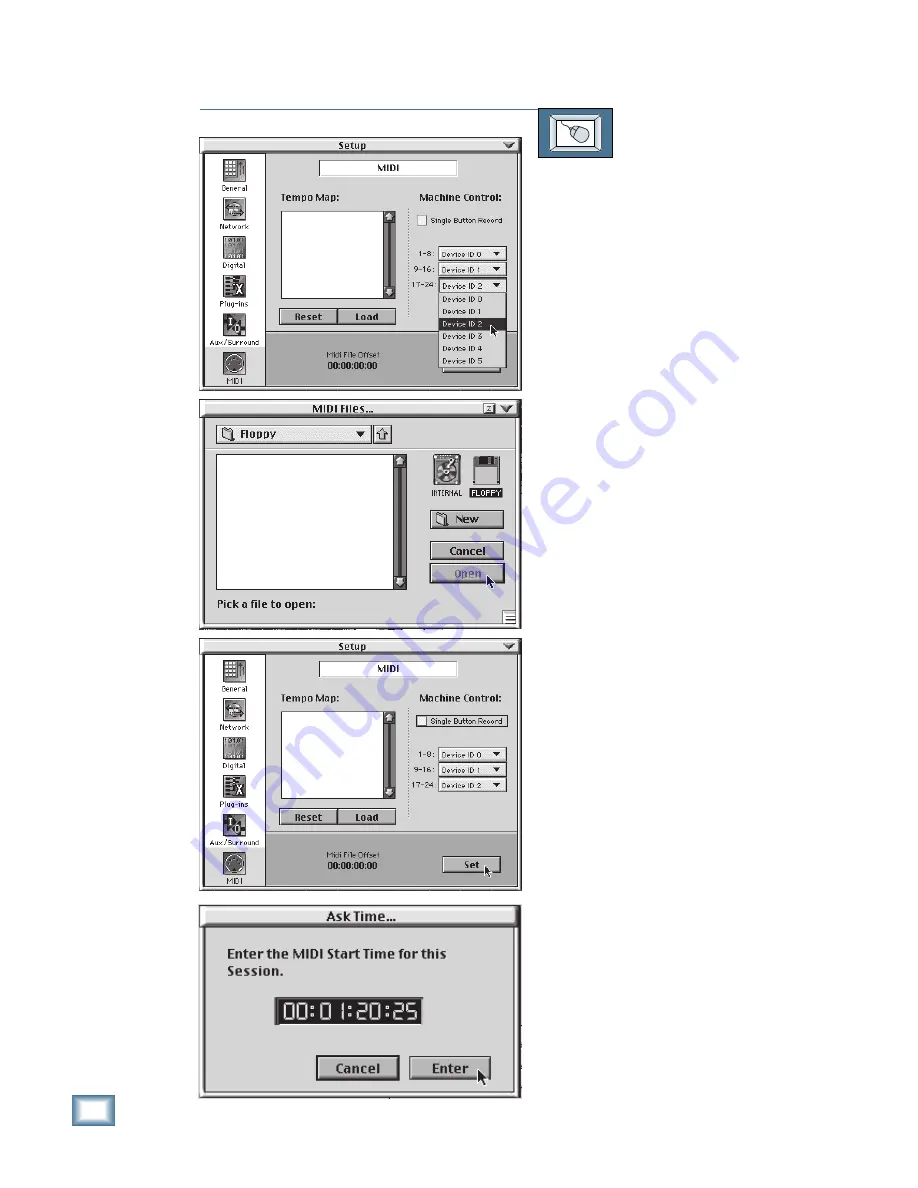
TO CONFIGURE MIDI PARAMETERS
From the screen:
1. Click on the Setup button in the lower
menu bar. The Setup dialog box opens.
2. Click on the MIDI-Sync icon on the
left side of the box. The MIDI-Sync
dialog box opens.
3. To set the device ID for MIDI Machine
Control (MMC) of each 8-track
recorder, click in the Device ID box
and drag down to the desired
selection. Release to finalize your
selection.
4. Click on the Load button to load a
tempo map file from a floppy disk. The
“MIDI Files” dialog box opens.
Click on the FLOPPY icon to display
the files on the floppy.
Click on the file you want to load, then
click on the “Open” button (or double-
click on the filename).
5. To set the MIDI File Offset time, click
on the Set button in the bottom of the
dialog box. The Ask Time... window
opens.
Enter the MIDI start time for the
session; that is, the point in SMPTE
timecode when the MIDI file should
start.
Click on the Enter button (or press the
Return key) to set the offset time and
close the window.
Summary of Contents for 8-BUS Series
Page 49: ...3 16 D i g i t a l 8 B u s Start Up ...
Page 57: ...4 8 D i g i t a l 8 B u s Connections ...
Page 77: ...5 20 D i g i t a l 8 B u s Preparing for a Session ...
Page 177: ...7 20 D i g i t a l 8 B u s Automation ...
Page 207: ...D 2 D i g i t a l 8 B u s Apogee UV22 ...
Page 219: ...F 4 D i g i t a l 8 B u s Optional I O Cards ...
Page 227: ...H 2 D i g i t a l 8 B u s Upgrading ...
Page 235: ...K 2 D i g i t a l 8 B u s ...
Page 237: ...D i g i t a l 8 B u s ...
Page 239: ...D i g i t a l 8 B u s ...


