


5-9
O w n e r ’ s M a n u a l
Preparing for a Session
Saving Sessions to Floppy Disk
In order to preserve hard drive space
and to supply clients with copies of their
session files, you may want to copy files
onto floppy disks. Additionally, floppies can
be used to store your EQ, Compressor,
Gate, and Effects patches. Copying a
session to floppy disk copies all of the
automation information for that session.
TO SAVE A SESSION TO FLOPPY DISK
From the console:
1. If you haven’t already done so, save the
session to the hard drive. Also make
sure you have a 3.5” floppy disk
inserted in the floppy drive.
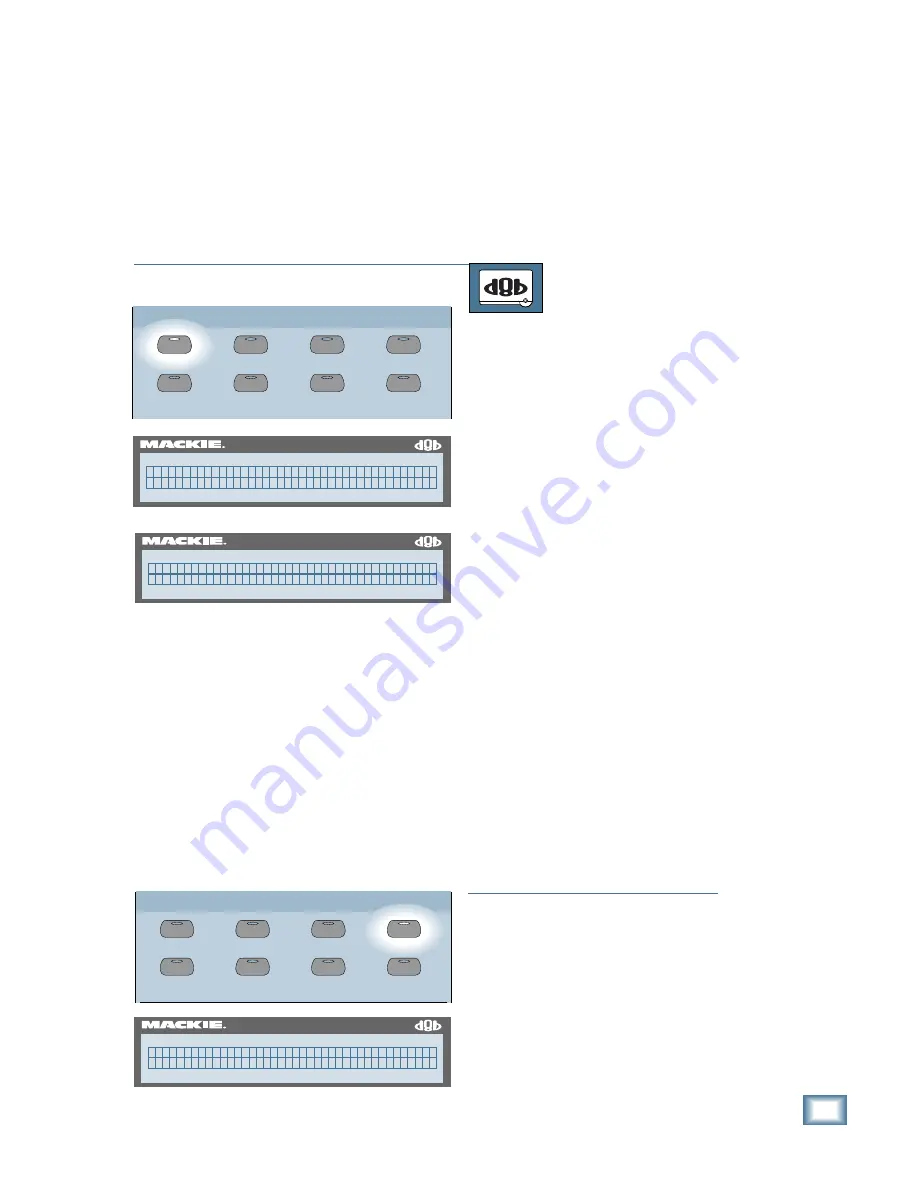
2. Press the SAVE button in the Setup
Section. The Save Session menu
appears in the Fat Channel Display.
3. An arrow appears in the right side of
the display to indicate that there is
another page available. Press the
NEXT button and the directory
navigator appears in the display. The
current folder (folder and directory are
used interchangeably here) is indicated
in the upper-right side of the display.
4. Move toward the root directory (B:) by
scanning left until [BACK DIR]
appears in the upper-left corner of the
display, then selecting “ChangeDir”
until FLOPPY appears. Press
“ChangeDir” one more time and the
current directory becomes the floppy
drive (Cur:A:). If there are any folders
contained on the floppy disk, the name
of one will be displayed in the upper-
left corner.
5. Press the PREVIOUS button to return
to the Save Session menu. Select “Yes”
to save the session to the floppy disk.
Note:
Your working directory is now the
floppy drive. You must load the session
from the internal hard drive in order to
return to it as your working directory.
• Press LOAD in the Setup Section.
• Press NEXT to get to the directory
navigator.
• Scan left and select “ChangeDir” until
“INTERNAL” appears in the upper-left
corner of the display.
• Select “ChangeDir” and work your way
GROUP
GENERAL
PLUG INS
DIGITAL I/O
SAVE
SAVE AS...
NEW
LOAD
SETUP
56 INPUT / 72 CHANNEL DIGITAL MIXER
D8B
S a v e S e s s i o n " S t a r t u p " ? - >
C a n c e l Y e s
56 INPUT / 72 CHANNEL DIGITAL MIXER
D8B
< - [ B A C K D I R ] C u r : S t a r t u p
< < S c a n > > N e w C h a n g e D i r
56 INPUT / 72 CHANNEL DIGITAL MIXER
D8B
m i x # 1 ( L O A D S E S S I O N ) - >
< < S C A N > > C a n c e l O p e n
GROUP
GENERAL
PLUG INS
DIGITAL I/O
SAVE
SAVE AS...
NEW
LOAD
SETUP
Summary of Contents for 8-BUS Series
Page 49: ...3 16 D i g i t a l 8 B u s Start Up ...
Page 57: ...4 8 D i g i t a l 8 B u s Connections ...
Page 77: ...5 20 D i g i t a l 8 B u s Preparing for a Session ...
Page 177: ...7 20 D i g i t a l 8 B u s Automation ...
Page 207: ...D 2 D i g i t a l 8 B u s Apogee UV22 ...
Page 219: ...F 4 D i g i t a l 8 B u s Optional I O Cards ...
Page 227: ...H 2 D i g i t a l 8 B u s Upgrading ...
Page 235: ...K 2 D i g i t a l 8 B u s ...
Page 237: ...D i g i t a l 8 B u s ...
Page 239: ...D i g i t a l 8 B u s ...


