2-10
D i g i t a l 8 • B u s
Digital 8•Bus Description
iu
SAVE AS... button
Saves the currently active session under a
new name. Press SAVE AS..., then use the
V-Pots and SELECT buttons in the Fat Channel
Display to enter the new name. Alternatively, to
do a quick Save As (and accept the default ses-
sion name), press the SAVE AS... button twice.
jl
NEW button
Press this button to start a new session.
The New Session menu appears in the Fat
Channel Display.
jm
LOAD button
Brings up the Load Session menu in the Fat
Channel Display for loading previously saved
files from the hard disk and the floppy disk.
jn
GROUP button
Brings up the Group menu in the Fat Chan-
nel Display for creating Virtual Groups.
jo
GENERAL button
Brings up the General menu in the Fat
Channel Display for changing languages, set-
ting up the Surround matrix, setting up MIDI
or Auto Save, selecting Effects Return meter-
ing and pre/post settings for auxes and buses,
and determining the serial number and operat-
ing system version.
jp
PLUG INS button
Brings up the Plug-In menu in the Fat Chan-
nel Display for selecting the effects package to
download to the internal FX cards.
jq
DIGITAL I/O button
Brings up the Digital I/O menu in the
Fat Channel Display for selecting Tape I/O,
ALT I/O, and Stereo I/O (AES/EBU and
S/PDIF) settings, and selecting the inter-
nal sample rate.
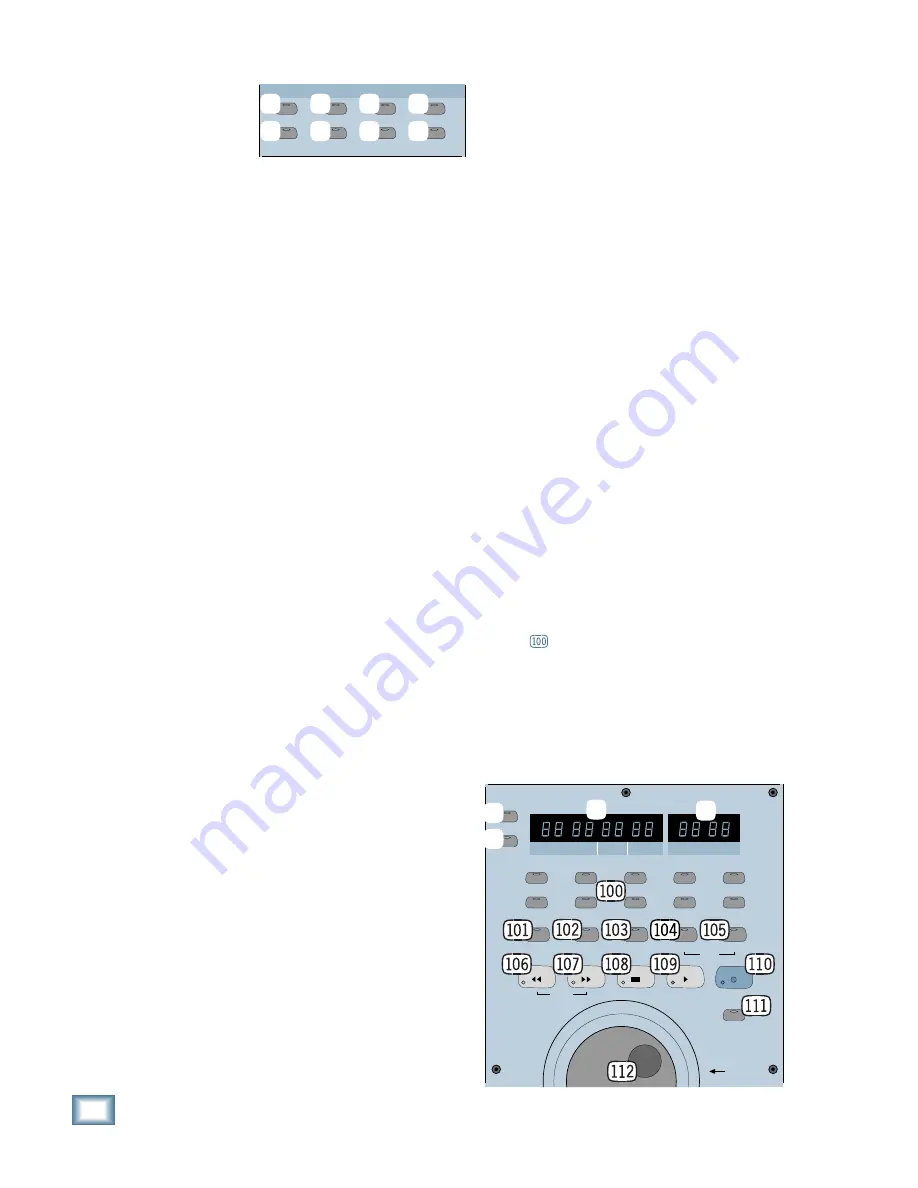
Transport Section
This section provides control for external re-
corder transports, time display, and snapshot
automation.
jr
POSITION LED Display
This display shows numeric representation
of SMPTE or MIDI Time Code (HOURS:
MINUTES:SECONDS:FRAMES) or the more
musical display of BARS:BEATS:TICKS. If the
console is set to receive external time code,
and MIDI Time Code (MTC) or SMPTE is being
input to the console, the position display will
continually update according to the time code
position.
js
RANGE LED Display
This display shows the snapshot number
(when in Snapshot mode) or the locate point
(when in Locator mode) that is currently en-
tered. When looping, it shows the beginning
(FROM) and ending (TO) points of the loop.
jt
SET TIME button
Press this button to enter a new time in the
POSITION DISPLAY. Use the number buttons to
enter the time, then press the ENTER button.
ju
SMPTE VIEW button
This button toggles between SMPTE/MTC
time and BBT in the POSITION display.
Number Buttons 0–9
Use these buttons to numerically enter
Snapshots, Locate and Loop points in the
RANGE display, and time values in the POSI-
TION display. Generally, when numeric buttons
are pressed in Locator, Snapshot, or Set Time
modes, it is necessary to press the ENTER but-
ton to initiate any changes.
SMPTE VIEW
SET TIME
MINUTES
HOURS
SECONDS
FRAMES
BARS
BEATS
LOOP
TICKS
POSITION
RANGE
MODE
FROM
TO
2
3
4
5
7
1
6
8
9
0
ENTER
STORE
LOCATOR
LOOP
SNAPSHOT
JOG & SHUTTLE
SHUTTLE
JOG
REWIND
FAST FWD
STOP
PLAY
RECORD
jr
js
jt
ju
GROUP
GENERAL
PLUG INS
DIGITAL I/O
SAVE
SAVE AS...
NEW
LOAD
SETUP
it
jn
iu
jo
jl
jp
jm
jq
Summary of Contents for 8-BUS Series
Page 49: ...3 16 D i g i t a l 8 B u s Start Up ...
Page 57: ...4 8 D i g i t a l 8 B u s Connections ...
Page 77: ...5 20 D i g i t a l 8 B u s Preparing for a Session ...
Page 177: ...7 20 D i g i t a l 8 B u s Automation ...
Page 207: ...D 2 D i g i t a l 8 B u s Apogee UV22 ...
Page 219: ...F 4 D i g i t a l 8 B u s Optional I O Cards ...
Page 227: ...H 2 D i g i t a l 8 B u s Upgrading ...
Page 235: ...K 2 D i g i t a l 8 B u s ...
Page 237: ...D i g i t a l 8 B u s ...
Page 239: ...D i g i t a l 8 B u s ...


