8-9
O w n e r ’ s M a n u a l
Advanced Techniques
3.
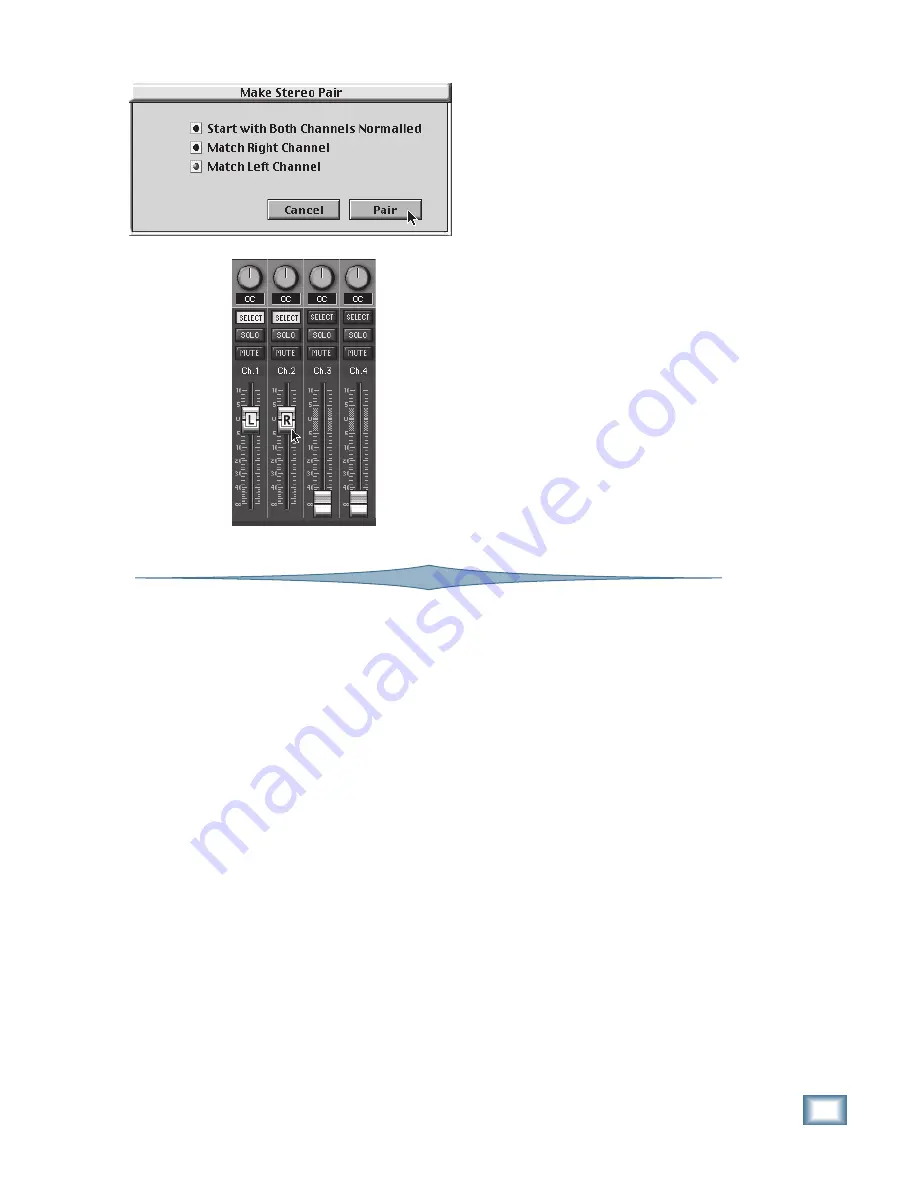
The “Make Stereo Pair” window appears.
4. You can select one of three options in
this dialog box:
• “Start with Both Channels
Normalled” means that both faders will
return to a nominal setting (faders
down, pans fully left/right).
• “Match Right Channel” means the
left channel fader will snap to the same
level as the right channel fader, with an
equal but opposite pan.
• “Match Left Channel” means the
right channel fader will snap to the
same level as the left channel fader,
with an equal but opposite pan.
5. Click on “Pair” in the “Make Stereo
Pair” window to link the two channels.
6. The two channels’ fader knobs are now
labeled “L” and “R” to indicate they are
stereo-paired. Move one fader up or
down, and the adjacent fader moves
with it. Move one pan control, and the
adjacent channel’s pan moves in the
opposite direction.
Controlling External Effects
Processors from the Console via MIDI
Fader Bank 4 includes 8 MIDI controllers
(channels 81-88), which can be used to transmit
MIDI continuous controller messages and note
on/off messages through the MIDI OUT connector
on the back of the Remote CPU. The channel fad-
ers and V-Pots transmit continuous controller
messages, and the channel mute buttons transmit
the note on/off messages.
The control messages and note on/off mes-
sages are as follows:
MIDI Faders:
$B0 $00 $XX to $B0 $07 $XX
(XX is a value ranging from $00 to $7F).
MIDI V-Pots:
$B0 $08 $XX to $B0 $0F $XX
(XX is a value ranging from $00 to $7F).
MIDI Mute:
$90 $00 $XX to $90 $07 $XX
(Mute on = Note on = $40;
Mute off = Note off = $00).
Surround-Sound
The Mackie Real Time OS automation system
provides a powerful method for automating
surround-sound mixes by using the Surround
Control Panel (on-screen only).
You can select one of five different surround
sound modes in the General menu (from the con-
sole) or the Aux/Surround window in the Setup
dialog box (from the screen). The surround
modes are global; whatever surround mode you
select applies to all channels.
The surround outputs are routed to the D8B’s
outputs. The buses used depends on the sur-
round mode you have selected. You can
individually pan and locate the signal from each
channel within the sound-field by dragging the
point-source dot in the Surround Control Panel.
You can save the static location as a surround
patch, or you can automate a dynamic move (for
example, a sweep from left-rear to right-front),
and save it as part of your session. What’s more,
you can copy the move in the Mix Editor, and
paste it to another channel. For example, you
could copy a sweep to an effects return channel,
but place it at a point in time slightly behind the
dry signal, to get a cool, trailing sweep effect.
Summary of Contents for 8-BUS Series
Page 49: ...3 16 D i g i t a l 8 B u s Start Up ...
Page 57: ...4 8 D i g i t a l 8 B u s Connections ...
Page 77: ...5 20 D i g i t a l 8 B u s Preparing for a Session ...
Page 177: ...7 20 D i g i t a l 8 B u s Automation ...
Page 207: ...D 2 D i g i t a l 8 B u s Apogee UV22 ...
Page 219: ...F 4 D i g i t a l 8 B u s Optional I O Cards ...
Page 227: ...H 2 D i g i t a l 8 B u s Upgrading ...
Page 235: ...K 2 D i g i t a l 8 B u s ...
Page 237: ...D i g i t a l 8 B u s ...
Page 239: ...D i g i t a l 8 B u s ...


