6-71
O w n e r ’ s M a n u a l
Starting a New Session
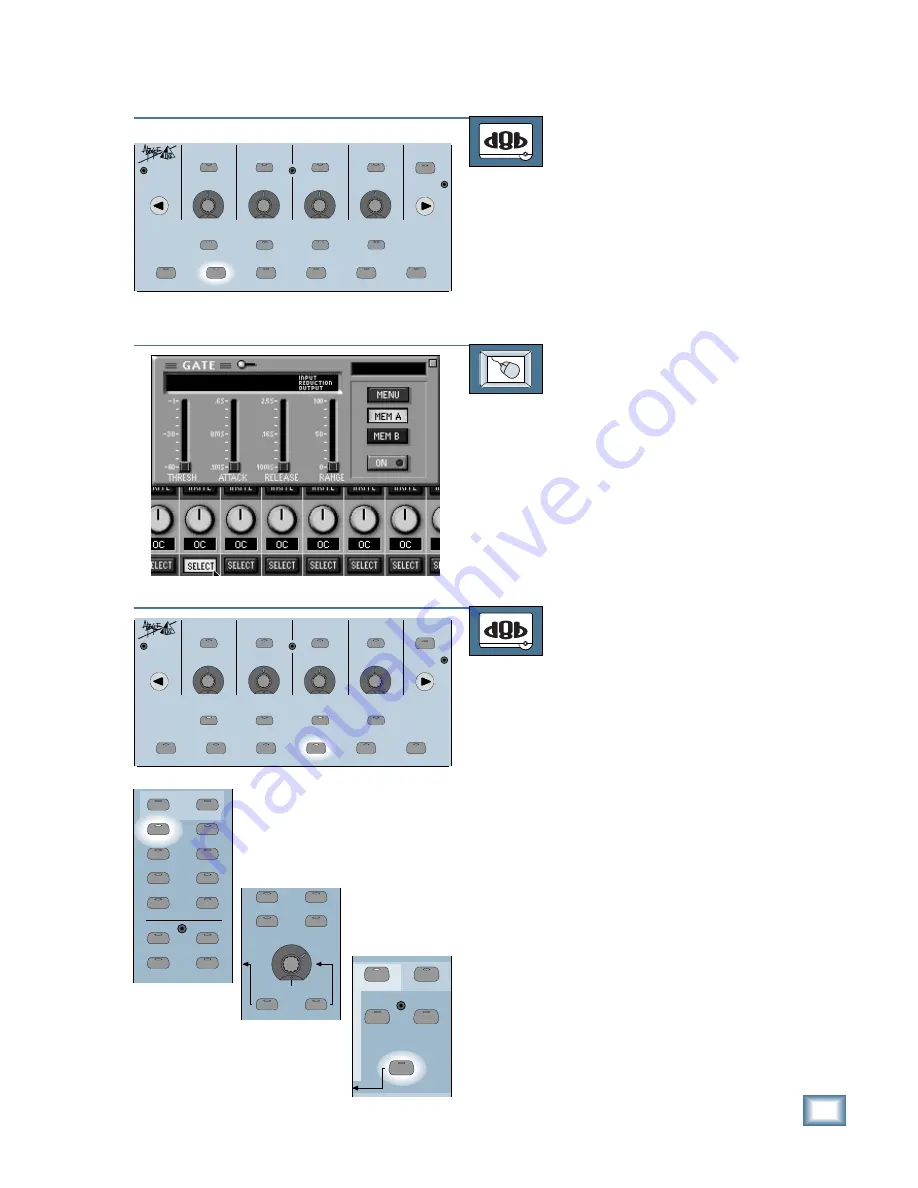
Adding Gate
TO ADD GATE
From the console:
1. Select the channel you want to gate by
pressing its SELECT button.
2. Press the GATE button in the Fat
Channel Section.
3. Adjust the gate parameters as desired.
TO ADD GATE
From the screen:
1. Click on the Gate button in the lower menu
bar and the Gate control panel appears.
2. Select the channel you want to gate by
clicking on its SELECT button.
3. Adjust the gate parameters as desired.
Adding Effects
TO ADD EFFECTS
From the console:
1. Press the PLUG-INS button in the Fat
Channel Section.
2. Select the aux send in the V-Pot Select
Section corresponding to the effects
processor you want to use.
3. Adjust the V-Pots on the channels you
want to send to the selected effect.
4. Turn the Master V-Pot to adjust the
overall aux send level to the selected
effect. You can press the SOLO button
in the Master V-Pot Section to monitor
the aux send signal.
5. Select the effect you want to use with
the first V-Pot (in the Fat Channel), and
adjust the effect’s parameters as de-
sired. See “Selecting Internal Effects”
on page 6-53 for more information on
selecting and adjusting internal effects.
6. Press the EFFECTS button to select
Fader Bank 3. Adjust the correspond-
ing FX Return fader to add the effect to
the Left and Right buses.
ON
LOW
PREVIOUS
SELECT
LOW MID
HI MID
EQ
COMPRESSOR
GATE
PLUG-INS
LOAD PATCH
SAVE PATCH
SETUP
MEMORY A
MEMORY B
HI
NEXT
SELECT
SELECT
SELECT
HELP
SUPER CD ENCODING
ON
LOW
PREVIOUS
SELECT
LOW MID
HI MID
EQ
COMPRESSOR
GATE
PLUG-INS
LOAD PATCH
SAVE PATCH
SETUP
MEMORY A
MEMORY B
HI
NEXT
SELECT
SELECT
SELECT
HELP
SUPER CD ENCODING
AUX 7
AUX 8
AUX 5
AUX 6
AUX 1
AUX 3
AUX 2
AUX 4
LEVEL TO TAPE
DIGITAL TRIM
AUX 9
-
10
AUX 11
-
12
PAN
PAN
1-24
1-48
MASTER
PAN
SOLO
AUX 9
-
10
AUX 11
-
12
PAN
PAN
SHIFT
MASTERS
1
-
24
25
-
48
49
-
72
(TRACK)
(MONITOR)
BANK SELECT
EFFECTS
MIC/LINE
TAPE IN
Summary of Contents for 8-BUS Series
Page 49: ...3 16 D i g i t a l 8 B u s Start Up ...
Page 57: ...4 8 D i g i t a l 8 B u s Connections ...
Page 77: ...5 20 D i g i t a l 8 B u s Preparing for a Session ...
Page 177: ...7 20 D i g i t a l 8 B u s Automation ...
Page 207: ...D 2 D i g i t a l 8 B u s Apogee UV22 ...
Page 219: ...F 4 D i g i t a l 8 B u s Optional I O Cards ...
Page 227: ...H 2 D i g i t a l 8 B u s Upgrading ...
Page 235: ...K 2 D i g i t a l 8 B u s ...
Page 237: ...D i g i t a l 8 B u s ...
Page 239: ...D i g i t a l 8 B u s ...


