


i.
Outer edges - work from the sides upwards
and then along the top edge, to ensure that it
clips securely into position.
ii. Inner edges - ensure that the bezel sits flat
against the unit.
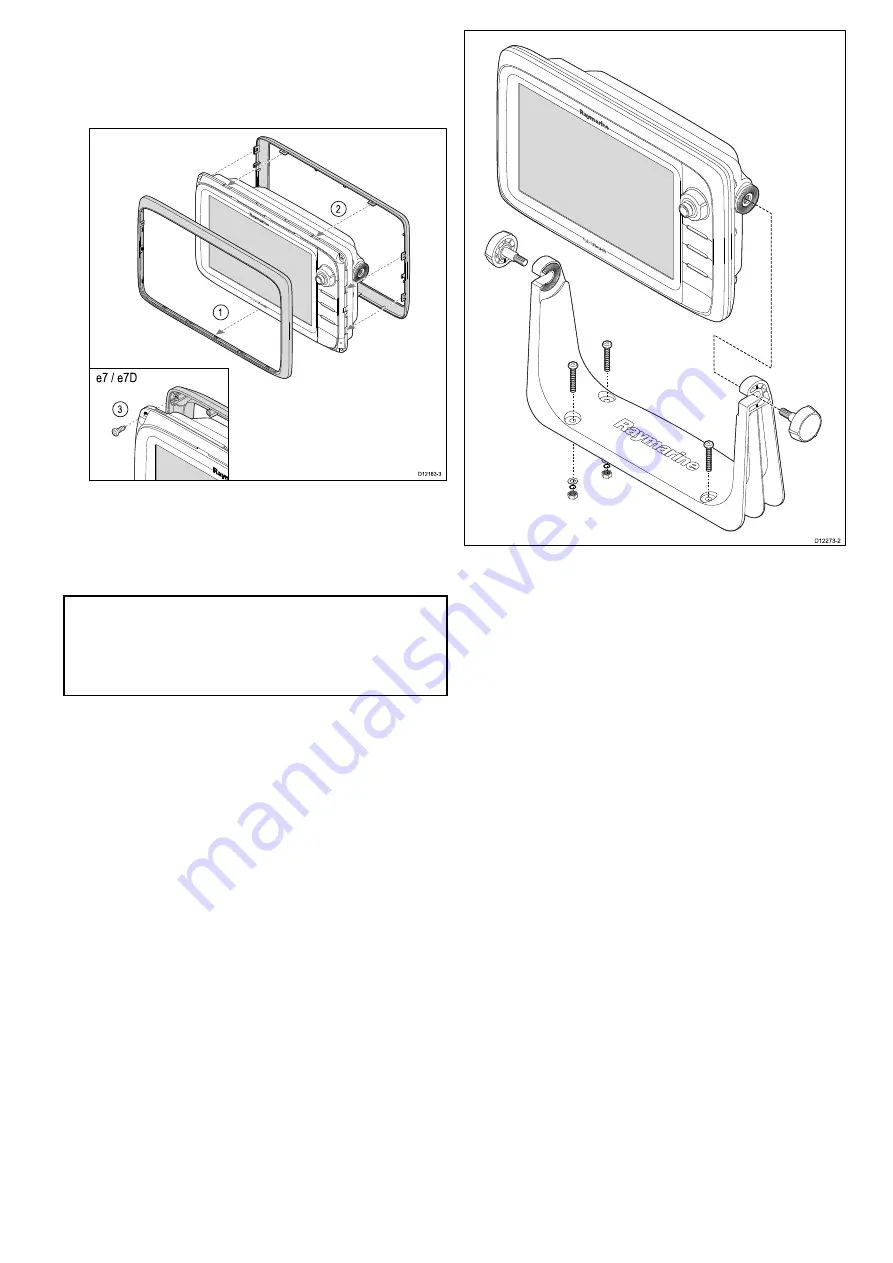
D12183-3
e7 / e7D
1
2
3
3. Use the supplied screws to secure the bezel to
the display (e7 and e7D only).
Bracket (trunnion) mounting
The display can be mounted on a trunnion bracket.
Note:
The mounting bracket is supplied with the
e7 and e7D display variants, for all other display
variants the mounting bracket is an optional
accessory See the
Spares and Accessories
section of this manual for details.
Before mounting the unit ensure that you have:
• Selected a suitable location.
• Identified the cable connections and route that the
cables will take.
• Attach the front bezel.
D12273-2
1. Mark the location of the mounting bracket screw
holes on the chosen mounting surface.
2. Drill holes for the fixings using a suitable drill,
ensuring there is nothing behind the surface that
may be damaged.
3. Use the fixings supplied with the mounting
bracket to attach securely.
4. Attach the display unit to the mounting bracket.
Front bezel
Attaching the front bezel
The following procedure assumes that the unit has
already been mounted in position.
1. Carefully lift one edge of the screen protection
film, so that it is accessible for removing when
unit installation is complete.
2. Ensure the memory card slot door is in the open
position.
3. Orientate the bottom-right side of the bezel under
the lip of the chart card door and place the bezel
over the front of the display, ensuring that the
clips along the bottom edge of the bezel latch
into position.
Mounting
87
Summary of Contents for a125
Page 2: ......
Page 6: ......
Page 16: ...16 a Series c Series e Series ...
Page 43: ...13 GPS receiver 14 Thermal camera 15 Wireless connection Planning the installation 43 ...
Page 50: ...50 a Series c Series e Series ...
Page 82: ...82 a Series c Series e Series ...
Page 114: ...114 a Series c Series e Series ...
Page 120: ...120 a Series c Series e Series ...
Page 186: ...186 a Series c Series e Series ...
Page 190: ...190 a Series c Series e Series ...
Page 208: ...208 a Series c Series e Series ...
Page 230: ...230 a Series c Series e Series ...
Page 320: ...320 a Series c Series e Series ...
Page 340: ...340 a Series c Series e Series ...
Page 364: ...364 a Series c Series e Series ...
Page 420: ...420 a Series c Series e Series ...
Page 424: ...424 a Series c Series e Series ...
Page 434: ...434 a Series c Series e Series ...
Page 459: ......
Page 460: ...www raymarine com ...


