


16.2 AIS prerequisites
You must have suitable AIS hardware connected to
your multifunction display to make use of the AIS
functionality.
In order to run AIS, you will need:
• A receive-only AIS unit or a full AIS transceiver (a
unit that sends and receives).
• A VHF antenna.
• A GPS - to provide position data.
• The AIS layer enabled in the chart or radar
application, as appropriate.
Note:
A receiver will allow you to receive data
about other vessels in your area but will not allow
other vessels to ‘see’ you. A full transceiver
transmits and receives AIS data, and therefore
allows you to receive data about other vessels. It
also enables other AIS-equipped vessels to see
and receive information about your vessel. This
could include position, course, speed and rate of
turn data.
When the AIS unit is connected to your multifunction
display, the status of the unit is indicated by an AIS
icon in the status bar.
You can connect an AIS unit to your multifunction
display using NMEA0183 or SeaTalk
ng
, depending
on the AIS unit. If connecting using NMEA0183,
you will now need to specify the 38,400 baud setting
(
homescreen > Set-up > System Settings > NMEA
Set-up
) for the NMEA input port that communicates
with the AIS transceiver or receiver.
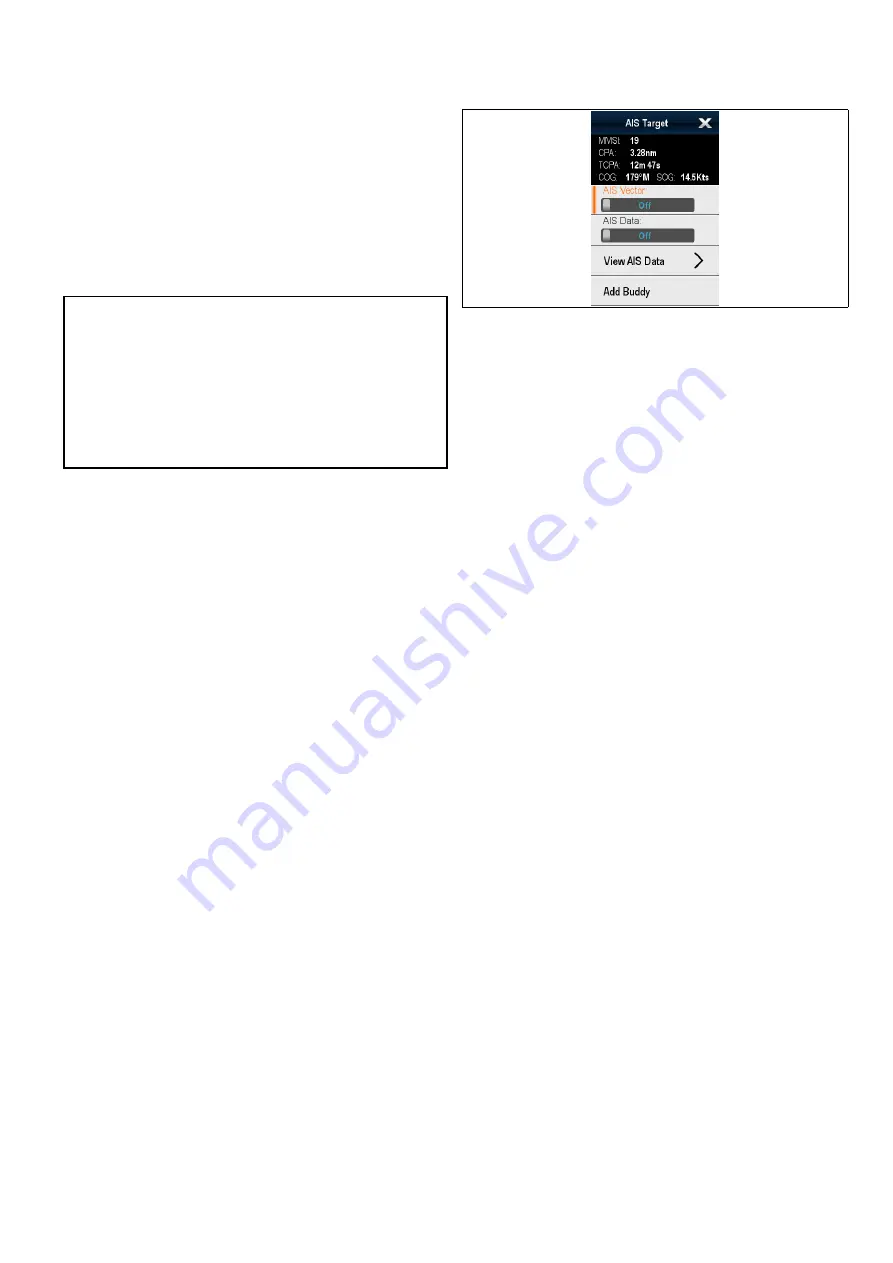
16.3 AIS context menu
The AIS function includes a context menu which
provides AIS target information and menu items.
The context menu provides the following AIS target
data:
• MMSI
• CPA
• TCPA
• COG
• SOG
The context menu also provide the following menu
items:
•
AIS Vector
— Switch target vectors On and Off.
•
AIS Data
— Switch on screen target data On and
Off.
•
View Full Data
•
Add Buddy
— Add target to the buddy directory.
•
Acquire Target
(only available if Radar overlay is
switched on.)
•
Slew thermal camera
(only available when
thermal camera is connected and operating.)
Accessing the context menu
You can access the context menu by following the
steps below.
1. Non-touchscreen and HybridTouch displays:
i.
Selecting a location, object or target on-screen
and pressing the
Ok
button.
2. HybridTouch and Touch only displays:
i.
Selecting an object or target on-screen.
ii. Selecting and holding on a location on-screen.
AIS function
199
Summary of Contents for a125
Page 2: ......
Page 6: ......
Page 16: ...16 a Series c Series e Series ...
Page 43: ...13 GPS receiver 14 Thermal camera 15 Wireless connection Planning the installation 43 ...
Page 50: ...50 a Series c Series e Series ...
Page 82: ...82 a Series c Series e Series ...
Page 114: ...114 a Series c Series e Series ...
Page 120: ...120 a Series c Series e Series ...
Page 186: ...186 a Series c Series e Series ...
Page 190: ...190 a Series c Series e Series ...
Page 208: ...208 a Series c Series e Series ...
Page 230: ...230 a Series c Series e Series ...
Page 320: ...320 a Series c Series e Series ...
Page 340: ...340 a Series c Series e Series ...
Page 364: ...364 a Series c Series e Series ...
Page 420: ...420 a Series c Series e Series ...
Page 424: ...424 a Series c Series e Series ...
Page 434: ...434 a Series c Series e Series ...
Page 459: ......
Page 460: ...www raymarine com ...


