


19.8 Depth Range
The Depth Range function enables you to define
the range of depth that you see in the Fishfinder
application. In Auto Range, the Fishfinder application
automatically adjusts the range to ensure the
water column and bottom are always displayed. In
Manual Range, you can adjust the range displayed
on-screen to suit your needs.
The table below shows examples of the Range
function used with different sonar types.
Traditional and CHIRP
channels
DownVision
TM
channel
Auto
Range
Manual
Range
Changing the depth range
You can choose from either:
•
Automatic
adjustment whereby the display
automatically shows the shallowest required
range.
•
Manual
adjustment of the depth range, up to
the maximum depth allowed by the Fishfinder
application.
From the Fishfinder application menu:
1. Select
Range
.
2. Select
Range
to switch between Auto and Man.
3. With manual mode selected you can now adjust
the depth range shown on-screen.
Note:
With the
Range
menu displayed you cannot
use the
Rotary Control
to range in and out. To
use the
Rotary control
to range in and out, first
close the
Range
menu.
Range in and out
The method of ranging in and out of the Fishfinder
application is dependent upon the multifunction
display variant being used.
The table below shows the Range controls available
for each display variant.
Controls
Multifunction
displays
Rotary Control
• c Series
• e Series
• RMK-9 keypad
Range in
and
Range out
buttons
• c Series
• e Series
(excluding e7
and e7D
• RMK-9 keypad
Slide the screen
Up
or
Down
• a Series
• e Series
• gS Series
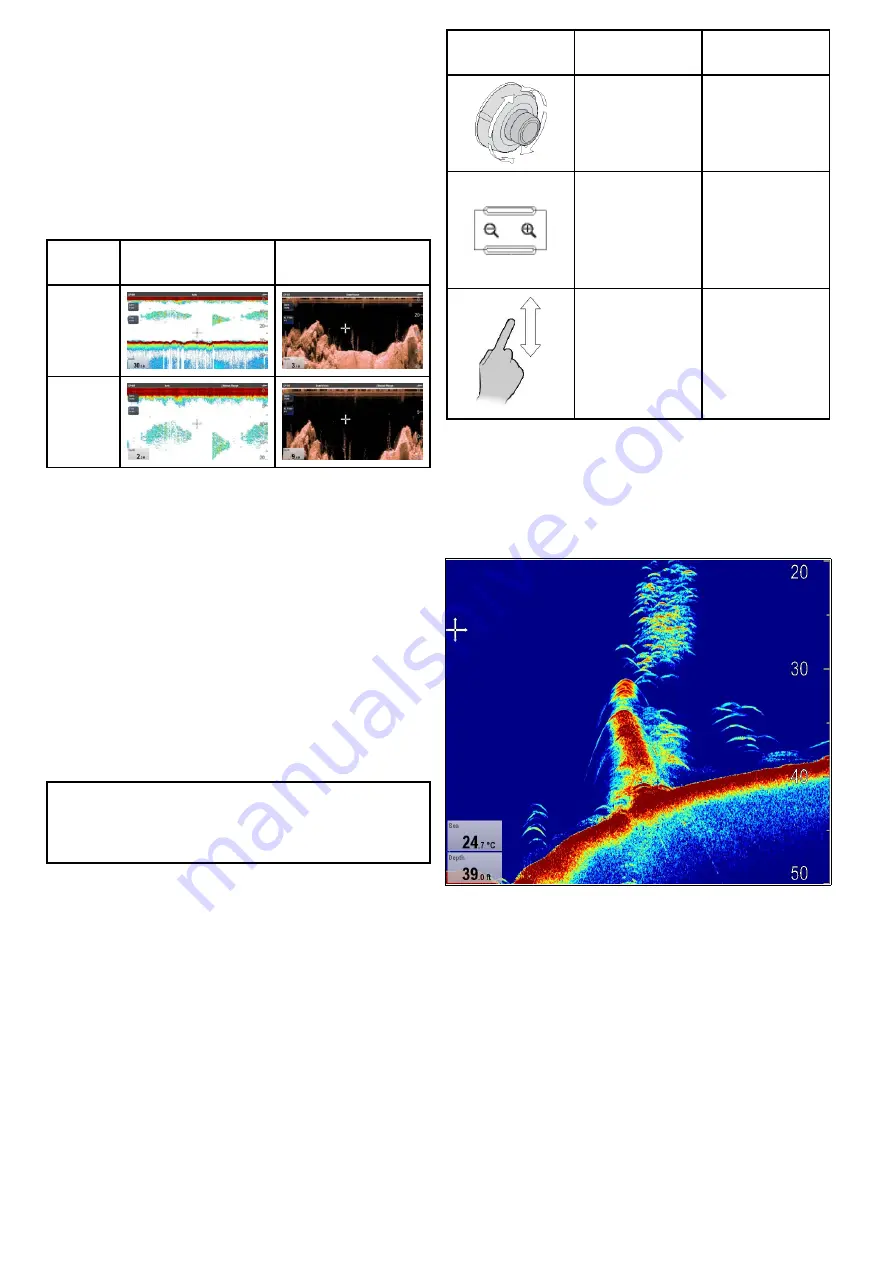
Range shift
The Range Shift function enables a specific area of
the water column to be displayed on-screen.
In the below example the top 20 feet of the water
column is not displayed
Using range shift
The default setting adjusts the display to keep the
bottom in the lower half of the screen. Alternatively
you can shift the image within the current range.
From the application menu, with
Range
set to
Manual:
1. Select
Range
.
2. Select
Range Shift
.
The range shift dialog is displayed.
3. Adjust the setting to the required value.
You will see the range changing on the screen as
you adjust the setting.
4. Select
Back
or press the
Ok
button to confirm
the setting and close the range shift dialog.
274
a Series / c Series / e Series
Summary of Contents for a125
Page 2: ......
Page 6: ......
Page 16: ...16 a Series c Series e Series ...
Page 43: ...13 GPS receiver 14 Thermal camera 15 Wireless connection Planning the installation 43 ...
Page 50: ...50 a Series c Series e Series ...
Page 82: ...82 a Series c Series e Series ...
Page 114: ...114 a Series c Series e Series ...
Page 120: ...120 a Series c Series e Series ...
Page 186: ...186 a Series c Series e Series ...
Page 190: ...190 a Series c Series e Series ...
Page 208: ...208 a Series c Series e Series ...
Page 230: ...230 a Series c Series e Series ...
Page 320: ...320 a Series c Series e Series ...
Page 340: ...340 a Series c Series e Series ...
Page 364: ...364 a Series c Series e Series ...
Page 420: ...420 a Series c Series e Series ...
Page 424: ...424 a Series c Series e Series ...
Page 434: ...434 a Series c Series e Series ...
Page 459: ......
Page 460: ...www raymarine com ...


