background image

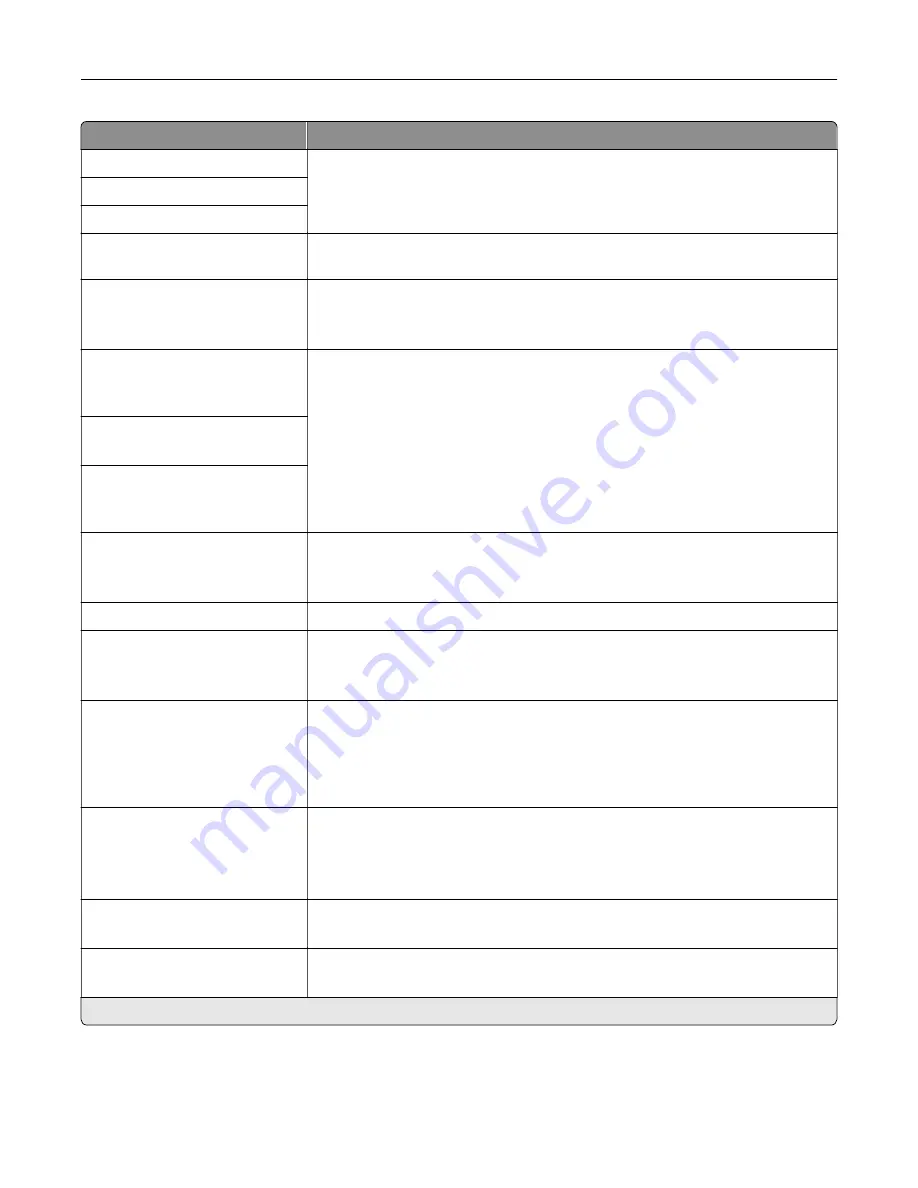
Menu item

Description

Backup DNS Server Address

Specify the backup DNS server addresses.

Backup DNS Server Address 2

Backup DNS Server Address 3

Domain Search Order

Specify a list of domain names to locate the printer and its resources that reside
in different domains on the network.

Enable DDNS

Off*

On

Update the Dynamic DNS settings.

DDNS TTL

300–31536000 seconds
(3600*)

Specify the current DDNS settings.

Default TTL

5–254 seconds (254*)

DDNS Refresh Time

300–31536000 seconds
(604800*)

Enable mDNS

On*

Off

Update multicast DNS settings.

WINS Server Address

Specify a server address for Windows Internet Name Service (WINS).

Enable BOOTP

Off*

On

Allow the BOOTP to assign a printer IP address.

Restricted Server List

Specify an IP address for the TCP connections.

Notes:

Use a comma to separate each IP address.

You can add up to 50 IP addresses.

Restricted Server List Options

Block All Ports*

Block Printing Only

Block Printing and HTTP Only

Specify how the IP addresses in the list can access the printer functionality.

MTU

256–1500 (1500*)

Specify a maximum transmission unit (MTU) parameter for the TCP connections.

Raw Print Port

1–65535 (9100*)

Specify a raw port number for printers connected on a network.

Note: 

An asterisk (*) next to a value indicates the factory default setting.

Understanding the printer menus

74

Summary of Contents for MX-B557P

Page 1: ...LASER PRINTER MX B557P MX B707P User s Guide October 2021 Machine type 4064 Models 29H 69H ...

Page 2: ...d using the home screen applications 15 Using the home screen 15 Customizing the home screen 16 Using Display Customization 16 Configuring Eco Settings 16 Managing bookmarks 17 Managing contacts 18 Loading paper and specialty media 20 Setting the size and type of the specialty media 20 Configuring Universal paper settings 20 Loading the 250 or 550 sheet tray 20 Loading the 2100 sheet tray 23 Loading...

Page 3: ...ling a print job 43 Understanding the printer menus 44 Menu map 44 Device 45 Print 56 Paper 65 USB Drive 66 Network Ports 68 Security 81 Reports 88 Help 89 Troubleshooting 89 Printing the Menu Settings Page 89 Securing the printer 91 Locating the security slot 91 Erasing printer memory 91 Erasing printer hard disk memory 91 Encrypting the printer hard disk 92 Restoring factory default settings 92 ...

Page 4: ... multipurpose feeder 136 Paper jam in the output expander 137 Paper jam in the high capacity output expander 137 Paper jam in the 4 bin mailbox 138 Paper jam in the staple finisher 139 Paper jam in the staple hole punch finisher 140 Staple jam in the staple finisher 141 Staple jam in the staple hole punch finisher 144 Troubleshooting 147 Printing problems 147 The printer is not responding 167 Unable t...

Page 5: ...Upgrading and migrating 176 Hardware 176 Software 200 Firmware 202 Notices 204 Index 213 Contents 5 ...

Page 6: ... this product with extension cords multioutlet power strips multioutlet extenders or UPS devices The power capacity of these types of accessories can be easily overloaded by a laser printer and may result in a risk of fire property damage or poor printer performance CAUTION POTENTIAL INJURY Do not use this product with an inline surge protector The use of a surge protection device may result in a r...

Page 7: ...inter has a caster base then carefully roll it to the new location Use caution when passing over thresholds and breaks in flooring If the printer does not have a caster base but is configured with optional trays or output options then remove the output options and lift the printer off the trays Do not try to lift the printer and any options at the same time Always use the handholds on the printer to...

Page 8: ...ot recharge disassemble or incinerate a lithium battery Discard used lithium batteries according to the manufacturer s instructions and local regulations This product is designed tested and approved to meet strict global safety standards with the use of specific manufacturer s components The safety features of some parts may not always be obvious The manufacturer is not responsible for the use of o...

Page 9: ...his product near water or wet locations Make sure that airflow in the room meets the latest revision of the ASHRAE 62 standard or the CEN Technical Committee 156 standard Provide a flat sturdy and stable surface Keep the printer Clean dry and free of dust Away from stray staples and paper clips Away from the direct airflow of air conditioners heaters or ventilators Free from direct sunlight and humid...

Page 10: ...sing possible injury For more information on supported configurations contact the place where you purchased the printer CAUTION TIPPING HAZARD To reduce the risk of equipment instability load each tray separately Keep all other trays closed until needed You can configure your printer by adding optional 250 550 or 2100 sheet trays Basic model 1 Standard 550 sheet tray 2 Multipurpose feeder 3 Control ...

Page 11: ...put expander High capacity output 4 bin mailbox Staple finisher The staple hole punch finisher must not be combined with any other output options In a configuration with two or more optional finishers The staple finisher must always be on top The high capacity output expander must always be at the bottom The output expander is the only option that can be placed on top of the high capacity output expand...

Page 12: ...NJURY To avoid the risk of fire or electrical shock connect the power cord to an appropriately rated and properly grounded electrical outlet that is near the product and easily accessible CAUTION POTENTIAL INJURY To avoid the risk of fire or electrical shock use only the power cord provided with this product or the manufacturer s authorized replacement Warning Potential Damage To avoid loss of data ...

Page 13: ...numeric value of a setting 4 Numeric keypad Enter numbers or symbols in an input field 5 Power button Turn on or turn off the printer Note To turn off the printer press and hold the power button for five seconds 6 Backspace button Move the cursor backward and delete a character in an input field 7 Stop or Cancel button Stop the current printer task 8 Indicator light Check the printer status 9 Back bu...

Page 14: ...r status 7 Volume buttons Adjust the speaker volume 8 Headset or speaker port Attach a headset or speaker Note This feature is available only in some printer units 9 Back button Return to the previous screen Understanding the status of the power button and indicator light Indicator light Printer status Off The printer is off or in Hibernate mode Blue The printer is ready or processing data Red The...

Page 15: ...n the printer warning or message and on how to clear it Note You can also access this setting by touching the top section of the home screen 2 Job Queue Show all the current print jobs Note You can also access this setting by touching the top section of the home screen 3 Change Language Change the language on the display 4 Settings Access the printer menus 5 Held Jobs Show the print jobs that are ...

Page 16: ...enabled the status icons appear on the screen saver only when there are errors warnings or cloud based notifications 2 Apply the changes Changing the wallpaper image 1 From the home screen touch Change Wallpaper 2 Select an image to use 3 Apply the changes Running a slide show from a flash drive 1 Insert a flash drive into the USB port 2 From the home screen touch Slideshow Images appear in alphabeti...

Page 17: ...formation for your web browser For FTP type the FTP address For example myServer myDirectory Enter the FTP port Port 21 is the default port for sending commands For SMB type the network folder address For example myServer myShare myFile pdf Type the network domain name If necessary select the Authentication type for FTP and SMB To limit access to the bookmark enter a PIN Note The application suppo...

Page 18: ...in the address field Notes View the printer IP address on the printer home screen The IP address appears as four sets of numbers separated by periods such as 123 123 123 123 If you are using a proxy server then temporarily disable it to load the web page correctly 2 Click Address Book 3 From the Contact Groups section add a group name Note You can assign one or more contacts to the group 4 Apply th...

Page 19: ...address field Notes View the printer IP address on the printer home screen The IP address appears as four sets of numbers separated by periods such as 123 123 123 123 If you are using a proxy server then temporarily disable it to load the web page correctly 2 Click Address Book 3 Do either of the following From the Contacts section select a contact that you want to delete From the Contact Groups se...

Page 20: ...ontrol panel navigate to Settings Paper Media Configuration Universal Setup For non touch screen printer models press to navigate through the settings 2 Configure the settings Loading the 250 or 550 sheet tray CAUTION POTENTIAL INJURY To reduce the risk of equipment instability load each tray separately Keep all other trays closed until needed 1 Remove the tray Note To avoid paper jams do not remove...

Page 21: ...x fan and align the paper edges before loading 4 Load the paper stack with the printable side facedown and then make sure that the side guides fit snugly against the paper Loading paper and specialty media 21 ...

Page 22: ... staple finisher is installed or not Without an optional staple finisher With an optional staple finisher One sided printing One sided printing Two sided printing Two sided printing When loading prepunched paper make sure that the holes on the long edge of the paper are against the right side of the tray One sided printing Two sided printing Loading paper and specialty media 22 ...

Page 23: ...ray 6 From the control panel set the paper size and paper type to match the paper loaded Loading the 2100 sheet tray CAUTION TIPPING HAZARD To reduce the risk of equipment instability load each tray separately Keep all other trays closed until needed 1 Pull out the tray 2 Adjust the guides Loading A5 size paper a Pull up and slide the width guide to the position for A5 Loading paper and specialty ...

Page 24: ...ngth guide to the position for A5 until it clicks into place c Remove the A5 length guide from its holder d Insert the guide into its designated slot and then press until it clicks into place Loading paper and specialty media 24 ...

Page 25: ... width guide to the correct position for the size of the paper being loaded b If the A5 length guide is still attached then remove it If the guide is not attached then proceed to step d on page 26 c Place the A5 length guide in its holder Loading paper and specialty media 25 ...

Page 26: ...d align the paper edges before loading 4 Load the paper stack with the printable side facedown Load letterhead depending on whether an optional staple finisher is installed or not Without an optional staple finisher With an optional staple finisher One sided printing One sided printing Loading paper and specialty media 26 ...

Page 27: ...per make sure that the holes on the long edge of the paper are against the right side of the tray One sided printing Two sided printing 5 Insert the tray Note Press down the paper stack while inserting the tray 6 From the control panel set the paper size and paper type to match the paper loaded Loading paper and specialty media 27 ...

Page 28: ...oading 3 Flex fan and align the paper edges before loading 4 Load paper with the printable side faceup Load letterhead depending on whether an optional staple finisher is installed or not Without an optional staple finisher With an optional staple finisher One sided printing One sided printing Loading paper and specialty media 28 ...

Page 29: ...match the paper loaded Linking trays 1 From the control panel navigate to Settings Paper Tray Configuration For non touch screen printer models press to navigate through the settings 2 Select a paper source 3 Set the same paper size and paper type for the trays that you are linking 4 From the control panel navigate to Settings Device Maintenance Config Menu Tray Configuration 5 Set Tray Linking to Au...

Page 30: ...5 182 x 257 mm 7 2 x 10 1 in X Oficio Mexico 216 x 340 mm 8 5 x 13 4 in Statement 140 x 216 mm 5 5 x 8 5 in X Executive 184 x 267 mm 7 3 x 10 5 in X Letter 216 x 279 mm 8 5 x 11 in Legal 216 x 356 mm 8 5 x 14 in Folio 216 x 330 mm 8 5 x 13 in Universal 105 x 148 mm 4 1 x 5 8 in to 216 x 356 mm 8 5 x 14 in X 7 3 4 Envelope Monarch 98 x 191 mm 3 9 x 7 5 in X X 1 A5 long edge feed LEF is recommended o...

Page 31: ...0 mm 6 9 x 9 8 in X X 1 A5 long edge feed LEF is recommended over A5 short edge feed SEF 2 Envelopes wider than 101 6 mm 4 5 in may crease This paper type must be tested for acceptability Paper sizes supported by the output options or finishers Paper size Output expander or high capacity output expander 4 bin mailbox Staple finisher Staple hole punch finisher Stack Staple Stack Staple Hole punch A4 2...

Page 32: ...3 x 10 5 in X X X Letter 216 x 279 mm 8 5 x 11 in Legal 216 x 356 mm 8 5 x 14 in X Folio 216 x 330 mm 8 5 x 13 in Universal 105 x 148 mm 4 1 x 5 8 in to 216 x 356 mm 8 5 x 14 in X X X X X 7 3 4 Envelope Monarch 98 x 191 mm 3 9 x 7 5 in X X X X X X 9 Envelope 98 x 225 mm 3 9 x 8 9 in X X X X X X 10 Envelope 105 x 241 mm 4 1 x 9 5 in X X X X X X DL Envelope 110 x 220 mm 4 3 x 8 7 in X X X X X X C5 E...

Page 33: ...pported paper types Paper types supported by the printer Paper type Standard 550 sheet tray optional 250 or 550 sheet tray Optional 2100 sheet tray Multipurpose feeder Two sided printing Plain paper Card stock X Transparency1 X X Labels X X Vinyl Labels X X Bond Envelope X X Rough Envelope X X Letterhead Preprinted Colored Paper X Light X Heavy X 1 To prevent transparencies from sticking together ...

Page 34: ...pported by the output options or finishers Paper type Output expander or high capacity output expander 4 bin mailbox Staple finisher Staple hole punch finisher Stack Staple Stack Staple Hole punch Plain paper Card stock X X X X X X Transparencies X X X X Labels X X X X X X Vinyl Labels X X X X X X Bond Envelope X X X X X X Rough Envelope X X X X X X Letterhead Preprinted Colored Paper X X X X X X Lig...

Page 35: ... lb bond X Card stock 199 g m grain long 110 lb bond X Card stock 176 g m grain long 65 lb bond X Transparency 138 146 g m grain long 37 39 lb bond X X Paper labels 180 g m 48 lb bond X Integrated forms2 140 175 g m 37 47 lb bond X Integrated forms 75 135 g m 20 36 lb bond X Envelopes3 60 105 g m 16 28 lb bond X 1 Grain short is preferred for paper over 176 g m 47 lb 2Pressure sensitive area must ...

Page 36: ... Plain paper or Bond 60 90 g m grain long 16 24 lb bond Card stock 203 g m grain long 125 lb bond X X X X Card stock 199 g m grain long 110 lb bond X X X X Card stock 176 g m grain long 65 lb bond X X X X X X Card stock 163 g m grain long 90 lb bond X X X X Transparency 138 146 g m grain long 37 39 lb bond X X X X Paper labels 180 g m 48 lb bond X X X X X X Integrated forms 140 175 g m 37 47 lb bo...

Page 37: ...nd weight Output expander or high capacity output expander 4 bin mailbox Staple finisher Staple hole punch finisher Stack Staple Stack Staple Hole punch Envelopes 60 105 g m 16 28 lb bond X X X X X X Paper support 37 ...

Page 38: ...then make sure that both devices are connected to the same subnet This application is supported only in some Apple devices 1 From your mobile device select a document from your file manager or launch a compatible application 2 Tap the share icon and then tap Print 3 Select a printer If necessary adjust the settings 4 Print the document Printing from a mobile device using Wi Fi Direct Wi Fi Direct i...

Page 39: ...ert the flash drive while the printer is processing other print jobs then Busy appears on the display 2 Select the document that you want to print If necessary configure other print settings 3 Print the document To print another document select USB Drive Warning Potential Damage To avoid loss of data or printer malfunction do not touch the flash drive or the printer in the area shown while actively p...

Page 40: ...USB flash drives must support the File Allocation Table FAT system Many flash drives are tested and approved for use with the printer For more information contact the place where you purchased the printer File types Documents doc or docx xls or xlsx ppt or pptx pdf xps Images dcx gif jpeg or jpg bmp pcx tiff or tif png Printing 40 ...

Page 41: ... time that the printer prints a copy before printing the remaining copies Note Verify jobs print one copy to check if it is satisfactory before printing the remaining copies Reserve Job Expiration Set the expiration time that the printer stores print jobs Note Reserve held jobs are automatically deleted after printing Require All Jobs to be Held Set the printer to hold all print jobs Keep duplicat...

Page 42: ...to Held jobs select your computer name Confidential enter the PIN select the print job Print For non touch screen printer models press to navigate through the settings Using the print driver 1 With a document open choose File Print 2 Select a printer and then from the drop down menu following the Orientation menu choose Print and Hold 3 Choose Confidential Print and then enter a four digit PIN 4 Cli...

Page 43: ... through the settings 2 Print the document Canceling a print job From the printer control panel For touch screen printer models do the following 1 From the home screen touch Cancel a job 2 Select a job to cancel For non touch screen printer models press From the computer 1 Depending on the operating system do either of the following Open the printers folder and then select your printer From the Sy...

Page 44: ...nt Network Ports Network Overview Wireless Wi Fi Direct Ethernet TCP IP SNMP IPSec 802 1x LPD Configuration HTTP FTP Settings ThinPrint USB Restrict external network access Security Login Methods Certificate Management Schedule USB Devices Security Audit Log Login Restrictions Confidential Print Setup Disk Encryption Erase Temporary Data Files Solutions LDAP Settings Miscellaneous Reports Menu Settin...

Page 45: ... screen Date and Time Configure Current Date and Time Manually Set Date and Time Date Format MM DD YYYY Time Format 12 hour A M P M Time Zone Eastern Time Configure the printer date and time Date and Time Network Time Protocol Enable NTP On NTP Server Enable Authentication Configure the settings for Network Time Protocol NTP Notes Enable Authentication appears only in some printer models When Enable ...

Page 46: ...Set the idle time in seconds before the display shows the home screen or before the printer logs out a user account automatically Note An asterisk next to a value indicates the factory default setting Eco Mode Menu item Description Print Sides 1 Sided 2 Sided Specify whether to print on one side or two sides of the paper Print Pages per Side Off 2 pages per side 3 pages per side 4 pages per side 6...

Page 47: ...Show Supply Estimates Show estimates Do not show estimates Show the estimated status of the supplies Supplies Cartridge Alarm Off Single Continuous Set the number of times that the alarm sounds when the toner cartridge is low E mail Alerts Setup E mail Setup Primary SMTP Gateway Type the IP address or host name of the primary SMTP server for sending e mail Note This menu item appears only in some ...

Page 48: ...nter models E mail Alerts Setup E mail Setup Use SSL TLS Disabled Negotiate Required Send an e mail using an encrypted link Note This menu item appears only in some printer models E mail Alerts Setup E mail Setup Require Trusted Certificate On Off Require a trusted certificate when accessing the SMTP server Note This menu item appears only in some printer models E mail Alerts Setup E mail Setup SMTP...

Page 49: ...m appears only in some printer models E mail Alerts Setup E mail Setup Kerberos 5 REALM Specify the realm for the Kerberos 5 authentication protocol Note This menu item appears only in some printer models E mail Alerts Setup E mail Setup NTLM Domain Specify the domain name for the NTLM security protocol Note This menu item appears only in some printer models E mail Alerts Setup E mail Setup Disabl...

Page 50: ...boot Counter Show a read only information of the reboot counter Error Prevention Auto Reboot Reset Auto Reboot Counter Cancel Continue Reset Auto Reboot Counter Error Prevention Display Short Paper Error On Auto clear Set the printer to show a message when a short paper error occurs Note Short paper refers to the size of the paper loaded Error Prevention Page Protect Off On Set the printer to proc...

Page 51: ...eout to turn off the printer while an active Ethernet connection exists Schedule Power Modes Schedules Add New Schedule Schedule the printer when to enter Sleep or Hibernate mode Note This menu item appears only in some printer models Note An asterisk next to a value indicates the factory default setting Anonymous Data Collection Menu item Description Anonymous Data Collection Device Usage and Per...

Page 52: ...on and reset the Screen Timeout timer when it expires instead of returning to the home screen Headphone Volume 1 10 5 Adjust the headphone volume Note This menu item appears only when a headphone is attached to the printer Enable Voice Guidance When Headphone Is Attached Off On Enable Voice Guidance when a headphone is attached to the printer Speak Passwords PINs Off On Set the printer to read out...

Page 53: ...eed and disable its high speed capabilities Tray Configuration Tray Linking Automatic Off Set the printer to link the trays that have the same paper type and paper size settings Tray Configuration Show Tray Insert Message Off Only for unknown sizes Always Display a message to select paper size and type after inserting the tray Tray Configuration A5 Loading Short Edge Long Edge Determine the default l...

Page 54: ...rs Clear Supply Usage History Reset Black Cartridge Counter Reset Black Imaging Unit Counter Reset Maintenance Counter Reset the supply page counter or view the total printed pages Printer Emulations PPDS Emulation Off On Set the printer to recognize and use the PPDS data stream Printer Emulations PS Emulation Off On Set the printer to recognize and use the PS data stream Printer Emulations Emulat...

Page 55: ...e offering as much functionality as possible despite known issues For example when set to On and the duplex motor is nonfunctional the printer performs one sided printing of the documents even if the job is two sided printing Device Operations Clear Custom Status Erase user defined strings for the Default or Alternate custom messages Device Operations Clear all remotely installed messages Erase mes...

Page 56: ...ookmarks Held Jobs USB App Profiles Display Customization Eco Settings Specify which icons to show on the home screen About this Printer Menu item Description Asset Tag Describe the printer The maximum length is 32 characters Printer Location Identify the printer location The maximum length is 63 characters Contact Personalize the printer name The maximum length is 63 characters Export Configuration...

Page 57: ...et Note Multipurpose Feeder appears only when the optional 650 sheet duo tray is installed Pages per Side Off 2 pages per side 3 pages per side 4 pages per side 6 pages per side 9 pages per side 12 pages per side 16 pages per side Print multiple page images on one side of a sheet of paper Pages per Side Ordering Horizontal Reverse Horizontal Vertical Reverse Vertical Specify the positioning of mul...

Page 58: ...lled Download Target RAM Disk Specify where to save all permanent resources such as fonts and macros that have been downloaded to the printer Note This menu item appears only when a hard disk is installed Resource Save Off On Determine what the printer does with downloaded resources such as fonts and macros when it receives a job that requires more than the available memory Notes When set to Off t...

Page 59: ...ve smoother lines with sharper edges Brightness 6 to 6 0 Adjust the brightness of the printed output Contrast 0 5 0 Adjust the contrast of the printed output Gray Correction Auto Off Adjust the contrast enhancement applied to images Note An asterisk next to a value indicates the factory default setting Job Accounting Menu item Description Job Accounting Off On Set the printer to create a log of th...

Page 60: ...dest Log Delete All But Current Delete All Logs Specify how the printer responds when the hard disk is nearly full Note The value defined in Log Near Full Level determines when this action is triggered Log Action at Full None E mail Delete Current Log E mail Delete Oldest Log Post Delete Current Log Post Delete Oldest Log Delete Current Log Delete Oldest Log Delete All But Current Delete All Logs S...

Page 61: ...rint Specify whether to print annotations in the PDF Print PDF Error Off On Enable the printing of PDF error Note An asterisk next to a value indicates the factory default setting PostScript Menu item Description Print PS Error Off On Print a page that describes the PostScript error Note When an error occurs processing of the job stops the printer prints an error message and the rest of the print ...

Page 62: ...s Disk and Flash appear only when a non defective non protected hard disk or flash memory is installed Download appears only if downloaded fonts exist in the printer memory Font Name List of available fonts Courier Select a font from the specified font source Symbol Set List of available symbol set 10U PC 8 Specify the symbol set for each font name Note A symbol set is a set of alphabetic and numeri...

Page 63: ...t commands the printer to move the position of the cursor to the first position on the same line Auto LF after CR On Off Set the printer to perform a line feed after a carriage return control command Tray Renumber Assign Tray x Configure the printer to work with a different print driver or custom application that uses a different set of source assignments to request a given paper source Tray Renumbe...

Page 64: ... best available paper size and orientation setting for an image Note When set to On this menu item overrides the scaling and orientation settings for the image Invert Off On Invert bitonal monochrome images Note This menu item does not apply to GIF or JPEG image formats Scaling Anchor Top Left Best Fit Anchor Center Fit Height Width Fit Height Fit Width Adjust the image to fit the printable area No...

Page 65: ...b Server Letter A4 prints A4 size document on letter when loading letter and letter size jobs on A4 paper size when loading letter All Listed substitutes Letter A4 Configure MP Cassette Manual First Determine the behavior of the multipurpose feeder Notes Cassette configures the multipurpose feeder as the automatic paper source Manual sets the multipurpose feeder only for manual feed print jobs First...

Page 66: ...e is shorter than the maximum width supported Note An asterisk next to a value indicates the factory default setting Media Types Menu item Description Plain Card Stock Transparency Recycled Labels Vinyl Labels Bond Envelope Rough Envelope Letterhead Preprinted Colored Paper Light Heavy Rough Cotton Custom Type X Specify the texture weight and orientation of the paper USB Drive Flash Drive Print Me...

Page 67: ...e 6 pages per side 9 pages per side 12 pages per side 16 pages per side Print multiple page images on one side of a sheet of paper Pages per Side Ordering Horizontal Reverse Horizontal Reverse Vertical Vertical Specify the positioning of multiple page images when using Pages per Side menu Pages per Side Orientation Auto Landscape Portrait Specify the orientation of multiple page images when using ...

Page 68: ...atus on the display Speed Duplex Show the speed of the currently active network card IPv4 Show the IPv4 address All IPv6 Addresses Show all IPv6 addresses Reset Print Server Start Reset all active network connections to the printer Note This setting removes all network configuration settings Network Job Timeout Disabled Enabled Set the time before the printer cancels a network print job Note Networ...

Page 69: ...cted Setup WPS Auto Detect Off On Start Push Button Method Start PIN Method Establish a Wi Fi network and enable network security Notes WPS Auto Detect appears only when the Wireless Security Mode is set to WEP Start Push Button Method connects the printer to a Wi Fi network when buttons on both the printer and the access point wireless router are pressed within a given time Start PIN Method conne...

Page 70: ...rity through Wi Fi Protected Access WPA Note This menu item appears only when the Wireless Security Mode is set to WPA2 WPA Personal Set Pre Shared Key Set the password for secure Wi Fi connection WPA2 Personal AES Enable Wi Fi security through WPA2 Note This menu item appears only when the Wireless Security Mode is set to WPA2 Personal 802 1x Encryption Mode WPA WPA2 Enable Wi Fi security through...

Page 71: ...amine incoming data and uses the default printer language specified in the Setup menu PS SmartSwitch Off On Set the printer to switch automatically to PS emulation when a print job requires it regardless of the default printer language Note If PS SmartSwitch is off then the printer does not examine incoming data and uses the default printer language specified in the Setup menu Job Buffering On Off T...

Page 72: ...Off On Accept requests to connect to the network automatically Note Accepting clients automatically is not secured Note An asterisk next to a value indicates the factory default setting Ethernet Menu item Description Network Speed Show the speed of the active network adapter IPv4 Enable DHCP On Set Static IP Address Configure the IPv4 settings IPv6 Enable IPv6 On Enable DHCPv6 Off Stateless Address...

Page 73: ... binary PostScript print jobs Notes Auto processes print jobs from computers using either Windows or Macintosh operating systems Off filters PostScript print jobs using the standard protocol Energy Efficient Ethernet On Off Auto Reduce power consumption when the printer does not receive data from the Ethernet network Note An asterisk next to a value indicates the factory default setting TCP IP Note...

Page 74: ...ess Specify a server address for Windows Internet Name Service WINS Enable BOOTP Off On Allow the BOOTP to assign a printer IP address Restricted Server List Specify an IP address for the TCP connections Notes Use a comma to separate each IP address You can add up to 50 IP addresses Restricted Server List Options Block All Ports Block Printing Only Block Printing and HTTP Only Specify how the IP a...

Page 75: ...ections Note An asterisk next to a value indicates the factory default setting SNMP Note This menu appears only in network printers or printers that are attached to print servers Menu item Description SNMP Versions 1 and 2c Enabled Off On Allow SNMP Set Off On Enable PPM MIB Off On SNMP Community Configure Simple Network Management Protocol SNMP versions 1 and 2c to install print drivers and applic...

Page 76: ...t to a value indicates the factory default setting IPSec Note This menu appears only in network printers or printers that are attached to print servers Menu item Description Enable IPSec Off On Enable Internet Protocol Security IPSec Base Configuration Default Compatibility Secure Set the IPSec base configuration Note This menu item appears only when Enable IPSec is set to On DH Diffie Hellman Group...

Page 77: ...te Specify an IPSec certificate Note This menu item appears only when Enable IPSec is set to On Pre Shared Key Authenticated Connections Host x Configure the authenticated connections of the printer Note These menu items appear only when Enable IPSec is set to On Certificate Authenticated Connections Host x Address subnet Note An asterisk next to a value indicates the factory default setting 802 1x N...

Page 78: ...tion on the same line Note An asterisk next to a value indicates the factory default setting HTTP FTP Settings Menu item Description Enable HTTP Server Off On Access the Embedded Web Server to monitor and manage the printer Enable HTTPS Off On Enable Hypertext Transfer Protocol Secure HTTPS to encrypt data transferring to and from the print server Force HTTPS Connections On Off Force the printer t...

Page 79: ...guage Note When this setting is disabled the printer does not examine incoming data and uses the default printer language specified in the Setup menu PS SmartSwitch Off On Set the printer to switch to PostScript emulation when a print job received through a USB port requires it regardless of the default printer language Note When this setting is disabled the printer does not examine incoming data a...

Page 80: ...ct access to network sites External network address Specify the network addresses with restricted access E mail address for notification Specify an e mail address to send a notification of logged events Ping frequency 1 300 10 Specify the network query interval in seconds Subject Specify the subject and message of the notification e mail Message Note An asterisk next to a value indicates the factory ...

Page 81: ...ss to the printer functions Administrative Menus Security Menu Network Ports Menu Paper Menu Reports Menu Function Configuration Menus Supplies Menu Option Card Menu SE Menu Device Menu Control access to the printer menu settings Device Management Remote Management Firmware Updates Apps Configuration Embedded Web Server Access Import Export All Settings Out of Service Erase Control access to the pri...

Page 82: ...ssword PIN Create local accounts to manage access to the printer functions User Name Password Accounts Add User User Name Accounts Add User Password Accounts Add User PIN Accounts Add User Default Login Methods Note This menu appears only when you configure the settings in the Local Accounts menu Menu item Description Control Panel User Name Password User Name Password PIN Specify the default login...

Page 83: ...m Description Schedules Add New Schedule Schedule access to the front USB port Security Audit Log Menu item Description Enable Audit Off On Record the events in the secure audit log and remote syslog Enable Remote Syslog Off On Send audit logs to a remote server Remote Syslog Server Specify the remote syslog server Remote Syslog Port 1 65535 514 Specify the remote syslog port Remote Syslog Method ...

Page 84: ...Use 3 local3 20 Local Use 4 local4 21 Local Use 5 local5 22 Local Use 6 local6 23 Local Use 7 local7 Specify a facility code that the printer uses when sending log events to a remote server Severity of Events to Log 0 Emergency 1 Alert 2 Critical 3 Error 4 Warning 5 Notice 6 Informational 7 Debug Specify the priority level cutoff for logging messages and events Remote Syslog Non Logged Events Off ...

Page 85: ...istrator when the log fills its allotted memory Full Alert Level 1 99 90 E mail Log Exported Alert Off On Send e mail notification to the administrator when a log is exported E mail Log Settings Changed Alert Off On Send e mail notification to the administrator when Enable Audit is set Log Line Endings LF n CR r CRLF r n Specify how the log file terminates the end of each line Digitally Sign Exports O...

Page 86: ...mit is reached the print jobs for that user name and PIN are deleted Confidential Job Expiration Off 1 Hour 4 Hours 24 Hours 1 Week Set the expiration time for confidential print jobs Notes If this menu item is changed while confidential print jobs reside in the printer memory or hard disk then the expiration time for those print jobs does not change to the new default value If the printer is turned ...

Page 87: ...fault setting Disk Encryption Note This menu appears only when a hard disk is installed Menu item Description Status Enabled Disabled Enable disk encryption Start encryption Erase Temporary Data Files Menu item Description Stored in onboard memory Off On Delete all files stored on the printer memory Note An asterisk next to a value indicates the factory default setting Solutions LDAP Settings Menu ...

Page 88: ...2 Specify the password length Enable Password PIN Reveal Show the password or personal identification number Note An asterisk next to a value indicates the factory default setting Reports Menu Settings Page Menu item Description Menu Settings Page Print a report that contains the printer menus Device Menu item Description Device Information Print a report that contains information about the printer...

Page 89: ...able Wi Fi Direct is set to On Help Menu item Description Print All Guides Prints all the guides Connection Guide Provides information about connecting the printer locally USB or to a network Information Guide Provides information about the printer Media Guide Provides information about loading paper and specialty media Mono Quality Guide Provides information about solving mono print quality setti...

Page 90: ...For non touch screen printer models press to navigate through the settings Understanding the printer menus 90 ...

Page 91: ...anel navigate to Settings Device Maintenance Out of Service Erase Sanitize all information on nonvolatile memory For non touch screen printer models press to navigate through the settings 2 Select either Start initial setup or Leave printer offline Erasing printer hard disk memory 1 From the control panel navigate to Settings Device Maintenance Out of Service Erase Sanitize all information on hard...

Page 92: ...els press to navigate through the settings 2 Select Restore all settings Statement of Volatility Type of memory Description Volatile memory The printer uses standard random access memory RAM to buffer temporarily user data during simple print and copy jobs Non volatile memory The printer may use two forms of non volatile memory EEPROM and NAND flash memory Both types are used to store the operating...

Page 93: ...nter hard disk Degaussing Flushes the hard disk with a magnetic field that erases stored data Crushing Physically compresses the hard disk to break component parts and render them unreadable Milling Physically shreds the hard disk into small metal bits Note To guarantee that all data are completely erased destroy physically each hard disk where data is stored Securing the printer 93 ...

Page 94: ...re the printer to send e mail alerts when supplies are low when paper must be changed or added or when there is a paper jam 1 Open a web browser and then type the printer IP address in the address field Notes View the printer IP address on the printer home screen The IP address appears as four sets of numbers separated by periods such as 123 123 123 123 If you are using a proxy server then temporar...

Page 95: ...te The volume resets to the default value after the session is logged out or when the printer wakes from Sleep or Hibernate mode Networking Connecting the printer to a Wi Fi network Make sure that Active Adapter is set to Auto From the control panel navigate to Settings Network Ports Network Overview Active Adapter For non touch screen printer models press to navigate through the settings 1 From t...

Page 96: ... Fi Protected Setup Start Push Button Method For non touch screen printer models press to navigate through the settings 2 Follow the instructions on the display Using the personal identification number PIN method 1 From the control panel navigate to Settings Network Ports Wireless Wi Fi Protected Setup Start PIN Method For non touch screen printer models press to navigate through the settings 2 Cop...

Page 97: ...ction requests automatically Note Accepting push button requests automatically is not secured Note To know the password of the Wi Fi Direct network from the control panel navigate to Settings Reports Network Network Setup Page Connecting a mobile device to the printer Before connecting your mobile device make sure that Wi Fi Direct has been configured For more information see Configuring Wi Fi Direc...

Page 98: ...lick Show Wi Fi Direct printers and then select the printer Wi Fi Direct name 3 From the printer display take note of the eight digit PIN of the printer 4 Enter the PIN on the computer Note If the print driver is not already installed then Windows downloads the appropriate driver For Macintosh users 1 Click the wireless icon and then select the printer Wi Fi Direct name Note The string DIRECT xy w...

Page 99: ...vigate to the list of printers and then select IP 2 Type the IP address in the address field 3 Apply the changes Cleaning printer parts Cleaning the printer CAUTION SHOCK HAZARD To avoid the risk of electrical shock when cleaning the exterior of the printer unplug the power cord from the electrical outlet and disconnect all cables from the printer before proceeding Notes Perform this task after eve...

Page 100: ...and then unplug the power cord from the electrical outlet 2 Using a damp soft lint free cloth wipe the touch screen Notes Do not use household cleaners or detergents as they may damage the touch screen Make sure that the touch screen is dry after cleaning 3 Connect the power cord to the electrical outlet and then turn on the printer CAUTION POTENTIAL INJURY To avoid the risk of fire or electrical s...

Page 101: ...3 Remove the pick roller 4 Using a damp soft lint free cloth wipe the pick tires Note Apply isopropyl alcohol to the cloth 5 Insert the pick roller 6 Insert the tray Maintaining the printer 101 ...

Page 102: ...arning Potential Damage To prevent damage from electrostatic discharge touch any exposed metal frame of the printer before accessing or touching interior areas of the printer 3 Remove the pick roller 4 Apply isopropyl alcohol to a soft lint free cloth and then wipe the pick roller Maintaining the printer 102 ...

Page 103: ...5 Insert the pick roller 6 Close the multipurpose feeder 7 Turn on the printer Maintaining the printer 103 ...

Page 104: ...otes The estimated cartridge yield is based on the ISO IEC 19752 standard Extremely low print coverage for extended periods of time may negatively affect actual yield To order a toner cartridge contact the place where you purchased the printer Ordering an imaging unit To order an imaging unit contact the place where you purchased the printer Ordering a maintenance kit To order a maintenance kit co...

Page 105: ...2 Remove the used toner cartridge 3 Unpack the new toner cartridge and then shake it to redistribute the toner Maintaining the printer 105 ...

Page 106: ...he imaging unit 1 Open door A Warning Potential Damage To prevent damage from electrostatic discharge touch any exposed metal frame of the printer before accessing or touching interior areas of the printer 2 Remove the toner cartridge Maintaining the printer 106 ...

Page 107: ...ential Damage Do not expose the imaging unit to direct light for more than 10 minutes Extended exposure to light may cause print quality problems Warning Potential Damage Do not touch the photoconductor drum Doing so may affect the quality of future print jobs 5 Remove the packing material Maintaining the printer 107 ...

Page 108: ... 111 1 Open door C CAUTION HOT SURFACE The inside of the printer might be hot To reduce the risk of injury from a hot component allow the surface to cool before touching it Warning Potential Damage To prevent damage from electrostatic discharge touch any exposed metal frame of the printer before accessing or touching interior areas of the printer Maintaining the printer 108 ...

Page 109: ...2 Unlock the fuser 3 Remove the used fuser 4 Unpack the new fuser Maintaining the printer 109 ...

Page 110: ...5 Insert the new fuser until it clicks into place 6 Lock the fuser 7 Close the door Maintaining the printer 110 ...

Page 111: ...r C CAUTION HOT SURFACE The inside of the printer might be hot To reduce the risk of injury from a hot component allow the surface to cool before touching it Warning Potential Damage To prevent damage from electrostatic discharge touch any exposed metal frame of the printer before accessing or touching interior areas of the printer Maintaining the printer 111 ...

Page 112: ...he hot roll fuser 5 Remove the used hot roll fuser 6 Unpack the new hot roll fuser 7 Insert the new hot roll fuser until it clicks into place 8 Lock the hot roll fuser 9 Close the door Maintaining the printer 112 ...

Page 113: ... Remove the standard bin cover CAUTION HOT SURFACE The inside of the printer might be hot To reduce the risk of injury from a hot component allow the surface to cool before touching it Warning Potential Damage To prevent damage from electrostatic discharge touch any exposed metal frame of the printer before accessing or touching interior areas of the printer Maintaining the printer 113 ...

Page 114: ...3 Remove the used hot roll fuser wiper Maintaining the printer 114 ...

Page 115: ...4 Insert the new hot roll fuser wiper 5 Install the standard bin cover 6 Turn on the printer Replacing the transfer roller 1 Open door A Maintaining the printer 115 ...

Page 116: ...e accessing or touching interior areas of the printer 2 Remove the toner cartridge 3 Remove the imaging unit 4 Remove the used transfer roller CAUTION HOT SURFACE The inside of the printer might be hot To reduce the risk of injury from a hot component allow the surface to cool before touching it Maintaining the printer 116 ...

Page 117: ...5 Unpack the new transfer roller 6 Insert the new transfer roller until it clicks into place Maintaining the printer 117 ...

Page 118: ...ose the door Replacing the pick roller 1 Remove the tray Warning Potential Damage To prevent damage from electrostatic discharge touch any exposed metal frame of the printer before accessing or touching interior areas of the printer Maintaining the printer 118 ...

Page 119: ...t the tray Replacing the pick roller in the multipurpose feeder 1 Open the multipurpose feeder Warning Potential Damage To prevent damage from electrostatic discharge touch any exposed metal frame of the printer before accessing or touching interior areas of the printer Maintaining the printer 119 ...

Page 120: ...2 Remove the used pick roller 3 Unpack the new pick roller Maintaining the printer 120 ...

Page 121: ...4 Install the new pick roller 5 Close the multipurpose feeder Maintaining the printer 121 ...

Page 122: ...Replacing the staple cartridge in the staple finisher 1 Open door F 2 Remove the staple cartridge holder 3 Remove the empty staple cartridge Maintaining the printer 122 ...

Page 123: ...tridge 5 Insert the staple cartridge holder 6 Close the door Replacing the staple cartridge in the staple hole punch finisher 1 Depending on the staple cartridge to replace open either door F or door G Maintaining the printer 123 ...

Page 124: ...2 Remove the staple cartridge holder 3 Remove the empty staple cartridge 4 Insert the new staple cartridge 5 Insert the staple cartridge holder 6 Close the door Maintaining the printer 124 ...

Page 125: ...ll it to the new location Use caution when passing over thresholds and breaks in flooring If the printer does not have a caster base but is configured with optional trays or output options then remove the output options and lift the printer off the trays Do not try to lift the printer and any options at the same time Always use the handholds on the printer to lift it Any cart used to move the printe...

Page 126: ...Hibernate mode before sending a print job To wake the printer from Hibernate mode press the power button The Embedded Web Server is disabled when the printer is in Hibernate mode Adjusting the brightness of the display Note This setting is available only in some printer models 1 From the control panel navigate to Settings Device Preferences For non touch screen printer models press to navigate thr...

Page 127: ...um paper fill indicator Do not slide the paper into the tray Load paper as shown in the illustration Make sure the guides in the tray or the multipurpose feeder are properly positioned and are not pressing tightly against the paper or envelopes Push the tray firmly into the printer after loading paper If you are loading prepunched paper for use with the staple finisher then make sure the holes on the...

Page 128: ...xtender is longer than the size of the paper you are printing on then the edges become uneven and the paper is not stacked properly For example if you are printing on a letter size paper and the bin extender is set to legal size then the paper does not stack properly If paper needs to be returned to the mailbox bin then insert the paper under the bin arm and then push the paper all the way back No...

Page 129: ... and type are set correctly on the computer or printer control panel Store paper per manufacturer recommendations Identifying jam locations Notes When Jam Assist is set to On the printer flushes blank pages or pages with partial prints after a jammed page has been cleared Check your printed output for blank pages When Jam Recovery is set to On or Auto the printer reprints jammed pages Clearing jams...

Page 130: ... 1 Finisher or output option bin 2 Standard bin 3 Door A 4 Multipurpose feeder 5 Trays 6 Finisher or output option rear door Door H Door K Door L Door N Door P 7 Door C 8 Stapler door Door F Door G Clearing jams 130 ...

Page 131: ...hat all paper fragments are removed 3 Insert the tray Paper jam in door A 1 Open door A Warning Potential Damage To prevent damage from electrostatic discharge touch any exposed metal frame of the printer before accessing or touching interior areas of the printer Clearing jams 131 ...

Page 132: ...l Damage Do not expose the imaging unit to direct light for more than 10 minutes Extended exposure to light may cause print quality problems Warning Potential Damage Do not touch the photoconductor drum Doing so may affect the quality of future print jobs Clearing jams 132 ...

Page 133: ...4 Pull out the duplex unit 5 Remove the jammed paper Note Make sure that all paper fragments are removed 6 Insert the duplex unit 7 Insert the imaging unit Clearing jams 133 ...

Page 134: ...from a hot component allow the surface to cool before touching it Warning Potential Damage To prevent damage from electrostatic discharge touch any exposed metal frame of the printer before accessing or touching interior areas of the printer 2 Remove the jammed paper from any of the following areas Note Make sure that all paper fragments are removed Clearing jams 134 ...

Page 135: ... Fuser area Below the fuser area Duplex area 3 Close the door Paper jam in the standard bin Remove the jammed paper Note Make sure that all paper fragments are removed Clearing jams 135 ...

Page 136: ...ipurpose feeder 1 Remove paper from the multipurpose feeder 2 Remove the jammed paper Note Make sure that all paper fragments are removed 3 Flex fan and align the paper edges before loading 4 Reload paper Clearing jams 136 ...

Page 137: ... Remove the jammed paper Note Make sure that all paper fragments are removed 3 Close the door Paper jam in the high capacity output expander 1 Open door L 2 Remove the jammed paper Note Make sure that all paper fragments are removed Clearing jams 137 ...

Page 138: ...3 Close the door Paper jam in the 4 bin mailbox Paper jam in door N 1 Open door N 2 Remove the jammed paper Note Make sure that all paper fragments are removed Clearing jams 138 ...

Page 139: ... bin Remove the jammed paper Note Make sure that all paper fragments are removed Paper jam in the staple finisher Paper jam in door H 1 Open door H 2 Remove the jammed paper Note Make sure that all paper fragments are removed Clearing jams 139 ...

Page 140: ...in Remove the jammed paper Note Make sure that all paper fragments are removed Paper jam in the staple hole punch finisher Paper jam in door P 1 Open door P 2 Remove the jammed paper Note Make sure that all paper fragments are removed Clearing jams 140 ...

Page 141: ... Close the door Paper jam in the staple hole punch finisher bin Remove the jammed paper Note Make sure that all paper fragments are removed Staple jam in the staple finisher 1 Open door F Clearing jams 141 ...

Page 142: ...2 Remove the staple cartridge holder 3 Remove the loose staples Clearing jams 142 ...

Page 143: ... bracket Note If the staples are at the rear of the cartridge then shake the cartridge downward to bring the staples near the metal bracket 5 Insert the staple cartridge holder until it clicks into place 6 Close the door Clearing jams 143 ...

Page 144: ...Staple jam in the staple hole punch finisher 1 Depending on the staple jam location open either door F or door G 2 Remove the staple cartridge holder Clearing jams 144 ...

Page 145: ...he loose staples 4 Press the staples against the metal bracket Note If the staples are at the rear of the cartridge then shake the cartridge downward to bring the staples near the metal bracket Clearing jams 145 ...

Page 146: ...5 Insert the staple cartridge holder until it clicks into place 6 Close the door Clearing jams 146 ...

Page 147: ... or white pages on page 148 Dark print on page 148 Fine lines are not printed correctly on page 150 Folded or wrinkled paper on page 151 Gray background on page 152 Horizontal light bands on page 158 Incorrect margins on page 153 Light print on page 153 Mottled print and dots on page 155 Paper curl on page 172 Print crooked or skewed on page 155 Repeating defects on page 162 Troubleshooting 147 ...

Page 148: ...ge 157 Vertical dark bands on page 160 Vertical dark lines or streaks on page 160 Vertical dark streaks with print missing on page 161 Vertical light bands on page 159 Vertical white lines on page 159 Print quality is poor Blank or white pages Contact your dealer Dark print Troubleshooting 148 ...

Page 149: ... the control panel navigate to Settings Print Quality Toner Darkness c Print the document Is the print dark Go to step 3 The problem is solved Step 3 a Depending on your operating system specify the paper type from the Printing Preferences or Print dialog Notes Make sure that the setting matches the paper loaded You can also change the setting on the printer control panel Navigate to Settings Pape...

Page 150: ...screen printer models press to navigate through the settings Action Yes No Step 1 a Check if the printer is using a genuine and supported toner cartridge Note If the cartridge is not supported then install a supported one b Print the document Are fine lines not printed correctly Go to step 2 The problem is solved Step 2 a Adjust the print quality settings 1 From the control panel navigate to Settin...

Page 151: ...p 2 The problem is solved Step 2 a Load paper from a fresh package Note Paper absorbs moisture due to high humidity Store paper in its original wrapper until you are ready to use it b Print the document Is the paper folded or wrinkled Go to step 3 The problem is solved Step 3 a Depending on your operating system specify the paper type from the Printing Preferences or Print dialog Notes Make sure t...

Page 152: ...Go to step 2 The problem is solved Step 2 a Check if the printer is using a genuine and supported toner cartridge Note If the toner cartridge is not supported then install a supported one b Print the document Does gray background appear on prints Go to step 3 The problem is solved Step 3 a Depending on your operating system specify the paper type from the Printing Preferences or Print dialog Notes...

Page 153: ...pending on your operating system specify the paper size from the Printing Preferences or Print dialog Notes Make sure that the setting matches the paper loaded You can also change the setting from the printer control panel Navigate to Settings Paper Tray Configuration Paper Size Type b Print the document Are the margins correct The problem is solved Contact your dealer Light print Note Before solvi...

Page 154: ...aper type from the Printing Preferences or Print dialog Notes Make sure that the setting matches the paper loaded You can also change the setting on the printer control panel Navigate to Settings Paper Tray Configuration Paper Size Type b Print the document Is the print light Go to step 4 The problem is solved Step 4 Check if the print resolution is set to 600 dpi a From the control panel navigate ...

Page 155: ... Is the print mottled Go to step 2 The problem is solved Step 2 Check the printer for leaked toner contamination Is the printer free of leaked toner Go to step 3 Contact your dealer Step 3 Check the status of the imaging unit From the control panel navigate to Status Supplies Supplies Is the imaging unit near end of life Contact your dealer Contact your dealer Print crooked or skewed Note Before s...

Page 156: ...rinting on a supported paper b Print the document Is the print crooked or skewed Contact your dealer The problem is solved Solid black pages Note Before solving the problem print the Print Quality Test Pages From the control panel navigate to Settings Troubleshooting Print Quality Test Pages For non touch screen printer models press to navigate through the settings Action Yes No a Check if the pri...

Page 157: ... one b Print the document Are text or images cut off Contact your dealer The problem is solved Toner easily rubs off Note Before solving the problem print the Print Quality Test Pages From the control panel navigate to Settings Troubleshooting Print Quality Test Pages For non touch screen printer models press to navigate through the settings Action Yes No Step 1 a Check if the printer is using a g...

Page 158: ...the Print Quality Test Pages From the control panel navigate to Settings Troubleshooting Print Quality Test Pages For non touch screen printer models press to navigate through the settings Action Yes No Step 1 a Check if the printer is using a genuine and supported toner cartridge Note If the cartridge is not supported then install a supported one b Print the document Do horizontal light bands app...

Page 159: ...ocument Do vertical light bands appear on prints Contact your dealer The problem is solved Vertical white lines Note Before solving the problem print the Print Quality Test Pages From the control panel navigate to Settings Troubleshooting Print Quality Test Pages For non touch screen printer models press to navigate through the settings Action Yes No Step 1 a Check if the printer is using a genuin...

Page 160: ...odels press to navigate through the settings Action Yes No a Check if the printer is using a genuine and supported toner cartridge Note If the toner cartridge is not supported then install a supported one b Print the document Do vertical dark bands appear on prints Contact your dealer The problem is solved Vertical dark lines or streaks Note Before solving the problem print the Print Quality Test ...

Page 161: ...it to direct light for more than 10 minutes Extended exposure to light can cause print quality problems Warning Potential Damage Do not touch the photoconductor drum under the imaging unit Doing so may affect the quality of future print jobs b Print the document Do vertical dark lines or streaks appear on prints Go to step 3 The problem is solved Step 3 a Replace the imaging unit b Print the docum...

Page 162: ...e problem is solved Go to step 3 Step 3 a Check if the ports are working and if the cables are securely connected to the computer and the printer For more information see the setup documentation that came with the printer b Print the document Is the document printed The problem is solved Go to step 4 Step 4 a Turn off the printer wait for about 10 seconds and then turn on the printer b Print the d...

Page 163: ...navigate through the settings b Print the document Is the printer printing slow Go to step 3 The problem is solved Step 3 a Depending on your operating system specify the print resolution from the Printing Preferences or Print dialog b Set the resolution to 600 dpi c Print the document Is the printer printing slow Go to step 4 The problem is solved Step 4 a From the control panel navigate to Setti...

Page 164: ...dia Texture and Media Weight match the paper being loaded From the control panel navigate to Settings Paper Media Configuration Media Types For non touch screen printer models press to navigate through the settings Note Rough paper texture and heavy paper weight may print more slowly b Print the document Is the printer printing slow Go to step 7 The problem is solved Step 7 Remove held jobs Is the ...

Page 165: ...n your operating system specify the paper size and paper type from the Printing Preferences or Print dialog Note You can also change the settings on the printer control panel Navigate to Settings Paper Tray Configuration Paper Size Type For non touch screen printer models press to navigate through the settings b Make sure that the settings match the paper loaded c Print the document Is the document...

Page 166: ...nerate a new file and then print the documents Are the documents printed The problem is solved Go to step 3 Step 3 If you are printing from the Internet then the printer may be reading the multiple job titles as duplicates a Open the Printing Preferences dialog b From the Print and Hold tab click Use Print and Hold and then click Keep duplicate documents c From the Confidential Print section enter a...

Page 167: ...set the breaker Go to step 3 Step 3 Check if the printer is on Is the printer on Go to step 4 Turn on the printer Step 4 Check if the printer is in Sleep or Hibernate mode Is the printer in Sleep or Hibernate mode Press the power button to wake the printer Go to step 5 Step 5 Check if the cables connecting the printer and the computer are inserted to the correct ports Are the cables inserted to th...

Page 168: ...o the correct port Step 3 Check if the flash drive is supported For more information see Supported flash drives and file types on page 40 Is the flash drive supported Go to step 4 Insert a supported flash drive Step 4 a Check if the USB port is enabled For more information see Enabling the USB port on page 168 b Remove and then insert the flash drive Does the printer recognize the flash drive The problem...

Page 169: ...t Explorer version 11 or later Microsoft Edge Safari version 6 or later Google ChromeTM version 32 or later Mozilla Firefox version 24 or later Is your browser supported Go to step 4 Install a supported browser Step 4 Check if the network connection is working Is the network connection working Go to step 5 Contact your administrator Step 5 Make sure that the cable connections to the printer and pr...

Page 170: ...inactive or the network cable may be unplugged or malfunctioning Contact your administrator for assistance Hardware options problems Defective flash detected Contact your dealer Not enough free space in flash memory for resources Contact your dealer Unformatted flash detected Try one or more of the following From the control panel select Continue to stop the defragmentation and continue printing Form...

Page 171: ...t any and all of these risks and to proceed with the use of non genuine supplies or parts in your printer depending on your printer model from the control panel press and hold X and or X and simultaneously for 15 seconds If you do not want to accept these risks then remove the third party supply or part from your printer and install a genuine supply or part from the printer manufacturer Paper feed...

Page 172: ...document that you are trying to print open the Print dialog and then select Collate b Print the document Is the document collated correctly The problem is solved Go to step 3 Step 3 a Reduce the number of pages to print b Print the document Are the pages collated correctly The problem is solved Contact your dealer Paper curl Action Yes No Step 1 a Adjust the guides in the tray to the correct posit...

Page 173: ...rint on the other side of the paper a Remove paper flip it over and then reload paper b Print the document Is the paper curled Go to step 4 The problem is solved Step 4 a Load paper from a fresh package Note Paper absorbs moisture due to high humidity Store paper in its original wrapper until you are ready to use it b Print the document Is the paper curled Contact your dealer The problem is solved ...

Page 174: ... Contact your dealer Paper frequently jams Action Yes No Step 1 a Remove the tray b Check if paper is loaded correctly Notes Make sure that the paper guides are positioned correctly Make sure that the stack height is below the maximum paper fill indicator Make sure to print on recommended paper size and type c Insert the tray d Print the document Do paper jams occur frequently Go to step 2 The prob...

Page 175: ...navigate to Settings Device Notifications Jam Content Recovery For non touch screen printer models press to navigate through the settings b In the Jam Recovery menu select On or Auto and then apply the changes c Print the document Are the jammed pages reprinted The problem is solved Contact your dealer Contacting your dealer Before contacting your dealer make sure to have the following information ...

Page 176: ...g optional hardware or memory devices sometime after setting up the printer then turn the printer off and unplug the power cord from the electrical outlet before continuing If you have any other devices attached to the printer then turn them off as well and unplug any cables going into the printer 1 Turn off the printer 2 Unplug the power cord from the electrical outlet and then from the printer 3...

Page 177: ...lectrical shock if you are accessing the controller board or installing optional hardware or memory devices sometime after setting up the printer then turn the printer off and unplug the power cord from the electrical outlet before continuing If you have any other devices attached to the printer then turn them off as well and unplug any cables going into the printer 1 Turn off the printer 2 Unplug...

Page 178: ...4 Unpack the memory card Warning Potential Damage Do not touch the connection points along the edge of the card 5 Insert the memory card until it clicks into place Upgrading and migrating 178 ...

Page 179: ...controller board or installing optional hardware or memory devices sometime after setting up the printer then turn the printer off and unplug the power cord from the electrical outlet before continuing If you have any other devices attached to the printer then turn them off as well and unplug any cables going into the printer 1 Turn off the printer 2 Unplug the power cord from the electrical outle...

Page 180: ...e edge of the card 5 Push the card firmly into place Note The entire length of the connector on the card must touch and be flush against the controller board Warning Potential Damage Improper installation of the card may cause damage to the card and the controller board Upgrading and migrating 180 ...

Page 181: ...dware or memory devices sometime after setting up the printer then turn the printer off and unplug the power cord from the electrical outlet before continuing If you have any other devices attached to the printer then turn them off as well and unplug any cables going into the printer 1 Turn off the printer 2 Unplug the power cord from the electrical outlet and then from the printer 3 Using a flat h...

Page 182: ... disk 5 Attach the hard disk and then connect the hard disk interface cable to the controller board Warning Potential Damage Do not touch or press the center of the hard disk 6 Close the access cover Upgrading and migrating 182 ...

Page 183: ...rdware or memory devices sometime after setting up the printer then turn the printer off and unplug the power cord from the electrical outlet before continuing If you have any other devices attached to the printer then turn them off as well and unplug any cables going into the printer 1 Turn off the printer and then unplug the power cord from the electrical outlet 2 Using a flat head screwdriver op...

Page 184: ... the internal solutions port ISP kit 1 ISP 2 Mounting bracket 3 Thumbscrews 4 If necessary remove the printer hard disk 5 Insert the bracket into the board until it clicks into place Upgrading and migrating 184 ...

Page 185: ... bracket 7 If necessary attach the hard disk to the ISP a Remove the hard disk bracket b Connect the hard disk to the ISP Warning Potential Damage Do not touch or press the center of the hard disk Upgrading and migrating 185 ...

Page 186: ...or memory devices sometime after setting up the printer then turn the printer off and unplug the power cord from the electrical outlet before continuing If you have any other devices attached to the printer then turn them off as well and unplug any cables going into the printer CAUTION TIPPING HAZARD Installing one or more options on your printer or MFP may require a caster base furniture or other...

Page 187: ... 202 Installing the 2100 sheet tray CAUTION SHOCK HAZARD To avoid the risk of electrical shock if you are accessing the controller board or installing optional hardware or memory devices sometime after setting up the printer then turn the printer off and unplug the power cord from the electrical outlet before continuing If you have any other devices attached to the printer then turn them off as we...

Page 188: ...20 kg 44 lb then it may require two or more people to lift it safely 5 Align the printer with the tray and then lower the printer until it clicks into place CAUTION POTENTIAL INJURY If the printer weight is greater than 20 kg 44 lb then it may require two or more people to lift it safely Upgrading and migrating 188 ...

Page 189: ...hock connect the power cord to an appropriately rated and properly grounded electrical outlet that is near the product and easily accessible 7 Turn on the printer Add the tray in the print driver to make it available for print jobs For more information see Adding available options in the print driver on page 202 Upgrading and migrating 189 ...

Page 190: ... or other feature to prevent instability causing possible injury For more information on supported configurations contact the place where you purchased the printer 1 Turn off the printer 2 Unplug the power cord from the electrical outlet and then from the printer 3 Unpack the mailbox 4 Remove the printer top cover Upgrading and migrating 190 ...

Page 191: ...OTENTIAL INJURY To avoid the risk of fire or electrical shock connect the power cord to an appropriately rated and properly grounded electrical outlet that is near the product and easily accessible 7 Turn on the printer Add the mailbox in the print driver to make it available for print jobs For more information see Adding available options in the print driver on page 202 Upgrading and migrating 191...

Page 192: ...ions contact the place where you purchased the printer 1 Turn off the printer 2 Unplug the power cord from the electrical outlet and then from the printer 3 Unpack the output expander or high capacity output expander 4 Attach the guide bar to the output expander or high capacity output expander Note When installing multiple options attach the guide bar only to the option that is connected directly...

Page 193: ...b Insert the tabs of the guide bar into the output expander Upgrading and migrating 193 ...

Page 194: ...c Slide the guide bar to the right until it clicks into place 5 Remove the printer top cover Upgrading and migrating 194 ...

Page 195: ... at the bottom of the configuration 7 Connect the power cord to the printer and then to the electrical outlet CAUTION POTENTIAL INJURY To avoid the risk of fire or electrical shock connect the power cord to an appropriately rated and properly grounded electrical outlet that is near the product and easily accessible 8 Turn on the printer Add the output expander in the print driver to make it availabl...

Page 196: ... other feature to prevent instability causing possible injury For more information on supported configurations contact the place where you purchased the printer 1 Turn off the printer 2 Unplug the power cord from the electrical outlet and then from the printer 3 Unpack the staple finisher 4 Remove the printer top cover Upgrading and migrating 196 ...

Page 197: ...OTENTIAL INJURY To avoid the risk of fire or electrical shock connect the power cord to an appropriately rated and properly grounded electrical outlet that is near the product and easily accessible 7 Turn on the printer Add the staple finisher in the print driver to make it available for print jobs For more information see Adding available options in the print driver on page 202 Upgrading and migrat...

Page 198: ... other feature to prevent instability causing possible injury For more information on supported configurations contact the place where you purchased the printer 1 Turn off the printer 2 Unplug the power cord from the electrical outlet and then from the printer 3 Unpack the staple hole punch finisher 4 Remove the printer top cover Upgrading and migrating 198 ...

Page 199: ...OTENTIAL INJURY To avoid the risk of fire or electrical shock connect the power cord to an appropriately rated and properly grounded electrical outlet that is near the product and easily accessible 7 Turn on the printer Add the finisher in the print driver to make it available for print jobs For more information see Adding available options in the print driver on page 202 Upgrading and migrating 199...

Page 200: ...ions For drivers and utilities that are compatible with Mac OS X version 10 6 or earlier and for specific supported Linux or UNIX operating system versions go to our website For more information on software compatibility with all other operating systems contact customer support Installing the printer software Notes The print driver is included in the software installer package For Macintosh compute...

Page 201: ...k Add device Click Show Wi Fi Direct printers select a printer and then click Add device Click The printer that I want isn t listed and then from the Add Printer window do the following a Select Add a printer using a TCP IP address or hostname and then click Next b In the Hostname or IP address field type the printer IP address and then click Next Notes View the printer IP address on the printer ho...

Page 202: ...of hardware options and then add any installed options 3 Apply the changes Firmware Exporting or importing a configuration file You can export the configuration settings of your printer into a text file and then import the file to apply the settings to other printers 1 Open a web browser and then type the printer IP address in the address field Notes View the printer IP address on the printer home scree...

Page 203: ...ld Notes View the printer IP address on the printer home screen The IP address appears as four sets of numbers separated by periods such as 123 123 123 123 If you are using a proxy server then temporarily disable it to load the web page correctly 2 Click Settings Device Update Firmware 3 Do either of the following Click Check for updates I agree start update Upload the flash file a Browse to the flas...

Page 204: ...ill be incorporated in later editions Improvements or changes in the products or the programs described may be made at any time GOVERNMENT END USERS The Software Program and any related documentation are Commercial Items as that term is defined in 48 C F R 2 101 Computer Software and Commercial Computer Software Documentation as such terms are used in 48 C F R 12 212 or 48 C F R 227 7202 as applica...

Page 205: ...reported in conformance with ISO 9296 Note Some modes may not apply to your product 1 meter average sound pressure dBA Printing One sided 57 4064 29H 58 4064 69H Two sided 56 4064 29H 58 4064 69H Ready 14 Waste from Electrical and Electronic Equipment WEEE directive The WEEE logo signifies specific recycling programs and procedures for electronic products in countries of the European Union We encour...

Page 206: ...ection systems for batteries in your local community such as a battery recycling drop off location The separate collection of waste batteries assures appropriate treatment of waste including reuse and recycling and prevents any potential negative effects on human health and environment Please responsibly dispose of the batteries Information on disposal Information on the disposal of this equipment...

Page 207: ...acility For Spain Please contact the established collection system or your local authority for take back of your used products Cartridge disposal and treatment Regarding your used Sharp toner cartridges and other consumables from Sharp copiers multifunctional machines please observe that these waste products shall be treated properly according to the legal requirements in your area We recommend to...

Page 208: ...ure2 22 8 C 73 F Printer cartridge imaging unit short term shipping 40 to 40 C 40 to 104 F 1 Supplies shelf life is approximately 2 years This is based on storage in a standard office environment at 22 C 72 F and 45 humidity 2 Wet bulb temperature is determined by the air temperature and the relative humidity Laser notice The printer is certified in the U S to conform to the requirements of DHHS 21...

Page 209: ...epresent time averaged measurements Instantaneous power draws may be substantially higher than the average Sleep Mode This product is designed with an energy saving mode called Sleep Mode The Sleep Mode saves energy by lowering power consumption during extended periods of inactivity The Sleep Mode is automatically engaged after this product is not used for a specified period of time called the Slee...

Page 210: ...ould be multiplied by the time the product spends in each mode in order to calculate energy usage The total product energy usage is the sum of each mode s energy usage Applicability of Regulation EU 2019 2015 and EU 2019 2020 Per Commission Regulation EU 2019 2015 and EU 2019 2020 the light source contained within this product or its component is intended to be used for Image Capture or Image Proj...

Page 211: ...ikely to cause harmful interference in which case the user will be required to correct the interference at his own expense The manufacturer is not responsible for any radio or television interference caused by using other than recommended cables or by unauthorized changes or modifications to this equipment Unauthorized changes or modifications could void the user s authority to operate this equipmen...

Page 212: ...ic equipment This product satisfies the Class A limits of EN 55032 and safety requirements of EN 62368 1 United Kingdom UK conformity This product is in conformity with the protection requirements of the Electromagnetic Compatibility Regulations 2016 the Electrical Equipment Safety Regulations 2016 and the Restriction of the Use of Certain Hazardous Substances in Electrical and Electronic Equipment...

Page 213: ...e staple finisher 141 in the staple finisher bin 139 in the staple hole punch finisher 140 in the staple hole punch finisher bin 140 in trays 131 clearing staple jam in the staple hole punch finisher 144 collated printing does not work 172 computer connecting to the printer 98 confidential print jobs 41 configuring Eco Mode setting 16 configuring Eco Settings 16 configuring supply notifications 94 configurin...

Page 214: ...d disk 181 installing the 2100 sheet tray 187 installing the 4 bin mailbox 190 installing the high capacity output expander 192 installing the output expander 192 installing the print driver 200 installing the printer software 200 installing the staple finisher 196 installing the staple hole punch finisher 198 installing trays 186 internal options firmware card 176 flash memory 176 font card 176 inter...

Page 215: ... 136 paper jam in the output expander 137 paper jam in the staple finisher bin 139 paper jam in trays 131 paper jams avoiding 127 location 129 paper jams clearing in the standard bin 135 paper size setting 20 paper type setting 20 personal identification number method 96 pick roller replacing 118 pick roller in the multipurpose feeder cleaning 102 replacing 119 pick tires cleaning 100 placing separa...

Page 216: ...capacity output expander 137 in mailbox bin 138 in the duplex unit 134 in the fuser 134 in the multipurpose feeder 136 in the output expander 137 in the staple finisher bin 139 in the staple hole punch finisher 140 in the staple hole punch finisher bin 140 in trays 131 removing staple jam 141 144 repeat print jobs 41 Replace cartridge printer region mismatch 170 replacing pick roller in the multipurp...

Page 217: ...paper curl 172 repeating defects 162 skewed print 155 solid black pages 156 text or images cut off 157 toner easily rubs off 157 vertical dark bands 160 vertical dark lines or streaks 160 vertical dark streaks with print missing 161 vertical light bands 159 vertical white lines 159 white pages 148 U unable to read flash drive troubleshooting print 168 Unformatted flash detected 170 Universal paper c...

Reviews: