191
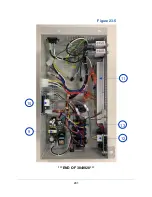
5. Locate the gray rectangle connector labeled as J2 (see Figure 22-3) on the
Alarm/Relay Contact board supplied with the kit. This connector shows through
the knock-out opening previously removed on the electronics control module.
Note the location of the connector J1 (Figure 22-4) on the opposite side of the
board for use later.
6. Install the Alarm/Relay Contact board inside the electronics module using the
screws, standoffs, lockwashers, and nuts included with the kit. First, secure each
standoff inside the electronics module with a screw and lockwasher (screw and
lockwasher on outside of module). Then, place circuit board over standoff’s male
threads, and secure board with the four nuts.
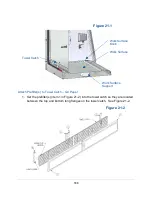
Figure 22-2
Knock-out
Figure 22-3
Figure 22-4
Gray
Connector
(J2)
(J1)
Summary of Contents for Logic+ A2
Page 149: ...149 208 240V...
Page 151: ...151 Blower only will not start...
Page 152: ...152 Lights only will not illuminate...
Page 153: ...153 UV Light will not illuminate...
Page 154: ...154 Airflow Alert activating...
Page 155: ...155 Filter Life Gauge not at 100 when new...
Page 156: ...156 Contamination in the work area...
Page 200: ...200 Figure 23 4 1 2 4 3 5 7 6 8 8...
Page 201: ...201 END OF 3849920 Figure 23 5 9 10 11 12 13...


