182
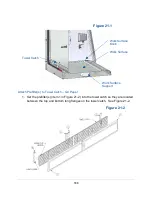
4. Install the UV ballast with the hardware (two screws, washers and nuts) provided
in the kit. See Figure 19-1 for reference.
5. Install the relay as shown in Figure 19-1, and secure it with the hardware
provided in the kit.
6. Identify the four circuit wire connectors described below, remove the protective
black cover from each connector with a utility knife, and wire the relay.
Relay Coil: 35-RED & 33BC-BLU (no orientation sensitivity)
NO (normally open): 25-ORG
COM (common): 3E-BLK
7. Connect the UV ballast into the electronics module wiring harness as described
below:
UV Ballast Wires
White wire
2E-WHT
Black wire
25-ORG
Red wires
16-RED & 17-RED (no orientation sensitivity)
Yellow wires
18-BLU & 19-BLU (no orientation sensitivity)
8. Reattach the electronics module to the top of the biosafety cabinet and tighten
the three acorn nuts.
9. Raise the sash and install the UV lamp by placing the lamp pins into each socket,
pressing down on the UV lamp (gently), and then rotating the lamp 90 degrees to
lock it in the lamp sockets.
10. Lower the sash to the fully closed position. Restore electrical power to the
biosafety cabinet.
Summary of Contents for Logic+ A2
Page 149: ...149 208 240V...
Page 151: ...151 Blower only will not start...
Page 152: ...152 Lights only will not illuminate...
Page 153: ...153 UV Light will not illuminate...
Page 154: ...154 Airflow Alert activating...
Page 155: ...155 Filter Life Gauge not at 100 when new...
Page 156: ...156 Contamination in the work area...
Page 200: ...200 Figure 23 4 1 2 4 3 5 7 6 8 8...
Page 201: ...201 END OF 3849920 Figure 23 5 9 10 11 12 13...


