background image

3-3-60

1AH

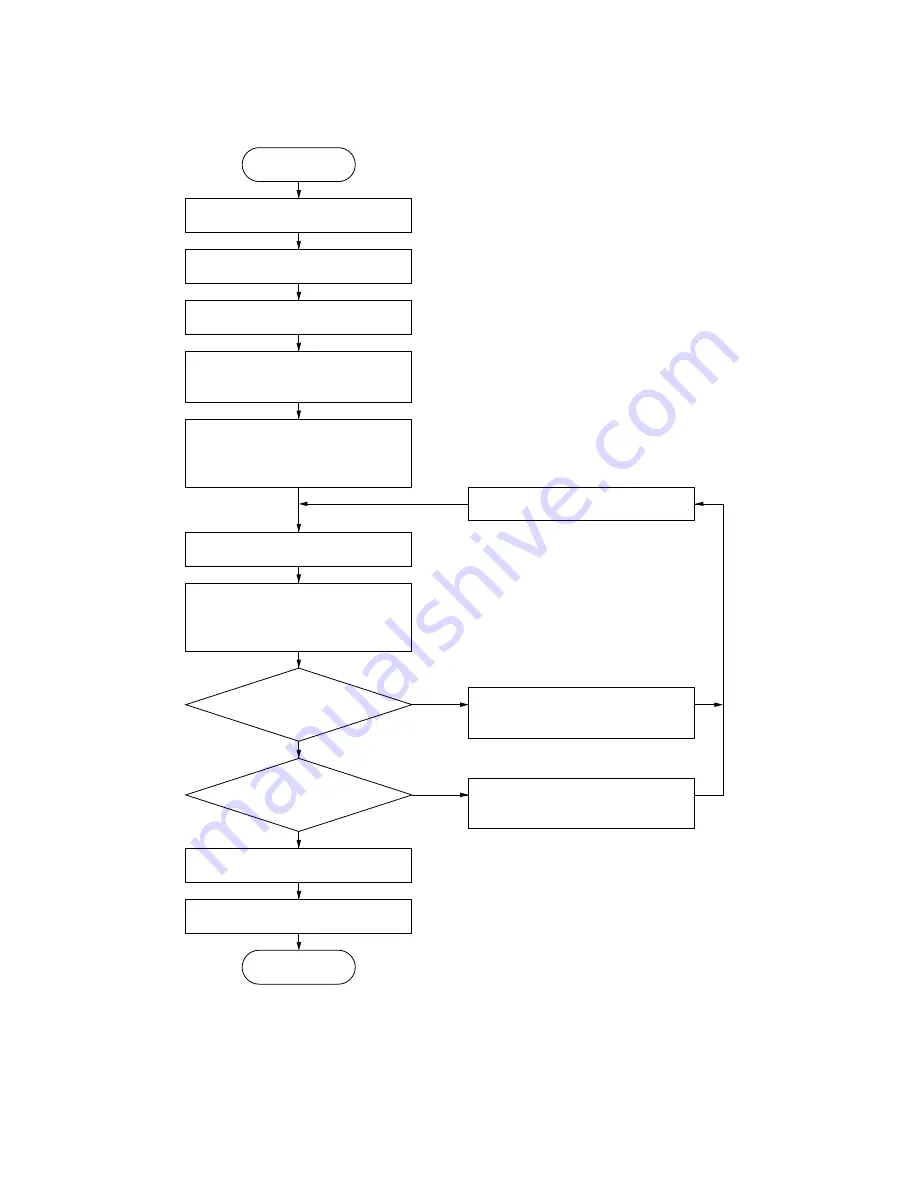
(10-1) Adjusting the exposure amount for enlargement mode (200%)

Procedure

Is the image

abnormally light?

Is the image

abnormally dark?

No

No

Yes

Yes

The copier enters ready mode.

· · · · · · ·

· · · · · · ·

The new setting is stored.

The current setting is displayed.

Select mode 1 with the exposure 
adjustment keys.

Decrease the setting with the zoom 
key.

Increase the setting with the zoom 
key.

Press the print key to make a test 
copy. (A test copy is made at 
200%)

Place the NTC on the contact 
glass and ensure there is A3/11" 

× 

17" paper present.

Press the print key.

Enter simulation mode.

Enter 29 with the numeric keys.

Press the print key.

Press the interrupt key.

Start

* Setting range: 102~242

Reference: 200

* Increasing the value makes the image 

lighter, and decreasing it makes the im-
age darker.

End

Press the stop/clear key.

Exit simulation mode.

Summary of Contents for DC-2060

Page 1: ...SERVICE MANUAL Published in Oct 99 841AH110 DC 2060 2560 DC 2060 2560...

Page 2: ...Service Manual DC 2050 2560...

Page 3: ...USED BATTERIES ACCORDING TO THE MANUFACTURER S INSTRUCTIONS CAUTION DOUBLE POLE NEUTRAL FUSING ATTENTION IL Y A DANGER D EXPLOSION S IL Y A REMPLACEMENT IN CORRECT DE LA BATTERIE REMPLACER UNIQUEMENT...

Page 4: ......

Page 5: ...sonnel to ensure the safety of their customers their machines as well as themselves during maintenance activities Service personnel are advised to read this booklet carefully to familiarize themselves...

Page 6: ...result from insufficient attention to or incorrect compliance with warning messages using this symbol CAUTION Bodily injury or damage to property may result from insufficient attention to or incorrec...

Page 7: ...the earth wire to an object not approved for the purpose may cause explosion or electric shock Never connect the ground cable to any of the following gas pipes lightning rods ground cables for telepho...

Page 8: ...2 Precautions for Maintenance WARNING Always remove the power plug from the wall outlet before starting machine disassembly Always follow the procedures for maintenance described in the service manual...

Page 9: ...rom chains and belts Handle the fixing section with care to avoid burns as it can be extremely hot Check that the fixing unit thermistor heat and press rollers are clean Dirt on them can cause abnorma...

Page 10: ...only a small amount of solvent at a time being careful not to spill Wipe spills off completely Ventilate the room well while using grease or solvents Allow applied solvents to evaporate completely bef...

Page 11: ...3 1 2 3 2 Main PCB 2 3 11 2 3 3 Operation unit PCB 2 3 18 III SET UP AND ADJUSTMENT SECTION 3 1 Installation 3 1 1 Unpacking and installation 3 1 1 3 1 2 Setting initial copy modes 3 1 13 3 1 3 Instal...

Page 12: ...2 3 6 5 Mechanical problems 3 6 45 3 7 Appendixes Timing chart No 1 3 7 1 Timing chart No 2 3 7 2 Timing chart No 3 3 7 3 Timing chart No 4 3 7 4 Timing chart No 5 3 7 5 Timing chart No 6 3 7 6 Timing...

Page 13: ...1AH MCE THEORY AND CONSTRUCTION SECTION I I Theory and Construction Section...

Page 14: ...1AH 1 1 Specifications 1 1 1 Specifications DC 2560 1 1 1 1 1 4 Specifications DC 2060 1 1 4...

Page 15: ...by the original and copy paper sizes 1 1 1 0 Pre set ratios Metric 1 2 00 1 1 730 1 1 630 1 1 410 1 1 270 1 1 220 1 1 150 1 1 100 1 1 060 1 0 910 1 0 900 1 0 860 1 0 810 1 0 770 1 0 750 1 0 700 1 0 65...

Page 16: ...nt ferrite carrier N27D black toner N27T 2 Toner density control Toner sensor 3 Toner replenishing automatic from a toner hopper Transfer system Single positive corona charging 5 0 kV DC Separation sy...

Page 17: ...py tray Options ADF RADF duplex unit paper feed unit special tray sorter stapler sorter key counter cassette heater Original size sensor metric models only Auto duplex unit optional Type To be install...

Page 18: ...ratios Metric 1 2 00 1 1 730 1 1 630 1 1 410 1 1 270 1 1 220 1 1 150 1 1 100 1 1 060 1 0 910 1 0 900 1 0 860 1 0 810 1 0 770 1 0 750 1 0 700 1 0 650 1 0 610 1 0 570 1 520 1 0 500 Copy speeds 100 magni...

Page 19: ...nt ferrite carrier N27D black toner N27T 2 Toner density control Toner sensor 3 Toner replenishing automatic from a toner hopper Transfer system Single positive corona charging 5 0 kV DC Separation sy...

Page 20: ...py tray Options ADF RADF duplex unit paper feed unit special tray sorter stapler sorter key counter cassette heater Original size sensor metric models only Auto duplex unit optional Type To be install...

Page 21: ...1AH 1 2 Handling Precautions 1 2 1 Drum 1 2 1 1 2 2 Developer and toner 1 2 1 1 2 3 Dehumidifier 1 2 1 1 2 4 Copy paper 1 2 1...

Page 22: ...al after effect from the exposure to light However exposure to direct sunlight 100 000 to 300 000 lx should be absolutely avoided 1 2 2 Developer and toner Store the developer and toner in a cool dark...

Page 23: ...s 1 3 10 1 2 Paper feed from bypass tray 1 3 14 2 Image formation section 1 3 18 2 1 Main charging section 1 3 19 2 2 Developing section 1 3 23 2 3 Cleaning section 1 3 30 3 Exposure section 1 3 31 4...

Page 24: ......

Page 25: ...lease lever 5 Fixing unit handle 6 Fixing unit 7 Fixing unit anchor screw 8 Fixing unit knob 9 Total counter 0 Toner cartridge Drawer 1 Drawer 2 Width adjustment lever Length adjustment lever Stack by...

Page 26: ...opy Presentation F R F F F R Border Erase Book Erase Margin 2 Sided Original 81 2 14 81 2 11R 81 2 11 17 11 15 11 51 2 81 2 Misfeed Add Paper Add Toner Mainte nance Check Paper Size Direction Recall U...

Page 27: ...resentation indicator Margin key Margin indicator Sorter mode selection key Sorter mode indicators Inch 1 Interrupt key Interrupt indicator 2 Energy saver key Energy saver indicator 3 Auto selection k...

Page 28: ...rmation section page 1 3 18 Main charging section page 1 3 19 Developing section page 1 3 23 Cleaning section page 1 3 30 3 Exposure section page 1 3 31 4 Transfer and separation sections page 1 3 38...

Page 29: ...ion page 1 3 48 2 Duplex section page 1 3 49 Figure 1 3 4 Machine cross section feedshift and duplex sections optional Figure 1 3 5 Machine cross section special tray optional 1 2 Paper path Special t...

Page 30: ...1AH 1 3 6 1 2 3 4 5 6 7 8 9 0 1 3 3 Drive system Figure 1 3 6 Drive system copier...

Page 31: ...feed pulley gear 30 Central lead roller pulley Recycle pulley 10 1 Scanner wire pulley 2 Scanner wire pulley Light source unit 2 3 Scanner wire 4 Scanner motor pulley 5 Scanner drive belt 6 Scanner dr...

Page 32: ...1 Idle gear 16 2 Idle gear 20 3 Duplex drive gear 4 Duplex joint gear 5 Refeed roller gear 6 Duplex registration clutch gear 7 Refeed clutch gear 8 Forwarding drive gear 18 9 Pulley 22 0 Forwarding b...

Page 33: ...ST gear 2 Paper feed clutch ST gear 7 Switchback feed gear 25 3 Gear 16T 8 Paper feed motor gear 4 Gear 67 32 9 Forwarding pulley gear 5 Switchback feed gear 25 0 Lift motor ST Figure 1 3 9 Drive syst...

Page 34: ...to the transfer separation section in sync with the exposure timing 1 1 Paper feed from the cassettes 123 4567 8 9 0 Figure 1 3 10 Cassette paper feed section 1 Upper pre transfer guide 2 Upper trans...

Page 35: ...te by the rotation of the forwarding pulley upper paper feed pulley and lower paper feed pulley Lower paper feed pulley Right feed pulley Desk paper conveying roller Left feed guide Lower paper feed s...

Page 36: ...ms 304 ms 20 ms 209 ms 95 ms 29 ms 130 ms 1 40 ms SM PFCL U FCL U RCL FSW ON RSW ON SHPSW OFF RSW OFF H G A F E D C B Automatic exposure mode original size A4 11 81 2 magnification ratio 100 1 Varies...

Page 37: ...on the upper paper feed clutch PFCL U goes off F 95 ms after the registration switch RSW is switched on by the leading edge of the primary feed paper the upper feed clutch FCL U goes off the paper arr...

Page 38: ...utch BYPCL comes on the drive motor DM drive is transmitted to the SB upper paper feed roller and the SB lower paper feed roller and the primary paper feed starts The SB lower paper feed roller rotate...

Page 39: ...1AH 1 3 15 Figure 1 3 13 Bypass paper feed section block diagram CN2 10 CN2 14 CN2 13 MPCB BYPSOL BYPCL BYPPSW...

Page 40: ...40 ms 50 ms 300 ms 180 ms BYPCL RCL RSW ON SHPSW ON RSW OFF 172 ms 1 Forward Reverse G A F E D C B Manual exposure mode original size A3 11 7 copy paper A5R 51 2 81 2 magnification ratio 50 1 Varies d...

Page 41: ...edge of the primary feed paper the bypass solenoid BYPSOL and the bypass clutch BYPCL go off the paper arrives at the stopped upper registration roller and lower registration roller and the leading ed...

Page 42: ...are combined in a single unit 1 2 3 4 1 Cleaning section 3 Drum 2 Main charging section 4 Developing section Figure 1 3 14 Image formation section Developing roller Main charger Drum Main charger gri...

Page 43: ...Main charger 2 Tungsten wire 3 Main charger grid Figure 1 3 16 Main charging section 7 3 1 6 2 0 9 8 5 4 Figure 1 3 17 Main charger assembly 1 Main charger front housing 7 Main charger front lid 2 Ma...

Page 44: ...A When the print key is pressed the drive motor DM comes on B 300 ms after the drive motor DM comes on the blank lamps BL all light up C 300 ms after the blank lamps BL all light up the MC REM signal...

Page 45: ...ontrol voltage GB CNTL output from the main PCB MPCB to the high voltage transformer PCB HVTPCB Table 1 3 1 Surface potential correction value vs absolute humidity Absolute humidity g m3 Correction va...

Page 46: ...22 71 8 23 73 4 24 75 2 25 77 26 78 8 27 80 6 28 82 4 29 84 2 30 86 0 75 0 72 0 69 0 66 0 63 0 60 0 57 0 54 0 51 0 48 0 45 0 42 0 39 0 36 0 33 0 30 0 27 0 24 0 21 0 18 0 15 0 12 0 09 0 06 0 03 0 0 0...

Page 47: ...oner from the toner cartridge is mixed with residual toner recovered from the cleaning section The mixture is conveyed to the developing assembly Theamountoftonerinthehopperismonitoredbythetonerleveld...

Page 48: ...roller and the position of the doctor blade A developing bias voltage generated by the high voltage transformer HVTPCB is applied to the developing roller to provide image contrast 1 3 6 5 4 2 A N1 N...

Page 49: ...decreases and the period during which the toner level detection switch TEDSW is on becomes shorter When the level of toner in the hopper becomes low the speed at which hopper bottle B falls increase a...

Page 50: ...to the main PCB MPCB The main PCB CPU can detect the toner density from this voltage toner sensor output voltage As the toner is consumed and the proportion of the carrier by weight in the developer i...

Page 51: ...n is continued the toner sensor output voltage rises above the AP detection level the message Low toner level inch models Checking toner metric models is shown on the message display and the toner fee...

Page 52: ...off level is reached Figure 1 3 24 b 6 After the toner cartridge is replaced the forced feed operation 6 minutes max is started by switching the safety switch off on During the forced feed operation...

Page 53: ...idity vs relative humidity on page 1 3 22 0 86 Absolute humidity g m3 Absolute humidity correction value V 0 8 20 25 30 15 5 0 73 0 57 0 37 0 0 43 1 27 Figure 1 3 25 Correction based on the absolute h...

Page 54: ...ual toner from the drum surface after transfer and the cleaning spiral that carries the residual toner back to the toner hopper The cleaning unit employs the blade cleaning method 4 5 1 2 3 Figure 1 3...

Page 55: ...or mount 8 Exposure adjuster 9 Main reflector 0 Halogen lump HL Optical section thermostat TH3 Mirror unit Original detection switch ODSW Mirror 4 Mirror 5 Mirror 1 Original size sensor 5 6 ODS5 6 1 M...

Page 56: ...ading edge Detection with 148 mm 100 mm Figure 1 3 30 AE sensor detection width CN10 2 CN7 1 3 5 CN7 16 18 20 CN6 20 CN6 17 CN6 23 CN7 11 13 15 CN4 1 6 CN6 14 CN7 6 8 10 CN6 7 10 CN6 1 4 CN1 1 PWP CLT...

Page 57: ...me that the prescanning ends the halogen lamp HL goes out 40 ms after the end of prescanning the scanner motor SM rotates in reverse to start returning the optical system to the home position E 10P af...

Page 58: ...Manual exposure EXP1 Exposure scale EXP 1 2 3 Figure 1 3 31 Manual exposure control Manual exposure control Theintensityoflightfromthehalogenlampformanualexposureiscontrolledinthefollowing manner from...

Page 59: ...rom the photo mode EXP1 simulation 24 5 and photo mode EXP4 simulation 24 6 settings and the exposure light intensities for each EXP value are controlled according to this slope 2 EXP4 EXP7 The exposu...

Page 60: ...voltage of the AE sensor AES The light intensity for the halogen lamp for copying is controlled with the NTC original and NPTC original scanner AE sensor voltage values obtained by executing simulatio...

Page 61: ...28 5 29 0 29 5 30 0 0 0 0 0 0 0 0 0 0 0 0 0 0 0 0 0 0 0 0 0 0 0 0 0 0 0 0 0 0 0 0 0 0 0 0 0 0 0 0 0 0 0 0 0 0 0 0 0 0 0 0 0 1 1 2 2 2 3 3 4 4 Exposure volume correction When the absolute humidity exce...

Page 62: ...prises the transfer charger assembly separation claws etc 1 2 3 4 5 6 7 Figure 1 3 34 Transfer and separation sections 1 Separation guide 5 Separation charger 2 Separation claw Tungsten wires 3 Separa...

Page 63: ...sfer rear housing 0 Charger pin 4 Charger cleaning pad Separation charger 5 Separation guide Tungsten wire 6 Transfer shield Transfer charger 7 Transfer front housing Tungsten wire CN1 10 CN1 9 MPCB D...

Page 64: ...e SC REM signal come on high voltage is applied from the high voltage transformer PCB HVTPCB to thetransferchargerandtheseparationchargerandthetransferchargingandseparation charging start C 209 ms aft...

Page 65: ...p removes the residual charge on the drum to prepare for the next copy Blank lamps The blank lamps comprise 44 LEDs The extraneous image area charge on the drum is eliminated by lighting up the number...

Page 66: ...PSW OFF SHPSW ON ESW ON ESW OFF RSW OFF 1500 ms 322 ms 300 ms 300 ms 1122 ms 446 ms 133 ms 1 All on All on All off Side erasure Automatic exposure mode original size A4 11 81 2 magnification ratio 100...

Page 67: ...registration clutch RCL comes on the blank lamps BL light the number of LEDs corresponding to the paper size and the magnification ratio to clean extraneous image area charge on the drum side erase E...

Page 68: ...at and press rollers to fix it to the paper The paper for which the fixing has been completed is separated from the heat roller and the press roller by the heat roller claw and the press roller claw a...

Page 69: ...1AH 1 3 45 Figure 1 3 40 Fixing section block diagram CN10 3 CN11 7 MPCB TH1 H REM AC power supply TH2 FTH H CN11 1 CN11 3 CN6 3...

Page 70: ...n switch MSW comes on the fixing heater H comes on and the heat roller heating starts C 2000 ms after the internal cooling fan motor CFM starts rotating at full speed the internal cooling fan motor go...

Page 71: ...stor TH detects the fixing stable drive end temperature of 175 C 347 F the drive motor DM goes off Also the internal cooling fan motor CFM rotates at half speed Fixing temperature correction for exter...

Page 72: ...e conveyed paper is horizontally aligned and inverted it is fed again for front side copying 7 1 Feedshift section 2 1 3 4 0 9 5 6 8 7 Figure 1 3 41 Feedshift section 1 Upper right feedshift guide 6 L...

Page 73: ...eject pulley 2 Duplex paper press plate Duplex lower eject pulley 3 Duplex paper tapping guide Side registration guide 4 Refeed roller Stock switch STKSW 5 Switchback roller Duplex registration switch...

Page 74: ...witchback roller and switchback separation belt The switchback separation belt rotates in the direction to return the paper and utilizes the torque limiter effect to keep more than one sheet from bein...

Page 75: ...PCCL STKSW DUPRSW SRM SRHPSW DUPESW DUP SENS DUPPTSOL DUP PCSW DUP FWDSOL DUP PPSOL CN16 11 CN16 6 CN16 7 CN16 9 CN16 17 CN16 10 CN16 18 CN16 3 CN16 4 CN16 16 CN16 12 CN16 15 CN16 8 CN16 5 Figure 1 3...

Page 76: ...KSW ESW FSSW PFCL L RCL FSSOL 127 ms 100 ms 104 ms 135 step 12 step 12 step 191 ms 1111 ms G A F E D C B Automatic exposure mode original size A4R 81 2 11 copy paper A4R 81 2 11 magnification ratio 10...

Page 77: ...e side registration guide moves to the paper stock position E 104 ms after the feedshift switch FSSW goes off the side registration motor SRM comes on for 12 steps paper side registration is carried o...

Page 78: ...PPCCL DM RSW DUPRSW DUPPCSW DUPESW FCL U 100 ms 76 ms 100 ms 275 ms 195 ms 95 ms J K LM N O P Q R Automatic exposure mode original size A4R 81 2 11 copy paper A4R 81 2 11 magnification ratio 100 paper...

Page 79: ...g section N 275 ms after the duplex registration clutch DUPRCL comes on the refeed clutch RFCL goes off and the refeed roller and the switchback roller stop O When the refeed clutch RFCL goes off and...

Page 80: ...ICSW ST 0 Paper feed switch ST PFSW ST 3 Paper switch ST PSW ST Left feed guide 4 Forwarding pulley Feed roller 5 Upper paper feed pulley Lower paper feed housing 6 Right cover Lift operating plate 7...

Page 81: ...in unit feed switch FSW the copier main unit upper feed clutch FCL U comes on the copier main unit feed unit roller rotates and the paper is conveyed 165 ms later the paper feed clutch ST PFCL ST goes...

Page 82: ...1AH MCE ELECTRICAL SECTION II II Electrical Section...

Page 83: ...1AH 2 1 Electrical Parts Layout 2 1 1 Electrical parts layout 2 1 1...

Page 84: ......

Page 85: ...components 2 Composite PCB CPCB Supplies power to the other electrical components generates 24 V and 5 V DC Forms and controls the halogen lamp fixing heater circuit 3 High voltage transformer PCB HV...

Page 86: ...afety circuit when the eject cover is opened and resets paper misfeed detection 5 Feed switch FSW Controls the upper feed clutch 6 Registration switch RSW Controls the secondary paper feed stop timing...

Page 87: ...r home position switch SHPSW Detects the optical system Light source units 1 and 2 in the home position 24 Lens home position switch LHPSW Detects the lens in the home position 25 Mirror home position...

Page 88: ...stem Light source units 1 and 2 5 Toner feed motor TFM Replenishes toner 6 Upper lift motor CLM U Drives the 1st cassette lift 7 Lower lift motor CLM L Drives the 2nd cassette lift 8 Optical section f...

Page 89: ...utch FCL U Controls the drive of the feed roller 3 Bypass paper feed clutch BYPCL Primary paper feed from the bypass tray 4 Bypass solenoid BYPSOL Operates the SB forwarding pulley 5 Lower feed clutch...

Page 90: ...fixing section 4 Optical section thermostat TH3 Prevents overheating in the optical system 5 Halogen lamp HL Performs paper exposure 6 Blank lamps BL Remove charge from non image forming areas of the...

Page 91: ...S Generates clock pulses 7 Side registration home position switch SRHPSW Detects the side registration guides in the home positions 8 Duplex registration clutch DUPRCL Controls the drive of the duplex...

Page 92: ...length switch ST PLSW ST Detects the length of paper in the cassette 4 Paper width switch ST PWSW ST Detects the width of paper in the cassette 5 Paper switch ST PSW ST Detects the presence of paper i...

Page 93: ...Paper misfeed detection 2 2 1 2 2 2 Paper misfeed detection conditions 2 2 2 1 Paper feed conveying and eject sections 2 2 2 2 Special tray optional 2 2 5 3 Feedshift duplex section optional 2 2 6 4...

Page 94: ......

Page 95: ...e To reset the paper misfeed detection open and close the front right or eject cover to turn safety switch 1 2 or 3 off and on When paper misfeed in the special tray open and close the right cover to...

Page 96: ...U FSW PFCL U FCL L PFSW U PFCL L Figure 2 2 2 Paper feed conveying and eject sections 1 Paper feed section No paper feed from the upper cassette JAM code 10 The feed switch FSW fails to turn on within...

Page 97: ...ch RSW fails to turn on within 2127 ms after the bypass clutch BYPCL has turned on BYPCL RSW 2127 ms OFF ON OFF ON Timing chart 2 2 3 The main body vertical paper conveying JAM code 17 The registratio...

Page 98: ...SW 3277 ms OFF ON OFF ON Timing chart 2 2 6 The registration switch RSW fails to turn off within 3850 ms after the registration clutch RCL has turned on RCL RSW 3850 ms OFF ON OFF ON Timing chart 2 2...

Page 99: ...Figure 2 2 3 Special tray No paper feed from the special tray JAM code 12 The lower paper feed switch PFSW L fails to turn on within 1868 ms after the paper feed clutch ST PFCL ST has turned on PFCL S...

Page 100: ...W DUPPCSW DUPESW DUPRCL DUPPCCL DUPFWDSOL Figure 2 2 4 Feedshift duplex section 1 Feedshift section The feedshift JAM code 51 The feedshift switch FSSW fails to turn on within 2006 ms after the eject...

Page 101: ...14 2 8 5 11R 2 5 5 8 5 2 11 8 5 2 universal 2 FOLIO 2 206 ms 170 ms 133 ms 103 ms 103 ms 206 ms 206 ms Time 201 ms 174 ms 142 ms 123 ms 100 ms 100 ms 87 ms Table 2 2 1 FSSW Table 2 2 1 OFF ON Timing c...

Page 102: ...ls to turn on within 2335 ms after the duplex registration clutch DUPRCL has turned on DUPRCL DUPPCSW 2335 ms OFF ON OFF ON Timing chart 2 2 14 The duplex eject switch DUPESW fails to turn on within 2...

Page 103: ...ervice manual DF conveying belt section JAM code 72 See the DF service manual DF reverse section JAM code 73 See the DF service manual DF eject section JAM code 74 See the DF service manual 5 Sorter o...

Page 104: ...ter control section 2 3 8 2 3 2 Main PCB 2 3 11 1 Abnormally high fixing temperature detection circuit 2 3 12 2 Reset circuit 2 3 13 3 Scanner drive circuit 2 3 14 4 Scanner motor control circuit 2 3...

Page 105: ......

Page 106: ...section of the composite PCB CPCB consists of the circuit shown in Figure 2 3 1 to generate from the AC input into stable 24 V and 5 V DC output In the power source circuit the AC input is converted i...

Page 107: ...cuit The noise filter circuit has two circuits which consists of coil L1 and capacitors C1 to C4 and coil L001 and capacitors C001 to C003 C005 It prevents high frequency noise peculiar to the switchi...

Page 108: ...nt limitation is provided The active filter circuit consists of the controller IC IC1 choke coil L102 diodes D107 D108 and FET Q101 With a conventional switching regulator using capacitor input system...

Page 109: ...Q102 are on pulse width the secondary side output increase and the shorter the time during which the FET Q102 are on the output voltage decrease The magnitude of the secondary output or the pulse widt...

Page 110: ...diode of D201 form a CR snubber circuit to absorb the surge voltage generated during rectification so noise is kept to a minimum Element AB2 AB3 that are arranged in serial with each diode of D201 fo...

Page 111: ...utput circuit When supplied to the 5 V DC output circuit the current of the 24 V is smoothed by the choke coil L301 and smoothing capacitor C301 Switching regulator IC IC4 of the 5 V DC output circuit...

Page 112: ...n When 5 V DC output voltage becomes higher than the voltage of the zener diode ZD401 a current flows through the photocoupler via the zener diode to turn the photocoupler PC2 on Between the base emit...

Page 113: ...sion circuit PC4 Halogen lamp control circuit HIC AC input HL PWM H REM Figure 2 3 8 AVR Fixing heater control section block diagram The AVR fixing heater control section on the composite PCB consists...

Page 114: ...rectified input Zero cross signal trigger pulse Figure 2 3 9 Zero cross signal The PWM signal voltage conversion circuit converts the halogen lamp intensity data signal HL PWM from the main PCB into a...

Page 115: ...gnal H REM from the main PCB goes low the photocoupler PC4 turns on The zero crossing pulse from pin 7 of the halogen lamp control circuit HIC is applied to the base of the transistor Q602 which then...

Page 116: ...16 IC27 Main operation is controlled by the CPU IC32 directly or via the I O control LSI according to the control program in EPROM The CPU IC18 is connected with the CPU IC32 the serial circuit and th...

Page 117: ...ormally high fixing temperature voltage 5 V DC set by resistors R149 R150 is applied to the non inverted input terminal of IC35B When voltage of the fixing unit thermistor FTH is exceeded by the volta...

Page 118: ..._RES2 IC37 IC39 I O IC16 IC27 CPU IC32 CPU IC18 BUPCB 4 3 2 1 Figure 2 3 14 Reset circuit When the power is turned on or if the power voltage drops excessively reset IC IC39 emits a reset signal to C...

Page 119: ...Serial control signal Figure 2 3 15 Scanner drive circuit block diagram The scanner drive circuit consists of CPU IC18 on the main PCB and each motor drive IC The CPU IC18 communicate timing and cont...

Page 120: ...river IC IC5 input pulse signals for control output from pins 18 19 20 and 21 of CPU IC18 and goes low the motor drive output according to the pulse signal in sequence The drive current flows to the r...

Page 121: ...l signals are data sending and receiving signals the data clock SCLK signal for bit synchronization and the data frame synchronization FSYNC signal which is emitted at every frame The controller ASIC...

Page 122: ...a point of time when the scan signal of the switch goes low level a low return signal is sent to the return signal terminals KIN0 KIN4 of the ASIC The controller ASIC IC1 determines which switch is p...

Page 123: ...voltage drops excessively A supply voltage monitor is always applied to the reset IC IC5 If the supply voltage drops below that level pin 3 of the reset IC IC5 goes low discharging capacitor C3 rapidl...

Page 124: ...1AH MCE III Set Up and Adjustment Section III SET UP AND ADJUSTMENT SECTION...

Page 125: ...Installation environment 3 1 1 2 Installation procedure 3 1 2 3 1 2 Setting initial copy modes 3 1 13 3 1 3 Installing the key counter optional 3 1 14 3 1 4 Installing the cassette heater optional 3 1...

Page 126: ......

Page 127: ...he weight of the machine Place the machine on a level surface maximum allowable inclination 1 Avoid air borne substances that may adversely affect the machine or degrade the photoconductor such as mer...

Page 128: ...Install the original holder Secure the pressure adjustment nuts Remove the image formation unit Exit simulation mode Initialize the toner control level simulation 60 Remove the tapes and the pins hol...

Page 129: ...pack 0 Original holder Plastic bag Plastic bag Accessories case Copy tray Skid Instruction handbook Warranty Business mail 1 Outer case 2 Top board 3 Inner frame 4 Hinge joints 4 5 Bottom pads 6 Machi...

Page 130: ...plate 7 Gently push each cassette back in Original detection switch Cassette lift Paper size detection plate Figure 3 1 4 1 Remove the tape holding the Eject cover 2 Remove the tapes with the two pin...

Page 131: ...Open the front cover 2 Remove the tape holding the front paper conveying guide 3 Remove the tape holding the lens unit pin 4 Remove the lens unit pin Front paper conveying guide Lens unit pin Figure...

Page 132: ...left of the fixing unit until it comes to the end of the spring pressure adjustment plate At the factory setting the pressure adjustment nuts A are adjusted and secured at the proper pressure position...

Page 133: ...t of the machine Image formation unit Paper conveying release lever 12 pin connector Figure 3 1 10 4 Turn the developing handle in the direction of the arrow While releasing the developing stopper tak...

Page 134: ...pper developing lid from the hook of the developing unit Remove the upper developing lid from the developing unit Upper developing lid Figure 3 1 12 2 Shake the developer bottle well 3 Pour developer...

Page 135: ...all outlet 2 Remove the image formation unit from the machine See page 3 1 7 3 While lifting up the blade mount slide the blade release lever in the direction of the arrow Set the cleaning blade to th...

Page 136: ...ater and the setting of the toner control voltage is automatically completed The copy number zoom ratio indicator shows the setting Example 2 80 Reference setting Caution If the copy number zoom ratio...

Page 137: ...d shake it four or five times up and down to agitate the toner 3 Pull off the toner cartridge lid Figure 3 1 15 4 Install the toner cartridge on the developing unit 5 Peel off the toner cartridge film...

Page 138: ...f the eject cover and install the copy tray to the machine 1 Load paper in the cassette 2 Insert the power plug into a wall outlet 3 Turn the main switch on After the machine is stabilized make test c...

Page 139: ...tte selecting Priority mode Setting the preheat mode Selecting between single double counts Setting the auto clear time Setting the auto preheat time Setting the auto shutoff time Selecting copy mode...

Page 140: ...P A screws P N B4304100 One M4 6 chrome TP A screw P N B4104060 Two M3 6 bronze flat head screws P N B2303060 One M3 bronze nut P N C1303000 Procedure 1 Fit the key counter socket to the key counter r...

Page 141: ...screws holding the right cover at the machine rear as shown in figure 6 Peel off the seal attached to the cutout of the rear side plate 7 Remove the shorting connector from the 4 pin connector on the...

Page 142: ...ounter cover retainer 66060020 Key counter cover M4 10 screws B4304100 4 pin plug M4 6 screw B4104060 4 pin connector Cutout part Key counter entrance M4 10 screws B4304100 Figure 3 1 19 11 Refit the...

Page 143: ...heater optional When installing the cassette heater to the special tray perform the same procedure Procedure 1 Take out the 2nd cassette 2 Remove the four screws and take the cassette out of the copi...

Page 144: ...installing at the base of the copier 4 Secure the cassette heater to the base of the copier with the removed two screws 5 Pass the wire of the cassette heater through the square hole of the rear side...

Page 145: ...Power source supply assembly Figure 3 1 22 7 Connect the cassette heater connector to the 2 pin connector on the copier 8 Bind the wire of the cassette heater to the cord clump of the copier 2 pin co...

Page 146: ...w and remove the optical unit wire cover Optical unit wire cover Figure 3 1 24 3 Connect the two original size sensors 115 and also the two original size sensors 60 to the original size sensor relay w...

Page 147: ...k can be seen as shown in the figure When installing the original size sensors ensure that the wires connected to the original size sensors 1 and 2 are beneath the power supply wire of the halogen lam...

Page 148: ...ch the two wiring bands 8 Bind the wires connected to the original size sensors 1 and 2 so that they do not get in the way when the light source units 1 2 are moved Also confirm that the wires do not...

Page 149: ...it wire cover Figure 3 1 29 11 Refit the contact glass and the upper right cover 12 Turn the main switch on run simulation 59 original size sensor installed not installed setting and make the setting...

Page 150: ...1AH 3 2 Simulation 3 2 1 Simulation 3 2 1 1 Running a simulation 3 2 1 2 Simulation list 3 2 2 3 Contents of simulation 3 2 8...

Page 151: ......

Page 152: ...y number zoom ratio indicator shows U00 Enter the number of simulation to be executed with the numeric keys The selected simulation number is shown on the copy number zoom ratio indicator Press the pr...

Page 153: ...iginal feed 07 Checking DF operation independently without original feed Paper 10 Turning the drive motor on feed and 11 Checking the paper conveying related switches conveying 6 7 8 1 2 3 4 5 LEDs on...

Page 154: ...witch is 2 Lower lift limit switch turned on the 3 Lift limit switch ST corresponding Special tray LED lights 4 8 4 1 Duplex registration switch When a switch is 2 Duplex paper conveying switch turned...

Page 155: ...No key Clutches and solenoids 1 0 Upper paper feed clutch 1 Lower paper feed clutch 2 Paper feed clutch ST Special tray 3 4 5 Upper feed clutch FCL U 6 Lower feed clutch FCL L 7 8 Feed clutch ST Speci...

Page 156: ...for the selected magnification ratio 2 Moves the lens and mirrors 4 and 5 sequentially to each standard magnification ratio 24 Adjusting exposure 25 Adjusting lateral magnification lens and mirrors ad...

Page 157: ...the option All cleared 79 Setting the Nearing maintenance interval preset 0 Setting Description 0 1 to 999999 Detection disabled Count Copy 14 Setting folio size modes For metric models only 17 Setti...

Page 158: ...canning function setting 0 enabled 2 B4 B5 split copy function setting 1 0 cancel 3 Manual density range setting 0 enabled 4 Selecting copying enabled disabled 0 disabled with originals left on the co...

Page 159: ...ce reset the cassette 7 Enter the number of copies to be made with the numeric keys Enter 250 to select endless copy mode 8 Press the print key The copying operation is started corresponding to the se...

Page 160: ...y 5 Press the stop clear key 05 Checking DF operation in sync with the copier without original feed 1 Unplug the CN1 connector from the high voltage transformer PCB 2 Enter 05 with the numeric keys 3...

Page 161: ...ndently without original feed 1 Enter 07 with the numeric keys 2 Press the print key The DF starts to operate independently without paper 3 Press the stop clear key The DF stops operating 10 Turning t...

Page 162: ...paper select key 6 Press the print key Copying operation starts and the LEDs on the operation panel light in sequence representing the switches actuated by the paper 6 7 8 1 2 3 4 5 LEDs on the operat...

Page 163: ...witch is 2 Lower lift limit switch turned on the 3 Lift limit switch ST corresponding Special tray LED lights 4 8 4 1 Duplex registration switch When a switch is 2 Duplex paper conveying switch turned...

Page 164: ...umeric keys 2 Press the print key 3 Select the mode number to be executed with the exposure adjustment keys Selected mode number is shown on the message display 4 Press the numeric key corresponding t...

Page 165: ...pping solenoid 8 Duplex forward solenoid 9 Duplex paper press solenoid 3 0 9 5 Press the stop clear key 14 Setting folio size For metric models only 1 Enter 14 with the numeric keys 2 Press the print...

Page 166: ...print key A test copy is made with the two end blank lamps off When the test copy looks like example A adjust the width size changing knob position Center registration see page 3 3 16 When the test co...

Page 167: ...ric keys 2 Press the print key 3 Press the print key The halogen lamp lights for not more than 20 s 4 Change the halogen lamp light intensity with the following keys The copy number zoom ratio indicat...

Page 168: ...he selected magnification ratio Original key Paper select key Manual key Zoom key 4 Press the print key If the scanner is not in its home position it first returns there and then starts scanning Scann...

Page 169: ...s and mirrors 4 and 5 move sequentially to the following standard magnification ratios 100 86 70 61 50 100 115 122 141 163 200 5 Press the stop clear key The lens and mirrors 4 and 5 stop operating 6...

Page 170: ...interrupt key Transfer charging starts for the selected output condition and the drive motor turns on 5 Press the interrupt key Transfer charging ends and the drive motor turns off 6 Press the stop c...

Page 171: ...ter 34 with the numeric keys 2 Press the print key 3 Select the mode number to be executed with the exposure adjustment keys Selected Mode No is shown on the message display 4 Press the print key Char...

Page 172: ...nt key 3 Select the largest size with the paper select key 4 Open the original holder 5 Press the print key Test copies are made with the blank lamps lit in the specified patterns to show the status o...

Page 173: ...the mode number 4 Change the setting with the zoom key 5 Press the print key The setting is stored and blinks The interrupt indicator blinks at the same time 6 Press the stop clear key During copying...

Page 174: ...Enter 50 with the numeric keys 2 Press the print key All LEDs on the operation panel light up 3 Press the stop clear key The LEDs turn off Setting preheat mode Setting Remarks 0 1 2 Energy saving mod...

Page 175: ...4 Adjusting the leading trailing edge margin See page 3 3 20 3 3 22 55 Adjusting the blank cut margin with the DF 1 Enter 55 with the numeric keys 2 Press the print key The copy number zoom ratio indi...

Page 176: ...tor shows the current setting 3 Change the setting with the zoom key 4 Press the print key The setting is stored and blinks The interrupt indicator blinks at the same time 5 Press the stop clear key E...

Page 177: ...1AH This page is intentionally left blank...

Page 178: ...indicator 3 Press the stop clear key 61 Forced toner supply 1 Enter 61 with the numeric keys 2 Press the print key Aging starts and toner is supplied until the toner sensor output drops to the add to...

Page 179: ...with the numeric keys 2 Press the print key 3 Press the interrupt key The contents listed below are initialized Contents Default Sim No Setting folio paper For metric models only 14 width 210 mm lengt...

Page 180: ...position at enlargement 20 Mirror position at reduction 20 Adjusting longitudinal magnification 14 26 scanner adjustment Adjusting the leading edge registration 27 100 44 Enlargement 42 Reduction 45...

Page 181: ...lized reading data 8 1 144 Setting the original size sensor installed or 0 59 not installed Not installed Initializing the toner control level 2 80 60 Checking and setting the toner control level 2 80...

Page 182: ...ting the destination 1 metric 93 Setting the memory switch 1 94 Auto prescanning function setting 0 enabled B4 B5 split copy function setting 1 0 cancel Manual density range setting 0 enabled Selectin...

Page 183: ...be confirmed or changed with the exposure adjustment key The exposure scale indicator corresponding to the selected mode No digits blinks 4 Change the setting with the numeric keys Setting range 0 99...

Page 184: ...firmed or changed with the exposure adjustment key The exposure scale indicator corresponding to the selected mode No digits blinks 4 Change the count with the numeric keys Setting range 0 999999 coun...

Page 185: ...1AH This page is intentionally left blank...

Page 186: ...zoom ratio indicator shows the occurred service call code The display shows C and service call No alternately If service call has not occurred indicator shows 000 5 Press the print key The count value...

Page 187: ...11 12 13 14 15 16 17 18 19 20 21 22 30 50 51 60 70 Type of paper jam 000 999 Setting range Jam in the first paper feed device no paper feed Jam in the second paper feed device no paper feed Jam in th...

Page 188: ...at the same time 7 Press the stop clear key twice To check another contents of the jam code press the stop clear key then carry out steps 3 to 6 To clear all the counts 3 Select the ALL with the expo...

Page 189: ...with the exposure adjustment keys The copy number zoom ratio indicator shows the selected service call code C code The display shows C and service call No alternately 4 Press the stop clear key The c...

Page 190: ...paper feed lift motor problem Third paper feed lift motor problem Paper feed motor problem Special tray Scanner motor problem Lens motor problem Mirror motor problem High voltage Main Transfer separa...

Page 191: ...ange the count with the numeric keys Enter 000 to clear the count 6 Press the print key The setting is stored and blinks the interrupt indicator blinks at the same time 7 Press the stop clear key at t...

Page 192: ...4 Select the mode No digits to be changed with the exposure adjustment key The exposure scale indicator corresponding to the selected mode No digits blinks 5 Press the stop clear key twice To check a...

Page 193: ...cted mode No digits blinks 5 Change the count with the numeric keys Enter 0 all setting to clear the count 6 Press the print key The setting is stored and blinks the interrupt indicator blinks at the...

Page 194: ...e No digits to be confirm with the exposure adjustment key The exposure scale indicator corresponding to the selected mode No digits blinks 6 Press the stop clear key twice To check another contents o...

Page 195: ...Press the print key The setting is stored and blinks the interrupt indicator blinks at the same time 8 Press the stop clear key twice To check another contents of the count for the counter No press t...

Page 196: ...h the zoom keys 4 Press the print key The setting is stored and blinks The interrupt indicator blinks at the same time 5 Press the stop clear key 81 Selecting between manual automatic exposure mode 1...

Page 197: ...umber zoom ratio indicator shows the current setting 0 Cut off disabled 1 Cut off enabled 3 Change the setting with the zoom keys 4 Press the print key The setting is stored blinks The interrupt indic...

Page 198: ...auto preheat time min The auto preheat time is 25 min at a setting of 5 and 45 min at a setting of 9 4 Press the print key The setting is stored and blinks The interrupt indicator blinks at the same...

Page 199: ...at initial paper source 4 Press the print key The setting is stored and blinks The interrupt indicator blinks at the same time 5 Press the stop clear key 88 Setting the auto cassette change 1 Enter 8...

Page 200: ...ys 2 Press the print key The copy number zoom ratio indicator shows the current setting 3 Change the setting with the numeric keys Setting range 1 999 4 Press the print key The setting is stored and b...

Page 201: ...e 1 When the value is set to 0 the copying operation stops as the toner empty status is detected and continuous copying is disabled after that 4 Change the setting with the zoom keys 5 Press the print...

Page 202: ...d blinks The interrupt indicator blinks at the same time 5 Press the stop clear key 93 Setting the destination 1 Enter 93 with the numeric keys 2 Press the print key The copy number zoom ratio indicat...

Page 203: ...5 Press the print key The setting is stored and blinks The interrupt indicator blinks at the same time 6 Press the stop clear key Contents Mode No 1 0 Setting 1 2 3 4 5 6 7 Auto prescanning function s...

Page 204: ...red and blinks The interrupt indicator blinks at the same time 6 Press the stop clear key 96 Resetting the partial operation control function 1 Enter 96 with the numeric keys 2 Press the print key 3 P...

Page 205: ...copying is made after 3 min pass from the previous copying ends the scanner fan motor does not turns on till six papers of continuous copying 3 Change the setting with the zoom keys 4 Press the print...

Page 206: ...7 Adjustments after installing rollers and clutches 3 3 18 7 1 Adjusting the leading edge timing 3 3 18 7 2 Adjusting the leading edge margin 3 3 20 7 3 Adjusting the trailing edge margin 3 3 22 8 De...

Page 207: ...ence 3 3 77 3 Adjusting developing bias voltage reference 3 3 78 3 3 7 Transfer and separation section 3 3 79 1 Replacing the charger wires 3 3 79 2 Setting transfer voltage reference 3 3 82 3 Setting...

Page 208: ...edshift and duplex sections optional 3 3 116 1 Detaching and refitting the duplex forwarding pulley 3 3 116 2 Detaching and refitting the switchback separation belts 3 3 117 3 Detaching and refitting...

Page 209: ......

Page 210: ...l section thermostats Never substitute electric wires as the copier may be seriously damaged When installing a thermostat ensure the correct clearance if specified using a thickness gauge Do not touch...

Page 211: ...ith the numeric keys and press the print key Enter the number of the simulation to be run with the numeric keys Press the print key The selected simulation is run Press the stop clear key Start End Si...

Page 212: ...e primary paper feed unit of the first cassette 3 Open the front cover of the copier Remove the screw holding the primary paper feed unit and then the unit When removing the primary paper feed unit of...

Page 213: ...of the arrows as shown in Figure 3 3 2 and remove it from the primary paper feed unit Forwarding pulley retainer Figure 3 3 2 3 Remove the stop ring pull out the forwarding pulley shaft in the directi...

Page 214: ...aper feed housing 4 Remove the upper paper feed pulley moving the upper paper feed shaft in the direction of the arrow as shown Figure 3 3 4 When refitting the upper paper feed pulley keep the side of...

Page 215: ...per feed shaft 3 Pull the lower paper feed shaft in the direction of the arrow as shown Figure 3 3 5 and remove the lower paper feed pulley When refitting the lower paper feed pulley keep the side of...

Page 216: ...ing the SB paper feed unit Procedure 1 Remove the inner cover and loosen the screw at the right side of the operation unit 2 Remove the upper right right covers 3 Take the bypass out of the copier Byp...

Page 217: ...eed unit see page 3 3 7 2 Remove the stop ring and pull out the SB forwarding pulley shaft in the direction of the arrow as shown in Figure 3 3 8 and remove the SB forwarding pulley SB forwarding pull...

Page 218: ...the bushing in front of the SB forwarding pulley retainer in the direction of arrow 1 3 Push the bypass solenoid lever in the direction of the arrow 2 and remove the SB forwarding pulley retainer fro...

Page 219: ...SB front frame in the direction of the arrow SB front frame Stop ring Bushing SB paper feed shaft Figure 3 3 10 5 Remove the bushing and SB upper paper feed pulley from the SB paper feed shaft SB uppe...

Page 220: ...Stop ring Spring Figure 3 3 12 3 Remove the E ring at the side of the one way clutch blue end Move the SB Iower paper feed pulley in the direction of the arrow and remove it with the separation pulley...

Page 221: ...upper and lower paper width switch as follows Caution After replacing a paper width switch be sure to perform 5 Adjusting the position of the width size changing knob see page 3 3 16 Procedure 1 Draw...

Page 222: ...refitting the 8 pin socket keep the convex part toward the upper side 5 Remove the three screws holding the width size changing knob 6 While lifting the cassette lift in the direction of the arrow re...

Page 223: ...he paper width switch Screws Paper width switch Figure 3 3 16 8 Apply the specified grease to the printed surface of the new paper width switch shaded area in the figure and fit the switch to the widt...

Page 224: ...e origi nal holder open Loosen the two screws holding the original size indicator and adjust the position of the indicator so that the centers of the original and the copy image are aligned When the w...

Page 225: ...the original size indicator see page 3 3 15 has been completed Procedure Yes No Start End Make a test copy with same size Loosen three screws holding the width size changing knob and ad just the posit...

Page 226: ...3 3 15 has been completed Procedure Yes No Start End Make a test copy at 100 with the maximum size of copy paper Loosen the two screws holding the bypass adjuster and change the position of the adjus...

Page 227: ...age too short example 1 Is the leading edge of the copy image too long example 2 No No Yes Yes The copier enters ready mode The new setting is stored The current setting is displayed Mode 1 for copyin...

Page 228: ...B Setting range 0 60 Reference 100 copying 44 Enlargement copying 42 Reduction copying 45 Changing the value by 1 moves the leading edge by 0 5 mm Increasing the value delays the second ary feed timin...

Page 229: ...new setting is stored The current setting is displayed Mode 1 for copying at 100 Mode 2 for enlargement copying 200 1 Specifications 100 copying 3 2 5 mm Enlargement copying 6 2 5 mm Select the mode...

Page 230: ...0 50 Reference 100 copying 42 Enlargement copying 45 Changing the value by 1 moves the leading edge by 0 5 mm Increasing the value makes the leading edge margin wider and decreasing it makes the marg...

Page 231: ...0 mm No Yes The copier enters ready mode The new setting is stored The current setting is displayed Select mode 3 with the exposure adjustment keys Press the print key to make a test copy with A3 11 1...

Page 232: ...ference 30 Changing the value by one changes the trailing edge margin width by 0 5 mm Increasing the value makes the trailing edge margin wider and decreasing it makes the margin narrower Contact glas...

Page 233: ...e lower registration cleaner Clean and replace the lower registration cleaner as follows Procedure 1 Remove the screw and draw out the lower registration cleaner Screw Lower registration cleaner Figur...

Page 234: ...aner Clean and replace the upper registration cleaner as follows Procedure 1 Removing the image formation unit see page 3 3 29 2 Remove the pin and draw out the upper registration cleaner Pin Upper re...

Page 235: ...nit Clean the lower registration roller as follows Procedure 1 Removing the SB paper feed unit see page 3 3 7 2 Remove the 8 pin connector and the two screws then take the feed unit out of the machine...

Page 236: ...3 3 27 1AH 3 Rub the lower registration roller with a dry cloth or a cloth with alcohol Lower registration roller Figure 3 3 32 4 Refit all the removed parts...

Page 237: ...the wire wrapped around the charger spring must not protrude from the charger housing The cut end of the charger wire must not protrude more than 2 mm from under the charger wire retainer pin Use a cl...

Page 238: ...and remove the image formation unit from the machine In this time raise the developing handle in the direction of the arrow While releasing the developing stopper take the image formation unit out of...

Page 239: ...e the screw the grid tension plate and the main charger grid 6 Remove the main charger front and rear lid 7 Remove the charger pin and the charger spring and the charger wire Main charger grid Charger...

Page 240: ...rger pin and pull the wire tight Pull the charger wire so that the distance from the end of the charger spring to the notch of the main charger rear housing is between 2 and 4 mm 11 Insert the charger...

Page 241: ...4 Refit the main charger grid and the grid tension plate When refitting the main charger grid take care to keep the marking toward the upper side and not to allow the grid to ride over the film F A C...

Page 242: ...by pressing the lamp terminal in the front of the machine in the direction of the arrow 1 and aligning the cutout of the ceramic part to the lamp terminal and moving it in the direction of the arrow 2...

Page 243: ...ng the optical thermostat proceed to 6 Adjusting focus refitting of light source unit 1 see page 3 3 51 Caution Use the specified thermostat for replacement Do not substitute a simple wire or similar...

Page 244: ...the faston connector 6 Check for continuity across the thermostat using a tester If there is no continuity press the button and check for continuity again 7 If continuity cannot be restored remove the...

Page 245: ...Is the copy image correct No Yes Make a test copy at 100 with the maximum size of copy paper Adjust the positions of the expo sure adjusters Start End For example if the copy image is not correct on t...

Page 246: ...djusting tension of the scanner drive belt see page 3 3 104 4 1 Detaching the scanner wires Procedure 1 Remove the original holder 2 Remove the upper right cover upper left cover and then upper rear c...

Page 247: ...he screw and then the original size sensor set plate Screw Original size sensor set plate Figure 3 3 44 7 Remove the six screws and then the right reinforcement plate Right reinforcement plate Screws...

Page 248: ...installed Screw 20 pin connector 1 24 pin connector 2 pin connector Wiring cover Figure 3 3 46 10 Move the optical unit in the direction of the arrow and then take it out of the machine When refitting...

Page 249: ...urce unit 1 see page 3 3 34 Wiring of the halogen lamp Clamp Screw Figure 3 3 48 13 Remove each screw and then the front and rear tension spring respectively 14 Remove the scanner wire from the scanne...

Page 250: ...drum stopper P N 34968130 Procedure 1 Loosen the two screws move the scanner drive motor assembly in the direction of the arrow remove the scanner drive belt from the scanner drive pulley Screw Screw...

Page 251: ...t and rear scanner wire drum respectively 3 Remove the E ring pull the scanner motor shaft out in the direction of the arrow and remove the scanner wire drum Screw Screw Scanner wire drum Scanner wire...

Page 252: ...silver to the machine front and that of the black to the machine rear 1 Holding the wire with the round terminal at the end of the scanner to the left side of the machine insert the ball at the cente...

Page 253: ...all seven turns around the scanner wire drum The drum of the machine front Wind toward the machine front The drum of the machine rear Wind toward the machine rear 4 Attach the scanner wire drum stoppe...

Page 254: ...er drive shaft see page 3 3 42 Do not fix the scanner wire drum to the scanner drive shaft with the screw in this time 6 Pull light source unit 2 to the end of the machine right and secure it with the...

Page 255: ...chine 3 Run the scanner wire with the ball along the groove in the scanner pulley of the machine from bottom to top 4 Run the scanner wire with the ball of the Step 3 along the groove in the outer sca...

Page 256: ...achine 3 Run the scanner wire with the ball along the groove in the scanner pulley of the machine from bottom to top 4 Run the scanner wire with the ball of the Step 2 along the groove in the outer sc...

Page 257: ...ght source unit 1 to the end of the right side make sure that the tub front and rear side described in the circle is secured with coming to the right scanner retainer Right scanner retainer Llight sou...

Page 258: ...ect No Yes Make a test copy with A3 11 17 paper Adjust the inclination of secondary mirror by turning the adjustment screw see figure 3 3 59 Start End For copy example 1 loosen the secondary mirror in...

Page 259: ...3 3 50 1AH Figure 3 3 59 Secondary mirror inclination adjustment screw Secondary mirror...

Page 260: ...es are replaced or if the entire copy image is out of focus Procedure Figure 3 3 60 Is the copy image correct No Yes Make a test copy with A3 11 17 paper Loosen the two screws Pull light source unit 1...

Page 261: ...with A3 11 17 paper Adjust the inclination of the fourth fifth mirror by turning the adjustment screw see figure 3 3 62 Start End For copy example 1 loosen the fourth fifth mirror inclination adjustme...

Page 262: ...3 3 53 1AH Fourth mirror Fifth mirror Fourth fifth mirror inclination adjustment screw Figure 3 3 62...

Page 263: ...amp has not deteriorated Clean the optical unit Never touch VR601 VR602 and VR603 on the Composite PCB Setting method 1 of the simulation 24 When NTC new test chart or NPTC newspaper test chart is use...

Page 264: ...e exposure adjustment keys Press the print key to make a test copy Test copy is executed with the image of the EXP 4 Press the print key Enter simulation mode Enter 24 with the numeric keys Press the...

Page 265: ...mode 2 setting minus 10 Decrease the setting with the zoom key Increase the setting with the zoom key Place the NPTC on the contact glass and select mode 4 with the exposure adjustment keys Press the...

Page 266: ...the print key to make a test copy Test copy is executed with the image of the EXP 4 of the pho to mode Press the print key Press the print key Press the interrupt key C B Setting range 102 242 Refere...

Page 267: ...Select mode 7 with the exposure adjustment keys Press the print key Press the stop clear key Exit simulation mode C Setting range 102 242 Reference 179 End Press the zoom key and set the difference b...

Page 268: ...is used Mode setting sequence Set mode 1 manual mode Exp 1 Set mode 2 manual mode Exp 4 Set mode 3 manual mode Exp 7 Set mode 4 manual mode Exp 7 2 End Start Precaution Check the copying image densit...

Page 269: ...y to make a test copy Test copy is executed with the image of the EXP 1 Press the interrupt key Setting range 102 242 Reference 162 Increasing the value makes the image lighter and decreasing it makes...

Page 270: ...the EXP 4 Press the interrupt key Setting range 102 242 Reference 172 Increasing the value makes the image lighter and decreasing it makes the image darker Is the copy image correct 2 Yes No B A Pres...

Page 271: ...mage of the EXP 7 Press the interrupt key Setting range 102 242 Reference 192 Increasing the value makes the image lighter and decreasing it makes the image darker Is the copy image correct 3 Yes No C...

Page 272: ...rupt key Press the stop clear key Is the copy image correct 4 Yes No C Press the print key Exit simulation mode End Change the setting using the zoom key Setting range 102 242 Reference 187 Increasing...

Page 273: ...mode Enter 22 with the numeric keys Press the stop clear key Exit simulation mode Select mode 2 with the exposure adjustment keys Place the NTC on the contact glass Press the interrupt key The pre sca...

Page 274: ...following adjustment after replacing the main PCB or the drum Procedure Check that exposure is correctly set in 8 Setting exposure amount Start End Perform 10 1 Adjusting the expo sure amount for enl...

Page 275: ...etting with the zoom key Increase the setting with the zoom key Press the print key to make a test copy A test copy is made at 200 Place the NTC on the contact glass and ensure there is A3 11 17 paper...

Page 276: ...tting with the zoom key Increase the setting with the zoom key Press the print key to make a test copy A test copy is made at 50 Place the NTC on the contact glass and ensure there is A3 11 17 paper p...

Page 277: ...correctly set in 8 Setting exposure amount Start End Perform 11 1 Adjusting the lens home position Perform 11 2 Adjusting the lens position for enlargement mode Perform 11 3 Adjusting the lens positi...

Page 278: ...setting with the zoom key Press the print key to make a test copy A test copy is made Place the NTC on the contact glass and ensure there is A3 11 17 paper present Press the print key Enter simulatio...

Page 279: ...the setting with the zoom key Press the print key to make a test copy A test copy is made at 200 Place the NTC on the contact glass and ensure there is A3 11 17 paper present Press the print key Ente...

Page 280: ...the setting with the zoom key Press the print key to make a test copy A test copy is made at 50 Place the NTC on the contact glass and ensure there is A3 11 17 paper present Press the print key Enter...

Page 281: ...setting with the zoom key Press the print key to make a test copy A test copy is made Place the NTC on the contact glass and ensure there is A3 11 17 paper present Press the print key Enter simulatio...

Page 282: ...rease the setting with the zoom key Press the print key to make a test copy A test copy is made at 200 Place the NTC on the contact glass and ensure there is A3 11 17 paper present Press the print key...

Page 283: ...rease the setting with the zoom key Press the print key to make a test copy A test copy is made at 50 Place the NTC on the contact glass and ensure there is A3 11 17 paper present Press the print key...

Page 284: ...made Decrease the setting with the zoom key Increase the setting with the zoom key Place the NTC on the contact glass and ensure there is A3 11 17 paper present Press the print key Enter simulation mo...

Page 285: ...on display A 1 Press the print key Enter simulation mode Enter 57 with the numeric keys Start End Press the stop clear key Exit simulation mode 1 When the original size sensor turns on the paper misfe...

Page 286: ...ce 5 sheets of the maximum size paper on the contact glass Press the interrupt key Initializa tion is executed The interrupt indicator lights all sensor is initialized at the same time Press the print...

Page 287: ...ends and never touch the drum surface After removing the drum keep it in the drum case or storage bag to protect the surface from light Procedure 1 Open the front cover 2 Remove the image formation un...

Page 288: ...ont and the thick shaft hole on the machine rear 8 Push the drum shaft into the rear of the drum and while turning the shaft insert it fully into the drum Ensure there is a clearance of about 1mm betw...

Page 289: ...ly dirty locally Do not clean the drum with alcohol or other organic solvent Required supplies Polishing cloth specified synthetic cotton Toner Procedure 1 Detach the drum see page 3 3 72 2 Apply a po...

Page 290: ...the ex posure adjustment keys Increase the setting with the zoom key Decrease the setting with the zoom key Press the print key Enter simulation mode Enter 32 with the numeric keys Press the print ke...

Page 291: ...pin connector for the developing bias at the rear side of the image formation unit from the magnetic roller retainer 3 Loosen the screw of the magnetic roller retainer 4 Move the magnetic roller reta...

Page 292: ...r Screws Upper developing cover Figure 3 3 69 3 Insert the thickness gauge into the three point as shown in the arrow and turning the three screws to adjust so that the distance between the developing...

Page 293: ...PCB and contact the tester s positive terminal to DB OUT Contact the tester s negative ter minal to an uncoated part of the frame Turning the VR 202 to adjust specified voltage 280 V DC 5 V Press the...

Page 294: ...t end of the charger wire must not protrude from under the charger pin Use a clean undamaged tungsten charger wire Keep the charger wire taut by stretching the charger spring Clean the charger shield...

Page 295: ...escribed in the circle and then take off the separation guide 5 Remove the charger wire retainer pins charger spring and then the charger wires Charger wire retainer pins Transfer charger front lid Se...

Page 296: ...the transfer charger and V notch in front of the transfer charger to pull the wire and fix it with the charger pin The charger wire must be adjusted so that it is more than no load tensile force of t...

Page 297: ...to check the im age Select mode number with the ex posure adjustment keys Adjusting the setting with the zoom key Press the print key Enter simulation mode Enter 31 with the numeric keys Press the pri...

Page 298: ...of the frame of the machine Contact the positive terminal of the tester to the jumper line J401 of the high voltage transformer PCB Press the print key Enter 34 with the numeric keys Enter simulation...

Page 299: ...he front cover and remove the image formation unit from the machine see page 3 3 29 2 Push up the blade attachment plate slide the blade lever toward the rear side take the cleaning blade out of the d...

Page 300: ...e blade attachment plate Screws Cleaning blade Projection Blade atta chment plate Figure 3 3 77 5 Refit all the removed parts 6 Push up the blade attachment plate slide the blade lever toward the fron...

Page 301: ...installing the separation claw mount fit the separation claw lever to the dent of the blade attachment plate Blade attachment plate Screws Separation claw mount Separation claw lever Figure 3 3 78 4...

Page 302: ...elt Clean or replace the conveying belt as follows Procedure 1 Remove the image formation unit see page 3 3 29 2 Remove the stop ring and front paper conveying guide 3 Remove the screw and paper conve...

Page 303: ...irection of the arrow 1 and remove it from the paper conveying guide 5 Remove the paper conveying shaft with the paper conveying pulley in the direction of the arrow 2 2 1 Paper conveying guide Paper...

Page 304: ...d remove it from the paper conveying guide Remove the paper conveying belt in the direction of the arrow 2 After replacing the paper conveying belt check if operation moves smoothly 1 2 Paper conveyin...

Page 305: ...ocedure 1 Open the front cover 2 Loosen the pin holding the fixing unit and take the fixing unit out of the machine Fixing unit Pin holding the fixing unit Figure 3 3 83 3 Remove the two pins and uppe...

Page 306: ...side 6 Remove the 2 pin connector of the fixing heater wire of the fixing unit rear side taking the part of the arrow with fingers 7 Remove each screw and then the front rear heater retainer respecti...

Page 307: ...3 3 92 1AH 8 Take the fixing heater out of the fixing unit rear side Fixing heater Figure 3 3 86 9 Refit all the removed parts...

Page 308: ...e the fixing unit thermistor If the temperature sensing part of the thermistor is dirty clean it When refitting the thermistor make sure that they are in even contact with the heat roller 2 pin connec...

Page 309: ...age 3 3 90 2 Remove the upper fixing cover see page 3 3 90 3 Remove the two faston terminas and screws from each fixing unit thermostat and then remove the fixing unit thermostats When fitting check t...

Page 310: ...fixing unit from the machine see page 3 3 90 2 Pressing the upper fixing cover in the direction of the arrow 1 turn the press release lever in the direction of the arrow 2 and open the fixing unit in...

Page 311: ...fixing guide plate in the direction of the arrow and remove the press roller 4 Remove the press roller bushing Lower fixing guide plate Press roller Press roller bushings Press roller Figure 3 3 91 5...

Page 312: ...roller as follows Procedure 1 Remove the fixing unit from the machine see page 3 3 90 2 Take out the fixing heater see page 3 3 90 3 Open the fixing unit see page 3 3 95 4 Remove the two screws and t...

Page 313: ...emove the heat roller gear 40 the heat roller bushing and then the heat roller When fitting the heat roller bushing fit it the part indicated with the arrow in figure toward the lower side with closin...

Page 314: ...ve the fixing unit from the machine see page 3 3 90 2 Remove the upper fixing cover see page 3 3 90 3 Remove the faston terminal of the fixing unit thermostat on the rear of the fixing unit 4 Remove t...

Page 315: ...the heat roller claws 4 Remove the E ring and moving the separation claws shaft in the direction of the arrow 1 from the upper fixing guide plate 5 Remove the heat roller claws moving it in the direct...

Page 316: ...move the blade spring 4 Remove the E ring and moving the press roller claws shaft in the direction of the arrow 1 from the lower fixing guide plate 5 Remove the heat roller claws moving it in the dire...

Page 317: ...width of the black belt printed on the paper indicating the part which stopped in the fixing unit Adjust the fixing pressure until the width measures the specified values with following procedures 1 L...

Page 318: ...3 3 11 Others 1 Detaching and refitting the ozone filter Replace the ozone filter as follows Procedure 1 Remove the rear cover 2 Remove the ozone filter Ozone filter Figure 3 3 98 3 Refit all the rem...

Page 319: ...e belt as follows Procedure 1 Loosen the two screws 2 Move the scanner drive motor assembly within long hole and adjust tension not so as to break the scanner drive belt tooth 3 Tighten the two screws...

Page 320: ...the screw 2 Set the marking of the fixing tension plate at the center of the rear retainer 3 Tighten the screw 4 Perform the operation check if there is any problems move the fixing tension plate with...

Page 321: ...rew 2 Set the marking of the paper feed tension plate at the center of the rear retainer 3 Tighten the screw 4 Perform the operation check if there is any problems move the paper feed tension plate wi...

Page 322: ...e 1 Loosen the screw 2 Set the marking of the drum tension plate at the center of the rear retainer 3 Tighten the screw 4 Perform the operation check if there is any problems move the drum tension pla...

Page 323: ...ing upper and lower paper feed pulleys Clean or replace the forwarding upper and lower paper feed pulleys as follows 1 1 Removing the primary paper feed unit Procedure 1 Draw out the cassette 2 Remove...

Page 324: ...3 3 109 1AH 3 Open the right cover of the copier 4 Remove the screw holding the primary paper feed unit and then the unit Screw Right cover Primary paper feed unit Figure 3 3 104...

Page 325: ...the arrows as shown in Figure 3 3 105 and remove it from the primary paper feed unit Forwarding pulley retainer Figure 3 3 105 3 Remove the stop ring pull out the forwarding pulley shaft in the direc...

Page 326: ...aper feed housing 4 Remove the upper paper feed pulley moving the upper paper feed shaft in the direction of the arrow as shown Figure 3 3 107 When refitting the upper paper feed pulley keep the side...

Page 327: ...per feed shaft 3 Pull the lower paper feed shaft in the direction of the arrow as shown Figure 3 3 108 and remove the lower paper feed pulley When refitting the lower paper feed pulley keep the side o...

Page 328: ...pier see page 3 3 108 2 Remove the two screws and 8 pin socket from the rear of the cassette 3 Remove the 8 pin paper width switch connector from the 8 pin socket When refitting the 8 pin socket keep...

Page 329: ...n the paper width switch Screws Paper width switch Figure 3 3 110 7 Apply the specified grease to the printed surface of the new paper width switch shaded area in the figure and fit it to the width si...

Page 330: ...e original size indicator see page 3 3 15 has been completed Procedure Figure 3 3 112 Figure 3 3 113 Original Copy example 1 Copy example 2 Yes No Start End Make a test copy with same size Loosen the...

Page 331: ...arding pulley as follows Procedure 1 Remove the stop ring and duplex forwarding pulley 2 Refit all the removed parts When refitting the duplex forwarding pulley align the projections of the duplex for...

Page 332: ...tchback separation belts as follows Procedure 1 Remove the two screws holding the duplex unit front cover and detach the cover 2 Loosen the three screws on the front and the two screws on the top to d...

Page 333: ...eparation assembly and then the assembly 4 Remove the E ring gear shim and bushing 5 Remove the three screws holding the separation guide and detach the guide Bushing Gear Shim E ring Separation guide...

Page 334: ...oks Separation front guide mount Stop ring Stop ring Separation roller Switchback separation belts Figure 3 3 117 8 Refit all the removed parts When refitting the separation assembly hold the separati...

Page 335: ...in connector from the side registration section and the 3 pin connector from the side registration home position switch and unlock the edge 4 Squeeze the paper tapping guide and take it out of the hol...

Page 336: ...d then the switchback roller from the shaft in the direction of the black arrow Refit the switchback roller so that it turns in the same direction as the shaft when the shaft is turned in the directio...

Page 337: ...ile raising the pulse disc guide After the installation check that the pulse disc guide is in the down position After installing the side registration section always proceed to 8 Adjusting the positio...

Page 338: ...plex unit from the rail 2 Remove the switchback roller see page 3 3 120 3 Remove the E ring and idle gear 34 4 Remove the E ring and the bushing of the duplex upper registration roller from the shaft...

Page 339: ...and detach the clutch 7 Remove the E ring and duplex joint gear 8 Remove the E ring and duplex drive gear 9 Remove the E ring bushing and duplex upper registration roller E ring E ring Duplex joint ge...

Page 340: ...n place End of the projection for the hex socket head screws Hex socket head screws Duplex registration clutch End of the shaft Tab of the frame Notch Figure 3 3 124 Install the side registration sect...

Page 341: ...t Bushing Stop ring Pin E ring Refeed roller gear Figure 3 3 125 5 Refit all the removed parts Install the side registration section while raising the pulse disc guide After the installation check tha...

Page 342: ...osen the screws holding the reteed solenoid 2 With the plunger pressed adjust the position of the refeed solenoid by moving it up and down until part A of the plate contacts the refeed roller 3 Tighte...

Page 343: ...crews holding the duplex paper tapping solenoid 2 With the plunger pressed adjust the position of the duplex paper tapping solenoid by moving it right and left so that the bottom surface A of the pape...

Page 344: ...er the paper is stocked in the duplex unit open the unit and move the paper all the way to the rear guide Press the interrupt key Duplex copy mode is automatically select ed Press the print key Enter...

Page 345: ...3 3 130 1AH Figure 3 3 128 Side registration front guide Side registration guide Copy paper A 0 5 mm End Press the stop clear key Exit simulation mode A Remove the paper and reinstall the duplex unit...

Page 346: ...ex posure adjustment keys Remove the paper and reinstall the duplex unit Setting range 0 400 Reference 100 Changing the value by one chang es the forwarding amount by one ms duplex forwarding solenoid...

Page 347: ...3 3 132 1AH End Press the stop clear key Exit simulation mode A Remove the paper and reinstall the duplex unit...

Page 348: ...est copy at 100 with the maximum size of copy paper Loosen the four screws of the side registration section retighten them after moving the position For example 1 move it toward the machine front For...

Page 349: ...scale between forth and fifth marked on the feed shift front plate as shown in figure 3 3 131 3 Tighten the screw 4 Perform the operation check if there is any problems move the feed shift drive tensi...

Page 350: ...1AH 3 4 PCB Initial Setting 3 4 1 Replacing the main PCB 3 4 1 3 4 2 Adjustment free variable resistors VR 3 4 4...

Page 351: ......

Page 352: ...CB 1 Record the user settings of the following items which must be reentered after replacement Initial mode selection 2 Enter simulation mode 3 Run the following simulations and record the counts 4 Ex...

Page 353: ...Double count 94 Selecting copying enabled disabled with originals left on the copier Copying disabled Copying enabled Copying enabled 117 s 87 s 87 s 84 Setting the auto clear time 81 Selecting betwee...

Page 354: ...feed counts Checking and clearing the each option counts Selecting between single double counts Selecting between automatic manual exposure mode Selecting between manual auto mode Setting the auto cl...

Page 355: ...variable resistors VR The variable resistors listed below are set at the factory prior to shipping and cannot be adjusted in the field Composite PCB VR601 VR602 VR603 High voltage transformer PCB VR10...

Page 356: ...1AH 3 5 Self diagnostics 3 5 1 Self diagnostic function 3 5 1 1 Automatic initialization of backup data 3 5 1 2 Self diagnostic display 3 5 1 3 Partial operation control 3 5 1...

Page 357: ......

Page 358: ...stops the first time the problem is detected and also the ser vice call display appears Rank B The service call display appears then the machine enters partial operation control Rank C The machine se...

Page 359: ...re Broken fixing unit thermistor wire Fixing thermistor short circuit abnormally high fixing temperature External temperature humidity sensor prob lem Broken blank lamp Sorter conveying motor problem...

Page 360: ...o o o DF original feed motor problem 3 DF conveying motor problem 3 DF reversing eject motor problem 3 1 Displayed that CPU does not return even if resetting the optical control side 2 Detects at the...

Page 361: ...hly If not repair C010 C030 C210 C220 Backup memory data problem No specified data in the specified area of the RAM Serial communi cation problem Inter CPU on the main PCB com munication error occurs...

Page 362: ...ck Increase in mechanical load Defective lower lift motor Poor contact in the lower lift motor con nector terminals Defective lower lift limit switch Poor contact in the lower lift limit switch connec...

Page 363: ...ctive lift limit switch ST Poor contact in the lift limit switch ST connector terminals The paper feed motor lock In crease in me chanical load Poor contact in the paper feed motor connector terminals...

Page 364: ...e scan ner wire retainers Defective lens motor Poor contact in the lens motor connector termi nals Defective lens home position switch Poor contact in the lens home po sition switch con nector termina...

Page 365: ...harger wire and re place it if it is broken Check the transfer separation charger assembly Clean it if it is dirty Check the transfer separation charger wire and replace it if it is broken Detach the...

Page 366: ...ode Contents Causes Check procedures corrective measures C610 C630 C640 The fixing unit thermistor is in stalled incorrectly Defective com posite PCB Broken fixing unit thermistor wire Poor contact in...

Page 367: ...ector termi nals Sorter detects sorter conveying motor problem Sorter detects sorter bin shift motor problem Sorter detects sorter guide bar motor problem Sorter detects sorter stapler mo tor problem...

Page 368: ...square longitudinally 3 6 13 20 Image is not square laterally 3 6 13 21 Lateral bands of the image are missing 3 6 13 3 6 2 Paper misfeeds 3 6 14 Copier 1 The misfeed indicator for the paper feed pap...

Page 369: ...e scanner fan motor 1 does not operate 3 6 33 9 The scanner fan motor 2 does not operate 3 6 34 10 The paper conveying fan motor does not operate 3 6 34 11 The upper lift motor does not operate C250 3...

Page 370: ...te 3 6 41 4 The duplex paper tapping solenoid does not operate 3 6 41 5 The duplex registration clutch does not operate 3 6 42 6 The duplex paper conveying clutch does not operate 3 6 42 7 The refeed...

Page 371: ...er misfeed 3 6 47 5 Abnormal noise is heard 3 6 47 Special tray optional 1 No paper feed from special tray 3 6 48 2 Multiple sheets of paper are fed from special tray at one time 3 6 48 3 Skewed paper...

Page 372: ...3 6 8 5 A white line ap pears longitudi nally 6 A black line ap pears longitudi nally 7 A black line ap pears laterally 8 One side of the copy image is darker than the other See page 3 6 8 See page 3...

Page 373: ...s ap pear on both sides of the image in re duction copies 16 Image is party missing See page 3 6 13 21 Lateral bands of the image are missing See page 3 6 12 See page 3 6 12 See page 3 6 13 See page 3...

Page 374: ...Clean the main charger housing Check for continuity across the terminals if none replace them Run simulation 32 If CN1 8 on the MPCB fails to go low or the correct control voltage is not output at CN...

Page 375: ...the button and recheck for continuity If there is still no continuity replace the thermostat Check for continuity across the terminals If none replace them Run simulation 20 If CN 10 2 on the MPCB re...

Page 376: ...e developer Readjust the developing section see page 3 3 76 Clean the drum or if the maintenance level is reached see page 3 3 72 1 2 3 4 Causes Check procedures corrective measures 4 Background is vi...

Page 377: ...the drum visually If it is flawed replace see page 3 3 72 1 2 3 Causes Check procedures corrective measures Clean the mirrors dust filter and other parts in the optical section Clean the drum or if it...

Page 378: ...t Defective MPCB Defective HVTPCB Check the drum visually If it is flawed replace see page 3 3 72 Check for poor developing bias wire contact Check for part contaminated with toner or carrier in the d...

Page 379: ...copy image is darker than the other Causes 1 Unevenly distributed halogen lamp light 2 Dirty optical section 3 Dirty main charger wire Unevenly distributed halogen lamp light Dirty optical section Di...

Page 380: ...page 3 3 37 Check visually and remove if any Check the press roller visually and if it is de formed replace see page 3 3 95 Check the gears and belts Grease the gears or readjust the belt tension if...

Page 381: ...the installation condition or operation of the registration clutch 1 Causes Check procedures corrective measures 13 Paper creases Causes 1 Paper curled 2 Paper damp 3 Defective fixing pressure springs...

Page 382: ...across the cleaning lamp ter minals if none replace the cleaning lamp If the cleaning lamp lights when CN3 17 on the MPCB is held low replace the MPCB 1 2 3 A B C Causes Check procedures corrective me...

Page 383: ...er 2 Defective fixing press springs 3 Flawed press roller Wrong paper Defective fixing press springs Flawed press roller Check if the paper meets specifications Replace the fixing press springs Replac...

Page 384: ...ral ly Causes 1 Misadjusted lateral image squareness inclination of fourth fifth mirror Misadjusted lateral image squareness inclination of fourth fifth mirror Readjust the lateral image squareness in...

Page 385: ...en the registration switch is turned on while 5 V DC is present at CN2 17 on the MPCB replace the registration switch Check and remedy Check see page 3 6 35 Problem Causes check procedures Corrective...

Page 386: ...ace the registration switch if the actuator is broken If CN2 18 on the MPCB remains low when the registration switch is turned on while 5 V DC is present at CN2 17 on the MPCB replace the registration...

Page 387: ...rollers do not contact each other The upper and lower registration roller cleaner and have deteriorated The feed unit rollers and the right feed pulley do not contact each other Broken eject switch ac...

Page 388: ...ormed heat roller claws The heat roller claws and the heat roller do not contact each other Check and replace the eject switch if the actuator is broken If CN11 9 on the MPCB remains low when the ejec...

Page 389: ...is turned on and off while 5 V DC is present at CN15 4 on the MPCB replace the duplex paper conveying switch Check visually and remedy or replace if necessary Replace see page 3 3 116 Check and repla...

Page 390: ...If CN16 5 on the MPCB remains low when the duplex eject switch is turned on and off while 5 V DC is present at CN15 4 on the MPCB replace the duplex eject switch Check if CN16 3 on the MPCB changes le...

Page 391: ...desk MPCB replace the lower paper feed switch Check and remedy Check see page3 6 43 Problem Causes check procedures Corrective measure 1 The misfeed indicator for the special tray lights as soon as t...

Page 392: ...can be damaged by static discharges If a PCB contains ICs do not touch the ICs cable connectors or edge connectors Store the circuit boards wrapped in aluminum foil conductive sponge rubber or simila...

Page 393: ...ct with CN7 1 Safety switch 2 24 V DC supply to MPCB output 5 V DC supply to MPCB output 24 V DC supply to MPCB output 5 V DC supply to DF output 24 V DC supply to DF output 24 V DC supply to DF outpu...

Page 394: ...1 1 IC41 IC35 ZD2 A K R18 R17 9 1 80 65 24 64 41 40 25 31 60 91 61 90 IC21 IC1 IC2 IC3 D12 D13 D14 D15 1 1 2 13 14 29 30 R1 R5 R9 B E TR1 1 2 1 2 1 1 6 2 32 1 1 2 23 24 19 20 1 2 D6 D11 D7 D8 D9 B E T...

Page 395: ...ff on output HVTPCB transfer charging output off on output HVTPCB separation charging output off on output HVTPCB grid control voltage output HVTPCB separation charging control voltage off on output H...

Page 396: ...V DC 24 0 V AC 24 V DC supply to RCL output Key counter disconnected connected input Key counter off on output 24 V DC supply to key counter output 5 V DC supply to BL output Blank lamp problem detec...

Page 397: ...24 V DC supply to TNS output TNS control voltage output Serial data from OPPCB input Serial data to OPPCB output Serial data communication clock to OPPCB output Serial data communication data frame s...

Page 398: ...DC 5 V DC 5 0 V DC 24 0 V DC 24 0 V DC ODS 5 6 control voltage output ODS 3 4 LED off on output 5 V DC supply to ODS 3 4 output ODS 3 4 detection voltage output ODS 3 4 control voltage output ODS 1 2...

Page 399: ...C pulse 5 0 V DC pulse 24 0 V DC 24 V DC 24 V DC 24 0 V DC PCFM off on output 24 V DC supply to PCFM output 24 V DC power supply 5 V DC power supply 24 V DC power supply 24 V DC supply to duplex unit...

Page 400: ...5 0 V DC 5 V DC 5 0 V DC pulse PSW U off on input 5 V DC supply to PSW U output LICSW U off on input 5 V DC supply to LICSW U output Return from PLSW U input Scan to PLSW U output 5 V DC supply to PF...

Page 401: ...24 V DC supply to PFM output PFM off on output PFM motor lock detection off on input Special tray connected disconnected input Serial communication from DF input Serial communication to DF output Seri...

Page 402: ...7 1 7 1 7 1 7 1 7 5 V DC 5 0 V DC pulse 5 0 V DC pulse 5 0 V DC pulse 5 0 V DC pulse 5 V DC power supply Serial data from MPCB input Serial data to MPCB output Serial data communication data sync fro...

Page 403: ...t replace the drive motor Run simulation 10 and check if CN4 10 on the MPCB goes low If not replace the MPCB Check for continuity across the coil If none replace the scanner motor Check for continuity...

Page 404: ...n simulation 23 and check if the motor drive coil energization pulse signals are present at CN6 7 8 9 and 10 on the MPCB If not replace the MPCB Check for continuity across the coil If none replace th...

Page 405: ...across the coil If none replace the scanner fan motor 2 Check for continuity across the connector terminals If none replace them With CN5 28 on the MPCB held low check if the scanner fan motor 2 opera...

Page 406: ...tch Check for continuity across the connector terminals If none replace them With CN2 25 on the MPCB held low check if the registration clutch operates if it does replace the MPCB Check for continuity...

Page 407: ...ty across the connector terminals If none replace them With CN17 4 on the MPCB held low check if the lower feed clutch operates If it does replace the MPCB Check for continuity If none replace the cle...

Page 408: ...th CN10 3 on the MPCB held low check if the fixing unit heater turns on If it does replace the MPCB Measure the resistance If it is 0 replace the fixing unit thermistor Check visually and clean see pa...

Page 409: ...the connector terminals If none replace them Check CN1 10 on the MPCB goes low during copying If not check the connector conditions If they are okay replace the MPCB With CN1 5 on the MPCB held low c...

Page 410: ...n the MPCB goes low when paper is put close to the upper paper switch If not replace the upper paper switch Check if CN18 14 on the MPCB goes low when paper is put close to the lower paper switch If n...

Page 411: ...connector terminals Defective safety switch 1 2 or 3 Wiring is broken shorted or makes poor contact Noise Check if CN2 18 on the MPCB remains low when the registration switch is turned on and off If i...

Page 412: ...sually and replace the side registration motor if necessary Check for continuity across the coil If none replace the side registration motor Run simulation 22 and check if motor drive coil excitation...

Page 413: ...ck for continuity across the coil If none replace the duplex registration clutch Check if the duplex registration clutch operates when CN16 9 on the MPCB is held low If it does replace the MPCB Check...

Page 414: ...erminals If none replace them Check for continuity across the coil If none replace the feed clutch ST in special tray Check if the feed clutch ST in special tray operates when CN19 4 on the MPCB is he...

Page 415: ...them correctly depend on each paper size Check for continuity across the three switches in paper wide switch ST 2 in special tray or the one switch in the paper length switch ST If there is no continu...

Page 416: ...feed pulleys feed unit roller right feed pulley vertical paper conveying roller desk paper conveying roller SB forwarding pulley SB upper and lower paper feed pulleys Check if the upper or lower paper...

Page 417: ...contact with each other correctly Check if the eject roller and pulley are in contact correctly Check if the developing unit is extremely dirty Check if the pulleys rollers or gears move smoothly Chec...

Page 418: ...ack roller Duplex upper registration roller Duplex lower registration roller Check if the duplex forwarding pulley is deformed Check for an electrical problem with the following electromagnetic clutch...

Page 419: ...Check if the surfaces of the following pulleys are dirty with paper powder forwarding pulley and upper lower paper feed pulleys in special tray Check if the upper or lower paper feed pulley is deforme...

Page 420: ...6 Timing chart No 7 3 7 7 Timing chart No 8 3 7 8 Composite PCB 1 3 Power source section 1 2 3 7 9 Composite PCB 2 3 Power source section 2 2 3 7 10 Composite PCB 3 3 AVR Fixing heater control sectio...

Page 421: ...s 200 ms MSW ON Primary stabilization 150 C 302 F Fixing stabilization drive starts Secondary stabilization 175 C 347 F Fixing stabilization drive ends The Print indicator lights now when the fixing t...

Page 422: ...13 CN2 25 CN5 2 CN13 1 CN5 30 CN5 28 CN8 4 Print key SHPSW RSW ESW DM DB REM MC REM TC REM SC REM CL BL SM HL BYPSOL BYPCL RCL TC PCFM OPFM1 2 CFM Input Output Print key ON RSW ON RSW OFF SHPSW ON ESW...

Page 423: ...0 CN5 28 CN8 4 Print key SHPSW FSW RSW ESW DM DB REM MC REM TC REM SC REM CL BL SM HL PFCL U FCL U RCL TC PCFM OPFM1 2 CFM Input Output Print key ON FSW ON RSW ON SHPSW ON SHPSW ON RSW OFF ESW OFF 600...

Page 424: ...PFCL L FCL U FCL L RCL TC PCFM OPFM1 2 CFM Input Output Print key ON PFSW U ON FSW ON RSW ON RSW OFF FSW ON RSW ON SHPSW ON FSW OFF PFSW U ON ESW OFF RSW OFF SHPSW ON ESW OFF 600 ms 300 ms 143 ms 2 18...

Page 425: ...TC Input Output Print key ON PFSW L ON PFSW U OFF PFSW L ON FSW ON RSW ON SHPSW ON RSW OFF FSW ON RSW ON SHPSW ON FSW OFF ESW OFF RSW OFF SHPSW ON ESW OFF 600 ms 1 Adjustable by simulation 27 2 Adjust...

Page 426: ...SSW OFF DUPRSW ON DUPPCSW ON DUPPCSW ON DUPRSW OFF DUPRSW ON DUPRSW OFF FSW ON DUPESW OFF DUPESW OFF SRHPSW ON RSW OFF ESW OFF RSW ON FSW OFF FSW ON RSW OFF RSW ON 100 ms 304 ms 304 ms 29 ms 29 ms 95...

Page 427: ...FCL L FCL U RCL FSSOL DUPPTSOL DUPFWDSOL RFCL SRM Input Output Print key ON PFSW U ON PFSW U ON FSW ON RSW ON RSW OFF FSW ON ESW ON RSW ON FSW OFF FSSW ON FSSW OFF FSSW ON FSSW OFF RSW OFF STKSW ON 10...

Page 428: ...N16 3 CN16 7 CN16 6 CN16 4 CN16 5 CN16 8 CN1 4 CN2 23 CN2 25 CN16 18 CN16 17 CN16 11 CN16 9 CN16 10 CN16 12 15 Print key FSW RSW ESW DUPSENS STKSW DUPRSW DUPPCSW DUPESW SRHPSW DM FCL U RCL DUPPTSOL DU...

Page 429: ...L C B 2B 1B 3B 2A 1A 3A B C F001 C001 L001 C002 C005 D001 4 1 3 2 C003 R137 R138 R139 R121 R123 C120 DT1 ZD104 C122 C121 R127 R119 R126 R125 R124 C115 R120 R122 C118 C114 C119 R129 C123 C117 IC1 Q104...

Page 430: ...2 5 CN3 5 CN5 4 CN5 6 CN1 1 CN2 1 CN3 1 CN4 5 CN4 6 P GND S GND S GND P GND S GND P GND P GND S GND P GND 5 V 5 V 5 V 5 V P GND R24 V R24 V R24 V R24 V R24 V R24 V 24 V 24 V 24 V 24 V 24 V C201 R201 R...

Page 431: ...R501 R601 R602 R603 R604 C602 ZD601 VR601 R606 3 1 2 8 4 R605 C601 2 1 3 4 3 Q601 PC3 1 2 1 3 2 PT1 IC601 6 7 5 IC601 D601 D603 R607 VR602 4 3 PC4 R613 2 1 PT2 C603 C604 Q602 R608 R614 VR603 R615 R609...

Page 432: ...9 D0 D1 D2 D3 D4 D5 D6 D7 _OE _CE _WE A0 A1 A2 A3 A4 A5 A6 A7 A8 A9 A10 A11 A12 A13 A14 IC1 22 20 27 25 24 21 23 26 9 7 6 5 4 3 2 1 8 10 A0 A1 A2 A3 A4 A5 A6 A7 A8 A9 A10 A11 A12 A13 A14 CN2 14 CN2 18...

Page 433: ...DB3 DB4 DB5 DB6 DB7 MA0 MA1 MA2 MA3 MA4 MA5 MA6 MA7 MA8 MA9 MA10 MA11 MA12 MA13 MA14 MA15 _OE T_R A0 A1 A2 A3 A4 A5 A6 A7 DB0 DB1 DB2 DB3 DB4 DB5 DB6 DB7 DB0 DB1 DB2 DB3 DB4 DB5 DB6 DB7 MD0 MD1 MD2 MD...

Page 434: ...20 KCNT DET TC DET CNT DET PSW U N C N C PSW L N C FSSOL DUPPPSOL DUPRCL DUPPCCL COUNT COUNT N C COUNT PFM N C SIZE DIG4 SIZE DIG4 SIZE DIG3 SIZE DIG3 SIZE DIG2 SIZE DIG2 N C N C COSW ST PSW ST PFM A...

Page 435: ...5 26 MODE _RESET SELECT AD0 AD1 AD2 AD3 AD4 AD5 AD6 AD7 GND A0 A1 A2 A3 A4 A5 A6 A7 ALE _RD _WR CS PD1 PD0 _Y3 PE7 PE6 PE5 PE4 PE3 PE2 PE1 PE0 GND PC7 PC6 PC5 PC4 PC3 PC2 PC1 PC0 INITD PA7 PA6 PA5 S S...

Page 436: ...7 L13 L18 L23 L2 L8 L14 L19 L24 L3 L9 L15 L20 L25 L10 L16 L21 L26 L5 L11 L17 L22 L27 L6 L12 L61 L35 L28 L34 L62 L42 L43 L36 L29 L58 L63 L41 L45 L30 L70 L54 L50 L59 L64 L39 L46 L31 L71 L55 L51 L60 L65...

Page 437: ...teen 40 2132 MS Hoofddorp The Netherlands Phone 020 6540000 Home page http www kyoceramita europe com Email info kyoceramita europe com KYOCERA MITA NEDERLAND B V Gyroscoopweg 122 1042 AZ Amsterdam Th...

Reviews: