Solving Other Problems
182
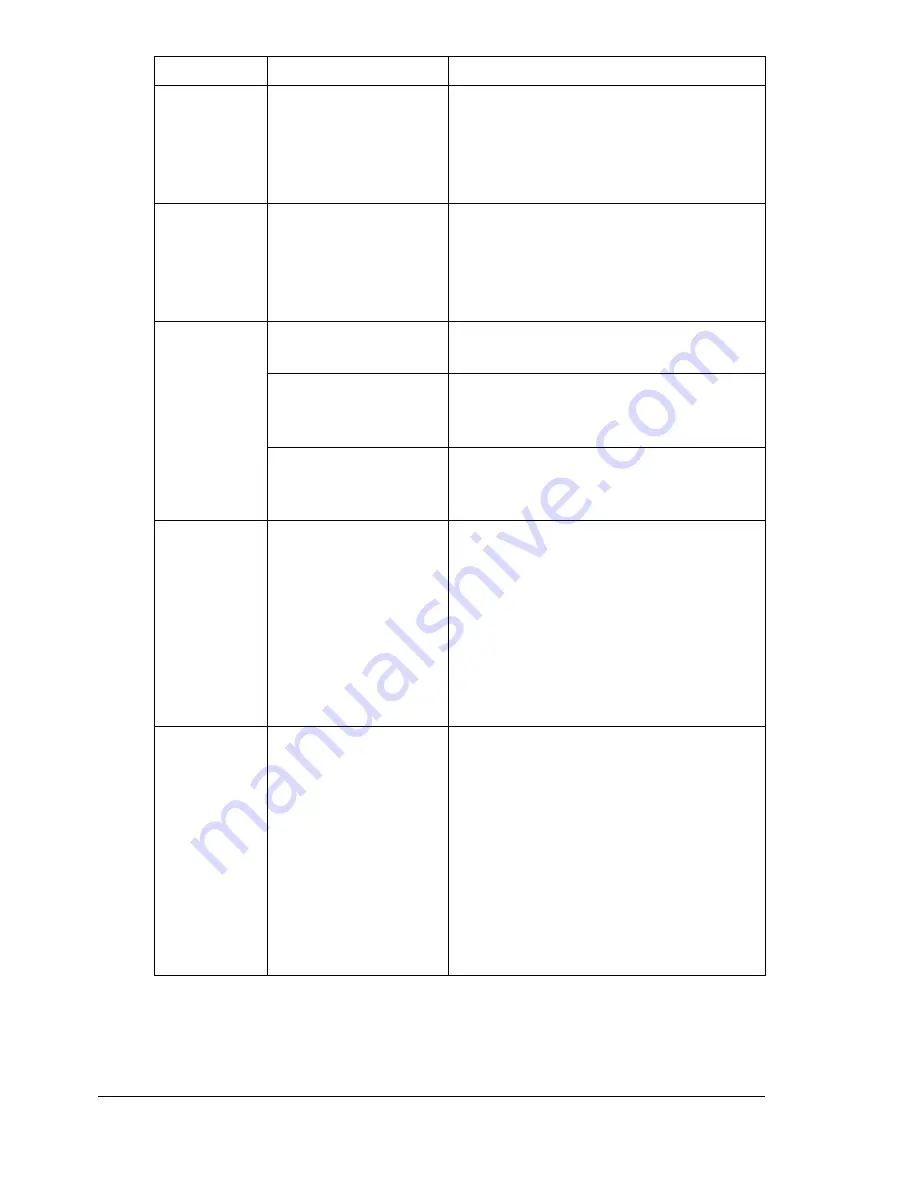
With N-up on
multiple cop-
ies, the out-
put is
incorrect.
Both the printer driver
and the application
have been set for col-
lation.
For N-up on multiple copies, choose
Collate only in the printer driver’s Basic
Tab. Do not set collation in the applica-
tion.
Booklet Left
and Right
Binding out-
put is incor-
rect.
Both the printer driver
and the application
have been set for col-
lation.
For Booklet Left Binding and Booklet
Right Binding, choose Collate only in
the printer driver’s Basic Tab. Do not
set collation in the application.
You hear
unusual
noises.
The machine is not
level.
Place the machine on a flat, hard, level
surface.
The tray is not
installed correctly.
Remove the tray that you are printing
from and reinsert it completely into the
machine.
There is a foreign
object stuck inside
the machine.
Turn off the machine and remove the
object. If you cannot remove it, contact
Technical Support.
When copy-
ing or scan-
ning with the
ADF, a band
appears at
the end of
the image or
paper (5 to 6
mm).
A malfunction may
have occurred while
paper was being
transferred with the
ADF.
If a band appears in the copy after
copying, select a copy density setting
that is one level darker.
If a band appears in the image after
scanning, scan using the original
glass.
While scan-
ning with the
ADF at 600
dpi, the
image has
become
lighter and
the back-
ground has
become
darker.
Immediately after the
machine is turned on,
the lamp intensity
increases. There-
fore, the image may
become lighter and
the background may
become darker.
If the image becomes lighter or darker,
scan using the original glass. In addi-
tion, perform the scan operation after
turning the machine on and lighting the
lamp for an hour and a half or more.
Symptom
Cause
Solution
Summary of Contents for BIZHUB C10
Page 1: ...bizhub C10 Printer Copier Scanner User s Guide 4556 9607 00A ...
Page 14: ...Contents viii ...
Page 15: ...1 Introduction ...
Page 24: ...Getting Acquainted with Your Machine 10 ...
Page 25: ...2 Control Panel and Configuration Menu ...
Page 52: ...Configuration Menu Overview 38 ...
Page 53: ...3 Media Handling ...
Page 71: ...Loading Media 57 10 Carefully close the engine cover ...
Page 77: ...Loading Media 63 6 Reattach the lid to Tray 2 7 Reinsert Tray 2 into the machine ...
Page 87: ...4 Using the Printer Driver ...
Page 96: ...Printer Driver Settings 82 ...
Page 97: ...5 Using Direct Print ...
Page 100: ...Camera Direct Photo Printing 86 ...
Page 101: ...6 Using the Copier ...
Page 112: ...Making Advanced Copies 98 ...
Page 113: ...7 Using the Scanner ...
Page 138: ...Basic Scan to PC Operation 124 ...
Page 139: ...8 Replacing Consumables ...
Page 155: ...9 Maintenance ...
Page 170: ...Storing the machine 156 ...
Page 171: ...10 10 Troubleshooting ...
Page 181: ...Clearing Media Misfeeds 167 8 Reinstall the drum cartridge 9 Carefully close the engine cover ...
Page 185: ...Clearing Media Misfeeds 171 20 Reinsert Tray 2 ...
Page 214: ...Status Error and Service Messages 200 ...
Page 215: ...11 11 Installing Accessories ...
Page 223: ...A Appendix ...
Page 236: ...Index 222 ...


