OPERATION
EXPLANATION OF COMPONENTS
107
●
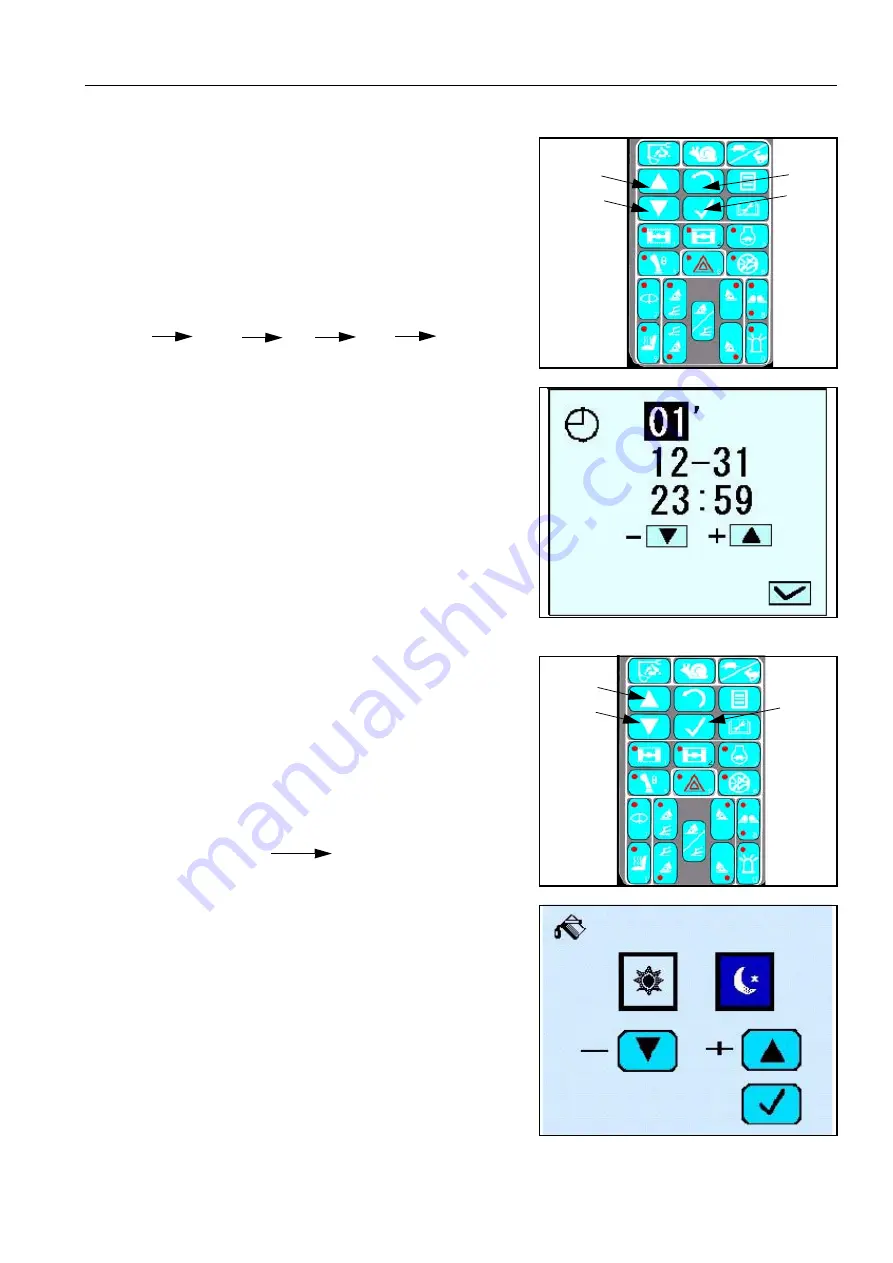
(C). Adjusting the clock
1.
Use the adjustment screen and press up switch (7) or down
switch (8) to select the clock monitor.
(The selected monitor is inverted to black.)
2.
When the screen changes to the clock adjustment screen,
press up switch (7) or down switch (8) to adjust the year, to
move to the date press input confirmation switch (9), the
order in which the cursor moves is shown below:
3.
After completing adjustment of the clock, press input confir-
mation switch (9). This will return you to the above menu and
store the new setting.
●
(D). Adjusting background colour
1.
Use the adjustment screen and press up switch (7) or down
switch (8) to select the background colour monitor.
(The selected monitor is inverted to black.)
2.
When the screen changes to the background colour adjust-
ment screen, press up switch (7) or down switch (8) to adjust
the colour day time and for night time, the different combina-
tions of colours are shown below: Day time/Night time.
3.
After completing adjustment of the background colour, press
input confirmation switch (9). This will return you to the above
menu and store the new setting.
7
8
9
5
Year
Month
Day
Hour
Minute
7
8
9
Light blue/Dark blue
Dark blue/Light blue
Summary of Contents for PW160-7K Series
Page 2: ......
Page 3: ...3 FOREWORD ...
Page 14: ...LOCATIONS OF PLATES TABLE TO ENTER SERIAL NO AND DISTRIBUTOR FOREWORD 14 ...
Page 20: ...20 ...
Page 222: ...TROUBLESHOOTING OPERATION 222 ...
Page 304: ...SERVICE PROCEDURE MAINTENANCE 304 ...
Page 305: ...305 SPECIFICATIONS ...
Page 307: ...SPECIFICATIONS SPECIFICATIONS 307 1 PIECE BOOM ...
Page 308: ...SPECIFICATIONS SPECIFICATIONS 308 2 PIECE BOOM ...
Page 312: ...SPECIFICATIONS SPECIFICATIONS 312 ...
Page 354: ...ROTATING ARM OPTIONS ATTACHMENTS 354 ...
Page 357: ......


