38 Maintenance and inspection
C 1200
Pivoted mowing
attachment
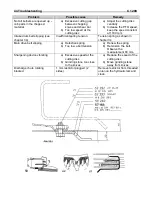
A common pivot connects the mowing attachment and the housing of the
precompression rollers to the chopping unit. Both units can therefore be
swung to the side for repair or maintenance work (see fig. 55).
Do not allow anyone to stay in the slewing range of the machine. Check that
the machine is in a horizontal position when swinging round. Failure to do so
may cause the machine to swing round due to its weight when the locking
mechanism is released. Special care should be taken when operating on a
slope.
Fold up the guard and unhook the pressure springs 1 & 2 (fig. 55).
Remove V-belts 3 & 4. If necessary the pulleys 6 & 7 can be removed. To
this end release screw 8.
Release tension nut 10 and carefully swing round the machine.
The mowing attachment / intake drum can also be swung round separately.
To this end slacken spring 12 and remove power band 11 from roller 13.
When reassembling the unit make certain that the power band is at the
correct tension. Tension will be correct when spring 12 is compressed to 270
mm (measured between both eyelets).
Cleaners (fig. 57)
The cleaners fitted above the teeth of the feed drum have the important task
of constantly clearing husk accumulations on the scrapers. There should be
a maximum distance of 1 – 2 mm between cleaner and scraper edge.
The cleaners are made from highly resistant special steel. Since they are
constantly suffering from wear it is essential to check them periodically.
Accumulations of husks indicate that the cleaners are poorly adjusted or
defective. Worn cleaner tips can be repaired by build-up welding with steel
electrodes.
Summary of Contents for Champion C 1200
Page 13: ...10 Designation of assembly groups C 1200 ...
Page 15: ...12 Champion harvesting technology C 1200 ...
Page 17: ...19 Technical instructions C 1200 ...
Page 19: ...19 Technical instructions C 1200 ...
Page 29: ...30 Operating instructions C 1200 ...
Page 42: ...32 2 Blade rotor C1200 Installation position ...
Page 45: ...35 Greasing chart C 1200 ...
Page 47: ...35 Greasing chart C 1200 ...
Page 48: ...35 Greasing chart C 1200 ...
Page 51: ...38 Maintenance and inspection C 1200 ...
Page 53: ...38 Maintenance and inspection C 1200 ...


