1-18
Performance Verification
Model 2701 Service Manual
Verifying frequency
Follow the steps below to verify the Model 2701 frequency function:
1.
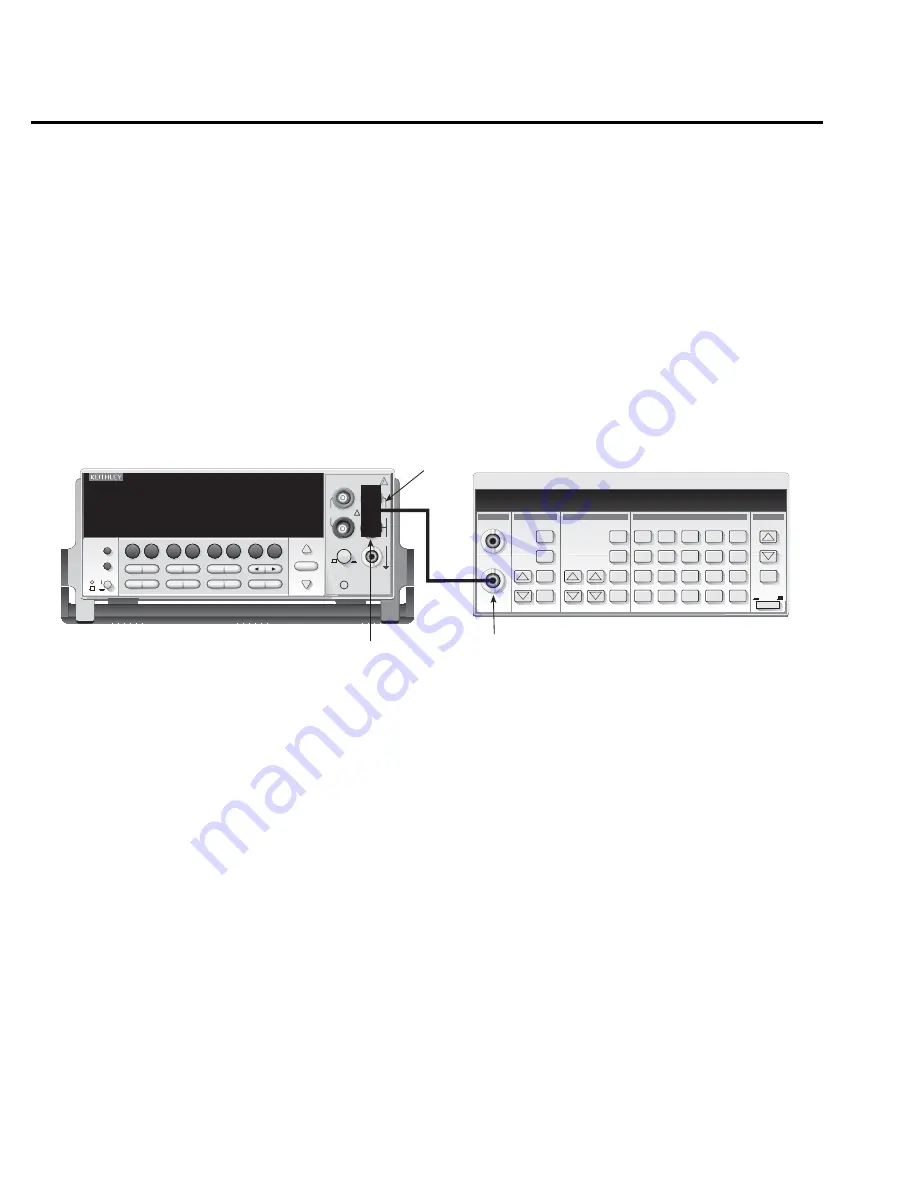
Connect the function generator to the Model 2701 INPUT jacks. (See
Figure 1-7
.) Be
sure the INPUTS switch is in the FRONT position.
2.
Set the function generator to output a 1kHz, 1V RMS sine wave.
3.
Select the Model 2701 frequency function by pressing the FREQ key.
4.
Verify that the Model 2701 frequency reading is between 999.9Hz and 1.0001kHz.
Figure 1-7
Connections for Model 2701 frequency verification
Model 7700 verification
Use these procedures to verify measurement accuracy through the Model 7700 20-Channel
Multiplexer Card.
NOTE
Although the following tests are based on the Model 7700 20-Channel Multiplexer,
the same general procedures can be used for other plug-in modules that have similar
capabilities. Refer to the Model 2701 User’s Manual for specific information on ter-
minals and connections for other plug-in modules.
Verifying DC voltage
Check DC voltage accuracy by applying accurate voltages from the DC voltage calibrator to
the Model 7700 input terminals and verifying that the displayed readings fall within specified
limits.
CAUTION
Do not exceed 300V DC between plug-in module INPUT H and L
terminals or between any adjacent channels.
!
Model 2701 Ethernet Multimeter / Data Acquisition System
RANGE
F
500V
PEAK
FRONT/REAR
3A 250V
AMPS
HI
INPUT
LO
SENSE
Ω
4 WIRE
INPUTS
350V
PEAK
1000V
PEAK
AUTO
SHIFT
LOCAL
POWER
RANGE
R
EXIT
ENTER
DIGITS RATE
REL
FILTER
TRIG
EX TRIG
STORE RECALL
OPEN
DCV
DCI
MATH
O U T P U T
RATIO
ACV
ACI
Ω
2
Ω
4
FREQ
TEMP
CH AVG
CONT
PERIOD SENSOR
LIMITS
ON/OFF
DELAY
HOLD
SAVE
SETUP
CONFIG
HALT
TYPE
LSYNC
TEST
MONITOR
STEP
SCAN
OCOMP
CH-OFF
CARD
CLOSE
Integra Series
RS-232
ETHERNET
Function Generator
Model 2701
50
Ω
Coax
Cable
Function
Output
BNC-to-Dual
Banana Jack
Adapter
INPUT
HI AND LO
CAT I
Summary of Contents for 2701
Page 15: ...1 PerformanceVerification...
Page 47: ...2 Calibration...
Page 70: ...3 RoutineMaintenance...
Page 78: ...4 Troubleshooting...
Page 97: ...5 Disassembly...
Page 104: ......
Page 105: ......
Page 106: ......
Page 107: ......
Page 108: ......
Page 109: ......
Page 110: ......
Page 111: ...6 ReplaceableParts...
Page 125: ......
Page 126: ......
Page 127: ......
Page 128: ......
Page 129: ......
Page 130: ......
Page 131: ...A Specifications...
Page 140: ...B CalibrationReference...


