MCP-Z PROCESS
,
14-020, REV. C
57 of 58
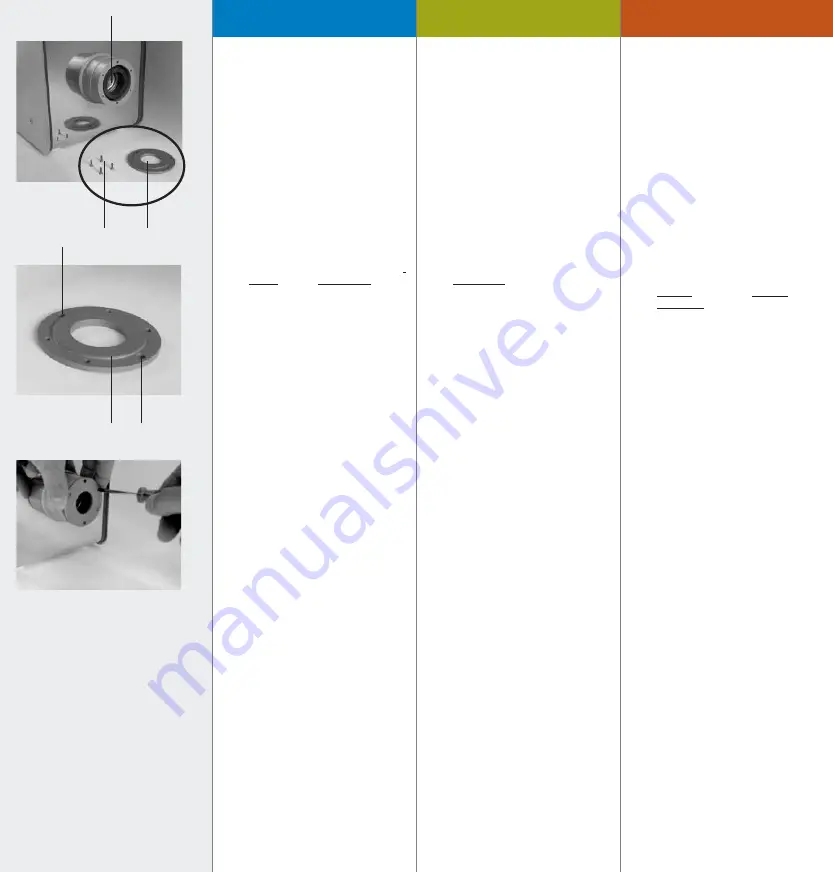
Centering flange
The centering flange fits onto
MCP-Z drive. It is only required
for the Micropump 200 and
201 pump-head series where it
facilitates their precise mounting.
Accessories:
a. 4 flat-headed screws
M 2.5 x 8 BN0187
b. 1 centering flange IS10379
Mounting instructions:
1. Please ensure that the circular drive
magnet (c) is correctly mounted.
2. When mounting the centering
flange, make sure that:
–
its elevated inner ring (1) exactly
fits into the drive flange, and
–
the two straight holes (2) are
placed in a vertical posi-tion at
the top and the bottom.
X
When screwing the centering
flange onto the drive, make
certain that none of the four
flat-headed screws protrude.
3. Mounting the gear pump-head
with the two screws can now
proceed in the usual way.
Couronne de centrage
La couronne de centrage s’adapte
sur le moteur MCP-Z. Elle n’est
nécessaire que pour la série de têtes
de pompe 200 et 201 de Micropump,
où elle assure un montage précis.
Accessoires:
a. 4 vis à tète fraisée
M 2,5 x 8 BN0187
b. 1 couronne de centrage IS10379
Instructions de montage:
1. Assurez-vous que l’aimant
circulaire d’entraînement (c)
soit correctement monté.
2. Lors du montage de la couronne
de centrage, assurez-vous que:
–
l’anneau intérieur surélevé (1)
s’ajuste exactement dans la
couronne du moteur, et que
–
les deux trous (2) sans facettes
soient placés verti-calement, en
haut et en bas de la couronne.
X
Lors de la fixation de la couronne
sur le moteur, assurez-vous qu’aucune
des vis à tête fraisée ne dépasse.
3. Vous pouvez maintenant
procéder au montage de la tête
de pompe à engrenage comme
habituellement avec deux vis.
Zentrierflansch
Der Zentrierflansch passt auf den
MCP-Z Antrieb. Er wird ausschließlich
für Micropump Pumpenköpfe
Series 200 und 201 verwendet und
vereinfacht deren exakte Montage.
Zubehör:
a. 4 Senkkopfschrauben
M 2,5 x 8 BN0187
b. 1 Zentrier-flansch IS10379
Montage:
1. Stellen Sie sicher, dass der ringförmige
Antriebsmagnet (c) montiert ist.
2. Setzen Sie den Zentrierflansch
so auf, dass:
–
seine ringförmige Stufe (1) genau
in den Antrieb hineinpasst,
–
die zwei gerade gebohrten
Löcher (2) oben und unten liegen.
X
Beim Befestigen des Flansches
achten Sie darauf, dass keine der vier
Senkkopf-Schrauben übersteht.
3. Nun kann der Zahnradkopf wie
gewohnt mit zwei Schrauben
befestigt werden.
1
2
2
a
b
c
3


