background image

1.6

Getting started

3

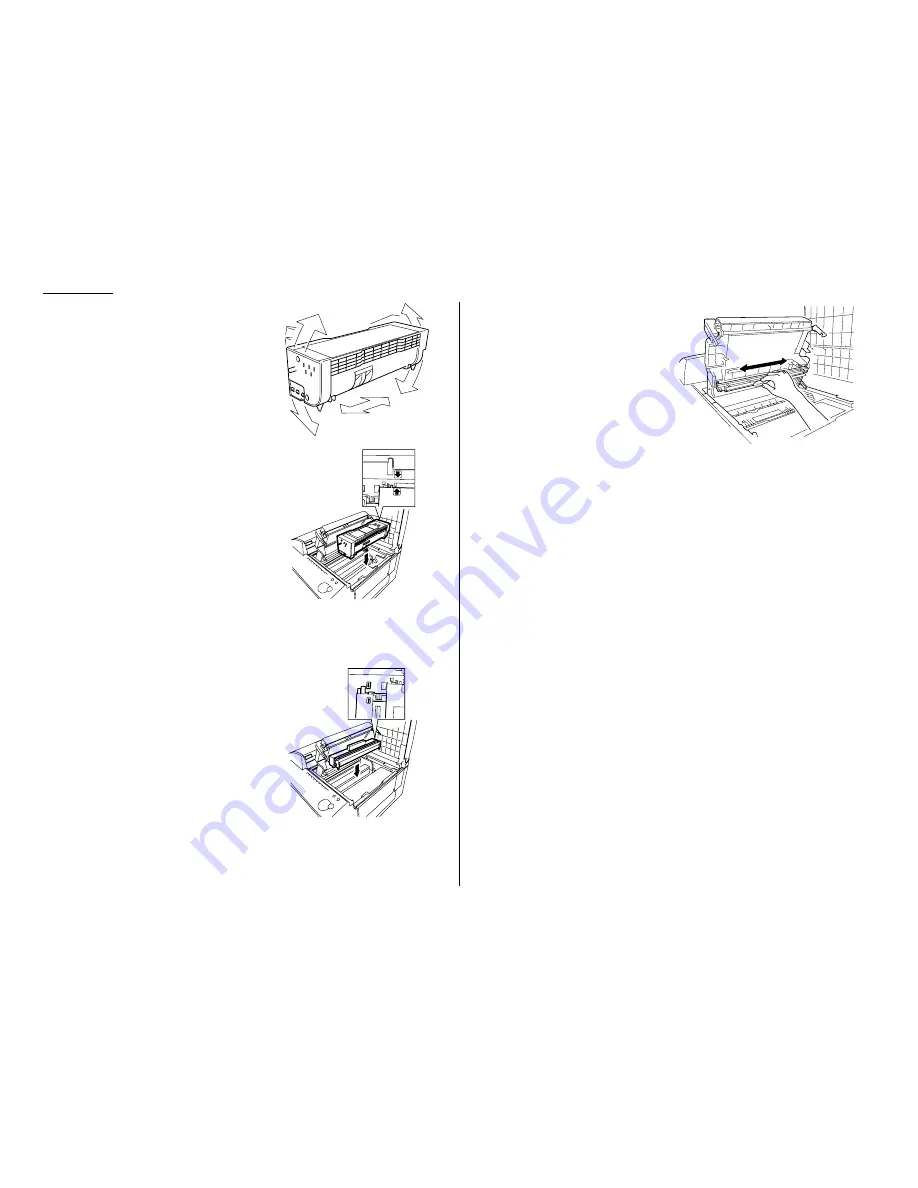
Unpack a new toner cartridge from its
carton. Then, holding the toner car-
tridge with both hands, slowly shake it
to distribute the toner evenly inside the
cartridge.

Note: Do not touch the roller in the

toner cartridge.

4

Gently install the toner cartridge in
the printer, making sure the toner car-
tridge’s two pins fit in the slits inside
the printer frame.

5

Unpack the drum unit from its carton.

Note: Shield the drum unit from light, especially strong light. Later, if you

have to remove the drum from the machine, immediately wrap it in a
thick cloth to protect it from light.

6

Gently install the drum unit in the
printer, making sure the drum unit’s
four pins fit in the slits inside the
printer frame.

7

Gently clean the LED print head
using the cleaning paper included in
the toner cartridge carton box.
For best print quality, you should
clean the LED head every time you
change the toner cartridge.
Note: Do not use abrasive materials

on the LED print head, and do
not 
subject it to heavy pres-
sure

8

Gently close the printer cover.

9

Close the top cover.

Note: The machine will not operate unless the cover is properly closed.

Summary of Contents for VarioPrint 5000

Page 1: ...www imagistics com Operating Manual For use with Imagistics and Pitney Bowes Model 5000 5000 Model ...

Page 2: ...International Inc fax machine for your business Before you begin please note that before your fax can be used and before you can turn on power to the unit for the first time there are important precautions to take Please see page 1 5 for more information ...

Page 3: ...Saving Mode In the Energy Saving Mode the printer will not use its fusing lamp and Energy Save Mode will be displayed on the LCD If your machine receives a fax message or if any key is pressed your machine will automatically wake up The time for the machine to enter the Energy saving mode can be selected from 1 to 120 minutes For details see Setting sleep mode page 4 10 The Model 5000 uses a high ...

Page 4: ...py machines air conditioners and computers can generate electronic noise that can interfere with the operation of your fax machine Clean Dust buildup can damage your fax Periodically clean your fax machine as described in the operating instructions Do not use a dust cover which can cause damaging overheating Near a phone jack Your fax machine uses a standard modular tele phone jack also known as a...

Page 5: ...ver use your fax machine outside the country in which you purchased it Doing so may violate telecommunication and safety regulations of that country and variations in electrical and telephone standards can cause poor performance and damage to your fax General Precautions Never disassemble your fax machine Disassembling your fax machine can cause serious injury to you and damage to your fax Keep aw...

Page 6: ...avoid damage to your fax machine and to assure the best performance possible follow these guidelines when storing and handling toner and or drum unit Store the cartridge Store the cartridge at a constant temperature within a range of 32º F to 95º F 0º C to 35º C To avoid condensation do not store cartridges in locations subject to extreme fluctuation of temperature and humidity Do not stand the ca...

Page 7: ...This page intentionally blank ...

Page 8: ...ur machine It also tells you how to give your machine the kind of easy sensible care that should keep troubles to a minimum Find your serial number and write it down Please note that your machine s serial number is located on the bar code label as shown on the drawing at right Use the blank at the bottom of this column to copy this down before you set up your machine Close up the bar code label lo...

Page 9: ...g fax reception 2 8 Making copies 2 9 Changing the reduction ratio 2 9 Using the bypass tray 2 9 Memory overflow message 2 10 If supplies run out while copying 2 10 Using your fax machine as a phone 2 11 Dialing a telephone number 2 11 On hook dialing 2 11 Redial 2 11 Call request 2 11 Changing the dialing type 2 11 Dialing in the event of a power failure 2 11 Attaching a second phone 2 12 Advance...

Page 10: ...e number of rings before answer 4 4 Image Rotation 4 4 Settings for dialing 4 5 Changing the dialing pause length 4 5 Changing redial settings 4 5 Settings for copying 4 6 Scan settings 4 6 Copy print settings 4 7 Settings for operation 4 8 Setting for silent mode 4 8 Setting Sleep mode Energy saving mode 4 9 Setting paper source 4 9 Adjusting the machine s clock 4 9 Setting 2 bin tray Option 4 9 ...

Page 11: ...o set up your machine operating tips and some important settings before you use your machine Packaging contents 1 1 Parts of your machine 1 1 Control Panel Overview 1 3 Setting up 1 5 Operating tips 1 10 Function table 1 13 Initial settings 1 18 ...

Page 12: ...a time It can hold up to 80 pages of letter sized pages 3 Scanner cover release Pull up on this to open the scanner cover 4 Scanner cover Opens this cover to remove original document jams 5 Document guides Adjust these to fit the width of the original document so it will feed properly into the machine 6 Document tray Holds original documents in place for scanning into the machine 7 Top cover Open ...

Page 13: ...about paper capacity of the paper cassette see Specifications page AI 2 17 LINE jack Where you plug in the telephone line cord The other end of the cord plugs into a wall telephone jack 18 PHONE2 jack If you connect a second telephone to your machine this is where you plug in the cord 19 PHONE1 jack Where you plug in the optional handset 20 PRINTER PARALLEL port optional Where you connect the prin...

Page 14: ... 7 REPORT Press to turn the confirmation report feature on or off for the next fax transmission Soft Key 8 MEMORY TRANSMISSION Selects which transmission mode your fax machine uses whether Memory transmission or Real time transmission see pages 2 2 2 3 2 Internet Fax Press to deliver the fax message to another computer as an E mail attachment via the Internet Note This function is available only i...

Page 15: ... into the machine The display shows up to 4 lines 30 characters per line If the LCD is blank the machine is off 16 LCD contrast key Press to adjust the contrast level of the LCD display 17 MEMORY RECEIVE light Glows when the machine is receiving an incoming fax document into its electronic memory 18 COMM light Glows when the machine is communicating with another machine 19 ALARM light Glows when a...

Page 16: ...sumption appliances can cause draw downs temporary drops in the power available for other equipment on the circuit which could damage your fax machine Use an electrical surge suppressor preferably one which guards both tele phone and electrical lines This device helps to shield your fax machine from damaging high voltage electrical surges Voltage requirements 120 VAC 10 50 60 Hz Power consumption ...

Page 17: ...g light Later if you have to remove the drum from the machine immediately wrap it in a thick cloth to protect it from light 6 Gently install the drum unit in the printer making sure the drum unit s four pins fit in the slits inside the printer frame 7 Gently clean the LED print head using the cleaning paper included in the toner cartridge carton box For best print quality you should clean the LED ...

Page 18: ...he volume down press 3 Press MONITOR CALL again to hang up Loading paper Acceptable paper size and cassette capacity Paper source Paper type Paper size Capacity Paper cassette Plain paper 1 Letter Legal Half letter 500 sheets Letter Legal Half letter Plain paper 1 2 A4 A5 A6 F4 50 sheets Bypass Tray Executive Custom sized 3 Envelopes 2 DL CM10 Monarch 1 sheet Postcard 2 3 9 5 8 100 148mm 20 sheets...

Page 19: ... sides of the paper are even Do not stack the paper over the limit mark inside of the cassette Place the edges of the top sheet under the metal tabs on the cassette s left and right side 5 Adjust the paper guides to fit the size of paper 6 Gently push the paper cassette back into its original closed position You ll feel a click when it s properly in place 7 Attach the paper size sticker on the cas...

Page 20: ...al type of paper such as transparency film use the bypass tray 1 Open the bypass tray on the right side of your machine 2 Pull out the hopper on the bypass tray and raise the flapper release lever 3 Place the paper on the bypass tray Adjust the paper guide to fit the paper and insert the paper until it comes to a stop Then lower the flapper release lever 4 When you load the paper on the bypass tra...

Page 21: ...rection of the document or paper and which side is printed MENU Any function can be started by first pressing the MENU key Cursor key Press or to select items in a menu or move the cursor How to operate the machine Most settings and functions are started by first pressing the MENU key Then press four digit numbers to select the function In this manual we explain the operation with short cut operat...

Page 22: ... appears 3 After you find the level one function item you want to program press to go to the level two function groups 4 Search the level two function groups using or until your desired item appears 5 After you find the level two function item you want to program press to go to the level three function groups 6 Search the level three function groups using or until your desired func tion appears 7 ...

Page 23: ... character or digit Then press CANCEL to erase it Re enter the character or digit correctly To change upper lower case Press Caps key to toggle upper case and lower case The word Lower means the machine will enter only lower case letters To type a upper case letter press Caps key The LCD changes to This means the machine will enter upper case letters To switch back for lower case entries press Cap...

Page 24: ...r 1 9 02 Protect Passcode Enter the protection passcode for using the security features 3 52 03 Soft Key Program to turn on or off the function by pressing this key Soft key 1 COMM CANCEL CONFIRM Soft key 5 SPEED DIAL GROUP Soft key 2 BROADCAST Soft key 6 MONITOR CALL See left 3 17 Soft key 3 COMM OPTIONS Soft key 7 REPORT Soft key 4 PAUSE DIAL OPT Soft key 8 MEMORY TRANSMIT 04 Silent Mode Mute yo...

Page 25: ...sending your TTI On 4 2 09 ECM Mode On Off setting for ECM mode On 4 2 10 Block Junk Fax Reject the fax reception from unauthorized incoming faxes Off 3 56 11 Security Rx Keep all received fax messages in memory and after print them Off 3 52 12 Separator Page Partition each received documents by inserting the separator page Off 3 30 13 Rotate Rx On Off setting for Rotate Rx Off 4 4 14 PIN Mode Pre...

Page 26: ... a key 02 Erase P One touch Erase the programming in a programmable one touch key 3 51 5 F Code Box 01 Set F Code Box Create the F Code box 3 34 02 Erase F Code Box Erase an empty F Code box 3 41 6 Batch Tx 01 Set Batch Box Create the Batch box 3 12 02 Erase Batch Box Erase an empty batch box 3 14 7 Scan Box 5 01 Set Scan Box Create the Scan box 02 Erase Scan Box Erase an empty scan box 8 Internet...

Page 27: ...over page 3 31 10 Dept Time List Print total communication time and printed pages of each department code 3 59 11 P One Touch List Print a list of the programmable one touch keys 3 51 12 F Code Box List Print a list of F Code boxes 3 38 13 F Code Doc List Print a list of the document stored in the F Code boxes 3 38 14 Batch Box List Print a list of Batch boxes 3 13 15 Batch Doc List Print a list o...

Page 28: ...e RS 232C parameters 9 User Install Set up the following settings Language on the LCD and Lists English Current Day and Time Automatic Daylight saving time adjust ON Select Rx Mode Fax Ready 1 18 Select dialing type Tone Subscriber ID your fax phone number Your TTI your name Select usual TTI Time for the machine to enter the sleep mode 5 minutes 1 17 Getting started 3 This option appears only if t...

Page 29: ...tifier TTI and a fax number called the Subscriber ID The TTI cannot be longer than 22 characters Clearing stored settings Before using Initial settings clear your machine s built in user data memory This ensures the memory will hold only your settings Important After you use Initial settings do not clear the memory again unless an authorized technician asks you to do so To clear the machine s memo...

Page 30: ...mode you want 15 Press ENTER to save the setting and continue 16 The LCD now asks you to enter your fax number as you want it to appear on other fax machines displays or printouts The fax industry term for this number is Subscriber ID 17 Use the numeric keypad to enter the fax number The number may contain up to 20 characters numbers and dashes Note To insert a dash as shown here press To insert b...

Page 31: ...TTI proceed to step 23 23 Select Exit and then press ENTER and continue 24 The LCD now asks you to set the default TTI Select the TTI you want to appear usually at the top of faxes you send using the cursor key 25 Press ENTER to save the setting and continue 26 The LCD now asks you to enter the time for the energy saver sleep mode Your machine will now automatically enter sleep mode after your sel...

Page 32: ...1 21 Getting started This page intentionally blank ...

Page 33: ...Basic Operations This chapter describes the basic operation of the transmission reception and copying Sending faxes 2 1 Receiving faxes 2 7 Making copies 2 9 Using your fax machine as a phone 2 11 ...

Page 34: ...ely complicated drawings floorplans or handwritten documents Superfine resolution S fine on the LCD reproduces the detail of extremely complicated drawings or line art Grayscale mode PHOTO on the LCD captures shades in photos and drawings Note If you send a fax in superfine certain fax models especially older non Pitney Bowes models receive it only in fine mode However you can send a fax in graysc...

Page 35: ... has ended This cuts your actual on line time to a minimum Save Even More Money Set up a delayed transmission see page 3 11 to send your document after hours This allows you to take advantage of cheaper line charges saving you even more money Note Some documents use up memory more quickly than others They include documents with many pages and those with many dark areas When the machine s memory is...

Page 36: ...ode In this mode the next page is not scanned in while the current page is being transmitted Note In this mode only one destination can be dialed Sending a fax 1 Insert the document face up top edge first Adjust the document guides by sliding either of them to the left or right to fit the page s you ll be fax ing Your fax machine s ADF Automatic Document Feeder will hold up to 80 pages with letter...

Page 37: ...or canceling commands page 3 21 6 At the end of the operation your fax machine beeps and displays Important Whenever you transmit a document what actually appears on the top line of the display depends on information stored in the remote fax The line may even be blank Note If the call fails see Redialing page 2 5 Sending a fax using MONITOR CALL key or a handset You also can fax a document using e...

Page 38: ...ars 4 Press START To redial a fax call manually with the MONITOR CALL key or an optional handset 1 Make sure the document is in the ADF and that the resolution and contrast are set 2 Press MONITOR CALL or lift the optional handset to get a dial tone 3 Press REDIAL The LCD will show 4 Your machine can remember the last 10 dialed numbers Press or until the dial number you want to redial appears 5 Wh...

Page 39: ...command indicated by its command number and the phone number it will dial If a command is in progress that will be the first command the LCD shows If there are no stored commands in your machine It beeps briefly and displays No Command on the LCD 2 Press or to scroll through currently stored commands 3 If you want to cancel the command shown press Erase The LCD shows 4 To go ahead with canceling t...

Page 40: ...has five different reception modes Tel Ready Fax Ready Fax Tel Ready Tel Fax Ready and Ans Fax Ready We ll explain each of these in this section Tel Ready mode Use it if You want to use the same line for both fax and phone calls and On that line you re using at least one other phone which is not connected to your fax machine or You have an optional handset installed on your fax machine In this mod...

Page 41: ...ch can cause problems when using an answering machine with your fax But your fax machine can accommodate these silent machines without disrupting your answering machine operation How to select the fax reception mode 1 Press MENU 9 and then press ENTER four times The LCD shows your current fax reception mode 2 Using the cursor key select your desired reception mode 3 Press ENTER to save the setting...

Page 42: ...ss STOP to return to the standby mode Using the bypass tray Whenyouneedtouseasizeofpapernotcurrentlyloadedinyourmachine spapercassette s orwhenyouwanttouseaspecialtypeofpapersuchasanoverheadprojectortransparency OHP usethebypasstray Important Yourmachineautomaticallyselectssuitablepaperaccordingtothedocument sizeandreductionrate So ifsuitablesizedpaperforyourcopyisinthepaper cassette themachinewil...

Page 43: ...tomati cally print out the document stored in the memory during the current operation If supplies run out while copying When your machine runs out of paper toner or drum is at end of life it beeps the ALARM light glows and the LCD shows which source has run out of supplies or paper in the 1st cassette 2nd cassette optional or the bypass tray In this example the machine runs out of the paper in the...

Page 44: ...k Note If the call fails press MONITOR CALL to hang up Redial 1 Lift the optional handset to get a dial tone 2 Press REDIAL The LCD will show 3 Your machine can remember the latest 10 dialed numbers Press or until the dial number you want to redial appears 4 Press START When the other person answers use the optional handset to speak Call request You can send or receive a fax message and have a reg...

Page 45: ... receives phone sig nals through your machine Now let s proceed 1 If your second phone is already plugged into a wall phone jack disconnect it from that jack Hold onto the phone plug you ll need it in step 2 Note Of course if your second phone is a model which requires AC power as is true for the base of a cordless phone don t unplug it from its AC power jack 2 Using the plug mentioned in step 1 p...

Page 46: ...2 13 Basic operation This page intentionally blank ...

Page 47: ...scribes convenient features of your machine Autodialer 3 1 Broadcasting 3 9 Delayed transmission 3 11 Batch transmission 3 12 Polling 3 15 Soft keys 3 17 Special features 3 18 Security features 3 52 Advanced Features ...

Page 48: ...se location IDs alphabetically Using your EasyDial directory you can look up these numbers by their descriptive names just as if you were using a phone book We ll explain how to store the numbers and location IDs in the next few pages The EasyDial directory is discussed in detail on page 3 8 Special Dialing Characters Your fax machine allows you to enter special dialing characters when programming...

Page 49: ... the LCD If you wish to change the location ID press CANCEL to erase it multiple times if necessary and then enter another location ID 7 Enter the Location ID Regarding how to enter the character see Entering character on page 1 12 A number s Location ID may be up to 24 characters in length 8 Press ENTER to save the setting 9 Select Exit and press ENTER The LCD will display the next empty one touc...

Page 50: ...nsmission see page 2 2 If you specified normal memory transmission Your fax machine scans your entire document into memory first then dials the other fax machine The LCD shows the Location ID and the document s width and resolution settings Note If the entry doesn t have a Location ID the number appears When the other machine answers your fax transmits the document directly from memory To review M...

Page 51: ...on the LCD If you wish to change the location ID press CANCEL to erase it multiple times if necessary and then enter another location ID 7 Enter the Location ID Regarding how to enter the character see Entering character on page 1 12 A number s Location ID may be up to 24 characters in length 8 Press ENTER to save the setting 9 Select Exit and press ENTER The LCD will display the next empty speed ...

Page 52: ...d document directly from memory To review Quick memory transmission see page 2 2 If you specified normal memory transmission Your fax machine scans your entire document into memory then dials the other fax machine The LCD shows the Location ID and the document s width and resolution settings Note If the speed dial entry doesn t have a Location ID the number appears When the other machine answers y...

Page 53: ...ore a number or change a previously stored number Note You can also select the group number by directly entering that two digit identifier code When entering the identifier code for group numbers less than 10 you must enter leading zero to make two digits For example 01 09 3 Press ENTER The LCD shows 4 Enter all the one touch number s or the speed dial number s you want to store into the group num...

Page 54: ... location speed dial location and up to 30 manually dialed number See Broadcasting page 3 9 4 Press START Printing a call group directory Your machine can also print a call group directory This lists all your stored autodialer numbers by Location ID and lists the groups to which these numbers belong The directory divides the call groups into four banks 01 09 the list shows 00 10 19 the list shows ...

Page 55: ...y or moves through alphabet Note The scrolling is open ended For example when you run out of listings beginning with alphabet A pressing or automatically moves you into listings beginning with other characters 4 When the LCD displays the name you want to dial press START If you ve set the document in the ADF your machine will start the fax transmission If you make a voice call speak after a person...

Page 56: ... you are finished press Return to return to the previous dis play 5 Press START Your fax machine scans the document into memory and then sends it to each number or call group you ve entered Delayed broadcasting What if you want the broadcast to take place later That s the purpose of setting up a delayed broadcast Note Delayed commands are discussed on pages 3 21 3 24 And you may want to read Delay...

Page 57: ...t you just programmed but it can still be used to send and receive faxes or to make copies if your broadcast document is stored in memory Reviewing or canceling parts of a broadcast If you need to review or cancel a broadcast you set see Reviewing or canceling parts of a broadcast page 3 22 Ready to Fax Ready to Fax Reserved Reserved Mode Contrast Mode Contrast Normal Normal Normal Normal Sep 25 2...

Page 58: ...ce or press Clear to change the time 5 When the date and time are entered press ENTER to save the delayed trans mission The LCD shows 6 Enter the fax number for the delayed transmission document You can either press a one touch key enter a speed dial number or use the numeric keypad to enter the fax number 7 Press START Your machine returns to standby mode while showing this on the LCD This means ...

Page 59: ...e right 5 When the number appears as you want it press ENTER The LCD now shows 6 Instructyourmachinetosendfromthisbatchboxinoneofthefollowingways Option1 Onceatacertaintimeonacertaindayofthemonth Forexample Do thisat5 05PM onthe30th Usethenumerickeypadtoenterthedateandtime 24 hourformat themachineshouldsendthedocumentsfromthebatchbox Option 2 At a certain time each day you press the key For exampl...

Page 60: ...t to use 5 Press ENTER The LCD shows Your machine gives each document in a batch box a file number You will need to know this file number should you later wish to erase or print the stored document Each batch box holds up to 40 files 1 40 6 Press ENTER The machine displays Reserved on the top line of the LCD This means the document is stored in memory Printing a list of stored batch documents You ...

Page 61: ...shows 2 Use the numeric keypad to enter the number 1 5 of the batch box you want to erase 3 Press ENTER If the batch box is empty the LCD shows Important If you want to quit without erasing the batch box you ve selected press No The fax will return to step 2 Important If you want to quit without erasing any batch box press STOP The machine returns to standby mode Important If you select a batch bo...

Page 62: ...go on to step 6 6 Press COMM OPTIONS ENTER The LCD shows 7 Use the numeric keypad to enter the date and time use the 24 hour format when your machine should perform the delayed regular polling 8 Press ENTER 9 Press START When your machine polls for documents it dials the number and upon making con tact with the other machine begins receiving the document as if the other machine had placed the call...

Page 63: ...ut erasing it press MENU 4 3 0 1 ENTER Erasing a stored polling document To erase a document you ve stored for regular polling from your machine s memory 1 Press MENU 4 2 0 1 ENTER The LCD shows 2 Press Yes to erase it Press STOP to finish 01 Polling Document 01 Polling Document Ok to Erase Ok to Erase Yes No Yes No ...

Page 64: ...n the optional Internet Fax kit is installed When you change this setting using a Soft Key it will be available only for the next transmission Once that transmission is complete your machine returns to its default setting If you want to change the default setting see Changing the default settings on page 4 1 4 10 Setting the Soft Key 1 Press MENU 2 1 0 3 ENTER The LCD shows the function name curre...

Page 65: ...age 3 30 Department time list page 3 59 List of F Code boxes page 3 38 List of documents stored in F Code boxes page 3 38 Batch transmission documents page 3 13 Batch box list page 3 13 List of stored batch documents page 3 13 Macros list page 3 21 Remote copy list page 3 27 F Code Box bulletin box documents page 3 39 Stored polling documents page 3 16 Security receive documents page 3 53 Document...

Page 66: ... 5 ENTER 7 If you programmed ENTER or START into the operation proceed to step 8 Otherwise press MACRO PROGRAM and skip to step 9 8 If you want to start immediately after pressing the Macro key when you use it press Yes If not press No Note If you want to confirm the settings or operations in the Macro key before you start it press No here 9 The LCD now shows The machine now asks you to enter the ...

Page 67: ...u have not programmed ENTER in the Macro key Fax dialing with the Macro key To dial a fax call using a Macro key 1 Insert the document 2 Press the Macro key in which you ve stored the fax communication com mand 3 Press START if you have not programmed START in the Macro key Your fax will perform the operation now or at the time you programmed If you programmed this key to delay its operation the L...

Page 68: ...ntifies each by a two digit command number from 01 to 99 To see your machine s stored commands or to cancel them 1 Press COMM CANCEL CONFIRM The LCD shows the first command indicated by its command number and the phone number it will dial If a command is in progress that will be the first command the LCD shows If there are no stored commands in your machine It beeps briefly and displays No Command...

Page 69: ...t to cancel this number also repeat this step If you want to cancel a different number go back to step 5 If you want to go back to reviewing or canceling other command press No If you don t want to cancel any more numbers press STOP The machine returns to standby mode Editing commands You can add the location that is the remote fax number of the command stored in your machine Also you can add some...

Page 70: ...e set ting is On see Job re schedule page 3 25 You can re send it if you want To re send incomplete jobs 1 Press COMM CANCEL CONFIRM 2 Press or to scroll through currently stored commands 3 When the incomplete job you want shown press Restart The LCD shows 4 To go ahead with restarting the transmission press Yes The machine will start the transmission Printing a delayed command list Your machine c...

Page 71: ...ed The destination name Resolution mode Starting date and time Duration in minutes and seconds Number of pages you sent or received Result of the call If preceded by an asterisk this signifies an ECM commu nication If preceded by a pound this signifies communication was via the highspeed V 34 modem Note Your machine s LCD shortens the word Transmission to Tx and the Reception to Rx 1 Press COMM CA...

Page 72: ...ee Review commands on pages 3 21 3 23 Remote Copy This feature tells your fax machine to transfer the same documents you have sent and or the received documents automatically to other fax machine registered in the one touch or speed dial number This feature is convenient for archiving the document transmitted and or received using your machine Note F Code boxes of your machine will be not availabl...

Page 73: ...ransfers the documents after the reception is completed Note If the security reception pages 3 54 3 55 is activating the machine dose not print received document regardless of this setting And the machine will not transfer it until it is printed out 11 Select the mode you want and press ENTER If you select Rx Doc in step 3 proceed to step 12 Otherwise skip to step 16 12 If you select Rx Doc in ste...

Page 74: ... the time period now TF Timed Forwarding will appear on the LCD Override the forwarding time The forwarding time you entered in step 12 left column can be overridden When you assign a Soft Key to Over Ride see Soft Keys on page 3 17 you can transfer the received documents at anytime by pressing the Soft Key regardless of the time period When you pressed the Soft Key assigned to Over Ride in order ...

Page 75: ...on and copying process Note If you do not wish to make a copy press CANCEL in step 4 The LCD will show To cancel the making copy press Yes The machine start transmission process without copying the document If you press No the machine return to step 4 Setting the journal and the report You can turn the following three items on or off regarding the activity journal and the confirmation report TCR A...

Page 76: ...tion for each com munication Date and time of the TCR s printout Remote location called Resolution mode Starting date and time Duration in minutes and seconds Length in number of pages Result of the call Any special operations For example a fax call made using an optional handset will appear as Manual Sample of the document An image of the first page of the document If an error occurs the TCR tell...

Page 77: ...wish to print on the separator page select ON 6 Press ENTER to save the settings To return to standby mode press STOP Cover page Your fax machine can store a cover page to send at the beginning of each outgoing fax This page includes the current date and time your Location ID your fax number as stored in the TTI and a message of up to 40 characters in length The informa tion appears in a box simil...

Page 78: ...th Jane Doe Consulting and the other with Hello This works because you can tell the difference between the distinctive patterns of the two rings Your fax machine is also smart enough to tell the difference between two different numbers that are ringing it All you have to do is set up your machine for the dis tinctive ring detection DRD feature In order to use DRD your phone company must set up you...

Page 79: ...x Important For this feature to work the remote fax machine must have a similar call request capability Your machine must also have an optional handset attached Faxing receiving first then talking To send or receive a fax first and then talk 1 While your fax machine is sending or receiving the fax press MONITOR CALL 2 At the remote fax machine the ringer will sound after that machine receives each...

Page 80: ...il For example mail for the Accounting department is first delivered to the company s main mailroom Then the mailroom routes the mail to Accounting That s the idea behind sub addressing Your fax and another F Code compatible fax exchange special signals to indicate just where the fax really should go It s as if the sending fax is saying Deliver this to room 48 and the receiving fax does just that ...

Page 81: ... to enter the proper I D code The LCD shows 5 Use the numeric keypad to enter the 4 digit I D code not the ITU T sub address and not the ITU T password Skip to step 7 Note If you enter an invalid I D code the fax machine rejects the attempt and aborts this operation Note If you want to modify an existing F Code box and want to change the box type you first must erase the old box then create a new ...

Page 82: ...s password can be up to 20 characters in length and include any combination of numbers and the and characters but no other non numerical characters 18 Press ENTER The LCD shows 19 Using the cursor key select Hold Time and press ENTER The LCD shows The fax machine now asks how long you want to keep a document stored in your machine s F Code box 20 Use the numeric keypad to enter a two digit number ...

Page 83: ...ting documents tells your machine if it should overwrite erase exist ing documents when it receives a new one Note This setting is available only when the reception protection setting is set to off see Rx Protect above ON When your machine receives a new document into this box it will erase any documents currently stored in it OFF When your machine receives a new document into this box it will not...

Page 84: ...press Review If you want to erase any number move the cursor on it and press Erase When you finish to review press Return to return to the previous display 40 Press ENTER The LCD shows 41 Select TTI Type and press ENTER The LCD shows The machine asks for the type of TTI you want to appear on the faxes that are relayed to other callers Sender Relay the document with sender unit s TTI don t send you...

Page 85: ... identifier number 2 Box name if any 3 Sub address 4 Password 5 Box type 6 Each box s settings To print a list of your F Code boxes press MENU 5 1 1 2 ENTER Printing a list of documents stored in your F Code boxes The list of documents stored in your machine s F Code boxes includes 1 Each box s identifier number 2 Box name if any 3 Box type 4 Each file number or document number that is stored To p...

Page 86: ...tores the document you want to print Note If the F Code box is storing any documents the symbol is appeared on the LCD 3 Press ENTER The LCD shows 4 Use the numeric keypad to enter your F Code box s four digit I D code 5 Press ENTER If you ve entered an incorrect I D code your fax machine rejects the attempt and aborts this operation If you ve entered the correct I D code the display shows 6 Use t...

Page 87: ... TTI if any and 4 the file numbers stored in the F Code box You then have a certain number of days see step 19 and 20 on page 3 35 in which to print out the document before your machine automatically erases it Note For this operation to work two things must be true You must know the F Code security box s two digit number You must know the F Code security box s four digit I D code To print a receiv...

Page 88: ...o enter the two digit identifier number 01 50 of the F Code box you want to erase Note If the F Code box is storing any documents the symbol is appeared on the LCD 3 Press ENTER If the F Code box is empty the LCD shows Important If you select an F Code box which is not empty the machine beeps and before returning to step 2 briefly displays Print any documents received in the F Code box then repeat...

Page 89: ... the character then enter the correct number 7 Press ENTER The LCD shows Note If this sub address does not have a password skip to step 9 8 Use the numeric keypad to enter the password 9 Press ENTER The LCD shows 10 Enter the fax number either by pressing a one touch key entering a speed dial number or dialing from the numeric keypad Do not press START 11 What you do now depends on when you want t...

Page 90: ...u want the polling to begin To have it begin now skip to step 12 To delay it go on to step 10 9 Press COMM OPTIONS ENTER The LCD shows 10 Use the numeric keypad to enter the day and time when the polling should begin then press ENTER 11 Press START If in step 9 you chose an immediate polling your fax machine begins dialing If you chose a delayed command the machine shows Reserved on the LCD indica...

Page 91: ...ed in F Code boxes page 3 38 Batch box list page 3 13 List of stored batch documents page 3 13 Macros list page 3 21 Remote copy list page 3 27 Document storage Regular polling documents page 3 16 F Code polling documents pages 3 38 3 39 Programming a delayed transmission To program a delayed transmission into a programmable one touch key 1 Press MENU 3 4 0 1 ENTER The LCD shows the first empty pr...

Page 92: ...he LCD shows The LCD asks if you want to make option settings which includes resolution contrast memory transmission report cover page and Fax Copy If you want to make any of these settings select ON using the cursor key 11 Press ENTER If you select ON proceed to step 12 If you select OFF skip to step 16 12 The LCD shows 13 Using the cursor key select the setting you want to specify for this progr...

Page 93: ...0 fax numbers you can use any combination of call groups one touch keys speed dial numbers and manually dialed numbers To enter a speed dial number press SPEED DIAL GROUP and the number s three digit identifier To enter a call group press SPEED DIAL GROUP twice and the group s identifier number To add more fax numbers press BROADCAST Then enter the next number Note If you want to review the number...

Page 94: ... Code box to which you re transmitting for example as a security box or a relay box Different fax manu facturers may use slightly different terms but the concepts are the same You must know the remote fax s ITU T sub address and password for each box to which you want to transmit To program an F Code transmission into a programmable one touch key 1 Follow steps 1 6 on pages 3 44 3 45 2 Select F Co...

Page 95: ... for this box press ENTER then skip to step 6 5 Use the numeric keypad to enter the appropriate ITU T password for the box Then press ENTER 6 If you want the polling to begin immediately every time you press the key proceed to step 7 If you want to delay the polling follow steps 7 9 on page 3 45 7 Select Exit and press ENTER The LCD asks if you want to make option settings which includes resolutio...

Page 96: ...ch key to print a list 1 Press MENU 3 4 0 1 ENTER The LCD shows the first empty programmable one touch number available 2 Select the programmable one touch key in which you want to program or change Note You can select the programmable one touch key by pressing that key on the control panel Note If you re changing a previously stored command If your previous com mand for this key was for a printou...

Page 97: ...ey select the document you want to store 6 Press ENTER If you select the Polling Document operation skip to step 11 If you select the F Code Document operation go on to step 7 7 The LCD asks which F Code bulletin box you want to use 8 Use the numeric keypad to enter the two digit identifier number 01 50 of the F Code box in which you want to store the document 9 Press ENTER The LCD shows On When y...

Page 98: ...ds you ve stored in your programma ble one touch keys The list includes 1 each key s one touch number 2 the fax telephone number 3 when the command should start 4 which command you ve selected 5 if applicable the selected call group s or F Code box es you ve stored in the key 6 the individual settings for each key To print a list of programmable one touch keys press MENU 5 1 1 1 ENTER Erasing a pr...

Page 99: ...y time you want to turn off the passcode change the passcode back to 0000 by repeating steps 2 6 and entering 0000 in step 6 Security reception Security reception tells your machine to keep all received faxes in memory but not print them Then you can print them out later at your convenience For example you could use this if you re concerned about unauthorized persons reading docu ments intended fo...

Page 100: ...on next column Printing from security reception Turning off security reception When security reception is on an incoming fax goes directly into your machine s memory and the MEMORY RECEIVE light comes on But the incoming fax message is not printed To retrieve the faxes received during this security reception and to return your machine to normal reception until the next time 1 Press MENU 4 3 0 4 EN...

Page 101: ...see pages 3 12 3 14 you must store the PIN access code for the remote unit within the appropriate batch box Important For this feature to work you must have activated the passcode protec tion as described on page 3 52 You must also know the passcode Activating the PIN mask 1 Press MENU 2 2 1 4 ENTER The LCD shows 2 Use the numeric keypad to enter the four digit passcode Note If you enter an invali...

Page 102: ... the numeric keypad to enter the PIN 3 Press START Your machine dials the number Note If you select either Mode 1 or Mode 2 and will be using batch transmission see page 3 12 you must store the PIN access code for the remote unit within the appropriate batch box Dialing from the numeric keypad while using the PIN mask If you ve specified Mode 1 use star power 1 Enter the phone number then press th...

Page 103: ...st understand how this feature works to determine if it s right for you There are four possible set tings for Block Junk Fax Off The feature isn t activated Mode1 Your fax machine checks whether the last four digits of any phone number in your autodialer matches the last four digits of the remote fax s sub scriber ID the phone number part of the TTI If it doesn t find a match your machine disconne...

Page 104: ...eturn your machine to standby mode Clearing a number from the blocked numbers list To clear a number from the list 1 Press MENU 2 2 1 0 ENTER The LCD shows 2 Using the cursor key select Block Junk Fax Mode and press ENTER The LCD shows 3 Select Mode 2 or Mode 3 The LCD shows 4 Using the cursor key select the number you want to clear 5 Press Erase to clear the number The LCD shows Important If you ...

Page 105: ...ntering all department codes you want press ENTER Press STOP to return to standby mode Clearing a department code 1 Press MENU 3 3 0 2 ENTER The LCD shows Note If department code operation is protected see page 3 59 the fax beeps briefly and then returns to standby mode You will have to turn off the protection first then repeat this step 2 Move the cursor and press CANCEL to erase it and the comma...

Page 106: ...e department time list To print the list press MENU 5 1 1 0 ENTER Note If department code operation is protected see left column the fax beeps briefly and then returns to standby mode You will have to turn off the pro tection first then repeat the above The department time list includes the following information for each department code Time period covered by the department time list Each departme...

Page 107: ...escribes how to change the settings of your machine Settings for transmission 4 1 Settings for reception 4 3 Settings for dialing 4 5 Settings for copying 4 6 Settings for operation 4 8 Changing the default settings ...

Page 108: ...ast mode select Primary Contrast and then press ENTER The LCD will show 5 Select contrast mode you want to set using the cursor key then press ENTER 6 To set the primary scan width select Scan Size and then press ENTER The LCD will show 7 Select scan width you want to set using the cursor key then press ENTER 8 When you finished your choice select Exit and then press ENTER to save the settings By ...

Page 109: ...u ment feeder real time transmission To change the default setting of memory transmission 1 Press MENU 2 2 0 6 ENTER The LCD shows 2 Using the cursor key select the mode you want Then press ENTER to save the setting If the MEMORY TRANSMIT light glows memory transmission is on If the MEMORY TRANSMIT light doesn t glow memory transmission is off Quick Memory transmission Default setting ON Important...

Page 110: ...hine prints the message on more than one sheet Note An Auto reduction setting and a reduction margin setting of 40mm will print most incoming faxes as single pages Try this combination first and then only if you have problems with it select different settings Half page reception Half page reception can conserve paper if some of the faxes you receive are half page memo sized messages When activated...

Page 111: ... rings 1 Press MENU 2 2 0 3 ENTER The LCD shows 2 Use the numeric keypad to enter the number of rings you want from 1 to 9 3 Press ENTER to save the setting Image Rotation Default setting OFF When this feature is activated incoming fax messages will be rotated automatically to fit on the paper 1 Press MENU 2 2 1 3 ENTER The LCD shows 2 Using the cursor key select the mode you want Then press ENTER...

Page 112: ...e redial settings 1 Press MENU 2 2 0 4 ENTER 2 Using the cursor key select of Redials and then press ENTER 3 Use the numeric keypad to enter the number of redials you want from 2 to 15 Note Enter a leading zero when entering a quantity less than 10 Note Also you can set the number of redials using or 4 When you finished the entering number press ENTER 5 Using the cursor key select Interval and the...

Page 113: ...et the primary contrast mode select Primary Contrast and then press ENTER The LCD will show 5 Select contrast mode you want to set using the cursor key then press ENTER 6 To set the primary scan width select Scan Size and then press ENTER The LCD will show 7 Select scan size you want to set using the cursor key then press ENTER 8 When you finished your choice select Exit and then press ENTER to sa...

Page 114: ...To adjust the copy print settings Default setting Copy reduction rate 100 Margin 24 mm Bypass tray priority OFF 1 Press MENU 2 3 0 2 ENTER The LCD shows the current print margin for copying 2 To set the reduction rate for copying select Reduction Ratio using the cursor key and then press ENTER The LCD will show 3 Using the cursor key to select Auto 100 or 78 for the copy reduction set ting Then pr...

Page 115: ... and then press ENTER If you want to turn off the ringer select On 5 The machine now asks if you want the alarm turned on or off 6 Press or to select On or Off and then press ENTER If you want to turn off the alarm select On 7 The machine now asks if you want the key tones on or off 8 Press or to select On or Off and then press ENTER If you want to turn off the key tone select On Otherwise the mac...

Page 116: ... 4 4 Select Exit then press ENTER to save the setting Adjusting the machine s clock You can adjust the machine s clock here 1 Press MENU 2 1 0 7 ENTER The LCD shows Note Enter the time using the 24 hr method e g 2 30pm 14 30 2 Use the numeric key to enter the current date and time to adjust the clock Then press ENTER Setting 2 bin tray Option Default setting Copy exit Lower tray Fax exit Upper tra...

Page 117: ... the machine with other users who might change the settings With this list you can quickly confirm that all of your settings are correct without having to go back and check them on the machine Or if you do need to undo someone else s changes this list guides you in returning the machine to your preferred settings To print the User settings list press MENU 5 1 0 2 ENTER 4 10 ...

Page 118: ...Changing the default settings This page intentionally blank 4 11 ...

Page 119: ...se Tips on caring for your machine What to do if problems occur Glossary Clearing paper jams 5 1 Print quality problems 5 3 Troubleshooting 5 5 Caring for your fax machine 5 11 Common questions 5 13 Glossary 5 16 ...

Page 120: ... 3 The LCD will show which page is jammed Reset the unscanned document s including the previously jammed page and press START to continue scanning Note If more than 60 seconds has elapsed without pressing a key the machine will begin to send or copy the document s stored during this operation If you wish to cancel this operation press STOP The machine will delete all pages from memory and then ret...

Page 121: ...ght If you need to remove the drum for an extended period wrap it in a thick cloth to protect it from light 4 Remove the jammed paper CAUTION The fuser unit becomes very hot Do not touch the fuser unit when you are removing a paper jam Note Avoid getting unfixed toner on your hands and clothes Open the side cover Raise the jam release lever to remove the jammed paper 5 Close the side cover then re...

Page 122: ...ery low Remove the toner cartridge and shake it a few times to redistribute the toner inside If the problem persists replace the toner cartridge Printouts are too dark The toner cartridge may be damaged Remove the toner cartridge and check it for damage If the problem persists replace the toner cartridge Printouts have a blurred background The toner cartridge may be damaged Remove the toner cartri...

Page 123: ...ide the toner cartridge Remove the toner cartridge and shake it a few times to redistribute the toner inside If the problem persists replace the cartridge The toner cartridge or drum unit may be damaged Remove the toner and drum and check them for damage If the problem persists replace either or both of the cartridges as indicated If you find smudges on the back of the printouts the trans port rol...

Page 124: ... What it means What to do Call for Service The scanner lamp is dim or inoperable Make repeated copies to help evaporate any internal moisture If that doesn t resolve the problem call the Imagistics International Inc Diagnostic Center Check Memory Tx You tried to turn the Fax Copy feature ON but the memory transmission setting is OFF To use the Fax Copy feature the memory transmis sion setting must...

Page 125: ...g the correct protec tion passcode What you see on the LCD What it means What to do Memory Overflow During transmission or copying you tried to Keep These Pages enter more pages into memory than your fax could store Press Yes to tell your fax to keep as many pages in memory as possible or press No to delete from memory all pages stored during this operation but not previous operations No Command S...

Page 126: ...hat to do Replace Drum in 500 Prints Your machine can print about 500 more sheets but your drum will need to be replaced soon Please contact the Imagistics Line to purchase a new drum unit if you don t already have one In the USA call for supplies 1 800 462 6797 Replace Toner Unable to Print Your toner cartridge is empty Replace the toner cartridge Your machine cannot print until it is replaced Sc...

Page 127: ...regularly call your local Imagistics Diagnostic Center at 1 800 243 5556 Error reports When an error occurs your fax machine prints an error report Each fax error report lists an error message which includes A possible solution to the problem The sending location if the remote fax stores a Location ID of its own The result which is a special error code A sample of the document s first page Kinds o...

Page 128: ...remote fax machine didn t respond to your machine Call someone at the remote machine s location T 1 2 Your fax machine s page counter detected a possible document feeder error Carefully put the document back into the feeder and try again T 1 4 Stop was pressed before the message was sent T 2 1 Either the phone line disconnected during transmission or fax communica tion became impossible due to bad...

Page 129: ...mary Error message Possible meanings Check condition of remote fax Remote machine malfunctioned No handshake signals from remote fax Wrong phone number reached Repeat transmission Poor phone line conditions No handshake signals from remote fax Document misfeed or miscount Unable to reach remote machine after attempting specified number of redial tries Line is busy Remote machine s line was busy Re...

Page 130: ...chine They re sealed to protect your safety and the machine For cleaning external surfaces such as the cover and handset use a mild clean ing solution sprayed onto a lint free towel or cloth Always use a lint free cloth or swabs moistened with alcohol to gently wipe components inside your machine In areas you can t reach with swabs use only dry dust free compressed air to gently blow away dust and...

Page 131: ...and moisten it with isopropyl alcohol 3 Open the top cover and then open the printer cover CAUTION The fuser unit becomes very hot Do not touch the fuser unit when you are cleaning the LED print head 4 Using the cloth gently clean the LED print head Note Do not use abrasive materials on the LED print head and do not subject the LED print head to heavy pressure If you have unsatisfactory printout q...

Page 132: ...hese tones that fax machines are able to send faxes over ordinary phone lines So next time you hear the tones press START and if you re using an optional handset hang up to send a fax Q I just sent a fax However the number that appeared in my machine s display during the transmission wasn t the number I dialed Why A That number you saw is programmed into the remote fax machine by the user Some use...

Page 133: ...average per page transmission time but when I transmit a page it can take much longer Why A We base this specification on transmission of an industry standard test docu ment called ITU T Test Document 1 sometimes also called the Slerexe letter Fax manufacturers use this method to test transmission speeds However The pages you send may be darker or otherwise contain more information than ITU T Test...

Page 134: ...orter the waiting period the more likely it is that the remote fax machine will proceed with the transmission Please create an outgoing message on your answering machine that s no longer than 10 seconds see page 2 8 for a suggestion Polling Q What s the purpose of polling A Polling lets you automatically pull a document which is set in another fax machine You can poll whenever you need to retrieve...

Page 135: ...spaces between words spaces between lines and paragraphs and even spaces within letters However drawings and photographs have a much higher black density sometimes approaching 100 The higher a page s black density the more slowly a fax machine sends it Broadcast A fax transmission in which a single document is sent to more than one loca tion bps Bits per second Used to express the speed of transmi...

Page 136: ... gives to each document it stores for a batch F Code or polling operation Fine resolution 203H 196V lpi Also shown as G3F Group 3 fine on some fax units Grayscale Not a level of resolution but a method of scanning and transmitting halftone images Fax machines with grayscale abilities interpret photographs in levels of gray between white and black The transmitting fax machine must have grayscale ab...

Page 137: ... safely through a fax machine Override To change existing settings Paper sizes All are width length Letter sized 8 5 11 0 216 279 mm Legal sized 8 5 14 0 216 356 mm A5 5 8 8 3 148 210 mm B5 7 2 10 1 182 257 mm A4 8 3 11 7 210 297 mm B4 10 1 14 3 257 364 mm A3 11 7 16 5 297 420 mm Passcode A four digit code number On your fax machine the protection passcode lets the user limit access to fax operati...

Page 138: ...pecial delivery characteristics of a transmission For example subaddressing allows fax machines from dif ferent manufacturers to send and receive messages into confidential memory mailboxes or to retrieve specific files from polling memory Subscriber ID A fax machine s telephone number as identified by a user setting See TTI Super Group 3 An extension of Group 3 fax technology standards allowing t...

Page 139: ...Appendix and index ...

Page 140: ...sting 330 locations 330 locations Transmission speed Approx 3 seconds per page One touch dial 56 locations Speed dial 244 locations Document input Document set Face Up Original reference position Center Scanning resolution horizontal vertical Transmission Normal 203 dots inch 98 lines inch Fine 203 dots inch 196 lines inch Superfine 406 dots inch 392 lines inch Grayscale MemoryTx 203 dots inch 196...

Page 141: ...e 120V AC 50 60 Hz Power consumption Sleep mode 8 7 W Standby 110 Wh Transmission 31 W Reception 960 W Copy 920 W Maximum 1030 0 W Operating Environment Environmental temperature 10º C to 32º C 50 F to 89 6 F Relative humidity 20 to 80 RH Miscellaneous Weight Approx 43 7 lb 19 8 Kg Dimensions Width 18 3 Depth 20 8 Height 14 2 inches Drum unit life Approx 20 000 pages Toner cartridge life Approx 20...

Page 142: ... instructions on programming this information the TTI into your fax machine see pages 1 18 1 20 Type of service Your fax is designed for use on standard device telephone lines The fax connects to the telephone line with a standard line called the USOC RJ 11 Connection to telephone company provided coin service central office implemented systems Connection to party line service is subject to State ...

Page 143: ...nt mode 4 8 for reception 4 3 Half page reception 4 3 Print reduction rate 4 3 Reduction margin 4 3 The number of rings 4 4 for transmission 4 1 Primary contrast mode 4 1 Primary resolution mode 4 1 Quick Memory transmission 4 2 Print your settings 4 10 Control Panel 1 3 Copies 2 9 Using the bypass tray 2 9 Cover page 3 30 D Delayed command list 3 23 Delayed transmission 3 11 Department code 3 58 ...

Page 144: ... 4 8 Soft Keys 3 17 Macros 3 18 Erasing 3 20 Printing a list of your Macro keys 3 21 Programming 3 18 Memory transmission 2 2 O One touch keys 3 2 Entering or changing 3 2 Erasing 3 2 One touch fax dialing 3 3 One touch phone dialing 3 3 Printing a list of one touch numbers 3 3 One touch labels 1 1 Operating tips 1 10 Out of paper reception 2 8 P Paper 1 7 Acceptable paper size 1 7 Paper size sett...

Page 145: ...l features Activity journal 3 28 Call request 3 32 Cover page 3 30 Distinctive ring detection DRD 3 31 Fax Copy 3 27 F Code Boxes 3 33 Macro keys 3 18 Programmable one touch keys 3 44 Reports 3 29 Specifications AI 1 AI 2 Speed dial numbers 3 4 Entering or changing 3 4 Erasing 3 4 Fax dialing via speed dial 3 5 Phoning via speed dial 3 5 Printing a list of speed dial numbers 3 5 Subscriber ID your...

Page 146: ...out notice to incorporate improvements made to the products listed in this manual Imagistics International Inc 2002 Printed in USA Part Number FX30078 www imagistics com Imagistics International Inc 100 Oakview Drive Trumbull CT 06611 TM www imagistics com Recyclable ...

Reviews: