Note:
If
your
server
is
a
tower
model,
you
might
find
it
easier
to
install
the
hot-swap
power-supply
option
if
you
turn
the
server
on
its
side
so
that
the
power
supply
is
on
the
bottom.
1.
Review
the
information
in
“Installation
guidelines”
on
page
45,
“Handling
static-sensitive
devices”
on
page
46,
and
“Safety
information”
on
page
169.
2.
Turn
off
the
server
and
disconnect
all
power
cords
and
external
cables
(“Turning
off
the
server”
on
page
9);
then,
remove
the
server
cover
(see
“Removing
the
server
left-side
cover
and
bezel
(tower
model)”
on
page
55
or
“Removing
the
server
top
cover
and
bezel
(rack
configuration)”
on
page
57).
3.
Remove
the
adapter-support
bracket.
See
“Removing
and
installing
the
adapter-support
bracket”
on
page
58
for
instructions.
4.
Disconnect
the
power-supply
cables
from
the
system
board
and
devices
in
your
server.
a.
Disconnect
the
small-device
power
cable
(P7)
from
the
back
of
the
diskette
drive.
Note:
You
might
need
to
remove
the
diskette
drive
from
the
server
in
order
to
disconnect
and
reconnect
its
cables.
The
diskette
drive
is
held
in
the
server
by
release
tabs
that
are
accessed
by
removing
the
server
front
bezel.
b.
Disconnect
the
device
power
connector
(P5)
from
the
back
of
the
CD-ROM
drive.
c.
Disconnect
the
other
device
power
connectors
(P4
and
P6)
from
the
rear
of
any
other
devices
in
the
server.
d.
Disconnect
the
SCSI
cable
(P2)
from
the
SCSI
backplane.
e.
Disconnect
the
power
cable
(P1)
from
the
J4
connector
on
the
system
board.
f.
Disconnect
the
power
signal
cable
(P3)
from
the
J10
connector
on
the
system
board.
g.
If
your
server
has
the
3-Pack
Ultra320
Hot-Swap
Expansion
option
installed,
disconnect
the
power
connector
(P8)
from
the
power
connector
on
the
3-Pack
backplane.
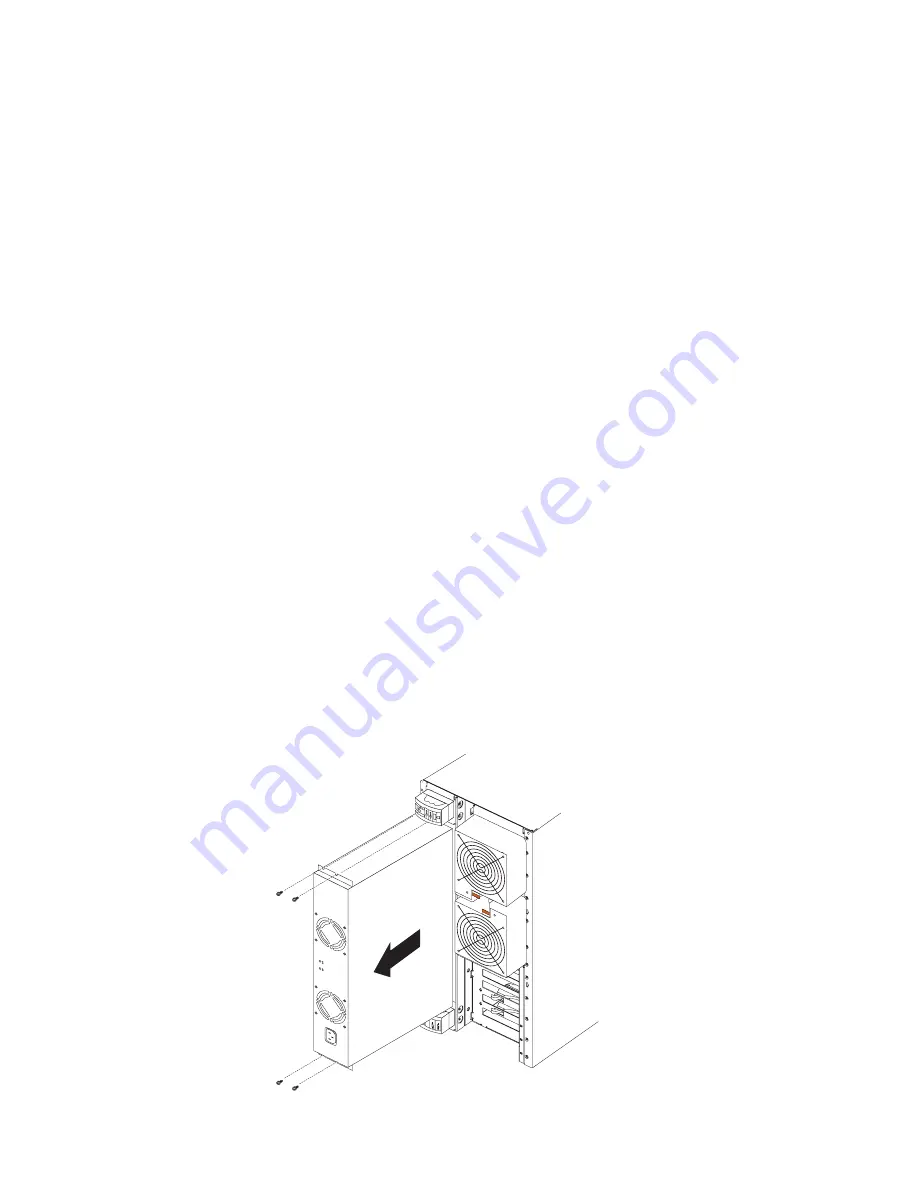
5.
Remove
the
fixed
power
supply
(see
the
following
illustration).
2
1
92
xSeries
235
Type
8671:
Hardware
Maintenance
Manual
and
Troubleshooting
Guide
Summary of Contents for 8671 - Eserver xSeries 235
Page 1: ...xSeries 235 Type 8671 Hardware Maintenance Manual and Troubleshooting Guide ERserver...
Page 2: ......
Page 3: ...xSeries 235 Type 8671 Hardware Maintenance Manual and Troubleshooting Guide ERserver...
Page 6: ...iv xSeries 235 Type 8671 Hardware Maintenance Manual and Troubleshooting Guide...
Page 24: ...14 xSeries 235 Type 8671 Hardware Maintenance Manual and Troubleshooting Guide...
Page 38: ...28 xSeries 235 Type 8671 Hardware Maintenance Manual and Troubleshooting Guide...
Page 54: ...44 xSeries 235 Type 8671 Hardware Maintenance Manual and Troubleshooting Guide...
Page 138: ...128 xSeries 235 Type 8671 Hardware Maintenance Manual and Troubleshooting Guide...
Page 170: ...160 xSeries 235 Type 8671 Hardware Maintenance Manual and Troubleshooting Guide...
Page 189: ...Appendix B Related service information 179...
Page 190: ...180 xSeries 235 Type 8671 Hardware Maintenance Manual and Troubleshooting Guide...
Page 191: ...Appendix B Related service information 181...
Page 192: ...182 xSeries 235 Type 8671 Hardware Maintenance Manual and Troubleshooting Guide...
Page 193: ...Appendix B Related service information 183...
Page 194: ...184 xSeries 235 Type 8671 Hardware Maintenance Manual and Troubleshooting Guide...
Page 195: ...Appendix B Related service information 185...
Page 205: ...Appendix B Related service information 195...
Page 206: ...196 xSeries 235 Type 8671 Hardware Maintenance Manual and Troubleshooting Guide...
Page 207: ...Appendix B Related service information 197...
Page 208: ...198 xSeries 235 Type 8671 Hardware Maintenance Manual and Troubleshooting Guide...
Page 209: ...Appendix B Related service information 199...
Page 210: ...200 xSeries 235 Type 8671 Hardware Maintenance Manual and Troubleshooting Guide...
Page 214: ...204 xSeries 235 Type 8671 Hardware Maintenance Manual and Troubleshooting Guide...
Page 220: ...210 xSeries 235 Type 8671 Hardware Maintenance Manual and Troubleshooting Guide...
Page 221: ......
Page 222: ...Part Number 24P2965 1P P N 24P2965...


