HIKVISION DS-6700HUHI-K Series User Manual Download Page 16

DS-6700HUHI-K Series Encoder User Manual 

15 


2.


Click the 

Device Management

 icon to enter the Device Management interface, as shown in the figure below. 


Figure 2. 4


Control Panel 


3.


Check the device status from the device list, and select an inactive device. 

4.


Click the 

Activate 

button to enter the Activation interface. 
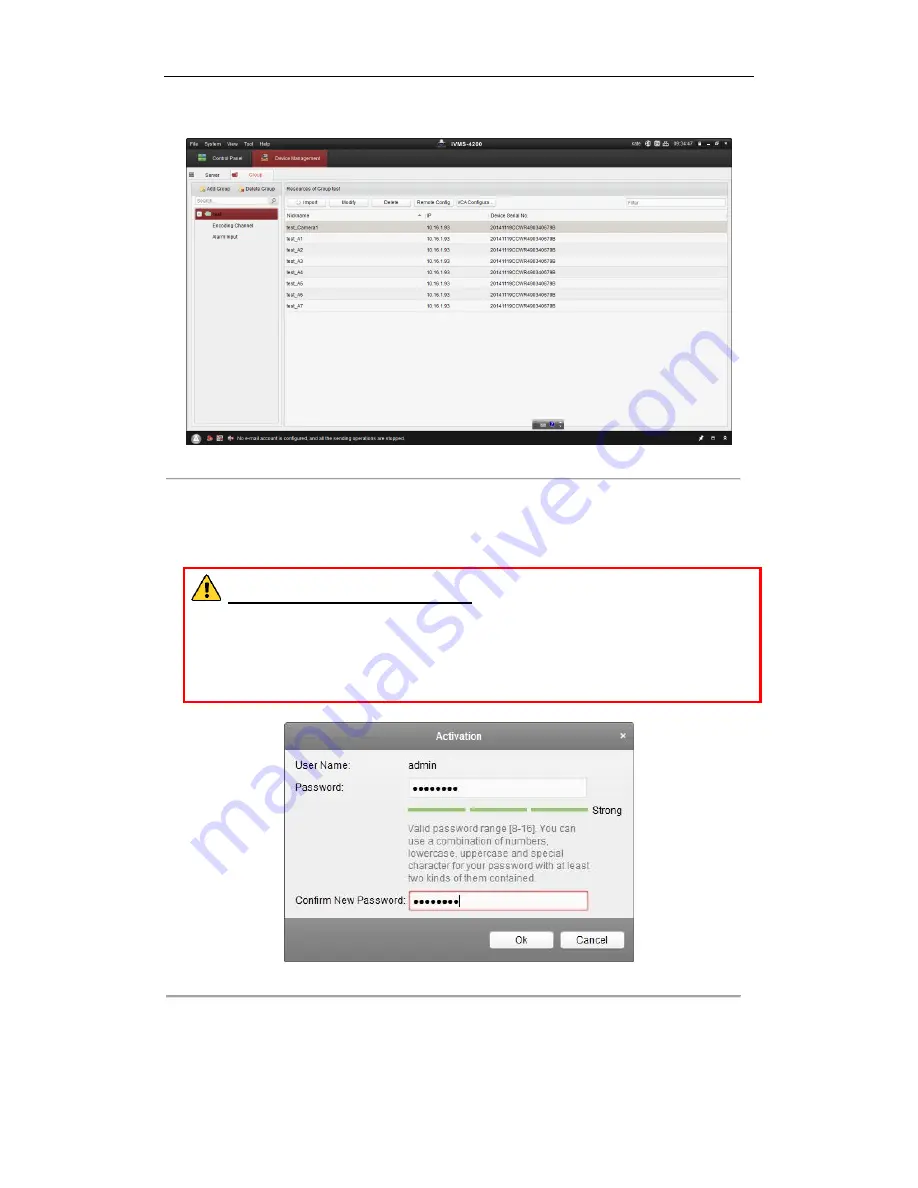
5.


Create a password and input the password in the password field, and confirm the password. 


STRONG  PASSWORD  RECOMMENDED

–  We  highly  recommend  that  you  create  a  strong 

password  of  your  own  choosing  (using  8-16  characters,  including  upper  case  letters,  lower  case  letters, 

numbers,  and  special  characters)  in  order  to increase the  security  of  your  product.  And  we  recommend  that 

you  reset  your  password  regularly, especially  in the  high  security  system, resetting the  password  monthly  or 

weekly can better protect your product. 


Figure 2. 5


Activation Interface (Client Software) 


6.


Click 

OK

 button to start activation. 

7.


Click the 

Modify Netinfo 

button to pop up the Network Parameter Modification interface, as shown in the 

figure below. 

Summary of Contents for DS-6700HUHI-K Series

Page 1: ...DS 6700HUHI K Series Encoder User Manual UD07058B...

Page 2: ...s mentioned below are the properties of their respective owners Legal Disclaimer TO THE MAXIMUM EXTENT PERMITTED BY APPLICABLE LAW THE PRODUCT DESCRIBED WITH ITS HARDWARE SOFTWARE AND FIRMWARE IS PROV...

Page 3: ...erence 2 This device must accept any interference received including interference that may cause undesired operation EU Conformity Statement This product and if applicable the supplied accessories too...

Page 4: ...ation of all passwords and other security settings is the responsibility of the installer and or end user In the use of the product you must be in strict compliance with the electrical safety regulati...

Page 5: ...is properly secured to a rack or shelf Major shocks or jolts to the unit as a result of dropping it may cause damage to the sensitive electronics within the unit Use the device in conjunction with an...

Page 6: ...rating PTZ Control 24 4 3 1 Operating PTZ Movement 24 4 3 2 Setting Calling a Preset 25 4 3 3 Setting Calling a Patrol 27 4 4 Configuring Channel Zero Encoding 28 Chapter 5 Device Configuration 29 5 1...

Page 7: ...ng Line Crossing Detection 61 7 2 4 Configuring Scene Change Detection 62 Chapter 8 Record Settings 65 8 1 Configuring Record Schedule 65 8 2 Configuring Holiday Settings 67 Chapter 9 HDD Management 6...

Page 8: ...DS 6700HUHI K Series Encoder User Manual 7 12 2 4 Upgrading the System 87 12 3 Configuring Security Settings 87 Chapter 13 Specification 88 Chapter 14 FAQ 89...

Page 9: ...sk with a maximum of 8 TB storage capacity S M A R T and bad sector detection HDD sleeping function HDD property redundancy read only read write R W HDD group management HDD quota management different...

Page 10: ...ce IPv6 is supported TCP IP protocol PPPoE DHCP DNS DDNS NTP SADP SMTP SNMP NFS iSCSI UPnP HTTPS and ONVIF are supported Support access by Hik Connect TCP UDP and RTP for unicast Auto Manual port mapp...

Page 11: ...ndicator Description 1 POWER Lights in green when the device is powered on 2 STATUS Lights in green when data is being read from or written to HDD 3 Tx Rx 1 Does not light when the network is not conn...

Page 12: ...Out 9 Power Switch 10 GND 1 3 Alarm Connections 1 3 1 Alarm Input Connections DS 6700HUHI K supports the open close relay input as the alarm input mode For the alarm input signal not in open close re...

Page 13: ...DC load Please refer to the following diagram Alarm output connections diagram Figure 1 6 Alarm Output Connections Please note the different connections of JJ1 shown above For DC load JJ1can be safel...

Page 14: ...ncoder is 192 0 0 64 You are recommended to change the default IP address after your access Figure 2 1 Activation 3 Create a password and input the password into the Password text field STRONG PASSWOR...

Page 15: ...File Or click Cancel to skip the configuration 2 2 Activating via Client Software The client software is versatile video management software for multiple kinds of devices Get the client software from...

Page 16: ...WORD RECOMMENDED We highly recommend that you create a strong password of your own choosing using 8 16 characters including upper case letters lower case letters numbers and special characters in orde...

Page 17: ...2 6 Modifying the Network Parameters 8 Change the device IP address to the same subnet with your computer by either modifying the IP address manually or checking the checkbox of Enable DHCP 9 Input th...

Page 18: ...3 1 Login Steps 1 Open WEB browser input the IP address of the device and then press the Enter key on PC The system will display the login interface When the HTTPS feature is enabled the system uses...

Page 19: ...and Install Plug in 2 Click Run or Save on the pop up warning message box Figure 3 3 Run Web Components 3 Click Next on the pop up Setup dialog box Figure 3 4 Click Next 4 When the installation compl...

Page 20: ...estions and answers or export the GUID file first in user management Refer to Chapter 11 1 4 Configuring Security Questions and Chapter 11 1 5 Exporting GUID File for reference 1 On the login page cli...

Page 21: ...fication 3 Click Next to set new password Figure 3 8 Set New Password 4 Click Next and the password is modified It will jump to the login interface Figure 3 9 Password Modified 3 3 Main Page Introduct...

Page 22: ...ectively Device List Display the connected encoder and its channels Live View Window Display the live video of the current camera Toolbar Realize functions in live view mode e g window division live v...

Page 23: ...Double click a camera from the device list to start the live view Figure 4 1 Start Live View 3 You can click on the toolbar to start the live view of all cameras on the device list Refer to the follow...

Page 24: ...If you click to switch to the full screen mode then press ESC on the keyboard to switch back to the normal mode If you double click to switch to the full screen mode then double click again to switch...

Page 25: ...ectively 2 The baud rate PTZ control and address configured in the RS 485 Settings interface Configuration System System Settings as shown below must be the same with the parameters of the connected p...

Page 26: ...of PTZ Control Buttons Button Description Zoom in out Focus near far Iris Light on off Wiper on off Adjust speed of pan tilt movement Auxiliary focus Initialize lens Adjust speed of pan tilt movements...

Page 27: ...rotocol applied Calling a Preset This feature enables the camera to point to a specified preset scene when an event takes place For the pre defined preset you can call it at any time to the desired pr...

Page 28: ...et No duration of staying for one preset and speed of patrol Preset determines the order at which the PTZ will follow while cycling through the patrol Time refers to the time span to stay at the corre...

Page 29: ...ew of many channels in real time from web browser or CMS Client Management System software in order to decrease the bandwidth requirement without affecting the image quality channel zero encoding is s...

Page 30: ...recommended to select MCAST type when using the Multicast function For detailed information about Multicast refer to Chapter 5 3 1 Configuring TCP IP Settings Stream Type Select the stream type to ma...

Page 31: ...files or pictures Save snapshots in live view to Set the saving path for the manually captured pictures in live view mode Save snapshots when playback to Set the saving path for the captured pictures...

Page 32: ...k Time Protocol NTP Server can be configured on your device to ensure the accuracy of system date time If the device is connected to a Dynamic Host Configuration Protocol DHCP network that has time se...

Page 33: ...me Figure 5 5 Manual Time Sync You can also check the checkbox of Sync with computer time to synchronize the time with the local PC Check Enable DST to enable the DST function and set the date of the...

Page 34: ...ect the camera by the RS 232 port the parameters of the RS 232 should be exactly the same with the parameters you configured here 3 Click Save to save the settings 5 2 4 Configuring RS 485 Serial Port...

Page 35: ...me as the PTZ camera parameters 3 Optional Click Copy to to copy the same settings to other cameras 4 Click Save to save the settings 5 3 Network Configuration 5 3 1 Configuring TCP IP Settings Networ...

Page 36: ...obtain the IP address Figure 5 10 DNS Server Settings 5 Click the Save to save the above settings 5 3 2 Configuring Port Settings Purpose You can set the port No of the encoder e g HTTP port RTSP port...

Page 37: ...gs page 2 Check Enable DDNS to enable this feature 3 Select DDNS Type Three different DDNS types are selectable DynDNS PeanutHull and NO IP DynDNS 1 Enter Server Address for DynDNS e g members dyndns...

Page 38: ...s Reboot the device to make the settings take effect 5 3 4 Configuring PPPoE Settings Your device also allows access by Point to Point Protocol over Ethernet PPPoE Steps 1 Go to Configuration Network...

Page 39: ...ou want to send notification 2 Please configure the DNS Server settings under Configuration Network Basic Settings TCP IP before using the Email function Steps 1 Enter the Basic Network Settings Confi...

Page 40: ...Video Tempering Alarm and Chapter 7 1 6 Handling Exception 5 3 6 Configuring UPnPTM Settings Purpose UPnP can permit the device seamlessly discover the presence of other network devices on the networ...

Page 41: ...the web site and associated web server that one is communicating with and create a secure channel over an insecure network HTTPS URLs begin with https and use port 443 by default Steps 1 Click Config...

Page 42: ...cate import the certificate to the device 4 There will be the certificate information after your successfully creating and installing the certificate Figure 5 19 Installed Certificate 5 Click Save to...

Page 43: ...s and is case sensitive Every time you enable Hik Connect the Service Terms page pops up and you should read Terms of Service and Privacy Policy before enabling it 3 If you want to customize the serve...

Page 44: ...lly to activate the multicast address settings 5 3 10Configuring Remote Alarm Host Purpose With a remote alarm host configured the device will send the alarm event or exception message to the host whe...

Page 45: ...arper The degree of contrast and saturation is high Dim Light the image is smoother than the other three modes 4 Set the image parameters of the camera Brightness describes bright of the image which r...

Page 46: ...at display mode and OSD size 5 Configure the text overlay settings 1 Check the checkbox in front of the textbox to enable the on screen display 2 Input the characters in the textbox Up to 6 text overl...

Page 47: ...igure 6 3 Privacy Mask Settings 4 Click Draw Area 5 Draw the mask area by clicking and dragging the mouse in the live video image Up to four privacy mask areas can be configured 6 When finishing the a...

Page 48: ...ream Video Type Select the video type to video stream or video audio composite stream The audio signal will be recorded only when the Video Type is Video Audio Resolution Select the resolution of the...

Page 49: ...the connnected camera the H 264 or H 265 should be supported by the camera Reboot the device to activate the new settings after enabling H 264 or H 265 6 If you want to copy the display settings of t...

Page 50: ...otion Detection Purpose Motion detection is a feature which can alert the personnel and record the video for the motion occurred in the surveillance scene Steps 1 Go to Configuration Event Basic Event...

Page 51: ...ouse in the live video image By default the full screen motion detection is configured 3 Click Stop Drawing to finish drawing You can click Clear All to clear all areas 4 Move the Sensitivity slide ba...

Page 52: ...time period you can adjust the time period to the desired time by either moving the time bar or input the exact time period 3 Optional Click Delete to delete the current arming schedule or click Save...

Page 53: ...vent occurs The alarm host refers to the PC installed with Remote Client Send Email Send an email with alarm information to a user or users when an event occurs To send the Email when an event occurs...

Page 54: ...gure 7 6 Motion Detection Alarm Linked Recording 8 Click Save to save the settings 7 1 2 Configuring Alarm Input Steps 1 Go to Configuration Event Basic Event Alarm Input to enter the Alarm Input Sett...

Page 55: ...Configuring Motion Detection Figure 7 8 Alarm Input Settings Linkage Method 8 You can also select the PTZ linking for the alarm input if your camera is installed with a pan tilt unit 1 Select the PTZ...

Page 56: ...efers to the time duration that the alarm output remains in effect after alarm occurs If you choose Manual you need to manually disable the alarm output 4 Click Arming Schedule tab to set the arming s...

Page 57: ...1 Configuring Motion Detection 5 Set the actions taken for video loss detection Please refer to Step 7 in Chapter 7 1 1 Configuring Motion Detection 6 Click Save to save the settings 7 1 5 Configurin...

Page 58: ...tion Detection 6 Set the actions taken for the tamper proof alarm Please refer to Step 7 in Chapter 7 1 1 Configuring Motion Detection 7 Click Save to save the settings 7 1 6 Handling Exception The ex...

Page 59: ...e events can trigger the linkage methods such as Notify Surveillance Center Send Email Trigger Alarm Output etc 7 2 1 Configuring Audio Exception Detection Purpose Audio exception detection function d...

Page 60: ...to trigger the detection Sound Intensity Threshold Range 1 100 it can filter the sound in the environment the louder the environment sound the higher the value should be You can adjust it according to...

Page 61: ...and right click to complete drawing 7 Click Stop Drawing when finish drawing 8 Set the time threshold for intrusion detection Threshold Range 0 2s the threshold for the time of the object loitering in...

Page 62: ...ou can click the Clear button to clear all pre defined regions 12 Click Arming Schedule to set the arming schedule Refer to Step 6 in Chapter 7 1 1 Configuring Motion Detection 13 Click Linkage Method...

Page 63: ...00 It stands for the percentage of the body part of an acceptable target that goes across the pre defined line Sensitivity S1 ST 100 S1 stands for the target body part that goes across the pre defined...

Page 64: ...etection or intrusion detection when you enable sudden scene change detection and save the settings the following attention box pops up as below Figure 7 17 Note 4 Drag the slider to set the sensitivi...

Page 65: ...DS 6700HUHI K Series Encoder User Manual 64 Motion Detection 7 Click Save to save the settings...

Page 66: ...hedule to enter record schedule settings page Figure 8 1 Record Schedule Settings 2 Select the Camera to configure the record schedule 3 Check the checkbox of Enable to enable scheduled recording 4 Se...

Page 67: ...e you have to configure the settings on the Motion Detection and Alarm Input Settings interfaces Refer to Chapter 7 1 1 Configuring Motion Detection and Chapter 7 1 2 Configuring Alarm Input Event If...

Page 68: ...Holiday to enter holiday settings page Figure 8 3 Holiday Settings 2 Select an item from the list and click to edit the holiday 1 Edit the Holiday Name 2 Select the holiday type from the drop down li...

Page 69: ...DS 6700HUHI K Series Encoder User Manual 68 The Holiday option is available in the Schedule drop down list when you have enabled holiday schedule in holiday settings...

Page 70: ...rage Storage Management HDD Management Figure 9 1 HDD Management 2 Check the HDD information such as the capacity free space status type property etc 3 Select HDD to be initialized 4 Click Format to i...

Page 71: ...please refer to the User Manual of IP SAN NAS Steps 1 Go to Configuration Storage Storage Management Net HDD Figure 9 3 Net HDD 2 You can search the available NAS IP SAN disks in the designated stora...

Page 72: ...Figure 9 5 Added Net HDD 5 Initialize the added network disk 1 Go to Configuration Storage Storage Management HDD Management to enter the HDD settings menu on which you can view the capacity free spa...

Page 73: ...ous indicators of reliability in the hopes of anticipating failures Steps 1 Go to Configuration Storage Storage Management HDD Detection 2 Click the S M A R T Settings tab to enter the page 3 Select t...

Page 74: ...to start detecting Figure 9 9 Bad Sector Detection 6 Optional Click Pause to pause the detection or click Cancel to cancel the detection 9 5 Configuring Cloud Storage Purpose The cloud storage facilit...

Page 75: ...d recording files to the cloud storage 1 Enter the cloud storage page and select the camera you have set in the recording schedule interface 2 Select the Upload Type 3 Check the Enable Event Upload ch...

Page 76: ...HDD Sleeping thus to decrease the power consumption of the device and extend the life of the HDDs if the HDDs are free of working for a long time 3 Check Enable Overwriting to enable HDD overwriting...

Page 77: ...ck on the menu bar to enter playback page Figure 10 1 Playback Page 2 Click the camera from the device list for playback 3 Select the date from the calendar 4 Select the Stream Type 5 Click Search Fig...

Page 78: ...es in playback mode Download video files Start Stop clipping video files Audio on off Enable e PTZ Full screen 8 Drag the progress bar with the mouse to locate the exact playback point Or input the ti...

Page 79: ...Add User page 2 Edit the User Name 3 Select the Level to Operator or User 4 Enter the Admin Password 5 Enter the Password of the added user 6 Confirm the same password STRONG PASSWORD RECOMMENDED We...

Page 80: ...udio in Remote Configuration and all operating permission in Camera Configuration User The Guest user has permission of Local Log Search in Local Configuration Remote Log Search in Remote Configuratio...

Page 81: ...DS 6700HUHI K Series Encoder User Manual 80 2 Click Modify to enter the modification interface Figure 11 4 Modify the Admin...

Page 82: ...e strong password 4 Configure the user permission for the user 5 Click OK to save the settings You need the admin password to modify the admin user or operator 11 1 3Deleting a User Steps 1 Select a u...

Page 83: ...em User Management User Management 2 Select a user from the user list 3 Click Security Question and the window pops up as below Figure 11 7 Confirm the Admin Password 4 Enter the Admin Password 5 Clic...

Page 84: ...d click OK 4 Select the directory to save the GUID file Then the note window pops up as below Figure 11 10 Note 5 Click OK to finish exporting GUID file 11 2 Online Users Purpose You can see the curre...

Page 85: ...realized only when the encoder is connected with HDD or network disk And make sure the HDD or network disk has been initialized for the first time to use Steps 1 Go to Configuration System Maintenance...

Page 86: ...Maintenance Upgrade Maintenance to enter the Maintenance page of the encoder Figure 12 2 Maintenance 12 2 1Rebooting the Device Steps 1 Go to Configuration System Maintenance Upgrade Maintenance Reboo...

Page 87: ...Box 12 2 3Importing Exporting Configuration Files The configuration files of the device can be exported to local device for backup and the configuration files of one device can be imported to multiple...

Page 88: ...start remote upgrade Figure 12 8 Remote Upgrade 12 3 Configuring Security Settings Purpose To enable the remote login and improve the data communication security the encoder provides the security serv...

Page 89: ...4 MP 15fps 3 MP 18fps 1080p 720p WD1 4CIF VGA CIF 25fps P 30fps N Sub stream WD1 4CIF CIF 25fps P 30fps N Video bit rate 32 Kbps to 10 Mbps Audio bit rate 64 Kbps Dual stream Support Network manageme...

Page 90: ...h software 1 Check the encoder IP 2 Make sure the cable is connected 3 User name and password of encoder are correct Why cannot control the connected PTZ camera or speed dome through the encoder 1 Che...

Page 91: ...DS 6700HUHI K Series Encoder User Manual 90...

Reviews: