4 - 42
Z-30/20N • Z-30/20N RJ • Z-34/22 • Z-34/22N
Part No. 139378
June 2011
Section 4 • Repair Procedures
REV B
MANIFOLDS
9V
BATTERY
10
RESISTOR
W
MULTI
METER
COIL
+
-
+
-
d
b
b
a
c
c
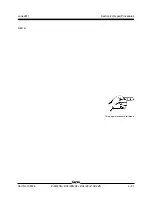
How to Test a Coil Diode
Genie incorporates spike suppressing diodes in all
of its valve coils. Properly functioning coil diodes
protect the electrical circuit by suppressing voltage
spikes. Voltage spikes naturally occur within a
function circuit following the interruption of
electrical current to a coil. Faulty diodes can fail to
protect the electrical system, resulting in a tripped
circuit breaker or component damage.
Electrocution/burn hazard. Contact
with electrically charged circuits
could result in death or serious
injury. Remove all rings, watches
and other jewelry.
1 Test the coil for resistance. See
How to Test a
Coil.
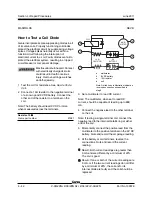
2 Connect a 10
Ω
resistor to the negative terminal
of a known good 9V DC battery. Connect the
other end of the resistor to a terminal on the
coil.
Note: The battery should read 9V DC or more
when measured across the terminals.
Resistor, 10
Ω
Ω
Ω
Ω
Ω
Genie part number
27287
a
multimeter
b
9V DC battery
c
10
Ω
resistor
d
coil
Note: Dotted lines in illustration indicate a
reversed connection as specified in
step 6
3 Set a multimeter to read DC current.
Note: The multimeter, when set to read DC
current, should be capable of reading up to 800
mA.
4 Connect the negative lead to the other terminal
on the coil.
Note: If testing a single-terminal coil, connect the
negative lead to the internal metallic ring at either
end of the coil.
5 Momentarily connect the positive lead from the
multimeter to the positive terminal on the 9V DC
battery. Note and record the amperage reading.
6 At the battery or coil terminals, reverse the
connections. Note and record the current
reading.
Result: Both current readings are greater than
0 mA and are different by a minimum of 20%.
The coil is good.
Result: If one or both of the current readings are
0 mA, or if the two current readings do not differ
by a minimum of 20%, the coil and/or its
internal diode are faulty and the coil should be
replaced.
Summary of Contents for Z-30/20N
Page 1: ......
Page 148: ...6 46 June2011 Section 6 Schematics 6 45 Power Cable Wiring Diagram...
Page 149: ...6 47 Section 6 Schematics June2011 6 48 Drive Contactor Panel Wiring Diagram...
Page 152: ...6 50 June2011 Section 6 Schematics Manifold and Limit Switch Wiring Diagram 6 49...
Page 153: ...6 51 Section 6 Schematics June2011 6 52 LVI BCI Option Wiring Diagram...
Page 156: ...6 54 June2011 Section 6 Schematics 6 53 Charger Interlock Option...
Page 157: ...6 55 Section 6 Schematics June2011 6 56 CTE Option CE Models...
Page 160: ...6 58 June2011 Section 6 Schematics Hydraulic Schematic 6 57...

