190-01007-C1
GTN Xi Part 23 AML STC Maintenance Manual
Rev. 1
Page 6-25
6.12 Interfaced Equipment Bonding Strap
The following removal and replacement steps are provided as guidance for replacing the interfaced
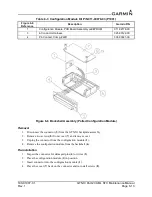
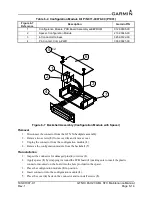
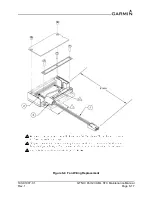
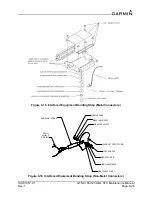
equipment bonding strap. The bonding strap assembly drawing is shown in Figure 6-15 for equipment with
metal connectors and in Figure 6-16 for equipment with non-metal connectors.
Removal
1. Disconnect one end of the bonding strap from the aircraft ground location.
2. Disconnect the other end of the bonding strap from the interfaced equipment connector backshell
or shield drain.
3. Remove the bonding strap.
Replacement
NOTE
The interfaced equipment bonding strap should be as short as practical and must not
exceed 6 inches.
1. Construct a bonding strap no longer than 6 inches by attaching terminal lugs (P/N MS20659-130)
to both ends of a 7/16" or wider tubular braid (P/N QQB575R30T437).
2. If needed, clean the attachment locations with a bonding brush.
3. Secure each end of the bonding strap to the previously installed locations. Ensure that the strap
does not loop back on itself and that the hardware is as shown in Figure 6-15 or Figure 6-16. The
washers must seat fully against the aircraft metallic structure without overhang or interference
from other hardware.
4. Using a milliohm meter, verify that the resistance between the connected structure is less than
2.5 mΩ.

