36
CHAPTER 5 - OPERATION
CHAPTER 5 - OPERATION
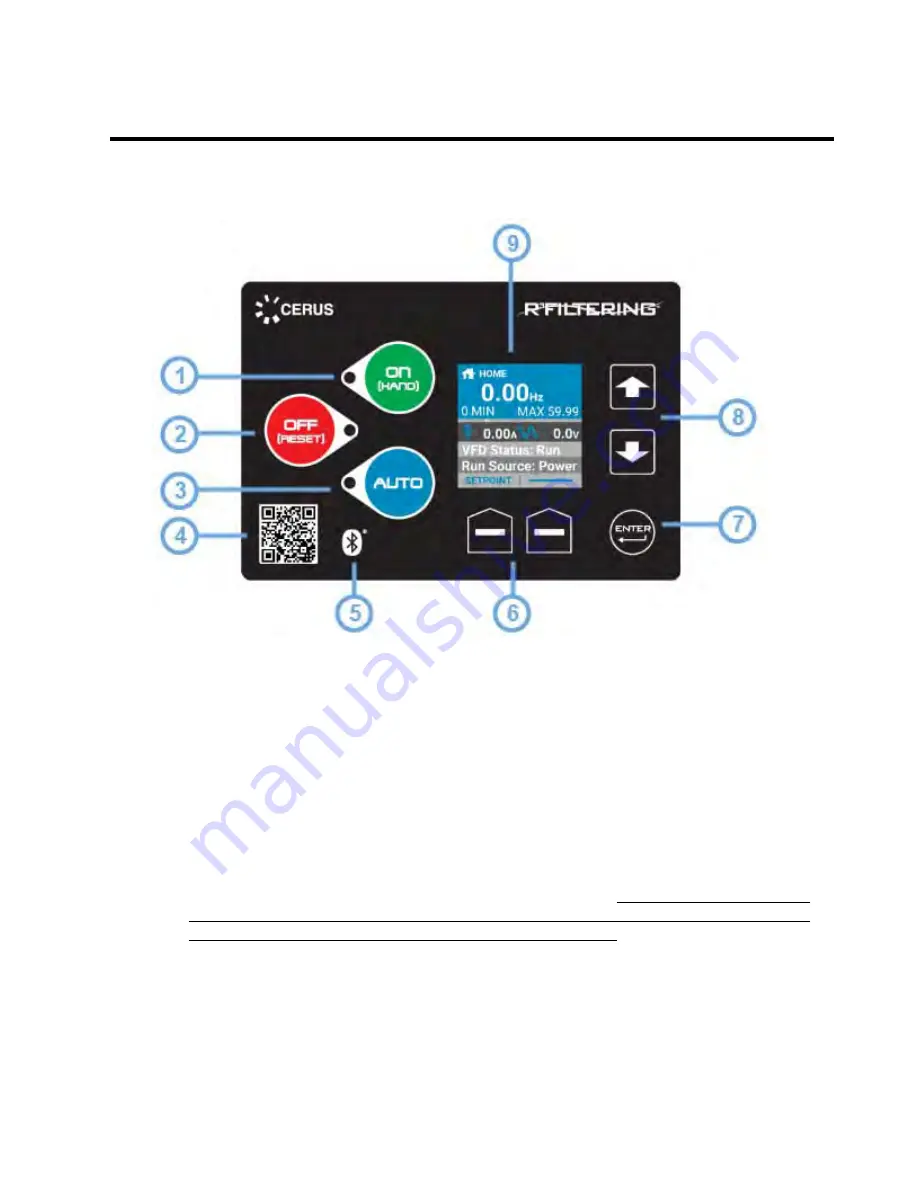
5.1 Control
Interface
1. On (Hand) [Hand Mode]:
Commands the drive to run at a preset (user specified)
frequency.
2. Off (Reset):
During normal operating mode this button will stop the drive. During a
fault condition, this button is used to reset and clear a fault when depressed for 3-5
seconds.
3. Auto
[Automatic
Mode]:
This button is used to run the drive based on user defined
remote commands, such as external sensors or BMS. When in
“
Auto Mode
”
the drive
will only start or stop based on these user-configured remote commands.
4. Bluetooth Quick Response (QR) Code [Quick Connect]:
Scanning QR code using
the Q-Link mobile application allows for instant access to VFD.
5. Bluetooth Connection (Device Pairing Available):
Indicates that the VFD is
capable of supporting a Bluetooth connection.
6. Soft Keys:
These keys correspond to the bottom left and right corners of the screen
and will change according to current menu and function.
On Bypass packages, the
soft keys are used to switch between
“
VFD
”
and
“
Bypass
”
by selecting the desired
mode (See section 5.4.1 for overview of the home screen).
7. Enter:
Executes menu selection and to confirm any changes made to parameter
settings. Also, allows user to access submenus and selected parameters.
8. Up and Down Arrows [Menu Select]:
Use to navigate menus and adjust parameters.
9. Organic Light-Emitting Diode (OLED) Display:
Displays status and menu items.
The VFD defaults to the home screen and displays status indicators upon activation.
Summary of Contents for Q-link
Page 12: ...12 2 1 2 UL Label...
Page 16: ...16 3 3 VFD with Disconnect Ratings 3 4 VFD HP Rated Ratings...
Page 18: ...18 3 8 Standalone and HP Rated VFD Dimensions...
Page 19: ...19 3 9 Smart Bypass and VFD with Disconnect Dimensions...
Page 26: ...26 4 3 Wiring Schematic Standalone HP Rated VFD s...
Page 27: ...27 4 4 Wiring Schematic Smart Bypass...
Page 28: ...28 4 5 Wiring Schematic VFD with Disconnect...
Page 35: ...35 4 12 PID Control Diagram...
Page 37: ...37 5 2 Control Interface...
Page 95: ...95 ADMIN 35 Serial Number Serial Number 30 XXXXXXXX 0 99 999 999...
Page 103: ...103 9 2 Fan Replacement...
Page 104: ...104 9 3 Battery Replacement...


