background image

Electrical connection

HyPower-Geko

86

FläktGroup DC-2014-0022-GB 2018-05/R5 • Subject to modifications

6.11.5 Operating mode 

Heating and Cooling 

(4-pipe system))

**) 

Fan control (terminal diagram depending on selected rotational speed combination, see wiring diagram in the electric switch cabinet.

***)  Signal contact condensate pump fault (for wiring on further units, refer to wiring diagram chapter 6.11.1).
****) In case of a condensate pump fault, the switch is automatically disconnected from the power supply.

Fig. 6-71:  Fan and valve control

(unit with terminal strip)

Configuration

Fig. 6-72:  Fan and valve control

(unit with terminal strip and condensate pump)

Fig. 6-73:  Fan and valve control

(unit with relay PCB)

Fig. 6-74:  Fan and valve control

(unit with relay PCB and condensate pump)

CET.ACEC

Unit with terminal strip

Parameter 3:  SEL0 = 14 and SEL2 = OFF

(4-pipe system)

Parameter 4:  SEL0 = 16 and SEL2 = OFF

(fan On/Off)

Parameter 5: SEL0 = 18 and SEL2 = auto
Parameter 7: SEL0 = 22 and SEL2 = auto
Parameter 8: SEL0 = 24 and SEL2 = 2

 (without sensor)

Parameter 9:  SEL0 = 26 and SEL2 = 1
(centrally or via sensor)

CET.ACEC

Unit with terminal strip and condensate pump

CET.ACEC

Unit with relay PCB

CET.ACEC

Unit with relay PCB and condensate pump

Summary of Contents for HYPOWER-GEKO

Page 1: ...HYPOWER GEKO OPERATION MANUAL ...

Page 2: ...HyPower Geko 2 FläktGroup DC 2014 0022 GB 2018 05 R5 Subject to modifications Product range FläktGroup ...

Page 3: ... 2 point 24 V S 0 10 V 24 V C 3 point 230 V 2 contacts Valve body 2 2 way 3 3 way Kvs value 03 Kvs 0 25 R N S C 04 Kvs 0 40 R N S C 06 Kvs 0 63 R N S C 10 Kvs 1 0 R N S C 16 Kvs 0 40 R N S C T Q 25 Kvs 2 5 R N S C T Q 40 Kvs 4 0 R N S C T Q 63 Kvs 6 3 R N S C T Q 80 Kvs 8 0 R N S C T Q Connection shut off 0 Inlet outlet flow with outside thread 1 Inlet outlet with solder fitting 2 Inlet outlet bal...

Page 4: ...1 2 8 Commission Regulation EU 2016 2281 22 3 Shipping and storage 24 3 1 Transport safety 24 3 2 Packaged content 24 3 3 Packaging 24 3 4 Transport 24 3 5 Temporary storage 25 3 6 Disposal 25 4 Mounting 26 4 1 Installation site 26 4 2 Recommended service opening for maintenance work on the basic unit 27 4 3 Pre installation work 29 4 4 Unit mounting 30 5 Hydraulic Connection 41 5 1 General 41 5 2...

Page 5: ...95 7 3 Vent the unit 100 7 4 Checking the condensate drain 100 7 5 Terminating resistors 101 7 6 Setting address 103 7 7 Setting limitation functions 105 7 8 Switch on unit 107 7 9 Checking data connection 108 7 10 Checking control inputs and outputs 109 7 11 Check condensate pump applies only to cooling units with condensate pump 111 7 12 Functional characteristics for the use of MATRIX 112 8 Mai...

Page 6: ...en working on the equipment observe all instructions and precautions in the current oper ation manual in particular the chapter on safety 1 2 Symbols used The following symbols are used to highlight particular text sections in this operation manual This symbol is used to indicate lists This symbol indicates handling instructions 9 This symbol indicates the result of an action 1 3 Safety instructio...

Page 7: ...g hot liquids that can result in per sonal injury including death and material damage Risk of damage to the unit This symbol indicates a hazardous location with a risk of material damage that can also lead to personal injury Danger of electrical current Before carrying out any jobs on the unit power the unit down to prevent injury from electrical current Ensure that the unit is secured against bei...

Page 8: ... are exclusively designed for heating filtering and cooling purposes Water or water glycol solution max 50 may be used as the medium The following limit values apply to medium for operating Cu Al heat exchangers Risk of personal injury Always wear protective gloves when shipping or installing the unit to prevent injury caused by sharp edges Risk of damage to the unit During the installation it mus...

Page 9: ...open systems e g when using well water used water should additionally be cleansed of suspended matter using a filter to be installed at the inlet Failure to do so could result in a risk of erosion by suspended matter consider the limit values specified in Tab 1 1 Also ensure that the unit is protected from dust and other substances that can cause acidic or alkaline reaction with water aluminum cor...

Page 10: ...sembly mountings Pos 2 Fan chamber optional Pos 3 Heat exchanger Cu Al Pos 4 Fan Pos 5 Bottom basic casing cover instead of condensate tray Pos 6 for heating only units Pos 6 Condensate tray optional Pos 7 Auxiliary condensate tray only for unit type U GH U Pos 8 Condensate pump optional Pos 9 Service panel Pos 10 Cover for heat exchanger and condensate drain Pos 11 Heat exchanger cover only for u...

Page 11: ...continuously variable EC motor is equipped with integrated control electronics and blockage protection Protection class IP20 and insulation class F Bottom basic casing cover instead of condensate tray Pos 6 for heating only units pos 5 For heating only units bottom basic casing cover is mounted instead of condensate tray Pos 6 Condensate tray optional pos 6 In the HyPower Geko the condensate tray ...

Page 12: ... allowable water inlet temperature is 8 C Unit part Material Fan chamber optional Galvanized sheet steel optionally insulation made of mineral wool laminated with glass fiber Basic casing including assembly mountings Galvanized steel sheet insulation PE Heat Exchanger Copper aluminium copper copper copper alodine AC and EC Motor Different materials Connecting cable Different materials Fan with cas...

Page 13: ... MPa 16 bar 90 C Max allowed ambient temperature 40 C Min allowed ambient temperature 2 C Operating voltage 230 V AC 50 60 Hz Power consumption protection class Refer to name plate Max discharge temperature 75 C fire hazard Tab 2 2 Operating limits for unit and heat exchanger Model size Capacity size Maximum medium flow rate l h 2 pipe cooling or heating circuit 4 pipe cooling circuit 4 pipe heati...

Page 14: ...5 s 60 Hz Load capacity for auxiliary switch Max 5 1 A 250 V Max 100 mA 24 V Water Max 50 glycol share allowable Tab 2 5 Operating limits for valves with modulating actuators and auxiliary switches Valves with thermoelectric actuators 230 V 24 V Values M100 230 V M100 24 V MT4 230 V MT4 24 V MT8 230 V MT8 24 V Max operating pressure inlet temperature 1 6 MPa 16 bar 110 C Max allowed ambient temper...

Page 15: ...t Fig 2 3 Dimensions for unit type U without fan chamber A not certified as of VDI 6022 GH U A0 Model size 1 2 3 4 b mm 560 865 1170 1590 Tab 2 8 Width of basic unit depending on unit size Fig 2 4 Dimensions for unit type U with fan chamber B C GH U B C Model size 1 2 3 4 b mm 560 865 1170 1590 Tab 2 9 Widths dependent on unit size ...

Page 16: ...accessories Fig 2 5 Dimensions for unit type H with fan chamber B C GH H B C Model size 1 2 3 4 b mm 560 865 1170 1590 Tab 2 10 Widths dependent on unit size Fig 2 6 Dimensions of intake and discharge plenum ZGH A031 ZGH A042 Model size 1 2 3 4 b mm 560 865 1170 1590 Tab 2 11 Unit size dependent width of accessories ...

Page 17: ...ir intake and air discharge sound absorber fittings ZGH A211 ZGH A212 Fig 2 8 Dimensions air intake grille intervention protection ZGH A511 Fig 2 11 Dimensions of air discharge transition piece ZGH A912 Fig 2 9 Filter chamber removal from top ZGH A411 Fig 2 12 Filter chamber removal from side ZGH A421 Model size 1 2 3 4 b mm 560 865 1170 1590 Tab 2 12 Unit size dependent width of accessories ...

Page 18: ... 875 2640 845 2070 825 1725 740 2300 525 2110 500 1965 3 780 3200 720 2670 700 2565 1115 3460 815 3045 735 2745 4 2595 4490 2460 3740 2400 3440 1455 4540 970 4050 880 3695 at 0 Pa external pressure VK Fan chamber Tab 2 14 air volume flow Model size Fan type Sound power level intake side dB A Sound power level discharge side dB A Sound power level casing radiation dB A Min Max Min Max Min Max VK A ...

Page 19: ...8 0 57 0 75 0 56 0 69 131 224 118 172 116 157 2 0 93 1 90 0 87 1 30 0 85 1 15 180 431 174 293 171 254 3 0 94 2 15 0 89 1 76 0 92 1 74 194 490 186 405 185 396 4 1 97 3 09 1 86 2 46 1 84 2 39 415 708 381 555 376 540 1 EC 0 13 1 54 0 11 1 47 0 11 1 44 20 213 18 212 16 206 2 0 18 2 09 0 16 2 10 0 15 2 07 17 296 13 300 11 288 3 0 30 3 43 0 26 3 47 0 23 3 47 33 510 27 485 26 471 4 0 29 3 76 0 26 3 98 0 ...

Page 20: ...city Pos 1 Condensate pump Pos 2 Suction hose with suction basket Pos 3 Pressure hose for on site condensate connection 1 5 m long Pos 4 Fill level sensor with protective cover Fig 2 13 Condensate pump Technical data Values Operating voltage 230 V AC 50 Hz Starting current max 0 07 A Operating current 0 02 A Power input 4 7 W Protection class IP64 Max pump head 8 m Max water flow rate 14 l h Sound...

Page 21: ...tal sheet module with removal of bag filter from top Filter chamber removal from side ZGH A421 Galvanized metal sheet module with removal of bag filter from side Sound absorber for suction side assembly ZGH A211 Galvanized sheet steel module with sound attenuating plates Sound absorber for pressure side assembly ZGH A212 Galvanized sheet steel module with sound attenuating plates Discharge transit...

Page 22: ...800 60 0 5 5 4 4 7 0 7 5 4 0 203 1065 58 0 2 GH12 W0 0W WC AC 1 4 5 3 5 1 0 5 0 0 120 705 55 0 3 5 7 4 5 1 2 6 4 0 140 940 60 0 5 6 3 5 1 1 2 7 2 0 155 1065 63 0 GH12 WW 1 4 3 3 4 0 9 6 4 0 118 685 55 0 3 5 4 4 3 1 1 7 8 0 135 890 60 0 5 5 9 4 7 1 2 8 5 0 150 990 62 0 GH12 W0 0W WC EC 1 2 9 2 2 0 7 3 2 0 017 425 43 0 3 5 0 3 9 1 1 5 6 0 087 800 60 0 5 6 3 5 1 1 2 7 2 0 203 1065 68 0 GH12 WW 1 2 8 ...

Page 23: ... 57 0 5 14 0 11 2 2 8 19 7 0 371 2345 66 0 GH32 W0 0W WC EC 1 5 6 4 1 1 5 6 0 0 026 800 46 0 3 11 4 9 0 2 4 12 8 0 181 1845 63 0 5 15 3 12 4 2 9 17 4 0 459 2615 71 0 GH32 WW 1 5 3 3 9 1 4 8 1 0 026 760 46 0 3 10 9 8 5 2 4 15 6 0 175 1740 63 0 5 14 7 11 9 2 8 20 6 0 450 2500 70 0 4 1 GH41 W0 0W WC AC 1 10 9 10 0 0 9 12 9 0 410 2585 63 0 3 12 5 11 5 1 0 14 8 0 472 3105 66 0 5 13 4 12 4 1 0 16 0 0 54...

Page 24: ...on a pallet in a carton with reinforcements that permits stacking max 2 pieces The accessories are packaged individually in cartons and fastened to the carton of the unit Everything is wrapped with a protective foil 3 4 Transport Danger due to overhead loads It is extremely dangerous to stand under overhead loads Make sure there are no persons below an overhead load Risk of damage to the unit Impr...

Page 25: ...n 50 and 85 The storage temperature must be between 10 to 50 C The fan coil unit must be protected from impacts vibrations etc Protect the unit from soiling before and during installation 3 6 Disposal During disposal the units components must be separated as far is possible and sorted by material type refer to Material specification on page 12 Fig 3 1 Transport Risk of damage to the unit All resid...

Page 26: ...cables and pipes Risk of personal injury Injury may be caused by falling parts and sharp edges Wear a helmet safety boots and protective gloves when installing the unit Ceiling installations should always be performed by two persons Personal injury and hazardous voltage If the HyPower basic unit is operated without FläktGroup accessories or on site accessories provided by others or ductwork on air...

Page 27: ...e U Pos 2 Service panel Pos 3 Filter behind cover strip Pos 4 Discharge transition piece ZGH A912 Pos 5 Auxiliary drain pan Fig 4 1 Service opening unit type U GH U Dimensions in brackets apply to units without fan chamber Dimensions in brackets apply if an auxiliary drain pan is used Model size 1 2 3 4 b mm 560 865 1170 1590 bmax mm 805 1110 1415 1835 B mm 1265 1565 1570 1870 1875 2175 2295 2595 ...

Page 28: ... 2 Service panel Pos 3 Filter behind cover strip Pos 4 Discharge transition piece ZGH A912 Fig 4 2 Service opening unit type H GH H Dimensions in brackets apply to units without fan chamber Model size 1 2 3 4 b mm 560 865 1170 1590 bmax mm 1110 805 1415 1110 1720 1415 2140 1835 B mm 1560 1265 1860 1570 2160 1875 2590 2295 Tab 4 2 Size of unit type H GH U and service opening Dimensions in brackets ...

Page 29: ... for proper inflow of the air from the back does not apply if connected to an on site intake duct to the back 200 2 for installation work e g for lateral connection to the on site valve piping to the side 260 without valve accessories 560 with valve accessories Tab 4 3 Installation clearances Fig 4 3 Assembly spacing viewing from below Dimensions in brackets apply to valve accessories for assembly...

Page 30: ...the holes of the assembly mountings is presented in thefig 4 4 The spacing of the holes of the assembly mountings correspond exactly to the spacing of the assembly holes in the room ceiling for the basic unit as well as the assemblies of the accessory Risk of damage to the unit The unit must be mounted in such a way to ensure unobstructed air flow in subse quent operation The clearance between uni...

Page 31: ...eko unit Use a spirit level to exactly align the HyPower Geko in longitudinal and lateral di rection refer to fig 4 6 Tighten the fixing bolts Pos 1 Ceiling construction Pos 2 Threaded rod M8 on site Pos 3 Z Profile on site Fig 4 5 Examples of mounting variants Pos 1 Assembly mountings Pos 2 Suspension rail Pos 3 Track adapter Fig 4 6 Assembly of the HyPower Geko User instructions Unobstructed con...

Page 32: ...equired mounting materials for the unit including threaded rods and screws is provided In the accessory package Hole spacing of the assembly mountings and suspension rails see fig 4 9 Fig 4 7 Sample module combinations Pos 1 Suspension rail length 950 mm ZGH 0A613 Pos 2 Suspension rail length 1550 mm ZGH 0A623 Pos 3 Suspension rail length 2150 mm ZGH 0A633 Pos 4 Basic unit Pos 5 Fan chamber Pos 6 ...

Page 33: ...e fig 4 8 Pos 5 on which the suspension rail see fig 4 8 Pos 2 is installed Fig 4 8 Fixing rail adapter Fig 4 9 Keyholes for mounting suspension rail All mounting slots keyholes 9 mm provided for M8 threaded rods Pos 1 Basic unit Pos 2 Fan chamber Pos 3 Discharge transition piece Pos 4 Intake discharge sound attenuator Pos 5 Intake discharge plenum Poz 6 Suspension rail length 950 mm ZGH 0A613 Pos...

Page 34: ...the suspension rail and threaded rods Hang the HyPower Geko with rail adapters see fig 4 8 in the suspension track Lift the opposite side of the HyPower Geko unit so that the threaded rods go through the holes of the assembly mountings Connect the HyPower Geko using supplied fixing material Use a spirit level to exactly align the MPower Geko in longitudinal and lateral direc tion refer to fig 4 6 ...

Page 35: ...is absolutely required The discharge transition piece is supplied extra with the adhesive tape provided for sealing the flange of the discharge transition piece and the unit Pos 1 Basic unit Pos 2 Discharge transition piece Pos 3 Screw M8x25 washer nut 2 pcs Pos 4 Insulation tape Stick the adhesive tape above the flange of the discharge transition piece fig 4 11 Pos 4 Set the flange of the dischar...

Page 36: ...the sign indi cates the model size of the unit using M8 screws washers and nuts and tapping screws see fig 4 12 Pos 2 to the unit with fan section or to the sound attenuator or to the discharge transi tion piece Fig 4 12 Mounting flexible canvas connection Personal injury For units without fan section type GH A a suitable on site interven tion protection must be ensured Pos 1 Unit with fan chamber...

Page 37: ... 1 Discharge transition piece Pos 2 Discharge sound attenuator Pos 3 Screw M8x25 washer nut 4 pcs Pos 4 Fan chamber The intake sound attenuator ZGH A211 can be mounted on the inlet side if the basic unit is furnished with a fan section The discharge sound attenuator ZGH A212 can be mounted on the discharge side if the unit is furnished with a discharge tran sition piece ZGH A912 Stick the adhesive...

Page 38: ...et side is only possible if the basic unit is furnished with a fan section or if the unit is furnished with a discharge transition piece on the discharge side discharge plenum ZGH A042 Stick the adhesive tape on to the flange Fasten the box to the discharge transition piece or to the fan section with M8 screws washers nuts For units which are furnished with an intake or discharge plenum unused rou...

Page 39: ...removal ZGH A411 ZGH A4212 are supplied with a separately enclosed insulation tape This tape is used as a sealing between the connection of the filter chamber and the fan chamber of unit Notice Before the installation remove the filter from the fan chamber After the installation of the filter chamber ZGH A411 ZGH A4212 insert the filter in this chamber Fig 4 16 Installation of filter chamber with ...

Page 40: ...te drain outlet of the condensate tray must always be on the heat exchanger connection side Pos 1 Coil drip tray Pos 2 Fastening screws 4 pcs Pos 3 Arrester straps Mount the condensate tray Pos 1 on the opposite side of the heat exchanger connection and fasten with 4 screws Pos 2 Fig 4 17 Assembly of condensate tray Pos 1 Auxiliary drain pan Pos 2 Screw nut 4 pcs Pos 3 Support 2 pcs Assemble the a...

Page 41: ...rer control is performed via a distributor circuit refer to fig 5 1 DANGER OF SCALDING BY ESCAPING HEATING MEDIUM Before the on site piping and hydraulic connections of the Hypower Geko are set up the heating cooling medium must be shut off and secured against inadvertent opening User instructions All field cooling medium pipework must be insulated to prevent condensate forma tion If the pipework ...

Page 42: ...th these valves If 3 way valves are fitted by the manufacturer control is performed via a distributor circuit refer to fig 5 3 With a 2 way valve control is carried out by throttling the medium supply see fig 5 4 Shut off valve The shut off valve is used to limit or shut off the medium flow refer to fig 5 5 Fig 5 2 Motor actuated 2 way valve Fig 5 3 3 way valves with thermoelectric actuator Fig 5 ...

Page 43: ...llation Please observe all instructions in Section Mounting connections on page 43 Run the pipes at a right angle to the side or backwards Seal the connections Screw in the connections 5 3 3 Medium connection in a 2 pipe system Fig 5 6 Ball valve Risk of damage to the unit During installation the connecting nut on the heat exchanger must be countered using a suitable tool User instructions The con...

Page 44: ... 1 Pos 2 Return line internal screw thread see Tab 5 1 Fig 5 8 Heat exchanger connections 2 pipe system right connection Type identification Connection fittings of the heat exchanger internal screw thread GH11 0W W0 WC GH12 0W W0 WC GH13 0W W0 WC G 1 2 G 1 2 G 1 2 GH21 0W W0 WC GH22 0W W0 WC GH23 0W W0 WC G 1 2 G 1 2 G 3 4 GH31 0W W0 WC GH32 0W W0 WC GH33 0W W0 WC G 1 2 G 3 4 G 1 GH41 0W W0 WC GH4...

Page 45: ...ng internal screw thread see Tab 5 2 Pos 4 Return line heating internal screw thread see Tab 5 2 Fig 5 9 Heat exchanger connections 4 pipe system left connection Pos 1 Inlet cooling internal screw thread see Tab 5 2 Pos 2 Return line cooling internal screw thread see Tab 5 2 Poz 3 Supply line heating internal screw thread see Tab 5 2 Pos 4 Return line heating internal screw thread see Tab 5 2 Fig ...

Page 46: ...flat sealing Solder fitting for Cu tube External thread flat sealing Solder fitting for Cu tube VGH 03 L VGH 03 R VGH 03 L VGH 03 R 0 25 R1 2 12 mm R3 4 15 mm R3 4 15 mm VGH 04 L VGH 04 R VGH 04 L VGH 04 R 0 40 R1 2 12 mm R3 4 15 mm R3 4 15 mm VGH 06 L VGH 06 R VGH 06 L VGH 06 R 0 63 R1 2 12 mm R3 4 15 mm R3 4 15 mm VGH 10 L VGH 10 R VGH 10 L VGH 10 R 1 00 R1 2 12 mm R3 4 15 mm R3 4 15 mm VGH 16 L...

Page 47: ...onnections of 2 pipe system 2 way valve left connection Pos 1 Supply line Pos 2 Valve actuator motor Pos 3 Shut off valve ball valve optional Pos 4 Return line Fig 5 12 Piping connections of 2 pipe system 2 way valve right connection User instructions The valve accessories are always delivered separately and must be installed on site to the basic unit The ball valves can be fitted at the water inl...

Page 48: ...system 3 way valve left connection Pos 1 Supply line Pos 2 Valve actuator motor Pos 3 Shut off valve ball valve optional Pos 4 Return line Fig 5 14 Piping connections of 2 pipe system 3 way valve right connection User instructions The valve accessories are always delivered separately and must be installed on site to the basic unit The ball valves can be fitted at the water inlet or return line the...

Page 49: ...onnections of 4 pipe system 2 way valve left connection Pos 1 Supply line cooling Pos 2 Valve actuator motor cooling Pos 3 Shut off valve ball valve cooling optional Pos 4 Shut off valve ball valve heating optional Pos 5 Return line cooling Pos 6 Supply line heating Pos 7 Valve actuator motor heating Pos 8 Return line heating Fig 5 16 Piping connections of 4 pipe system 2 way valve right connectio...

Page 50: ...ystem 3 way valve left connection Pos 1 Supply line cooling Pos 2 Valve actuator motor cooling Pos 3 Shut off valve ball valve cooling option al Pos 4 Shut off valve ball valve heating option al Pos 5 Return line cooling Pos 6 Supply line heating Pos 7 Valve actuator motor heating Pos 8 Return line heating Fig 5 18 Piping connections of 4 pipe system 3 way valve right connection User instructions ...

Page 51: ...per pipe on the provided connector of the drain pan and seal it refer to fig 5 19 pos 2 When connecting the condensate drain to the sewage system observe the relevant regulations of the local Water Board stench trap Pos 1 Coil drip tray Pos 2 Condensate drain outlet User instructions Maintain a continuous slope in drain line to provide adequate condensate drainage When running pressure free piping...

Page 52: ...ricant Set the plastic end piece of the suction hose of the condensate pump seefig 5 21 Pos 3 on the outlet fitting of the condensate tray seefig 5 21 Pos 2 until it sits firmly For for the assembly of the end piece be sure that the half round hole at the edge of the end piece see fig 5 21 Pos 1 is on the upper side Pos 1 Half round hole at the edge of the end piece Pos 2 Condensate tray Pos 3 Pla...

Page 53: ...sion of structure borne noise Actual discharge volume of condensate pump in l h Vertical discharge head Horizontal discharge head m 5 10 20 30 0 14 0 13 9 13 5 12 5 1 13 3 13 3 13 2 13 0 2 13 2 13 3 13 2 13 0 3 13 1 13 1 13 0 13 0 4 13 0 13 0 12 9 12 8 5 12 4 12 3 12 2 12 0 6 11 5 11 0 10 8 10 4 7 10 3 9 9 9 4 8 5 Tab 5 4 Actual discharge volume of the condensate pump depending on the horizontal a...

Page 54: ...the model additional electrical parts Metal sheet electric switch cabinet Danger of electrical current The electrical installation of the fan coil unit may only be carried out by qualified licensed electricians in compliance with this operation manual and the following reg ulations VDE regulations including safety regulations Accident prevention regulations Installation instructions Danger of elec...

Page 55: ...ring of other connecting terminals User instructions The factory performed assignment of the terminals depends on the speed combina tion selected by the customer Possible speed combination Terminal designation 110 111 112 113 114 Motor speed stage A K 1 2 3 B L 2 3 4 C M 3 4 5 E O 1 3 5 H R 1 2 3 4 5 Tab 6 2 Speed combinations User instructions Only authorized customer service after ales service m...

Page 56: ... or FG relay PCB to be supplied with the unit Fig 6 2 Terminal box and metal sheet electrical control box User instructions Refer to the wiring diagram enclosed with the unit for detailed instructions when con necting individual components fan valves etc Before commencing connections check that the order code of the unit s electrical equipment matches the wiring diagram According to the relevant r...

Page 57: ...Connect multiple HyPower Geko units in accordance with the wiring diagram Fig 6 3 Connection termial block relay PCB User instructions Before commencing connections check that the order code of the unit s electrical equipment matches the wiring diagram Only one fan speed stage may be activated simultaneously If the fan coil unit is to be connected to an on site control system in the event of an on...

Page 58: ...Geko units with a FG relay circuit board are prepared for parallel opera tion Only one fan speed stage may be activated simultaneously A minimum switch pause of 0 1 sec must be maintained between changing speeds According to the relevant regulations an all pole isolating device must be provided by others on site Speed 1 Speed 2Speed 3 Further slave units Damage to the unit If multiple motors are i...

Page 59: ...otor is running at nmin at 100 the motor is running at nmax When actuated with a 0 10 V signal consider that the speed is 0 for an input voltage of less than 1 V if voltage amounts to 1 4 V the motor is running at nmin with 10 V the motor is running at nmax User instructions Before commencing connections check that the order code of the unit s electrical equipment matches the wiring diagram Model ...

Page 60: ...of a conden sate pump fault ensure on site that the fan shuts down and the cooling valve closes Fig 6 6 Connecting terminals 1 N jumpers must be set on site by others 2 Connect valves if these are available in the unit configuration Otherwise only fan control For a 4 L system connect the heating valve to terminal 105 the cooling valve to terminal 103 For a 2 L system with the function Only Heating...

Page 61: ...ew of controller types 99 98 97 96 95 L 110 111 112 102 103 104 105 N N S T P S T P 120 121 122 123 124 125 N 32 31 73 72 71 70 38 37 36 07 06 15 14 13 12 11 10 35 34 33 N L STP STP STP S T V S T V S T V S T V 1 S T V N 30 2 S T V O N V 0 V 110 111 112 120 121 122 123 124 125 130 131 132 140 141 133 134 1 4 2 1 4 3 1 4 4 03 02 01 07 06 15 14 13 12 11 10 18 S T P S T P 99 98 97 96 95 L N 102 103 10...

Page 62: ...he precise control of room temperature Therefore avoid mounting the sensor in the following locations refer to fig 6 8 next to doors windows passageways etc since intense movement of air can cause incorrect measurements on hot or cold walls e g chimney outside wall since the wall temperature can cause incorrect measurements behind blinds and net curtains as the insulating layers of air can cause i...

Page 63: ...consumption of the units must not exceed 10 A If required provide an auxiliary power supply According to the relevant regulations an all pole isolating device must be provided by others on site User instructions Use the following control cables for connection In order to meet the specifications of the Declaration of Conformity multi wire control cable 0 5 mm2 with copper weave shielding Install th...

Page 64: ... using support terminals 2 additional cores for terminals 12 and 13 of the control panel should be provided In units with a return or inlet sensor 2 additional cores for terminals 12 and 13 of the control panel must be installed An external room sensor cannot be connected with this con figuration The wiring of the sensor is completed via support terminals STV1 STV2 Fig 6 10 Connecting control pane...

Page 65: ...ts 34 33 32 37 36 35 38 40 46 45 44 43 42 41 48 47 31 30 34 33 32 37 36 35 38 31 30 Further slave units Slave unit with MATRIX 3000 Slave unit with MATRIX 2000 MATRIX 2001 3001 4001 4001 IO 9 Connecting control panel network participant When connecting control panel MATRIX OP21 to MATRIX Net network a 2 wire bus line should be used Connect the control cables in accordance with the wiring diagram T...

Page 66: ... 97 96 95 13 34 33 32 37 36 35 38 99 98 97 96 95 Control panel MATRIX OP30 to OP51 Unit with MATRIX3000 Connecting master unit with slave units If units are fitted with MATRIX 3000 controllers a 2 core bus line must be used Connect the control cables in accordance with the wiring diagram Individual units can be fitted with MATRIX 3000 The following cable is recommended for the bus line Manufacture...

Page 67: ...MATRIX 2000 the con nection of an additional room or return air sensor is only possible via the AI module Fig 6 17 Connecting inlet sensor Pos 1 Connecting cable refer to notice on Seite 63 Connect the inlet sensor according to the wiring diagram Connect the shielding of the sensor line with grounding clamps to a large ground area Fig 6 18 Connecting inlet sensor MATRIX 2001 3001 4001 4001 IO 9 9 ...

Page 68: ...arge ground area MATRIX 2001 3001 4001 4001 IO 9 9 For connecting cable refer to notice on Seite 63 Pos 1 Air quality sensor Pos 2 Power supply unit by others Connect air quality sensor in accordance with the wiring diagram Fig 6 22 Connecting air quality sensor User instructions Illustrated connecting terminals of the sensors relate to type 903WRF04CO2V The sensor requires supply voltage of 24 V ...

Page 69: ...ccordance with the wiring diagram The loop resistance may not exceed 500 W Fig 6 24 Connecting function input Function inputs Functional inputs can be assigned with different functions Normal operation Economy mode Autonomous operating mode the functions of these operat ing modes can be programmed using the service software MATRIX PC Switching the unit off without frost free condition in room Func...

Page 70: ...up can also be made up of a LON module and a controller unit The LON module transmits setpoints and current readings to the group With units fitted with MATRIX 3000 and MATRIX 4000 a group can also be formed by replacing the control panel by a global module such as MATRIX LON Group structure with the MATRIX 2000 system A group can be formed with the MATRIX 2000 system as illustrated in fig 6 26 Fi...

Page 71: ...inted circuit board of the MATRIX 3000 controller refer to the unit s oper ation manual Data assignment of MATRIX LON module is performed via LON side configuration The MATRIX V module is assigned to this group via the group address switch refer to the Commissioning section in this operation manual or the corresponding manual for MATRIX Global Modules Units 2 to 16 can be freely assigned The contr...

Page 72: ...a the group address switch on the control panel refer to the Commissioning and Testing section in the relevant operation manual for MATRIX control panels on the printed circuit board of the MATRIX 3000 4000 controller refer to the unit s operation manual Data assignment of MATRIX LON module is performed via LON side configuration The MATRIX V MATRIX RF and MATRIX EM modules are assigned to this gr...

Page 73: ...modules MATRIX LON The arrangement of the unit groups and global modules in the network is arbitrary The following factors are critical for the assignment of units control panels and global mod ules to a group Setting of the group address switch refer to the chapter Commissioning and Test ing in the relevant operation manual Or the assignment of a module input and output to a unit group via the MA...

Page 74: ...roups is illustrated The maximum allowed branch feeder length is 25 m Fig 6 31 Structure of a MATRIX Net in line structure with a branch feeder Since it is not permissible to connect three lines an intermediate terminal must be provided To do this the intermediate terminals STV mounted on the board if not already occupied or terminals fitted on site by others can be used 1 2 User instructions The ...

Page 75: ...ial Total max line length m Max line length branch feeder m Manufacturer Cable type Only MATRIX Net MATRIX Net supply voltage 50 50 LAPP cable UNITRONIC BUS CAN 1x2x0 22 2x2x0 22 300 150 LAPP cable UNITRONIC BUS CAN 1x2x0 34 2x2x0 34 600 150 LAPP cable UNITRONIC BUS CAN 1x2x0 5 2x2x0 5 30 30 LAPP cable UNITRONIC BUS LD 1x2x0 22 2x2x0 22 30 30 LAPP cable UNITRONIC Li2YCY TP 2x2x0 22 150 60 LAPP cab...

Page 76: ...strate the interconnection of a miniature switch with 2 units for different unit models with a relay PCB Pos 1 Fan control terminal diagram depending on selected rotational speed combina tion see wiring diagram in the electric switch cabinet Pos 2 Power supply 230 V AC fusing by others max 6 A Pos 3 External terminals for thermal contacts Pos 4 Connecting terminals for valves Pos 5 Connecting term...

Page 77: ... pump is optional 2 Connect valves if these are available in the unit configuration Otherwise only fan control The connections highlighted light gray were executed at the factory This view provides a better visualization of the switches Fan control terminal diagram depending on selected rotational speed combination see wiring diagram in the electric switch cabinet Number of wires in the line e g 5...

Page 78: ... see wiring diagram in the electric switch cabinet Fig 6 34 Manual fan control unit with terminal strip Fig 6 35 Manual fan control unit with relay PCB Fig 6 36 Fan continuous mode and valve control unit with terminal strip Fig 6 37 Fan continuous mode and valve control unit with relay PCB Fig 6 38 Fan and valve control unit with terminal strip Fig 6 39 Fan and valve control unit with relay PCB CM...

Page 79: ... Fig 6 41 Fan continuous mode and valve control unit with relay PCB Fig 6 42 Fan continuous mode and valve control unit with terminal strip and condensate pump Fig 6 43 Fan continuous mode and valve control unit with relay PCB and condensate pump Fig 6 44 Fan and valve control unit with terminal strip Fig 6 45 Fan and valve control unit with relay PCB Fig 6 46 Fan and valve control unit with termi...

Page 80: ... and valve control unit with relay PCB Fig 6 50 Fan continuous mode and valve control unit with terminal strip and condensate pump Fig 6 51 Fan continuous mode and valve control unit with relay PCB and condensate pump Fig 6 52 Fan and valve control unit with terminal strip Fig 6 53 Fan and valve control unit with relay PCB Fig 6 54 Fan and valve control unit with terminal strip and condensate pump...

Page 81: ...ts see wiring diagram in section 6 10 1 With malfunction of condensate pump the switch is de energized Fig 6 56 Fan continuous mode and valve control unit with terminal strip Fig 6 57 Fan continuous mode and valve control unit with relay PCB Fig 6 58 Fan and valve control unit with terminal strip and condensate pump Fig 6 59 Fan and valve control unit with relay PCB and condensate pump CMT4D Unit ...

Page 82: ... terminal 105 the cooling valve to terminal 103 For a 2 pipesystem with the function Only Heating connect the heating valve to terminal 105 For all other 2 pipe systems connect the valve to terminal 103 Connect dotted pipes only for units with valve sleeve The connections highlighted light gray were executed at the factory This view provides a better visualization of the switches Fan control termi...

Page 83: ...c switch cabinet Fig 6 61 Fan and valve control unit with terminal strip Configuration Fig 6 62 Fan and valve control unit with relay PCB CET ACEC Unit with terminal strip Parameter 3 SEL0 14 and SEL2 auto 2 pipe system Parameter 4 SEL0 16 and SEL2 OFF fan On Off Parameter 5 SEL0 18 and SEL2 auto Parameter 7 SEL0 22 and SEL2 auto Parameter 8 SEL0 24 and SEL2 2 without sensor Parameter 9 SEL0 26 an...

Page 84: ...wer supply Fig 6 63 Fan and valve control unit with terminal strip Configuration Fig 6 64 Fan and valve control unit with terminal strip and condensate pump Fig 6 65 Fan and valve control unit with relay PCB Fig 6 66 Fan and valve control unit with relay PCB and condensate pump CET ACEC Unit with terminal strip Parameter 3 SEL0 14 and SEL2 auto 2 pipe system Parameter 4 SEL0 16 and SEL2 OFF fan On...

Page 85: ... and valve control unit with terminal strip Configuration Fig 6 68 Fan and valve control unit with terminal strip and condensate pump Fig 6 69 Fan and valve control unit with relay PCB Fig 6 70 Fan and valve control unit with relay PCB and condensate pump CET ACEC Unit with terminal strip Parameter 3 SEL0 14 and SEL2 auto 2 pipe system Parameter 4 SEL0 16 and SEL2 OFF fan On Off Parameter 5 SEL0 1...

Page 86: ...ig 6 71 Fan and valve control unit with terminal strip Configuration Fig 6 72 Fan and valve control unit with terminal strip and condensate pump Fig 6 73 Fan and valve control unit with relay PCB Fig 6 74 Fan and valve control unit with relay PCB and condensate pump CET ACEC Unit with terminal strip Parameter 3 SEL0 14 and SEL2 OFF 4 pipe system Parameter 4 SEL0 16 and SEL2 OFF fan On Off Paramete...

Page 87: ...the heating valve to terminal 105 For all other 2 pipe systems connect the valve to terminal 103 Connect dotted pipes only for units with valve sleeve 3 Second fan depending on the unit model size 4 control cable fan e g JY St Y 5 condensate pump is optional The connections highlighted in light gray were executed at the factory This view provides a better visualization of the switches Number of li...

Page 88: ...ontrol unit with terminal strip Configuration Fig 6 78 Fan and valve control unit with terminal strip and condensate pump CET ACEC 1st unit 2 4 unit Parameter 3 SEL0 14 and SEL2 auto 2 pipe system Parameter 4 SEL0 16 and SEL2 OFF fan On Off Parameter 5 SEL0 18 and SEL2 auto Parameter 7 SEL0 22 and SEL2 auto Parameter 8 SEL0 24 and SEL2 2 without sensor Parameter 9 SEL0 26 and SEL2 auto centrally o...

Page 89: ...lly disconnected from the power supply Fig 6 79 Fan and valve control unit with terminal strip Configuration Fig 6 80 Fan and valve control unit with terminal strip and condensate pump CET ACEC 1st unit 2 4 unit Parameter 3 SEL0 14 and SEL2 auto 2 pipe system Parameter 4 SEL0 16 and SEL2 OFF fan On Off Parameter 5 SEL0 18 and SEL2 auto Parameter 7 SEL0 22 and SEL2 auto Parameter 8 SEL0 24 and SEL2...

Page 90: ...s automatically disconnected from the power supply Fig 6 81 Fan and valve control unit with terminal strip Configuration Fig 6 82 Fan and valve control unit with terminal strip and condensate pump CET ACEC 1st unit 2 4 unit Parameter 3 SEL0 14 and SEL2 OFF 4 pipe system Parameter 4 SEL0 16 and SEL2 OFF fan On Off Parameter 5 SEL0 18 and SEL2 auto Parameter 7 SEL0 22 and SEL2 auto Parameter 8 SEL0 ...

Page 91: ... insulation Room sensor Fix the casing in a suitable place see fig 6 84 using appropriate screws max M4 Connect the room temperature sensor according to the wiring diagram CET Fig 6 84 Installation location User instructions The installation site of the room temperature sensor is crucial for the pre cise control of room temperature Therefore avoid mounting the sensor in the following locations ref...

Page 92: ... Besides fan control units with a cooling function must also be equipped with valve con trol Units with an installed CET ACEC and extract air sensor must have continuous fan operation Only one valve control type is allowed Fig 6 86 Miniature switch CET ACEC Miniature switch Open the miniature switch casing as illustrated see fig 6 86 Fix the casing in a suitable place see fig 6 87 using appropriat...

Page 93: ...an appropriate point of the on site power supply Danger of scalding Before completing any kind of job on fan coil units Seal off the heating medium inlet before performing work on the valves or the inlet or outlet pipes and secure this sealing from being opened unintentionally Do not commence work before the heating medium has cooled down Risk of damage to the unit Rotating fan impeller wheel pose...

Page 94: ...he mounting of actuators fig 7 1 pos 1 sample Tighten all screw connections on medium connections fig 7 1 pos 2 Check all electric connections according to the available wiring diagrams and check all terminal connections for secure seating Proceed with commissioning see Chapter 7 2 Check all built in components for soiling and clean if necessary Pos 1 Actuators Pos 2 Screw connections medium conne...

Page 95: ...lastic nose that is placed in the relevant slots Depending on the model as a 2 or 3 way valve the latter is open or closed if the red plastic noses are in one of two possible end positions refer to Tab 7 1 Position indicator of drive screw 2 way valve 3 way valve Setting 1 Valve OPEN Valve OPEN Setting 2 Valve CLOSE Valve CLOSED Tab 7 1 Position indicator with 2 and 3 way valves User instructions ...

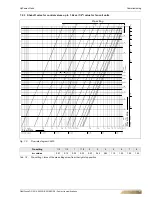
Page 96: ... 4 until the stop position on the right side Adjust by rotating as specified in the diagrams see fig 7 3 with Tab 7 2 fig 7 4 with Tab 7 3 and fig 7 5 with Tab 7 4 Turn the pre setting screw in a counter clockwise direction max 8 turns Use the hex key to open the flow control screw fig 7 2 pos 3 until the stop posi tion Screw the protective cap back on Pos 1 Shut off valve Pos 2 Protective cap Pos...

Page 97: ...or control valves up to 1 6 kvs 1 2 value for fan coil units Fig 7 3 Flow rate diagram V9400 Pre setting 1 4 1 2 1 1 1 2 2 3 4 5 6 7 8 kvs values 0 07 0 13 0 22 0 32 0 43 0 65 0 85 1 10 1 25 1 40 1 45 Tab 7 2 Pre setting turns of the pre setting screw from the right stop position Pre setting Pressure drop Flow Rate ...

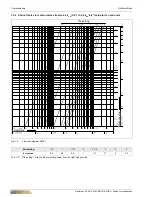
Page 98: ...valve for control valves from to 2 5 kvs 3 4 to 4 0 kvs 3 4 value for fan coil units Fig 7 4 Flow rate diagram V9441 Pre setting 1 2 1 1 1 2 2 2 1 2 3 4 5 kvs values 0 2 0 4 0 6 1 1 5 1 7 2 2 2 Tab 7 3 Pre setting turns of the pre setting screw from the right stop position Pre setting Pressure drop Flow Rate ...

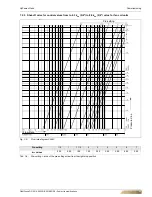
Page 99: ...r control valves from to 6 3 kvs 5 4 to 8 0 kvs 5 4 value for fan coil units Fig 7 5 Flow rate diagram V9440 Pre setting 1 2 1 1 1 2 2 3 4 5 6 7 kvs values 0 32 0 60 1 00 1 50 2 50 3 20 3 80 4 50 5 00 Tab 7 4 Pre setting turns of the pre setting screw from the right stop position g Pressure drop Flow Rate Pre setting ...

Page 100: ...os 1 is performed so that condensate can drain freely At the same time a sufficient slope of the condensate line must be considered User instructions Protect electrical hardware and furniture from escaping splash water Open all shut off and control valves Open the venting screw s with a suitable tool see fig 7 6 Close the air vent screw again only if heating cooling medium is still pouring out Pro...

Page 101: ...tors are placed at line start and end refer to fig 7 8 Activate the DIP switch on both users e g control panels unit MCBs or modules to ON The line beginning and line end correspond to the start and end of the bus cable The terminating resistors must also be switched on for stand alone units Fig 7 8 Setting terminating resistors DIP switch Function 1 2 OFF OFF Terminating resistor switched off ON ...

Page 102: ... 97 96 95 L 110 111 112 102 103 104 105 N N STP STP 120 121 122 123 124 125 N 32 31 73 72 71 70 38 37 36 07 06 15 14 13 12 11 10 35 34 33 N L STP STP STP STV STV STV STV 1 STV N 30 2 STV ON 110 111 112 120 121 122 123 124 125 130 131 132 140 141 133 134 142 143 144 03 02 01 07 06 15 14 13 12 11 10 18 STP STP 99 98 97 96 95 L N 102 103 104 105 N N STP STP N N N N 75 74 73 72 71 70 05 04 25 24 19 N ...

Page 103: ...panel set the addresses 0 15 Each group is assigned its own ad dress The labels A to F correspond to the addresses 10 to 15 MATRIX 511 2001 3001 4001 4001 IO 9 User instructions Assigning duplicate addresses on the control panels can cause malfunctions The default setting for the group address switch is 0 and must be changed if required Fig 7 10 Set address on the control panel Pos 1 Control panel...

Page 104: ...ssigned its own address The labels A to F cor respond to the addresses 10 to 15 MATRIX 511 2001 3001 4001 4001 IO 9 9 9 User instructions Assigning duplicate addresses on the control panels can cause malfunctions The default setting for the group address switch is 0 and must be changed if required Fig 7 11 Set address on the control panel Pos 1 Control panel Flex Geko s Group 0 address 0 Pos 2 Con...

Page 105: ...ly air mode The supply air temperature with relevant control settings is regulated to reach this limit value With the room temperature and cascade control types this temporary supply air con trol remains active until the main control setpoint i e particular room temperature is reached The unit then switches back to the main control mode Minimum heating temperature If this function is activated and...

Page 106: ...and enter limits for effect factor Default value1 0 Minimum entered value0 4 Maximum entered value4 0 Maximum heating temperature If this function is activated and a temperature sensor is present in supply air a tem perature value can be entered here This value should not exceed the supply air tem perature Factory setting and entered limit values Default value60 0 C Minimum entered value25 0 C Max...

Page 107: ...cal current The electric switch cabinet terminal box is open Direct interventions in the electric switch cabinet terminal box are not permitted Before completing work on the air treatment unit ensure that the electrical control box is properly closed refer to Connection with controls provided by others on page 56 Fig 7 12 Switching the unit on using the control panel 1 2 User instructions The posi...

Page 108: ...rcuit board signal the operating status of the unit Danger of electrical current Before correcting an error in the data connection power down the entire plant Ensure that the unit is properly secured against subsequent switch on at an appro priate point of the on site power supply MATRIX 511 2001 3001 4001 4001 IO 9 9 9 MATRIX 511 2001 3001 4001 4001 IO 9 9 9 LED LED status Operating status ACTION...

Page 109: ... adjust the setpoint as required to activate the fan Remove the jumper 9 The fan must switch off the valves close unit remains in frost protection monitoring mode Economy mode Turn the unit on and adjust the setpoint as required to activate the fan Couple input terminals 9 The fan must switch off and valves close Requirement economy mode setpoint adjusted accordingly unit continues to operate in f...

Page 110: ...de or economy mode Procedure for activating unit off Switch the unit on Couple input terminals 9 The unit switches off attention no frost protection function Procedure for activating heat request Switch the unit on and increase the setpoint until the unit starts heating 9 Contact heat request closes Procedure for activating cool request Switch the unit on and decrease the setpoint until the unit s...

Page 111: ...refully fill the drip tray with some water fig 7 13 pos 1 until the pump switches on After some time when the water is drained the pump must switch off again At this point increase the water supply to activate the alarm sensor fan must switch off and cooling valve close Check all hydraulic connections for tightness during this test phase User instructions Lay the pressure lines so that no structur...

Page 112: ...ends on the unit type Possible configurations Speed number 0 3 speed stage fan Fan speeds 0 5 only MATRIX 4000 with IO add on card Stageless minimum speed 100 only MATRIX 3000 4000 Manual The fan is operated at the pre set fan speed The fan speed can be pre set via control panel building management system or external modules e g MATRIX DI digital input module Air change function This function enab...

Page 113: ...valves to OPEN or CLOSE position every 12 hours 7 12 4 Condensate pump The condensate pump drains the condensate that forms on cooling units Depending on requirements the condensate pump is activated by a float switch When a limit value is exceeded the fan is switched off the cooling valve is closed and an error message is displayed on the control panel 7 12 5 Standby mode Standby mode is only ava...

Page 114: ...ending on the ambient temperature Application example Starting from 26 C outdoor temperature it is requested to increase the room tempera ture setpoint by 0 5 C per 1 C rise of outdoor temperature The setpoint should not be increased any further if outdoor air temperature reaches 32 C Thus enter 26 C as the start temperature and 32 C as the end temperature The setpoint offset is calculated as foll...

Page 115: ... is properly secured against subsequent switch on at an appropriate point of the on site power supply DANGER OF SCALDING Before completing any kind of job on fan coil units Seal off the heating medium inlet before performing work on the valves or the inlet or outlet pipes and secure this sealing from being opened unintentionally Do not commence work before the heating medium has cooled down Danger...

Page 116: ... checking intake and or discharge sound attenuator x Checking screw connections of pipes x Checking electrical connections x Checking earthing x Air venting heat exchanger x Checking heat exchanger and main condensate tray for dirt mold and if necessary clean and dis infect x Checking fans x Checking internal insulation for dirt and mould and if necessary cleaning and disinfecting x Checking setti...

Page 117: ... 1 Remove the filter evenly from the unit refer tofig 8 1 Pos 3 Pull away the terminal strips left and right of filter frame refer to fig 8 1 Pos 4 Pull the filter material from frame refer tofig 8 1 Pos 5 Once again insert the new filter element in reverse sequence Close the filter flap and lock the fasteners by pushing into the lock position Pos 1 Filter panel Pos 2 Quick locks Pos 3 Filter Pos ...

Page 118: ... and right of filter frame refer to fig 8 2 Pos 4 Pull the filter material from frame refer tofig 8 2 Pos 5 Once again insert the new filter element in reverse sequence Close the filter flap and lock the fasteners by pushing into the lock position User instructions Replacement filter set 5 units can be ordered from FläktGroup using the following order numbers ZGH A823 filter class G2 or ZGH A843 f...

Page 119: ...cessary take measures to secure such modules Risk of personal injury Injury may be caused by falling parts and sharp edges Upon disassembly of the unit wear helmet safety shoes and protective gloves Dis assembly should always be performed by two persons Release the center and connecting bolts fig 8 3 Pos 1 on both sides of the add on modules and remove them Loosen nuts M8 of the associated threade...

Page 120: ...ck that all electrical connections are securely seated in the terminal strips Use a suitable measuring device to check for proper earthing of the unit Close the terminal box or the electrical control box 8 3 4 Air venting the heat exchanger Air vent the heat exchanger as specified in Chapter 7 3 Fig 8 4 Checking bolt and screw medium connections Danger of electrical current Before completing the f...

Page 121: ...rrester straps Pos 4 Heat exchangers Mount all components in the reverse order Risk of personal injury Injury may be caused by falling parts and sharp edges Upon disassembly of the unit wear helmet safety shoes and protective gloves Dis assembly should always be performed by two persons Damage to the unit Do not use chemical detergents or disinfecting agents that cause acid or alkaline reactions a...

Page 122: ...lap see fig 8 7 Pos 3 as described in Chapter 8 2 1 and remove the filter if necessary Disassemble the cover panel of the fan chamber see fig 8 7 Pos 1 2 screws each right and left Check the fan s for ease of movement see fig 8 7 Pos 4 Remove soiling within the casing with a vacuum cleaner Fig 8 6 Assembly of the plastic end piece of the suction hose of the condensate pump User instructions Do not...

Page 123: ...prevent injury caused by sharp edges Damage to the unit It is prohibited to treat all surfaces with cleaning agents and disinfectants containing organic acids e g vinegar formic acid or materials containing aldehyde e g cin namic aldehyde This can lead to corrosion As a consequence unpleasant odours may occur Disinfectant Substance group Manufacturer Application concentration Terralin protect Glyc...

Page 124: ... Loosen 2 fixing screws of the adapter plate on both sides of the unit and remove the plate refer to fig 8 9 Pos 3 On the side of heat exchanger connections loosen the fixing screws of the bottom angle panel and remove it see fig 8 9 Pos 4 Remove the bottom cross strip see fig 8 9 Pos 5 First completely remove the screws that were loosened by one revolution see fig 8 9 Pos 1 and carefully pull the...

Page 125: ...robial growth In the event of the strong microbiological contamination of the insulation of type C please exchange the entire fan chamber Spare part No ZGH A0C1 Pos 1 Insulation Pos 2 Fixing screws 2 per side Mount all components in the reverse order After that check the heat exchangers and valve connections if required for firm seat and tightness Check proper operation of condensate drainage and ...

Page 126: ... drain outlet see fig 8 11 Pos 2 Loosen and remove nut of the cable inlet seefig 8 12 Pos 3 so as to detach the cable inlet seefig 8 12 Pos 2 along with cable and sensor see fig 8 12 Pos 4 from the sensor holder see fig 8 12 Pos 1 Rinse the cable gland and sensor with water Once again fasten sleeve including sensor to the holder and then fasten with the nut User instructions Protect the sensor of ...

Page 127: ...the condensate tray seefig 8 13 Pos 2 until it sits firmly For the assembly of the end piece of the condensate pump make sure that the half round hole at the edge of the end piece see fig 8 13 Pos 1 is on the upper side Pos 1 Half round hole at the edge of the end piece Pos 2 Condensate tray Pos 3 Plastic end piece of the suction hose of the condensate pump 8 4 2 Checking condensate pump function ...
Page 128: ...unning at too high RPM Set a lower RPM Air intake or discharge areas blocked Clear discharge air intake of obstructions or bends Noisy fan bearings Replace faulty fan technical personnel only Filter is dirty Clean replace filter Unit fails to heat heats insuffi ciently pumped warm water Fan not switched on Switch on fan Air volume flow of unit too low Select higher speed Air intake or discharge ar...

Page 129: ... hung horizontally Align the unit and hang it horizontally techni cal personnel only Leaking heat exchanger or hydraulic connec tions Check heat exchanger vent and valve connec tions for leak free state If necessary re tighten connections clean screw insert or reseal connections nur Fachpersonal On valves check screw connections for ease of movement clean sealing surfaces and replace seals if nece...

Page 130: ...ea pump almost always runs Pressure side pump resistance too high Reduce pump head resistance Pressure side pump hose clogged Clean or replace hose Condensate pump does not run Pump fuse is faulty Replace fuse technical personnel only Pump humidity sensor is faulty Replace humidity sensors technical personnel only Pump coil is faulty Replace pump technical personnel only Wiring has became loose Re...
Page 131: ...MITY pursuant to Directive 2006 42 EC of the European Parliament and of the Council original EC Declaration of Conformity 2018 041 5AA89851 Manufacturer FläktGroup Czech Republic a s Slovanská 781 463 12 Liberec XXV Vesec Czech Republic ID No 46708375 Entity authorized to compile technical documentation FläktGroup Czech Republic a s Slovanská 781 463 12 Liberec XXV Vesec Czech Republic ID No 46708...

Page 132: ...mulated industry experience The widest product range in the market and strong market presence in 65 countries worldwide guarantee that we are always by your side ready to deliver Excellence in Solutions PRODUCT FUNCTIONS BY FLÄKTGROUP Air Treatment Air Movement Air Diffusion Air Distribution Air Filtration Air Management Air Conditioning Heating Controls Service Learn more on www flaktgroup com or...

Reviews: