background image


156


Xe

sar

 Sy

st

em 

manu

al

 2

.0

 f

or

 v

er

si

on

 2

.0

.3

6.1

| 2

4.

06

.2

01

| mi

spr

int

ing 

and 

te

chni

cal

 c

hange

re

se

rv

ed


Activating or deactivating special days  

You can assign special days to 

access components

 and 

persons

 and in this process, they fulfil 

different functions. 
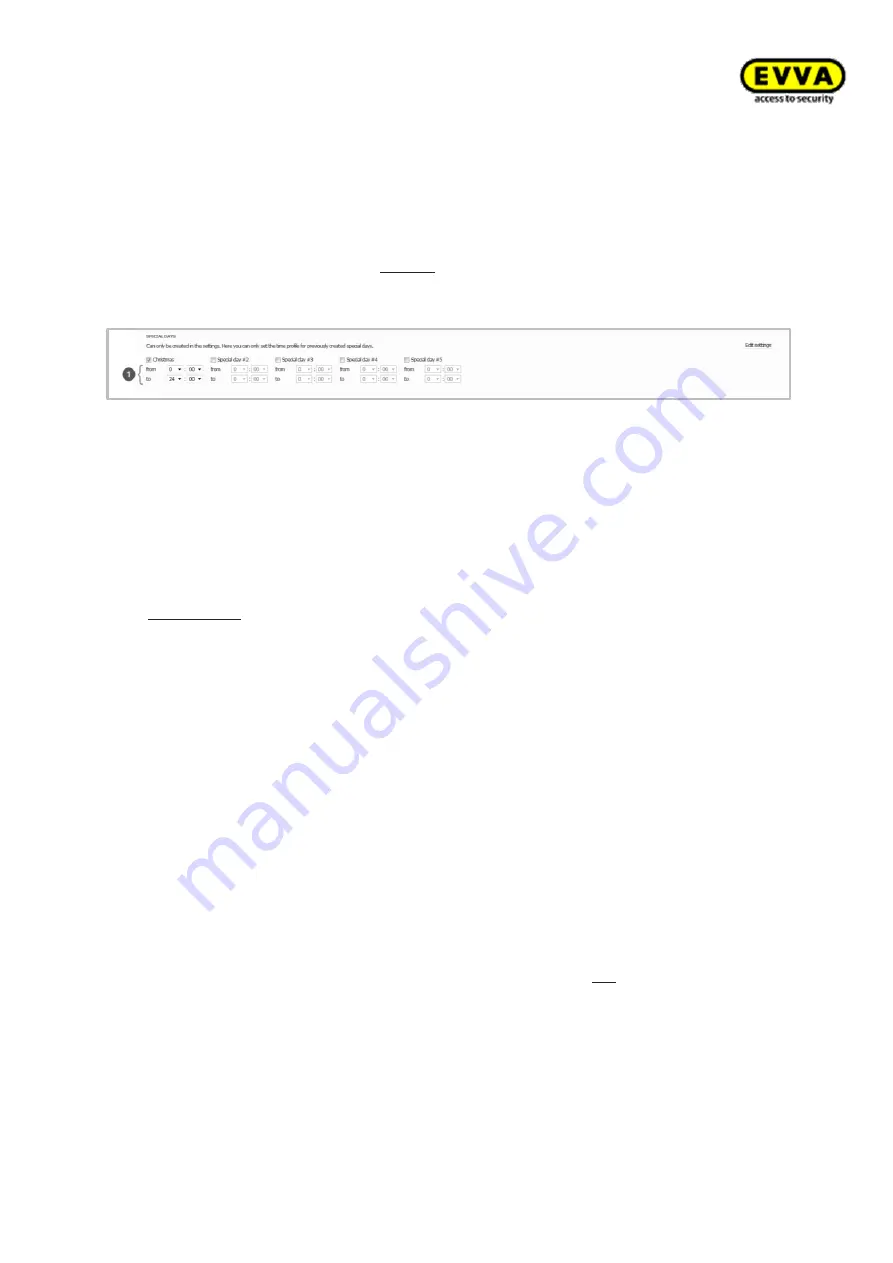
Enter a date or several dates for a special day  
(Figure 97: Configuring special days) to 

activate

 the special day function.


Figure 98: Assigning special days  


How special days affect access components 

In conjunction with Xesar 

access components

, special days can deactivate regular, time-based 

office modes or activate office mode, depending how the special day has been configured 

Special days take precedence over 

time-based

 or 

manual office modes

 and for this reason, any 

other 

office modes

 are bypassed on 

active special days

 and the special day configuration ap-

plies. 


Example 

A:  

You have ticked the "Christmas" special day 

 (Figure 98: Assigning special days) . 

You can now specify the start and end date for office mode using the drop-down list. As a result, 

automatic office mode

 has been 

activated

 on the "Christmas" special days applicable as previ-

ously specified, from 24 December 2014 to 26 December 2014. 
 

Example 

B:


The "Christmas" special days 

 (Figure 98: Assigning special days) are 

not

 ticked. 

As a result, office mode on the previously specified days 24.12.2014 - 26.12.2014 (refer to Figure 
97: Configuring special days)
 is 

automatically deactivated

 as you did not specify automatic office 

mode on the "Christmas" special days and special days take precedence over "normal" automatic 
office modes. 
Automatic office mode then once again applies from 27 December 2014. 


Summary of Contents for Xesar 2.0

Page 1: ......

Page 2: ...ar access components 16 Media user administration 17 Protocol events 18 Authorisation types 18 Available languages 18 System accessories 19 Xesar coding station 19 Xesar tablet 20 Functional principle 21 Xesar application app 22 Emergency power device 23 System medium 24 Admin Card 24 Xesar identification media 25 Construction Card 27 Access with a Xesar identification medium 28 Single access stan...

Page 3: ...esar handle functional description 44 Xesar cylinder 50 Xesar cylinder functional description 51 Cylinder tool 60 Xesar wall reader 61 Xesar wall reader functional description 63 Xesar wall reader connection label 65 Xesar control unit 66 Xesar control unit connection configurations 67 One Xesar wall reader one Xesar control unit 68 Two Xesar wall readers one Xesar control unit double sided access...

Page 4: ...Cards 90 Logging in using the DB key 91 Home page 92 Loading KeyCredits 93 Administrator 96 Changing the administrator password 96 Settings 97 Time settings 97 Summer and winter time settings 97 Setting special days 97 Security settings 99 Security PIN 99 Identification media validity periods 99 Replacement media validity periods 100 Logging personal data 100 Maximum archiving period for personal ...

Page 5: ... User groups 110 Deleting user groups 111 Creating user groups 112 Details 113 General rights 113 Editing user groups 114 Doors and areas 115 Doors and areas 115 All doors 116 Doors within an area 116 Doors that have not been assigned to areas 116 Creating door areas 117 Creating additional doors 118 Deleting doors 120 Removing doors from areas 120 Adding doors to areas 121 Listing authorised pers...

Page 6: ...ders with the Xesar control unit 133 Option C 1x Xesar wall reader existing 1x Xesar wall reader new 1x Xesar control unit 134 Added Xesar access components on the door list 135 Door list icons 136 Initialising Xesar access components step 3A 137 Initialising two Xesar wall readers for one control unit step 3B 142 Re synchronisations with the Xesar software step 4 142 Removing Xesar access compone...

Page 7: ...tions 160 Loading authorisations transferring authorisations from another person 160 Importing persons from CSV files 161 Authorisations 164 MasterKey authorisation 165 Adding access authorisations 166 Time profiles 166 Permanent access person 166 Periodic access person 166 Special days 167 How special days affect periodic access authorisations 168 Editing persons 169 Details 170 Settings 170 Expi...

Page 8: ... tasks 190 Maintenance tasks 191 Activating access media blocks at the access component 194 Checking the battery status using the Xesar tablet 194 Additional maintenance tasks 197 Xesar tablet error messages 197 Xesar tablet error messages 199 Xesar s virtual network XVN 200 Softwareplus package virtual network 201 Transferring access events using identification media 202 Transferring blacklist en...

Page 9: ...notify clients that the use of the locking system subject to this contract may trigger legal approval reporting or registration obligations in particular with regard to data protection e g if you are establishing a comprehensive information system as well as grant the right of co determination to staff in the event of use on corporate premises Customers clients and end users shall be responsible f...

Page 10: ...xesar system overview en Customer support We have provided our online form at http support evva at xesar en in case you have any ques tions regarding the information below You have exceeded the maximum attempts to enter credit codes Unable to add credit A KeyCredit was redeemed but the remaining credit has not increased Please contact your local retailer if you have any further questions We have p...

Page 11: ...ed or adapted neither in full or in part using electronic mechanical or chemical methods or any other procedures without writ ten consent by the publisher We shall not assume any liability for technical or printing errors and their potential consequences However the data in this system manual is revised regularly and corrections are incorporated All trademarks and industrial property rights reserv...

Page 12: ...ols Sequences of commands are illustrated as follows For instance Persons menu Create person or for commands and buttons such as Save Warning risk of material damage in the event of non compliance with the corresponding safety measures Notices and additional information Hints and recommendations Error messages Options ...

Page 13: ...rom EVVA Developed and manufactured in Austria the electronic locking system offers companies a wide variety of products Each Xesar access component brings about its individual benefits to profound ly safeguard your comprehensive security demands The ideal product for each situation most of all depends on the installation location security demands and the level of convenience required ...

Page 14: ...r applications Xesar handle The Xesar handle is the ideal solution for almost any internal door from solid doors to glass doors A convenience product that meets almost any requirements Xesar cylinder Xesar cylinders are ideal if security or easy retrofitting are paramount It locks securely and is easy to install Xesar wall reader in conjunction with the control unit Scores high marks amongst wall ...

Page 15: ... 7 64 bit Windows 8 1 32 bit or Windows 8 1 64 bit operating system The software must be installed locally server installations are not intended The installation requires approximately 1 GB free hard disk space Input output devices Keyboard Mouse Minimum screen resolution 1024 768 Internet connection to enable KeyCredits Please check your firewall configuration if no connection to the Xesar softwa...

Page 16: ...authorised Xesar identification medi um at the Xesar access component Temporary office mode Controlled by time profiles saved in the software Enables to define up to 96 door areas Merge several doors to facilitate an as signment of authorisations Blacklist List of blocked identification media DeleteKey function Blocked identification media are deleted upon attempting identification at the door Aut...

Page 17: ...ne 50 special days time profile Automatically updates the Xesar identification medium upon holding it to the Xesar coding station Note Xesar currently supports MIFARE DESFire EV1 with AES 128 bit encryption all Xesar identification media are equipped with a memory of 4 kB In ver sion 2 0 x x the Xesar segment requires 384 bytes the remaining memory on the Xesar identification medium may be used fo...

Page 18: ...cess granted person date time door Office mode automatically and manually Battery warnings Time change Firmware updates Battery replacements Authorisation types Permanent access without time profile Periodic access with time profile Manual office mode can be enabled per medium Automatic office mode with time profile Expiry of authorisations can be set Validity can be set extended periodically Mast...

Page 19: ...ovides a separate card slot on the front of the Xesar coding station for the Admin Card Install the associated driver and connect the Xesar cod ing station to the USB port of the computer where you installed Xesar software Note We have provided the driver required for the Xesar coding station in the download section of our homepage http www evva at products electronic locking systems access contro...

Page 20: ...the inside on the left hand side of the EVVA logo near the E and fold out on the right hand side near the A to access it The integrated interface of the Xesar access component in conjunction with the Xesar tablet is designed to synchronise Xesar software and Xesar access components only After use once again carefully close the connector cover EVVA logo of your Xesar access com ponents to continue ...

Page 21: ...ery operated Xesar access components Tip We recommend you regularly synchronise data at each Xesar access component to be able to quickly synchronise events with the software caution at maximum 1 000 events per access component from then on the oldest events will be overwritten Synchronise each access component at minimum once a year to make sure the time has been synchronised with the system Func...

Page 22: ...ponent events Resetting Xesar access components to construction mode Automatically synchronising the time in access components upon communication be tween tablet and access components Xesar application app The Xesar application is already preinstalled on your Xesar tablet The Xesar application is automatically updated once a more recent application version becomes available for in stance following...

Page 23: ... for emergency power supply only and it is not required as part of normal operation Immediately replace batteries after having used the emergency power device to operate access components and subsequently update access components using the Xesar tablet to once again enable access with all authorised identification media The emergency power device is optionally available Product code E ZU NG V1 Cau...

Page 24: ...ftware and uniquely identifies the system Any KeyCredits purchased to make changes to authorisations are saved on the card also applies to KeyCredits Unlimited Xesar software only enables the full range of functionality if a valid Admin Card with sufficient credit has been inserted into the Xesar coding station Note The Admin Card is not transferable and hence it cannot be used for other systems C...

Page 25: ...of 4 kB Overview of available Xesar identification media Xesar EVVA Card Figure 7 Xesar EVVA Card sample image Xesar Partner Card Figure 8 Xesar Partner Card sample image Xesar key tag Figure 9 Xesar key tag sample image Xesar combi key1 Figure 10 Xesar combi key sample image Caution Do not place more than one Xesar identification medium on the Xesar coding sta tion Otherwise identification media ...

Page 26: ...structions datasheets en Once your system is no longer in construction mode following commissioning you can use Xesar identification media programmed with the Xesar coding station to open Xesar access components Note Construction mode is active as long as the Xesar access component has not been assigned to a system Every Xesar access component is in this state upon delivery Note All Xesar identifi...

Page 27: ...long as the Xesar access component has not been assigned to a system Upon delivery each Xesar access component is in construc tion mode Manual office mode is also available in addition to conventional access component operation see Section Manual office mode The Construction Card is ready for use immediately and it must not be programmed using the Xesar coding station Caution Please note that your...

Page 28: ...e mode function It enables to en gage access components or keep them open This function is also available in factory state construction mode in conjunction with the Construction Card Manual office mode is de activated by holding the identification medium to the corre sponding Xesar access component twice within a space of two seconds The Xesar access component indicates the status change with an a...

Page 29: ... or manual office opening to be started Current permanent openings automatic manual however can still be closed In addi tion a clear log entry is applied to indicate not started automatic continuous openings DeleteKey function The blacklist list of all blocked media within a system is transmitted to each Xesar access component upon updating If a medium on the blacklist is used at a door component ...

Page 30: ...nterface is located on the front of all Xesar access components behind the connector cover EVVA logo Slightly press towards the inside on the left hand side of the EVVA logo near the E with your finger and fold out on the right hand side near the A and access the interface After having used the interface once again carefully close the connector cover EVVA logo to protect the your Xesar access comp...

Page 31: ...ng up time zones de pending on authorisations creating and managing areas managing schedule based office mode options and many more functions In addition to password protection the Xesar software features an additional security feature to enhance the security of your system the Admin Card Refer to Section Admin Card Register online to download the Xesar software http www evva at products electroni...

Page 32: ...tions Credit schemes We provide the following credit schemes Quantity credit 10 50 100 KeyCredits Time based credit KeyCredit Unlimited with an unlimited number of access authorisation changes for a duration of 12 or 36 months Softwareplus package to use the virtual network XVN You can merge quantity based and time based credit Any currently valid flat rate for time based credit covers all authori...

Page 33: ...d on the EVVA Server and not on the Admin Card In the event that an Admin Card with time based credit is lost or develops a fault the re maining time based credit of the 12 36 month flat rate saved on the server can be ac cessed and reactivated after having issued a replacement card It is not possible to reacti vate any remaining credit for quantity credits of 10 50 100 KeyCredits on faulty or los...

Page 34: ...ng manual office mode for a person Blocking persons blacklist Writing to updating media Changing personal master data Extending the identification media validity Additional information about EVVA KeyCredits When you load KeyCredit Unlimited the new period is added on to any on going KeyCredit Unlimited product validity periods KeyCredit codes can be redeemed only once Any KeyCredit codes available...

Page 35: ...coding station events are transported back into the software Informations about the Softwareplus package The Softwareplus card can be purchased from an EVVA distributor Information about the Softwareplus is displayed on the Dashboard homepage Additional Credits can be activated by clicking on Add Softwareplus package A single Softwareplus package is valid for 3 years additional Softwareplus packag...

Page 36: ... enclosed with the product in the event of use outdoors or in areas that are exposed to water The Xesar escutcheon is suitable for conventional metal frames and solid door locks with a handle range of up to 40 for self locking escape door locks as per EN 179 EN 1125 fire protection doors and there are also versions available for panic and emergency exit doors with bar handles or push handles as pe...

Page 37: ...he outside of the Xesar escutcheon between the connector EVVA logo and the LED Connector synchronisation updates emergency power supply Xesar escutcheons feature a connector located under the connector cover EVVA logo Slightly press towards the inside on the left hand side of the EVVA logo near the E and fold out on the right hand side near the A to access the connector The connector is intended f...

Page 38: ...side handle for five seconds If you operate the outside handle during this period the latch or bolt depending on the lock type will be retrieved The inside handle is always engaged and can be operated at any time In this process the mechanism always unlocks the latch Xesar escutcheons feature an event memory for the last 1 000 events Once the event memory is full the system overwrites the oldest e...

Page 39: ...sponding door manu facturer Please note the following important notices before use Conditions of use External ambient temperatures 20 C to 60 C internal ambient temperatures 0 C to 60 C depending on the battery Humidity 90 non condensing for 200 000 cycles as per EN 19061 Climatic and environmental effects Note the defined suitability of the escutcheon for the respective ambient conditions as per ...

Page 40: ...m of 3 mm Before installing escutcheons in particular in metal frame doors check the installation situation to prevent injuries e g squashed limbs In these cases we recommend using a handle suitable for metal frame doors Please note that if you install the escutcheon in smoke control fire doors you must verify the components suitability and potentially also obtain approval from the door manufactur...

Page 41: ...n Use a soft lint free cloth and soapy water to clean any visible areas of the escutcheon Do not use corrosive products or sprays that may be aggressive on metal surfaces plastics or sealants and seals Standards and guidelines CE tested DIN 182731 EN 1634 30 minutes EN 1634 90 minutes1 Austrian standard 3859 30 minutes1 Austrian standard 3859 90 minutes1 EN 19061 EN 1791 IP55 protection when using...

Page 42: ...plate You re quire a T8 Torx screwdriver to open the battery compartment 2 Turn the Torx screw clockwise until you can remove the internal escutcheon plate 3 Hold the bottom of the internal escutcheon plate and carefully remove it from the at tachment panel You can now pull the internal escutcheon plate over the handle Make sure you do not scratch the handle in the process You can alternatively re...

Page 43: ... to 40 the Xesar handle is compatible with many European lock types The Xesar handle is suitable for conventional solid door locks with a handle range of up to 40 self locking escape door locks as per EN 179 and fire protection doors Please check carefully to make sure the Xesar product you selected is suitable for your application We have made the required data sheet available in the download sec...

Page 44: ...utside of the Xesar handle between the con nector EVVA logo and the LED Connector synchronisation updates emergency power supply Xesar handles feature a connector located under the connector cover EVVA logo Slightly press towards the inside on the left hand side of the EVVA logo near the E and fold out on the right hand side near the A to access the connector The connector is intended for synchron...

Page 45: ...utside handle for five seconds If you operate the outside handle during this period the latch or bolt depending on the lock type will be retrieved The inside handle is always engaged and can be operated at any time In this process the mechanism always unlocks the latch Xesar handles feature an event memory for the last 1 000 events Once the event memory is full the system overwrites the oldest ent...

Page 46: ...P rating and specific temperature range Do not use the handles in very dusty environments Use the handles in environments with a humidity below 90 only Clarify the application options with a specialist retailer before installing handles in environments with a particularly high level of static charges Do not use handles in corrosive atmospheres e g chlorine ammonia lime water or salt water Conditio...

Page 47: ...ck the correct function of the complete panic unit consisting of panic lock and handle fittings The aforementioned certificate must confirm the handles suitability for installation An excessive tightening torque when fastening the fixing screws may cause handle malfunctions or make it hard to operate the handle For this reason note the data in the assembly manual Before completing the installation...

Page 48: ...rained specialist personnel only Replace batteries in due time as soon as the handle indicates Battery low see Section How Xesar access component indicate events Repeatedly disregarding the Battery low warning may cause handle malfunctions At normal ambient temperatures the first Battery low warning indicates that up to 1 000 actua tions are still possible within the next 4 weeks Temperatures devi...

Page 49: ...ew anti clockwise until you can remove the handle tube 3 Make sure you only screw in the attachment screw as far as absolutely necessary 4 Now remove the empty battery and replace it with a new battery you acquired earlier En sure correct polarity when inserting the battery 5 Once again position the handle tube on the outside handle and fasten it in reverse se quence The component outputs a signal...

Page 50: ...refer to the product catalogue for more information Xesar cylinders are suitable for indoors and outdoors as well as fire and emergency exit doors Xesar cylinders are available as half cylinders or double cylinders with one sided or double sided electronic access Please carefully check the Xesar cylinder you selected is suitable for your application Please refer to the corresponding data sheet for...

Page 51: ... plastic cap of the Xesar cylinder thumbturn be tween the EVVA logo and the LED Connector synchronisation updates emergency power supply Xesar cylinders feature a connector located under the connector cover EVVA logo Slight ly press towards the inside on the left hand side of the EVVA logo near the E and fold out on the right hand side near the A to access the connector The connector is intended f...

Page 52: ...an event memory for the last 1 000 events Once the event memory is full the system overwrites the oldest entries with the most recent events For this rea son it is important to regularly synchronise events to prevent event records from being lost Please refer to the corresponding data sheet for additional specifications at http www evva at products electronic locking systems access control xesar a...

Page 53: ...cks to safeguard the lock cylinder operates correctly All Xesar access components are delivered ex works in so called construction mode In this condi tion any Construction Card unlocks any Xesar access component For this reason immediately after having installed each Xesar access component ensure it is correctly added to the locking system so that exclusively authorised persons have access Exclusi...

Page 54: ...e and during installation of the lock cylinder if the cylinder housing is positioned correctly Lock cylinders must be installed in such a way that they are not subject to any external forces except when used correctly and at the designated mounting points A certificate in compliance with EN 179 or EN 1125 from the lock manufacturer is crucial for use of the lock cylinder in escape or panic doors C...

Page 55: ...dditionally have the option of blocking the thumbturn sleeve using a slim metal pin via a small hole on the front of the electronics module and be able to con sequently remove the thumbturn using the assembly tool The thumbturn is not intended as an object to move the door panel as would be the knob han dle etc Do not carry or lift the door panel using the thumbturn Do not stand on the thumbturn D...

Page 56: ...mbturn The metal pin must have a minimum diameter of 2 mm and be at minimum 40 mm long Procedure Step 1 Insert a matching metal pin e g a 2 mm Allen key into the front service duct of your European profile cylin der Step 2 In this process turn the thumbturn until you are able to insert the metal pin considerably deeper into the service duct Now hold the metal pin in this position and disassemble t...

Page 57: ... products or sprays that may be aggressive on metal surfaces plastics or sealants and seals Ensure particularly when the thumbturn has been removed no liquids penetrate the cylin der and that visible areas of the electronic thumbturn must exclusively be cleaned when the thumbturn is not open Caution Note the information in the assembly manual regarding the correct position of the cylinder Note Res...

Page 58: ...rmal ambient tempera tures the first Battery low warning indicates that up to 1 000 actuations are still possible within the next 4 weeks Temperatures deviating from normal ambient temperatures may cause the cyl inder to prematurely fail If the batteries are empty it is exclusively possible to operate the cylin der using the emergency power device optional accessory Always replace all batteries us...

Page 59: ...tacts using a soft lint free cloth 5 Now insert the two new and previously acquired batteries with the correct polarity into the battery compartment and close it once again 6 Battery replacements must not take longer than one minute Resynchronising using the Xesar tablet may be required once this period has expired 7 Once you have correctly replaced the batteries the component initialises and the ...

Page 60: ...anipulation and the dedi cated special tool is required for assembly and disassembly as well as battery replacements Order the cylinder tool separately It is not enclosed with Xesar cylinders The cylinder tool device is optionally available Product code E ZU PZ ZW V1 Please note the instructions in the Xesar cylinder assembly manual or watch the video instructions http video evva com tutorials xes...

Page 61: ...ith the product in the event of use outdoors or in areas that are exposed to water as well as in the event of surface mounted installation and observe the information in the assembly manual Xesar wall readers are connected to the Xesar control unit and supplied with power using a connecting cable Note Please note Xesar wall readers can only be used in connection with Xesar control units Connect th...

Page 62: ...u selected is suitable for your application We have made the required data sheet available in the download section of our homepage HYPERLINK http www evva at products electronic locking systems access control xesar assembly instructions datasheets en http www evva at products electronic locking systems access control xesar assembly instructions datasheets en ...

Page 63: ...or this purpose there is an LED at the top edge of the Xesar wall reader For a list of all available signals please refer to Section How Xesar access component indicate events Reader unit ON OFF status light The reader unit sensor is located behind the glass panel of the Xesar wall reader between the EVVA logo and the LED The status light of the Xesar wall reader lights up continuous ly during on ...

Page 64: ... EVVA logo to protect the con nector from penetrating dust and humidity For this purpose do not use pointed objects to prevent damage Functional principle Hold a Xesar identification medium to a reader unit and the Xesar control unit connected to the Xesar wall reader checks the Xesar identification medium The correspondingly trig gered relay of the Xesar control unit switches insofar as the ident...

Page 65: ...t Please note the data and information in the assembly manual enclosed with your Xesar product in particular the jumper position of the JP1 jumper to prevent malfunctions Figure 24 Xesar wall reader connection print sample image We have provided the assembly manual and the data sheet of the corresponding Xesar product on our homepage http www evva at products electronic locking systems access cont...

Page 66: ...ed to Xesar wall readers must be installed indoors in areas protected from manipulation Xesar control units are supplied with power using the power supply unit and in the event of pow er cuts they are equipped with data buffers for a maximum of 72 hours providing the Xesar con trol unit had been previously active for a minimum of six hours Please refer to the product catalogue in the download sect...

Page 67: ...n of the JP2 jumper Figure 26 Diagram sample image Please note the data and information in the assembly manual enclosed with your Xesar product We have also made the required data and information available in the download section of our homepage HYPERLINK http www evva at products electronic locking systems access control xesar assembly instructions datasheets en http www evva at products electron...

Page 68: ...Xesar wall reader one Xesar control unit One or both relays can be switched at the same time depending on the jumper position JP2 As a result you can use both relays for different applications e g relay 1 switches with and re lay 2 without an external power source Figure 27 One Xesar wall reader sample image ...

Page 69: ...echnical changes reserved Two Xesar wall readers one Xesar control unit double sided access Depending on the jumper position JP2 both relays can be switched by both Xesar wall read ers for instance to implement access from both sides Figure 28 Two Xesar wall readers sample image ...

Page 70: ...echnical changes reserved Two Xesar wall readers one Xesar control unit Both relays can be switched differently depending on the jumper position JP2 As a result one Xesar control unit and two wall readers can operate two different doors Figure 29 2 Xesar wall reader sample image ...

Page 71: ...e length of 20 metres to safeguard correct func tionality Note Maintain a minimum distance of 100 mm between Xesar wall readers to safeguard correct functionality Please check carefully to make sure the Xesar product you selected is suitable for your application We have made the required data sheet available on our homepage http www evva at products electronic locking systems access control xesar ...

Page 72: ... mains adapter is not within the control unit s scope of delivery and optionally available as an accessory In the event that you are using a mains adapter you have not procured from EVVA you must make sure the power supply requirements illustrated in the product catalogue are complied with Wall readers and control units are exclusively intended to actuate electronic locking components and technica...

Page 73: ...be removed using the dedicated special tools only Damage caused by other tools shall render any liability warranty or potentially separate guarantee claims void Do not cover the reader equipment of the wall reader with metal materials Regularly check the correct condition and function of the wall reader and control unit at mini mum once a month as part of a functional check using authorised identi...

Page 74: ...on to operators and users as per the defined manufacturer product liability according to product liability legislation Non compliance releases EVVA from any liability Any use deemed as non compliant with the contract or as unintended use any repair work or modifications that have not been explicitly approved by EVVA as well as all types of incorrect ser vicing may cause malfunctions and are prohib...

Page 75: ... unit using an inde pendent power supply and provide an uninterrupted 12 V power supply This con sequently prevents system failure and safeguards access As soon as the control unit has been connected to the power supply for six hours the system ensures the time settings are maintained for a minimum period of 72 hours in the event of a power cut Assemble the component as per the assembly manual enc...

Page 76: ...l unit mains adapter is optionally available Product code E ZU WL NT V1 Please refer to the product catalogue in the general download section of our homepage for more detailed information HYPERLINK http www evva at products electronic locking systems access control xesar system overview en http www evva at products electronic locking systems access control xesar system overview en ...

Page 77: ...ted office mode tttt hhhh Signal 5 Start of office mode tttt hhhh Signal 6 End of office mode hhhh tttt Signal 7 Unlocking attempt with authorised me dium battery low signal h h h h Signal 8 Battery inserted or component reboot tt mm hh After having inserted bat teries battery charge status display possible Signal 9 Medium without EVVA segmentation medium faulty other system No signals Visual LED ...

Page 78: ...ol xesar assembly instructions datasheets en Product specific assembly video clips We have provided assembly video clips with demonstrations of complex assembly steps here http video evva com tutorials xesar expzkzs expzkz s 1 en Language neutral drilling template EVVA provides a language neutral single use cardboard drilling template to support the as sembly of versions requiring one or several d...

Page 79: ...plate to facilitate preparing the door for an assembly of any type of Xesar escutcheons and Xesar handles An adjustable stop safeguards the holes are correctly aligned and it enables to adapt the settings to match the requirements of any door situation Hardened metal drilling sleeves guarantee a long service life even after intense use The drilling template is optionally available Product code E Z...

Page 80: ...a at products electronic locking systems access control xesar demand xesar software en You require appropriate administrator rights on your computer to install the soft ware Step 2 Proceed as follows after having downloaded your Xesar installer file exe Double click the application Select your language and click OK Figure 32 to continue Figure 32 Language selection Now the installation wizard open...

Page 81: ...ce agreement Then click Continue Figure 34 Xesar installation licence agreement By default the Xesar software is installed in a directory on the system drive Figure 35 Xesar installation selecting the designated directory Click Browse Figure 35 Xesar installation selecting the designated directory and select a different directory if you would like to install the Xesar software in a different direc...

Page 82: ...stallation selecting the designated directory Please note that during installation with no administrative rights no backup can created because access privileges to the installation file path drive C are missing Keep the installation path short and without special characters an invalid path is signaled via an error message ...

Page 83: ...r its name and then click Install Figure 36 Xesar installation specifying the folder Figure 36 Xesar installation specifying the folder Now the system installs the Xesar software the progress bar indicates the current activity Figure 37 Xesar installation Figure 37 Xesar installation Note If you are reinstalling your Xesar software but have failed to uninstall the applica tion you will be unable t...

Page 84: ...and technical changes reserved Figure 38 Error message installation Once the installation has completed a message indicates the Xesar software has been successfully installed Click Finish Figure 39 Xesar installation to complete the installation Figure 39 Xesar installation ...

Page 85: ...d Admin Card or if no Admin Card has been inserted into your Xesar coding station Insert a new Admin Card Once you have inserted a valid Admin Card enter the system designation and an administrator password in the Xesar Configuration window Then click Next Fehler Textmarke nicht definiert 39 Initialising the Admin Card Passwords must be 6 20 characters long and must contain at least one uppercase ...

Page 86: ...nal hard drive as a system hard drive failure would put your database and the backup at risk Then click Next Figure 40 Network path Note Configure your system so backup files are regularly saved according to their version Windows Preferences to be able to recover data from a certain version in the event of a database failure The system now shows the name of the system you selected Figure 41 Access...

Page 87: ...rke nicht definiert A confirmation prompt asking whether you have printed and archived your sys tem information appears to prevent you from accidentally skipping this window Figure 42 Configuration Confirm the security prompt in the Xesar Configuration application window Figure 42 Configuration and click Complete After having confirmed the Xesar Configuration with Complete you have completed the i...

Page 88: ...le Function Admin Owner and administrator of the locking system maintenance authorization of critical settings Users Users are responsible for administrative tasks within the program and each user is assigned individual authorisations Administrators centrally manage the system and they always have comprehensive authorisa tions Person Persons using authorisation media Persons are assigned access au...

Page 89: ...ting the program A program window appears after having started your Xesar software Figure 43 Opening the pro gram The system automatically loads various software modules in the background while you see this screen Wait until the program window has completed loading and automatically disappears Figure 43 Opening the program ...

Page 90: ...the information required in the Xesar Login Figure 44 Login login window Select the software language if you would like to use a language different to the de fault language Enter the selected client name in the Client field upon first time configuration Enter admin as the user name Enter the Administrator password you selected when you first registered and click Log in Figure 44 Login The user nam...

Page 91: ...faulty or not available the system shows the Xesar Configuration Figure 46 DB key application window allowing you to enter the DB key to continue Note that you will be unable to grant authorisations to per sons identification media without an Admin Card The DB key Figure 46 DB key is the automatically generated code included with your access data see Backing up access data and DB key Figure 46 DB ...

Page 92: ...edits Figure 47 Home page Note The system automatically logs off following ten minutes of inactivity for reasons of security The Xesar Login Note Please note that you must click the corresponding confirmation button to ac cept any changes you make to your system If you fail to do so an error message indicating Unsaved changes on this page appears upon closing the correspond ing menu Click OK to co...

Page 93: ...esar System manual 2 0 for version 2 0 36 17 24 06 2015 misprinting and technical changes reserved Loading KeyCredits KeyCredits enable you to create and change access authorisations Please refer to Section ...

Page 94: ...quire an operating Internet connection and the credit code on the back of the KeyCredit Card concealed by a scratch field to top up credit Enter the code in the Add credit Figure 49 Topping up credit application window Press the Tab key to move to the next input field Click Add credit to confirm your input If you entered the code correctly the system confirms your input green notification in the h...

Page 95: ...n the home page if KeyCredit Unlimited is not active or there are no more KeyCredits available Invalid KeyCredit code A message highlighted in red appears if you entered an incorrect code Figure 50 Topping up credit invalid input Figure 50 Topping up credit invalid input The Admin Card is automatically disabled after five incorrect attempts Please con tact our Online Support at http support evva a...

Page 96: ...n Figure 51 Changing the admin password Changing the administrator password 1 The tool bar shows the current user name 2 Click the name the user s application window opens Proceed as follows to change the administrator s password who is currently logged in 3 Click Change password always use secure passwords consisting of upper case and lower case letters as well as digits and confirm your changes ...

Page 97: ...nter time setting It is important to manually update these settings once a year and make sure you subsequently also update your Xesar access components if you work with the summer and winter time function Setting special days You can also specify five types of special days that are active at the same time over a period of fifty days in advance Figure 53 Time settings For instance use this function...

Page 98: ...98 Xesar System manual 2 0 for version 2 0 36 17 24 06 2015 misprinting and technical changes reserved Figure 53 Time settings ...

Page 99: ...Xesar identification medium is automatically extended by the specified period as soon as you hold it to the Xesar coding station This function is intended as a checkpoint function to enhance the se curity and force users to update their media within certain intervals If the Xesar identification medium is not used at a Xesar coding station within the speci fied period the identification medium expi...

Page 100: ... Replacement media validity periods You can issue one replacement medium per person should a Xesar identification medium be temporarily unavailable Set the general validity period of a replacement medium here The maximum permitted validity period is 72 hours Figure 53 Time settings Logging personal data If you would like to log personal data event protocol you can configure this in the Set tings I...

Page 101: ... computer using a proxy server you must configure the settings accordingly in the Host name or IP address of the proxy server section Figure 53 Time settings Configuration settings The configuration settings enable to change the path for automatic backups at any time and switch the automatic backup function on or off Please note that any database backups saved on the same hard disk will be lost in...

Page 102: ...s to configure general system settings Click Administration to open the overview Figure 54 Administration tab Figure 54 Administration tab Journal The Journal section records any user activities such as login and logoff data as well as information on access to personal data The filter function in the Journal allows to specify a period for the listed data ...

Page 103: ...ournal for personal data Click the drop down list in the Filter Figure 56 Filtering journal entries section and select the desired period to restrict the output Click the last item in the drop down list to activate the cal endar function Figure 56 Filtering journal entries Note Users are unable to delete the journal ...

Page 104: ...en be shown in the program s tool bar Figure 57 Individual client logo Figure 57 Individual client logo Proceed as follows to change the logo Select Administration Change client logo Select file Figure 58 Changing the Select the desired image file jpg png or gif Click Save changes Figure 58 Changing the Figure 58 Changing the client logo Note The desired image file must not exceed a size of 1 MB ...

Page 105: ... within the software Each user is assigned individual authorisations Administrators centrally manage the system and they always have comprehensive authorisation It is not possible to deactivate administrator accounts Select Administration User to view a list of all users and the user group assigned to the corre sponding user Figure 59 Users Figure 59 Users ...

Page 106: ...vated in the header of the list to filter by the corresponding us er group The Status column shows the corresponding icons for each user Editing users Click the affected user to open the Edit user menu item This section allows you to configure vari ous user specific settings and provides an overview of the selected user s current status Figure 60 Editing users Figure 60 Editing users ...

Page 107: ...ers and deactivate them Change the status by clicking Deactivate user Click OK to confirm the security prompt and Save the changed data Note You cannot deactivate user admins Changing access data and passwords You can change users passwords in the Access data field Proceed as follows Click the user name of the desired user and select Change password to open the dia logue to change the password in ...

Page 108: ... from the drop down list to which you would like to assign us ers Any assigned user groups are not shown in the menu Proceed as follows to delete assignments to user groups Tick to select affected user group s and click the Delete assignments field In this pro cess confirm your selection by once again clicking Delete assignment Creating users In this section you can create one or more users with d...

Page 109: ...llowing specifications Between 6 and 20 characters featuring upper case and lower case letter as well as digits Your password will qualify as a Secure password once it complies with the aforemen tioned specifications insecure passwords do not comply with the specifications User groups Select the User groups from the drop down list to which you would like to assign users Any assigned user groups ar...

Page 110: ...he software You can assign different authorisations to user groups The Administrators user group has been pre installed and you are unable to delete it Said user group has been assigned comprehensive authorisations Please note that each user must be assigned to a minimum of one user group Any created user groups are listed in Administration User groups Enter user groups in the search field to sele...

Page 111: ...or more user groups s to select them Then click the Delete user group field Click Delete user group to confirm the security prompt Once you have confirmed you will be unable to undo the process Note An additional security prompt appears if users are still assigned to the user group you would like to delete Note You are unable to delete the admin user and the Administrator user group The entries of...

Page 112: ...ser groups Different authorisation profiles may be required depending on the corresponding users manage ment tasks Open the Create user group section to create user groups for a host of requirements and assign different authorisations to said user groups Figure 64 Creating user groups Figure 64 Creating user groups ...

Page 113: ...nge or delete doors Select Access authorisations Show to view access authorisations for doors This re quires additional authorisations Select Access authorisations Administer to add change and delete access authorisa tions for doors This requires additional authorisations Select Clients Administer to view and change system settings You can configure all settings but the client logo Select Masterke...

Page 114: ...user group you would like to change in the user group list Figure 65 Editing us er Check or change the details name description Correct any activated general rights Save changes Figure 65 Editing usergroups Your changes will come into effect after having saved them and they apply to all users linked to the specific authorisation group ...

Page 115: ...hich have already been created in the Xesar software and view which doors have been assigned to which areas You can also assign doors to areas in this section Create areas to group several doors in categories and facilitate assigning authorisations to make the overall process more transparent For instance if you would like to grant one or more persons access to five individual doors you can group ...

Page 116: ...door area you would like to view Doors within an area is selected automatically and the system shows a list of doors within this area The number of doors within this area is shown in brackets next to the area designation Doors that have not been assigned to areas Click Doors that have not been assigned to areas to view all doors that have not been assigned to an area within your Xesar locking syst...

Page 117: ... Deleting doors Deleting doors from a door area Adding doors to a door area Editing deleting door areas Creating door areas Proceed as follows to create door areas Click Doors areas Doors areas Click Create door area Figure 67 Doors and areas Specify the Name of the door area Figure 68 Creating new door areas Click Save to confirm your input Figure 68 Creating new door areas ...

Page 118: ...ual 2 0 for version 2 0 36 17 24 06 2015 misprinting and technical changes reserved Creating additional doors Proceed as follows to create an additional door Click the Create door field and proceed as described in Section ...

Page 119: ...119 Xesar System manual 2 0 for version 2 0 36 17 24 06 2015 misprinting and technical changes reserved Creating doors Figure 69 Managing doors Figure 69 Managing doors ...

Page 120: ...k All doors or the area featuring the affected door Tick the check box next to the desired door Then click Delete door Click Delete door and confirm the following prompt to complete the process Removing doors from areas Proceed as follows to delete doors from an area Figure 69 Managing doors Click the affected area Tick the check box of the affected door Click the Remove door from area field ...

Page 121: ...4 06 2015 misprinting and technical changes reserved Adding doors to areas You can add one or several doors to an area Tick the check box es of the affected door s Then select the desired area from the drop down list Figure 70 Adding doors to door areas ...

Page 122: ... all doors within thins area Click the Authorisations field to view all persons with an authorisation to all doors of this area Figure 71 Door area level 2 Deleting door areas Click the affected door area to delete it Then click the recycling bin icon Click Delete door area to confirm the prompt Note Any doors that are assigned to a door area are automatically removed upon delet ing the door area ...

Page 123: ...ved Editing door areas Click the affected door area to rename it Then click the pen icon Figure 71 Door area level 2 Enter the new area designation in the Name field of the dialogue window Figure 72 Re naming areas and click Save to confirm Doors in this area remain available Figure 72 Renaming areas ...

Page 124: ...onding access component to open the access component overview window of this door Details This section lists all detailed information of your access component View battery status The Details field shows the battery status of battery operated access components Please note that the status dates back to the last time the access component and your Xesar software were synchronised and the actual batter...

Page 125: ...quently click Save to save any changes Figure 74 Creating doors Details When you create doors it is important to enter a unique Door designation mandatory field to safeguard the doors in the software can be assigned to the doors within the facility e g Main entrance There is also the Additional information field optional field intended for additional door information e g the room number Figure 74 ...

Page 126: ...l office mode Click On or Off to specify whether or not to enable manual office mode with an authorised identification medium Please note that the corresponding settings must have been activated for the respective doors and persons to enable the manual office mode function Click Save to save any changes you made to settings The New Xesar access component icon Figure 75 Creating doors and logging p...

Page 127: ... all settings for the Xesar access components within the context of the affected door Figure 75 Creating doors and logging personal data Figure 75 Creating doors and logging personal data Protocol settings Events The Edit doors application window shows the Protocol settings section Please refer to Section Protocol events for additional protocol information ...

Page 128: ... affected persons must additionally give their consent for you to be able to view their personal data Maximum retention period of personal data Enter the maximum period you would like to retain personal data in days You are unable to save data for a period in excess of 99 days The entered value also determines the maximum period door protocols are retained Note The input field is automatically act...

Page 129: ...ing and technical changes reserved If the Log personal data function Figure 76 Showing the personal data protocol is on you can click Show protocol to view the protocol list for this door Figure 77 Access events show protocol Figure 76 Showing the personal data protocol ...

Page 130: ...ved Figure 77 Access events show protocol Click Restrict period to specify a period within which to search for a certain event entry Click the Access and opening processes Rejections and deletions Door configuration and Information or Warnings and errors buttons to filter for various event categories ...

Page 131: ... Xesar access components Proceed as follows to add a Xesar access component to your Xesar locking system Adding Xesar access components step 1 Click New access component to add a Xesar access component to your locking system Figure 78 Assigning Xesar access components Figure 78 Assigning Xesar access components ...

Page 132: ...pleted as soon as you have initiated access components and transferred the data back to the software using the Xesar tablet Click Save to confirm your selection Selecting Xesar wall readers step 2B The process varies depending on whether you would like to assign one or two wall readers to your control unit Note options A B and C Figure 79 Connecting Xesar wall readers Option A 1x Xesar wall reader...

Page 133: ...133 Xesar System manual 2 0 for version 2 0 36 17 24 06 2015 misprinting and technical changes reserved Option B 2x Xesar wall readers with the Xesar control unit Create two new doors refer to ...

Page 134: ...r this is no longer possible once you have clicked Save to confirm your entries Now click Save and select To the door list to view the door list Option C 1x Xesar wall reader existing 1x Xesar wall reader new 1x Xesar control unit If you would like to enhance an existing Xesar control unit by a Xesar wall reader you must initially remove the existing wall reader electronically Subsequently proceed...

Page 135: ...ist in the status line as icons Figure 80 Door list status For example As you selected Option B on both doors B Two Xesar wall readers connected to your Xesar control unit the system indicates this with the icon at both affected doors The icon indicates that the Xesar access component is now ready for installation The icon indicates that the Xesar access component must still be synchronised Figure...

Page 136: ...cylinder Xesar escutcheon Xesar handle Xesar wall reader 2x Xesar wall readers Status information Ready for disassembly Installed Hardware replacement required Ready for installation or Replacement of Xesar access components required Tasks To be synchronised Door will be deleted Revoking installation or disassembly Replace thumbturn Xesar access component will be removed Forced disassembly ...

Page 137: ... tablet After having created doors within the system and having assigned or changed Xesar access com ponents you must initialise Xesar access components directly at the component for this reason usually at the corresponding door Xesar access component due for synchronisation are highlighted in the Status field on the door list with the To be synchronised icon Figure 81 Door list with status inform...

Page 138: ...ata with the Xesar tablet to start synchronisation Figure 82 Synchronising data with the Xesar tablet A notice appears in the software and on the Xesar tablet once synchronisation between PC and Xesar tablet has been completed successfully Note For reasons of security the synchronised data remains available on the Xesar tablet for a maximum of two days After this period you must repeat synchronisa...

Page 139: ...nent to your Xesar tablet using the connection cable and proceed as follows Select the Xesar access component in the Maintenance tasks The Xesar tablet shows Initialise Xesar access component Select Execute to start the process Figure 83 Xesar tablet initialising Xesar access components Figure 83 Xesar tablet initialising Xesar access components You are prompted to enter your initialisation PIN Fi...

Page 140: ...lisation PIN The system will give feedback if your input is correct Figure 85 Xesar tablet process completed successfully Figure 85 Xesar tablet process completed successfully You have now added the Xesar access component to your Xesar locking system Figure 86 Xesar tablet successful initialisation Figure 86 Xesar tablet successful initialisation ...

Page 141: ... An error message appears if your input is incorrect Note The data on the Xesar tablet is deleted after having entered an incorrect PIN five times due to a security violation In this case you must once again synchronise the information with the Xesar software Figure 87 Xesar tablet security violation message ...

Page 142: ...s to be connected to the Xesar tablet Each wall reader must be synchronised individually in the event of firmware updates Re synchronisations with the Xesar software step 4 Synchronise your Xesar tablet with your Xesar software to complete the integration of your new Xesar access component into your locking system Connect the Xesar tablet to your PC using the USB cable Click Synchronise Xesar tabl...

Page 143: ...ike to once again remove the component from the door Removing Xesar access components Use this function if you have already initialised your Xesar access component and you would once again like to remove it from the locking system Caution Do NOT use the Undo assembly function if you have already initialised the Xesar access component but you have subsequently failed to synchronise the Xesar tab le...

Page 144: ...r tab let with the Xesar software Otherwise your Xesar access component will be ren dered unusable and must be reset by EVVA Proceed as follows Select Doors areas Click the door for which you would like to revoke installation Click the Xesar access component icon in the Edit door application window The Xesar access component application window opens Click Undo assembly at the icon next to the Xesa...

Page 145: ...145 Xesar System manual 2 0 for version 2 0 36 17 24 06 2015 misprinting and technical changes reserved Figure 89 Undoing assembly ...

Page 146: ...sar access components Proceed as per the three steps described below to remove a Xesar access component from the locking system if the access component has already been initialised Note Please note that this requires procedures in the software and the Xesar access component Figure 90 Removing Xesar access components ...

Page 147: ...access components After having removed the Xesar access component from the locking system of your Xesar soft ware you can disassemble your Xesar access component from the corresponding door and if applicable assemble it in a different door Synchronising the Xesar tablet with Xesar access components step 2 Use the Xesar tablet to run the Disassemble access component task at the Xesar access compo n...

Page 148: ... tablet shows a message Figure 92 Xesar tablet successfully removing Xesar access components The corresponding entries in the door list are updated once you have synchronised the Xesar tab let with the Xesar software Figure 92 Xesar tablet successfully removing Xesar access components Note The Xesar access component is returned to construction mode and can exclusively be operated using the Constru...

Page 149: ... the Xesar access component Connect the Xesar tablet to your Xesar software Click Synchronise Xesar tablet in the Xesar software Check the status in the door list the Xesar access components have been removed Disassembling Xesar access components After having removed the Xesar access component from the locking system of your Xesar soft ware you can disassemble your Xesar access component from the ...

Page 150: ...he icon next to the Xesar access component A security prompt appears Click Undo to confirm Note All database records for this particular Xesar access component will be irrevocably deleted You will then no longer be able to exchange data with the Xesar access component Replacing thumbturns This function is available for Xesar cylinders only and gives you the option to replace a faulty or stolen thu...

Page 151: ...faulty thumbturn with a new replacement thumbturn In this process proceed as de scribed in the assembly manual The assembly manual is enclosed with every cylinder It is also available at any time at http www evva at products electronic locking systems access control xesar assembly instructions datasheets en Figure 94 Replacing thumbturns ...

Page 152: ...to select it Click the Xesar cylinder thumbturn and subsequently select Replace thumbturn Click the Replace field to confirm the security prompt Subsequently synchronise your Xesar tablet with your Xesar software to transfer the data on replacement of the Xesar thumbturn Proceed as described in sections Initialising Xesar access components step 3A Initialising two Xesar wall readers for one contro...

Page 153: ... a result it will be possible to unlock access components without using identifica tion media You can define unlocked and locked periods using a schedule which is divided into weekdays and special days identically to the schedules for persons Figure 95 Specifying the office mode period Click Office mode to open the screen in which you define the individual office mode times Figure 95 Specifying th...

Page 154: ...ct it Note The doors will be unlocked during the specified times for office mode and no iden tification media will be required for access Specifying the office mode period Click the desired day and select the desired start and end time for office mode on the cor responding day from the drop down list from to Figure 96 Changing the office mode period Figure 96 Changing the office mode period Deleti...

Page 155: ...ublic holiday Click Edit settings Figure 98 Assigning special days in the Time settings field to con figure special days Figure 97 Configuring special days You can specify any designation for the special day Enter the desired description in the corresponding field in this case Christmas Figure 97 Configuring special days In total you can assign fifty days Figure 97 Configuring special days for ins...

Page 156: ...and for this reason any other office modes are bypassed on active special days and the special day configuration ap plies Example A You have ticked the Christmas special day Figure 98 Assigning special days You can now specify the start and end date for office mode using the drop down list As a result automatic office mode has been activated on the Christmas special days applicable as previ ously ...

Page 157: ...isprinting and technical changes reserved Persons The Persons menu item allows to manage persons and identification media It also provides an overview of the persons and identification media within your locking system Figure 99 Persons tab Figure 100 Persons list ...

Page 158: ...neously For update Shows persons with expired Xesar identification media or persons who are required to update their media at Xesar coding stations following a change No Xesar identification medium Lists all persons for which no Xesar identification media have been issued Replacement medium Shows all persons that have been issued with a temporary replacement medium Show list Enables to differentia...

Page 159: ...g system Figure 102 Creating persons Note Within your Xesar locking system you can create each person only once in combi nation with all three criteria and for this reason the entries must be unique Proceed as follows to create a person Details First name and Last name are mandatory fields The last name is the sorting criterion for the person list Code Enter additional details such as the staff nu...

Page 160: ...ot to save access events log data of the corre sponding person please observe the locally applicable data protection regulations in the process Loading authorisations transferring authorisations from another person The Load authorisations of person function enables to use existing access authorisations or time profiles of persons you have already saved Loading authorisations of persons Select the ...

Page 161: ...order When creating the CSV file please note that the following fields can exclusively be imported First name Last name and Additional information Proceed as follows to import an existing CSV file Select the Persons Persons menu item Click the Import persons button Figure 103 Importing persons Note This function is exclusively available if you have not yet created persons in the software Any retro...

Page 162: ... 0 36 17 24 06 2015 misprinting and technical changes reserved Now click Select file to import your CSV file Figure 104 Import wizard Figure 104 Import wizard After having selected and successfully uploaded the file the status message appears ...

Page 163: ...015 misprinting and technical changes reserved Click Continue to open the Import wizard format settings Figure 105 Import wizard format Figure 105 Import wizard format The first row of the CSV file can optionally be skipped as part of the import configuration ...

Page 164: ...et from the drop down list to adapt the format a preview of the imported persons will appear Figure 105 Import wizard format Then click Continue Figure 106 Import wizard view All persons for import are shown as part of the last step in the Import wizard In this section you can delete complete personal data records or change individual data ...

Page 165: ...165 Xesar System manual 2 0 for version 2 0 36 17 24 06 2015 misprinting and technical changes reserved Then click Import to complete the CSV file import Figure 106 Import wizard view ...

Page 166: ...tification appears after having assigned authorisations saving your input Click Save authorisation and one KeyCredit will be deducted from your account Figure 107 Saving authorisations Editing authorisations Open the Edit authorisations selection window to manage access authorisations and the time profile of selected persons Click Authorisations The Edit authorisations application window opens Fig...

Page 167: ...istic is that MasterKey authorisations also allow to unlock access components that were added to the system after having issued the identification medium As a result there is no need to maintain media such as an updated fire service medium Caution It is not possible to issue replacement cards for persons that have been assigned MasterKey authorisations Adding MasterKey authorisations The Edit auth...

Page 168: ...isations include all individual doors and entire door areas Doors and door areas are shown simultaneously Time profiles The Time profiles setting enables to assign an unrestricted time profile or a time based profile to selected persons Proceed as follows to specify Permanent access or personal Periodic access Figure 109 Specifying personal access authorisations Permanent access person In the appl...

Page 169: ... Figure 109 Specifying personal access authorisations Special days In addition to selecting permanent access and personal periodic access the Special days function allows you to grant or revoke persons access to your Xesar locking system on selected days For this purpose please note the following section ...

Page 170: ...170 Xesar System manual 2 0 for version 2 0 36 17 24 06 2015 misprinting and technical changes reserved Specifying special days Figure 110 Assigning special days ...

Page 171: ...isations special days can deactivate access or depend ing on the configuration of the special day activate temporary access authorisations Special days take priority over periodic access authorisations and for this reason on active special days periodic access authorisations are bypassed and the special day configuration applies Special days are already active once you have saved the specified dat...

Page 172: ...and technical changes reserved Editing persons Click any person in the Persons menu item to open the Edit person menu Figure 111 Editing persons Figure 111 Editing persons You can configure various changes and settings in the Details Settings and Identification media fields ...

Page 173: ...ff number Settings Expiration date Specify the expiration date for a person s account in the Settings field After expiration of said date the corresponding person will be unable to open any doors using their identification medi um Manual office mode Click this selection field to specify whether or not this person is authorised to use the manual office mode function Refer to section Manual office m...

Page 174: ...n media you can block the media in the software and issue a new identification medium Adding identification media to persons accounts After having created and saved authorisations for a person you have the data available to create identification media Proceed as follows to create identification media for persons Figure 112 Writing authorisations new access medium Place an empty identification medi...

Page 175: ...se note that if you make any changes to authorisations and click Save to con firm them you will be deducted one KeyCredit from your account not with KeyCredit Unlimited Withdrawing identification media Withdrawing Xesar identification media means deleting the data and no longer being able to use the media at the previously authorised Xesar access components You can withdraw Xesar identifi cation m...

Page 176: ...hdrawing access media After having withdrawn the identification medium it can exclusively be used in this Xesar locking system and is shown as a New identification medium as soon as you once again position this very identification medium on the Xesar coding station Figure 114 Withdrawing access media Note If an identification medium due for deletion is available i e not lost we recom mend you dele...

Page 177: ...tive coding station or an updated Xesar access component this identification medium is automatically deleted from the system and the blacklist and will be denied access to your locking system Blocked identification media attempting to unlock access components with an updated blacklist are also deactivated by the DeleteKey function Caution The identification medium will only be fully transferred to...

Page 178: ...178 Xesar System manual 2 0 for version 2 0 36 17 24 06 2015 misprinting and technical changes reserved Figure 115 Blocking Xesar identification media ...

Page 179: ...ving deleted the person you must update the identification medium at a Xesar coding station to complete the deletion procedure for the affected person s identifi cation media The deleted identification media will subsequently no longer be able to gain access This deleted identification medium is now once again equivalent to a new identification medium However for security reasons it can exclusivel...

Page 180: ...ia will be deleted upon updating at a Xesar coding station Personal entries remain saved in the database Proceed as follows to delete a person Select Persons Persons Tick the check box of the person s you would like to delete Click Delete person Click Delete person to confirm the security prompt Figure 117 Deleting persons If you have highlighted and deleted several persons and confirm Delete pers...

Page 181: ...ause ac cess authorisations were changed Identification media are automatically updated upon holding them to a Xesar coding station re gardless of the currently open menu No interactions are required in the software You can view the list at any time For this reason select the desired filter in the Persons applica tion window Figure 119 Persons list with Xesar identification media requiring an upda...

Page 182: ...entification medium at home Proceed as follows to issue replacement media Figure 120 Assigning replacement media Click Persons Select the person Then click Assign replacement medium Save your changes Note You can specify the validity period of replacement media in the Settings 24h set by default the maximum validity period is 72h Note You are unable to extend the validity period of replacement med...

Page 183: ...anual 2 0 for version 2 0 36 17 24 06 2015 misprinting and technical changes reserved About Xesar The About Xesar menu item provides information regarding the installed software version Figure 121 Xesar software version ...

Page 184: ...e software version as your Xesar soft ware Proceed as follows if you are forced to restore your system using a Xesar backup as a result of hard disk failure Re install your Xesar software refer to Installing the Xesar software Insert the Admin Card for the locking system of your backup into the Xesar coding station Enter the network path where you saved your database backup Click Continue and foll...

Page 185: ...lication window Click Continue and the confirmation prompt to replace the Admin Card appears Check the codes you entered and click Continue to confirm you input data correctly Caution You will receive new access data for your Xesar software after having replaced the Admin Card Print out the data check the printout and only then click Finish to confirm Take care when handling Xesar Configuration ac...

Page 186: ...active Xesar identification media will be rendered irrevocably unusable upon unin stalling the software Xesar identification media within the system are exclusively assigned to this system and it will not be possible to use them for another Xesar locking system after having reset Sequence for uninstalling Uninstall Xesar access components Removing Xesar access components Delete Xesar identificatio...

Page 187: ... for version 2 0 36 17 24 06 2015 misprinting and technical changes reserved Figure 123 Uninstalling Xesar The system now correctly uninstalls the software Once the process is complete click Continue to confirm then click Finish ...

Page 188: ...ly transfer the most recent data e g blacklists firmware updates new key data etc from your Xesar software to the Xesar tablet to be able to update your Xesar access compo nents Maintenance tasks are automatically transferred to the Xesar tablet upon synchronising it with your Xesar software You can subsequently initialise and synchronise Xesar access components After having synchronised with Xesa...

Page 189: ...arting the application tablet Click the Xesar icon to start the Xesar application Figure 125 Xesar tablet home screen If the Xesar icon is not available on the start screen open the APPS menu item on your tablet and se lect the Xesar icon in this section to start the app Figure 125 Xesar tablet home screen ...

Page 190: ...eed as follows to synchronise components Figure 126 Synchronising the Xesar software Connect the Xesar tablet to the PC where you installed your Xesar software For this purpose use the enclosed USB cable Click Synchronise Xesar tablet in your Xesar software All unresolved maintenance tasks are listed on the Xesar tablet Figure 126 Synchronising the Xesar software ...

Page 191: ... appears following successful synchronisation Figure 127 Xesar tablet synchronised successfully If your Xesar application is open now a notification window will also appear Figure 128 Xesar tablet maintenance tasks updated door data Figure 127 Xesar tablet synchronised successfully Figure 128 Xesar tablet maintenance tasks updated door data ...

Page 192: ...n changes changes to special days changes to automatic office mode etc Make sure you complete maintenance tasks immediately to keep your Xesar locking system up to date For this reason you can separately list maintenance tasks Figure 129 Xesar tablet due mainte nance tasks Select Maintenance tasks Figure 129 Xesar tablet due maintenance tasks Note The Xesar tablet indicates your device features se...

Page 193: ...eserved All tasks The All tasks section lists Xesar access component maintenance tasks relevant to security and also tasks to synchronise data collected for the purpose of information such as battery states or per sonal protocols Figure 130 Xesar tablet all tasks Figure 130 Xesar tablet all tasks ...

Page 194: ... You can subsequently proceed as described below for all tasks and maintenance tasks Select Maintenance tasks or All tasks Figure 131 Xesar tablet selecting Xesar access components Select the correct Xesar access component and the desired task you would like to run Figure 132 Xesar tablet initialising Xesar access components from the maintenance task list on the Xesar tablet Figure 132 Xesar table...

Page 195: ...onnect the Xesar tablet to the Xesar access component using the Xesar connection cable Select Execute in the Xesar application You are prompted to enter your initialisation PIN Enter the 4 digit code Figure 133 Xesar tablet entering the initialisation PIN The system confirms having successfully completed the task Figure 134 Xesar tablet successful initialisation Caution For reasons of security an ...

Page 196: ...t the connection cable from your Xe sar access component and once again seal the connection socket using the EVVA cover Subsequently go to the next Xesar access component on the list and repeat the process until there are no further tasks on the Maintenance tasks or All tasks lists Subsequently synchronise your Xesar tablet with your Xesar software as described in Sec tion Synchronising the Xesar ...

Page 197: ...ed with your Xesar software a notification in your Xesar application on your Xesar tablet in the maintenance tasks indicates no further tasks All tasks lists all doors to enable you to implement individual tasks e g battery status regardless of the maintenance tasks synchronised in the Xesar software Figure 135 Xesar tablet all tasks Checking the battery status using the Xesar tablet You can query...

Page 198: ...198 Xesar System manual 2 0 for version 2 0 36 17 24 06 2015 misprinting and technical changes reserved Figure 136 Xesar tablet showing the battery status ...

Page 199: ... will appear if the battery status is OK Figure 137 Xesar tablet showing the battery status If the battery is empty the system indicates Battery status empty Immediately replace the batter ies Please refer to the description of the corresponding Xesar access component for more de tailed information Figure 138 Battery status empty ...

Page 200: ... been lost by attempting to operate the access component using an authorised identification medium after having re placed the batteries Identification media will be unable to unlock the door if the date and time settings have been lost In this case you must transfer the date and time settings using the Xesar tablet Test the component operates correctly before closing the door If the date and time ...

Page 201: ... the connection cable re connect it and attempt to synchronise The following error messages will appear on the Xesar tablet if the system is unable to change the configuration Incorrect Xesar access component type The following error message will appear if you have connected an incorrect Xesar access compo nent to the Xesar tablet for synchronisation Incorrect access component type The selection o...

Page 202: ...ommunication error XTDE12 Unknown error XTDE13 Operation failed temporarily XTDE14 Operation failed XTDE15 Xesar Tablet not synchronized XTDE16 Displaying battery status failed Tips Please make sure that the Xesar tablet is connected to the right Xesar component and re peat the synchronization Synchronize the Xesar tablet and the access components Check the USB connection cable of your Xesar table...

Page 203: ...a are provided1 with update information blacklist from the central coding sta tion The information is then transferred from door to door on the way through the facility In this process identification media update door states and collect door information battery states ac cess events deletions or unlocking attempts by blocked media The information is subsequently passed on to coding stations where ...

Page 204: ...ed from an authorized EVVA distributor the code on the back of the card can be activated just like any KeyCredit Figure 142 Softwareplus package Enter the code on the home page in the Xesar software via the menu item Additional packages Softwareplus package to unlock the virtual network for a time of 3 years In addition after the activation of the virtual network you get 15 KeyCredits for free Fig...

Page 205: ...software Said blacklist entries are written to all identification media using the coding station Identification media then distribute the information to all door components The memory of one identification medium is sufficient for up to 10 blacklist entries As soon as identification media are once again used at the coding station the software detects to which door components the blacklist has alre...

Page 206: ...of information is critical to security and the data is collected by other identification media within the system before it is transferred to the Xesar software using the coding station A warning is output accordingly on the dashboard if unlocking attempts have taken place using identification media that have already been blocked These warnings will be hidden as soon as the medium s validity expire...

Page 207: ...en blocked in the software As a consequence this medium can now no longer open doors with an out of date blacklist Xesar 1 1 x x already features this function The new feature is that the information about a deleted medium is returned to the Xesar software by other identification media within the system via the virtual network As a result administrators are automatically provided with information ...

Page 208: ...s automatically extended by the set value each time the identification medium is placed on the coding station For instance if the period has been set to three days each person must pass the coding station to extend the validity of their identification media within this period of time As a result system ad ministrators are provided with the corresponding information at the latest after three days e...

Page 209: ...age 36 Figure 16 Xesar escutcheon sample image 37 Figure 17 Xesar handle sample image 43 Figure 18 Xesar handle sample image 44 Figure 19 Xesar cylinder sample image 50 Figure 20 Xesar thumbturn sample image 51 Figure 21 Cylinder tool sample image 60 Figure 22 Xesar wall reader sample image 61 Figure 23 Xesar wall reader sample image 63 Figure 24 Xesar wall reader connection print sample image 65 ...

Page 210: ...tab 102 Figure 55 Journal for personal data 103 Figure 56 Filtering journal entries 103 Figure 57 Individual client logo 104 Figure 58 Changing the client logo 104 Figure 59 Users 105 Figure 60 Editing users 106 Figure 61 Changing the password 108 Figure 62 Creating users 109 Figure 63 User groups 110 Figure 64 Creating user groups 112 Figure 65 Editing usergroups 114 Figure 66 Doors and areas 115...

Page 211: ...ss components 148 Figure 92 Xesar tablet successfully removing Xesar access components 148 Figure 93 Door list after having removed the Xesar access component 149 Figure 94 Replacing thumbturns 151 Figure 95 Specifying the office mode period 153 Figure 96 Changing the office mode period 154 Figure 97 Configuring special days 155 Figure 98 Assigning special days 156 Figure 99 Persons tab 157 Figure...

Page 212: ...tasks updated door data 188 Figure 129 Xesar tablet due maintenance tasks 189 Figure 130 Xesar tablet all tasks 190 Figure 131 Xesar tablet selecting Xesar access components 191 Figure 132 Xesar tablet initialising Xesar access components 191 Figure 133 Xesar tablet entering the initialisation PIN 192 Figure 134 Xesar tablet successful initialisation 193 Figure 135 Xesar tablet all tasks 194 Figur...

Reviews: