Addressable Fire Panel MAGPRO96
- Installation and Programming Manual
25
•
Loop Controller MAGPRO96-L250
The loop controller MAGPRO96-L250 automatically recognizes the types of devices in the loop.
In addition the
installer defines the additional parameters for every MAGPRO device according its type - see also
the
Appendix B
-
MAGPRO device types. The “
SAVE
” button (Fig. Screen 3) can be used for fast configuration of the device. Following
this command, the panel sets up all detected loop and periphery devices by default. Only the new devices are configured
under this command. The “
RESTORE DEFAULTS
” command deletes all system parameters.
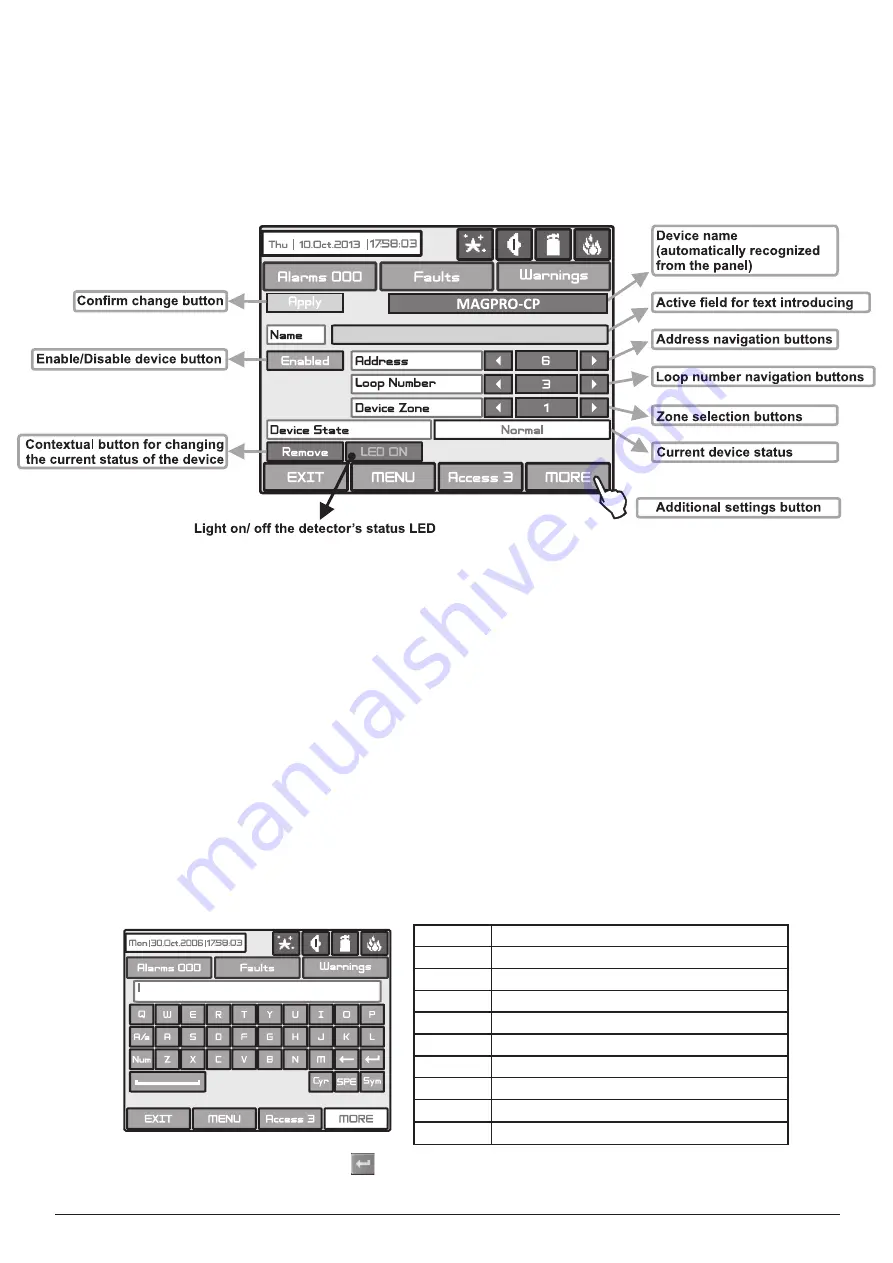
On Fig. Screen 8 is given the general view of the submenu for new loop devices for MAGPTO96-L250 (MAGPRO-CP
in the example).
Fig. Screen 8
Description of the button functions which are common for all devices (Fig. Screen 8):
• Confirm Change Button
-
Saves changes in the permanent memory.
• Button to enable/disable a device
-
Button for Enabling / Disabling devices.
• Address Navigation Buttons
-
These buttons help to scroll over (in sequence or directly) the devices of one and the
same loop.
• Loop Number Navigation Buttons
-
These keys alternate the loop (in sequence or directly) of the screened devices.
• Zone Selection Buttons
-
These keys alternate the zone (in sequence or directly) to which the device belongs.
• Current Device Status
-
The current device status varies according to the device type.
NEW
- new device found in the system. You can save it by pressing the “
Apply
” button.
NORMAL
- the device is working properly.
FAuLT
- the device is not responding. You can delete it by pressing the “
REMOVE
” button.
TYPE ERROR
- the device has been saved with a different type.
NONE
- there is no device on the current address.
• Button for Removing a device
-
Pressing the button deletes the device from the system configuration.
•
Button LED ON/ OFF-
Turns on the LED of the device when checking for the presence of doubling addresses in the
loop.
• Active Field for Text Introduction
-
Choosing this field accesses the text introduction mode. The text must not exceed
40 digits together with the spaces:
Entered information is confirmed with button
.
• Additional Settings Button MORE
-
The additional settings may vary according to the type of device - see the Fig.
Screens 9(a) - 9(p).
Button
Function
Cyr
Switches to Cyrillic letters.
SPE
Switches to specific letters.
Lat
Switches to Latin letters.
Sym
Switches to specific symbols.
A/a
Switches between capital and small letters.
Num
Switches to numbers.
[
Space.
Deletes numbers or letters.
Confirmation of the entered numbers or letters.


